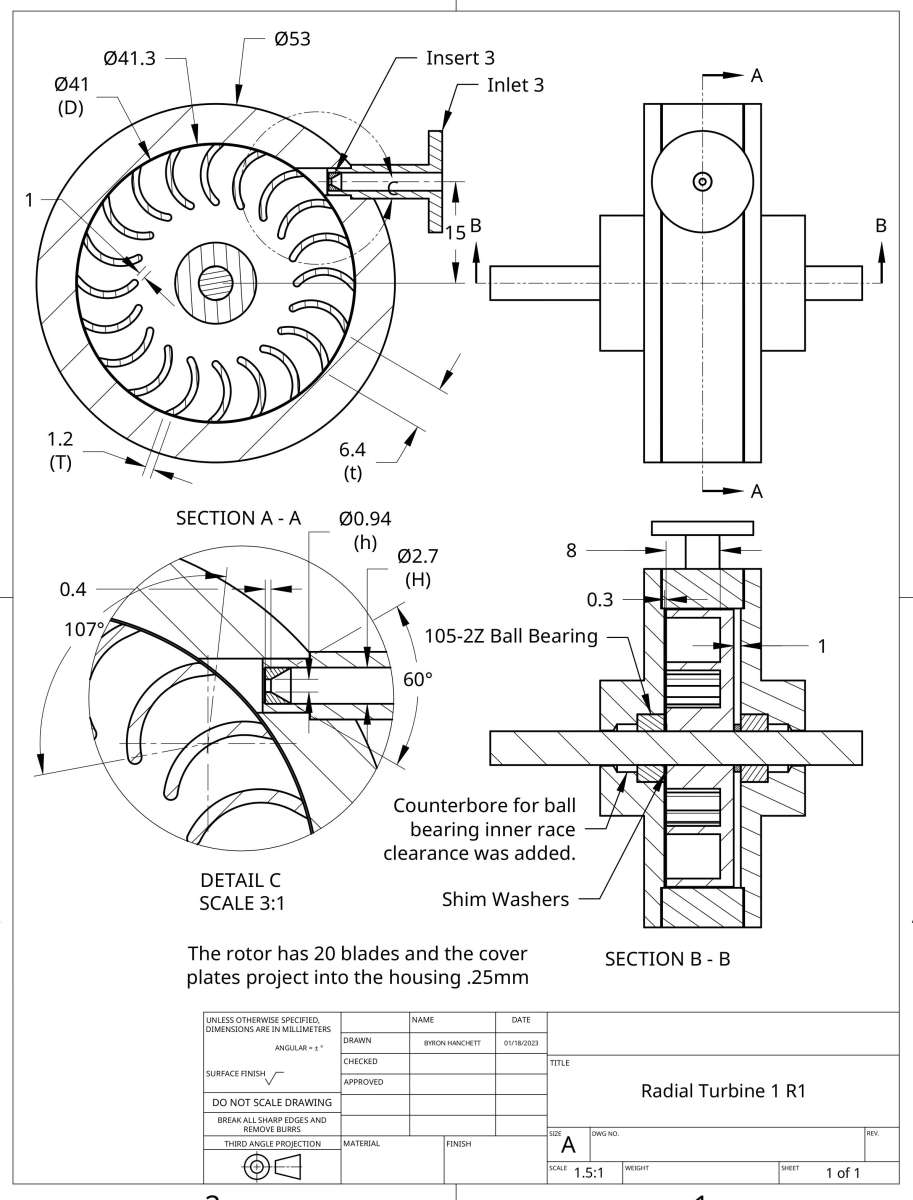
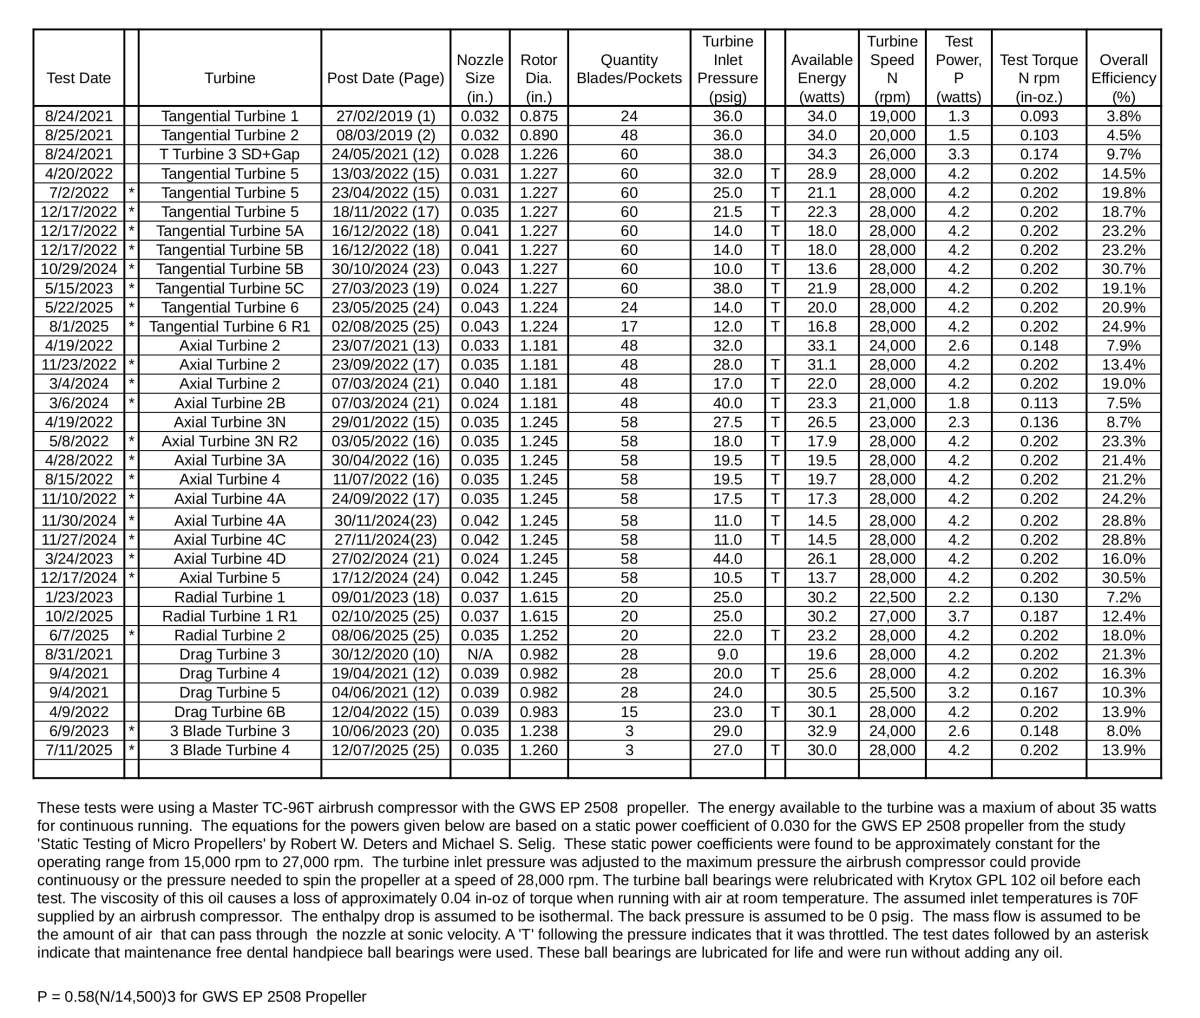
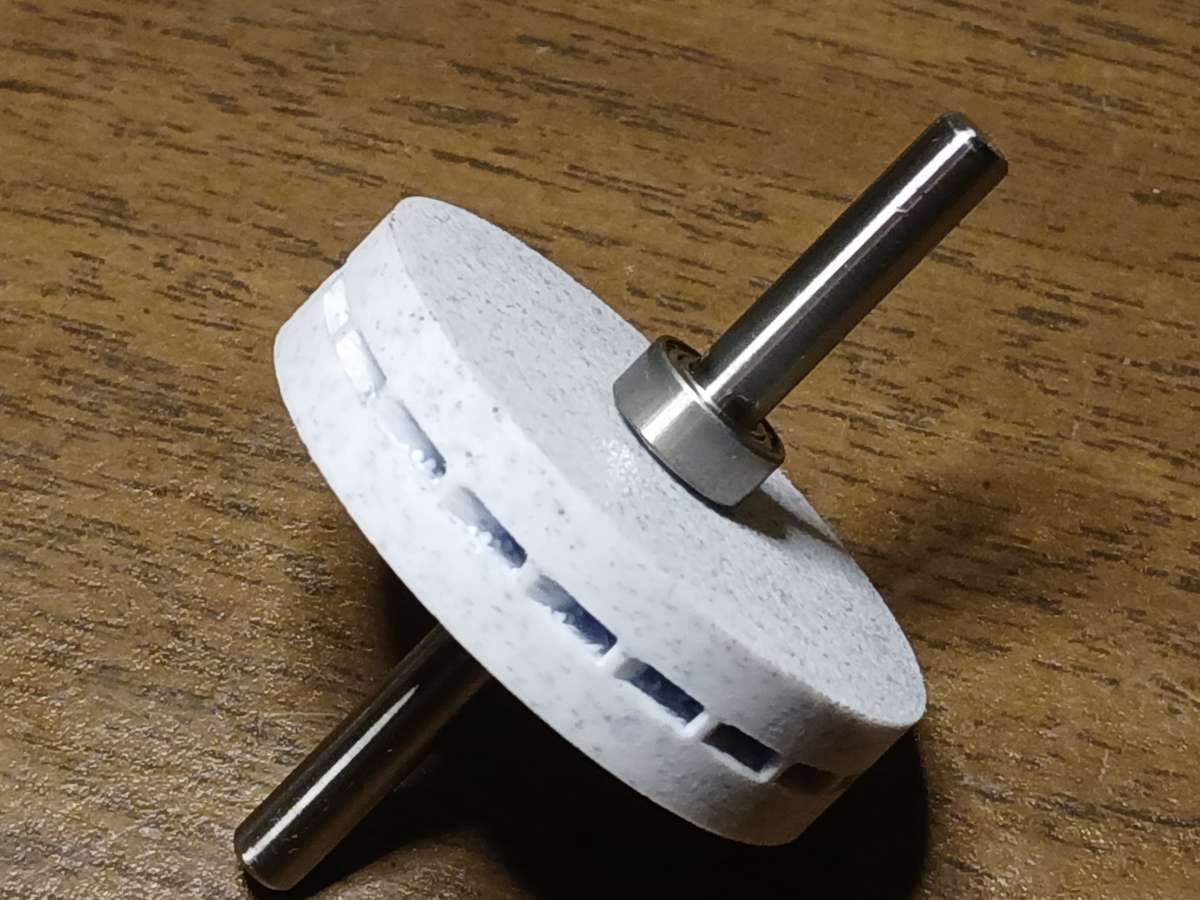
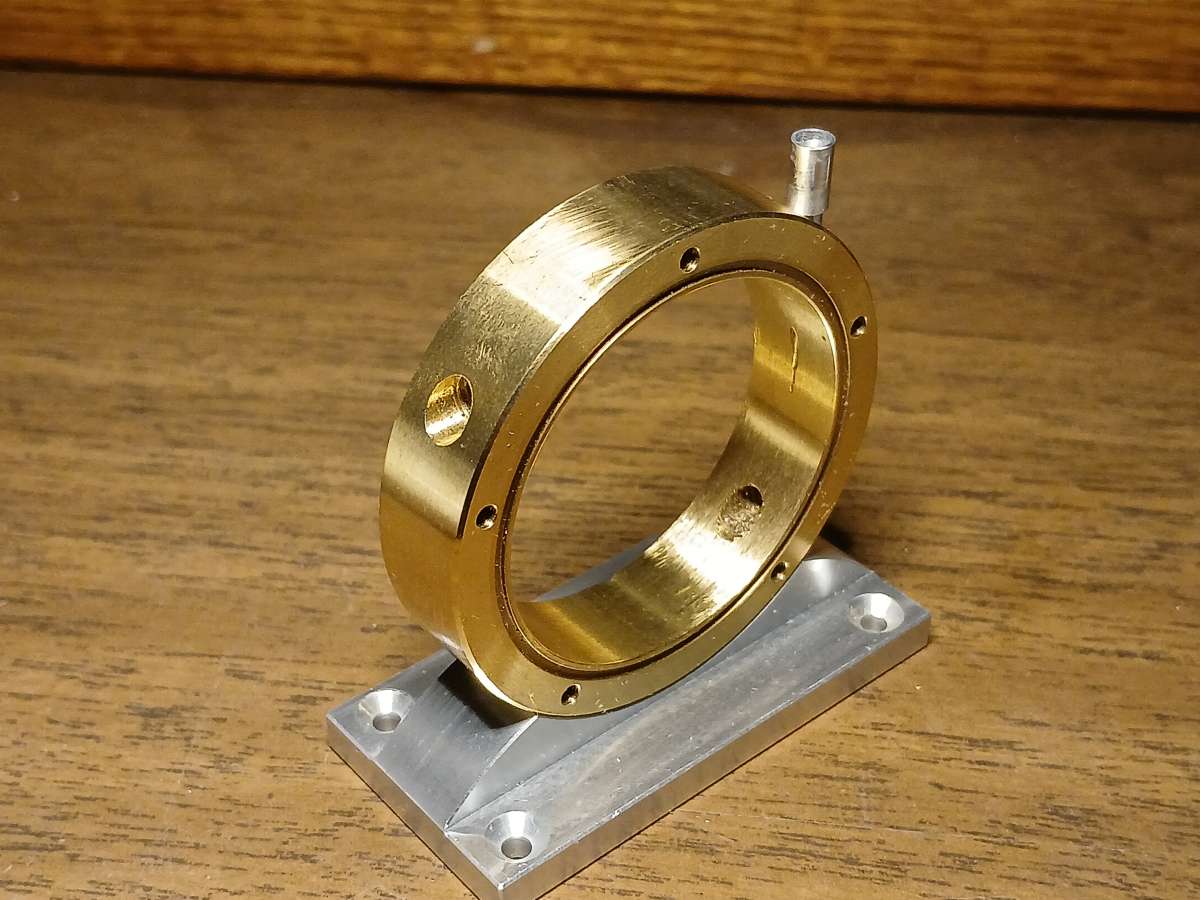
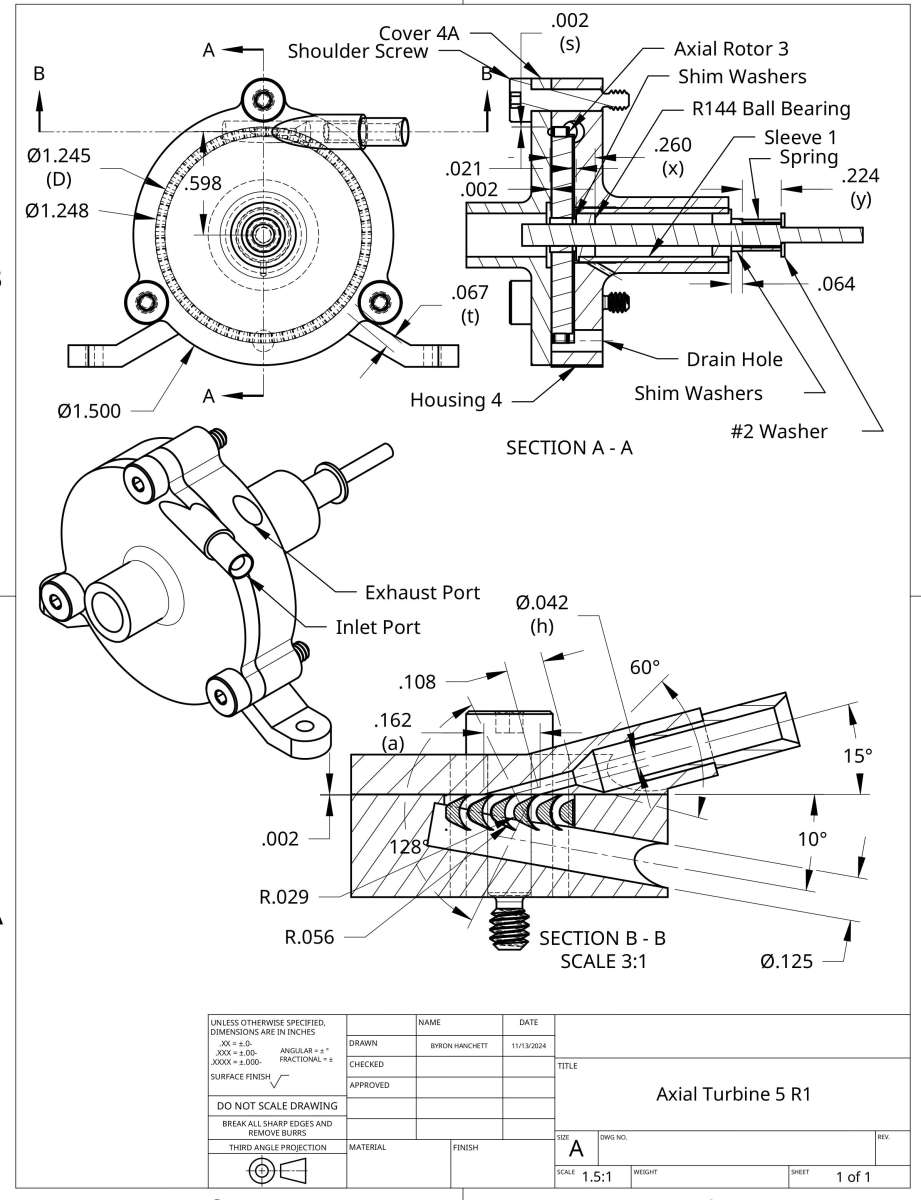
Home › Forums › Stationary engines › Model Turbines
I glued Rotor 6 PLA shown in the last post to a shaft and ran it in Tangential Turbine 6 shown in the following drawing and spreadsheet. I made an error in guessing where to glue Rotor 6 PLA on the shaft which resulted in getting much higher compression on the spring than I wanted, but as you can see in the spreadsheet the performance wasn’t that bad for the first test. Normally I would run several tests to find the optimum position of the rotor in the housing and the best spring compression before adding the performance in the spreadsheet. When I disassembled the turbine to reposition the rotor on the shaft, I found that the extension of the rotor on its outer face had broken off. I mentioned in the last post that the rotor was designed to be cast in bronze and had several areas that were two thin for a material like PLA. I am in the process of trying to fix the rotor assembly but it will require enough changes that it will have to be called a new assembly.


I must confess that I only dip-in occasionally … but I am always impressed by your dedication to this research.
Thanks for sharing it
MichaelG.
Hi Michael,
Thanks for your kind comment. I try to show how well turbines have performed for several designs of varying complexity and requiring different equipment to make or parts to purchase. I hope that this information will help people thinking about making a model turbine what they can expect in performance for models like the types tested.
Hope you are doing well,
Byron
I glued Rotor 6 PLA shown in the last post to a shaft and ran it in Tangential Turbine 6 shown in the following drawing and spreadsheet. I made an error in guessing where to glue Rotor 6 PLA on the shaft which resulted in getting much higher compression on the spring than I wanted, but as you can see in the spreadsheet the performance wasn’t that bad for the first test. Normally I would run several tests to find the optimum position of the rotor in the housing and the best spring compression before adding the performance in the spreadsheet. When I disassembled the turbine to reposition the rotor on the shaft, I found that the extension of the rotor on its outer face had broken off. I mentioned in the last post that the rotor was designed to be cast in bronze and had several areas that were two thin for a material like PLA. I am in the process of trying to fix the rotor assembly but it will require enough changes that it will have to be called a new assembly.
I fixed the rotor assembly mentioned in the quoted post by glueing Rotor 6 PLA to a set screw collar as shown in the following photo. I used the glue from my fly tying kit that was designed to bond plastics to metal and it was strong enough for me to finish the testing of Rotor 6 PLA. I was able to try various positions of the rotor in the housing and try various amounts of spring compression by changing the number of shim washers. My thinnest shim washers are only 0.001” thick so I can find the ideal location of items very close to their best positions. It took me several tests to find the ideal position of the rotor assembly shown in the following photo but the ideal position did not get any better performance than I got with the original rotor assembly as shown in the drawing of the quoted post. Reducing the spring force pressing the rotor against the inner ball bearing did not increase the performance so apparently the original assembly as shown in the quoted post gave the best performance for Rotor 6 PLA and the spreadsheet in the quoted post has the best performance for the Tangential Turbine 6.

I want to see how the model turbines I have built compare with ones that can be purchased. The Radial Turbine Link describes the Radial Turbine I just purchased shown in the photo below. The radial turbines seem to be the type most available and I have not tested this kind of turbine. I picked this particular model since it appeared to be a good design that seems to have ball bearings on each side of the rotor as shown in the drawing below. It also includes a speed reducer which is something I have also wanted to test. I created a Radial Turbine 1 folder and will update it as I get more information. This model is coming from China so It will be about a month before I receive it.
Edited By Turbine Guy on 09/01/2023 20:55:37
Edited By Turbine Guy on 09/01/2023 20:58:27
The quoted post describes my purchase of the turbine I call Radial Turbine 1. The posts following this post discuss my testing of this turbine and what others have done with this turbine. I believed that I could improve the performance by designing a radial turbine for the GWS EP 2508 propeller I use in my turbine performance spreadsheet. I thought that by reducing the blade height, covering the blade on both sides, increasing the amount the flow is turned, and adding a radius to turn the exhaust flow would improve the performance. I 3D printed the rotor I call Radial Rotor 2A shown in the following photo and used it in what I named Radial Turbine 2 shown in the following drawing. The following spreadsheet was updated to include the performance of this turbine. This design did significantly improve the performance over Radial Turbine 1.


I want to see how the model turbines I have built compare with ones that can be purchased. The Radial Turbine Link describes the Radial Turbine I just purchased shown in the photo below. The radial turbines seem to be the type most available and I have not tested this kind of turbine. I picked this particular model since it appeared to be a good design that seems to have ball bearings on each side of the rotor as shown in the drawing below. It also includes a speed reducer which is something I have also wanted to test. I created a Radial Turbine 1 folder and will update it as I get more information. This model is coming from China so It will be about a month before I receive it.
Edited By Turbine Guy on 09/01/2023 20:55:37
Edited By Turbine Guy on 09/01/2023 20:58:27The quoted post describes my purchase of the turbine I call Radial Turbine 1. The posts following this post discuss my testing of this turbine and what others have done with this turbine. I believed that I could improve the performance by designing a radial turbine for the GWS EP 2508 propeller I use in my turbine performance spreadsheet. I thought that by reducing the blade height, covering the blade on both sides, increasing the amount the flow is turned, and adding a radius to turn the exhaust flow would improve the performance. I 3D printed the rotor I call Radial Rotor 2A shown in the following photo and used it in what I named Radial Turbine 2 shown in the following drawing. The following spreadsheet was updated to include the performance of this turbine. This design did significantly improve the performance over Radial Turbine 1.
I noticed in the spreadsheet that I added in the copied post that the available energy for Radial Turbine 2 was not correct and resulted in an efficiency lower than it should be. The rest of the data added for Radial Turbine 2 is correct. I deleted the spreadsheet in the copied post and added the corrected spreadsheet below. The improvement in efficiency of Radial Turbine 2 compared with Radial Turbine 1 was very substantial. 3D printing the rotor with PLA filament did not produce as good of a finish as the 3D printed nylon parts I was getting from Shapeways that I have shown in this thread. The nylon is stronger and easier to machine but is not recommended by Flashforge for my 3D printer. Even with these deficiencies rotors 3D printed from PLA are strong enough and the finish smooth enough to make rotor with pretty good efficiency as shown in the last few posts.
I am convinced that the concept of the 3 blade rotor given in the link that was shown in the 18/04/2023 post is good but the simplicity is very deceptive. To work correctly, the surfaces must be smooth, the clearances very small, and must have minimum deflection. I have tried to come up with a low cost method to accomplish these goals but as I explained in the last few posts I had problems for each thing I tried. The finish of printed aluminum was way too rough. The wiping over edges rather than cutting off cleanly was a problem machining the printed nylon. The cost of CNC machining was way too expensive. The rotor would have to be supported on both sides to keep the deflection low enough. My goal for any of the turbines is to have a design that can be made at a reasonable cost and only require relatively simple machining so this is getting too complicated. Since 3 Blade Turbine 3 was able to get as good performance as some of the turbines I have tested even with the problems my rotors had, it shows the potential of this concept.
Edited By Turbine Guy on 08/07/2023 16:08:35
I mentioned in the quoted post the trouble I have experienced trying to make a model of the 3 blade rotor concept described in the 18/04/2023 post. I 3D printed a rotor I call 3 Blade Rotor 4 out of PLA and added it to the assembly I call 3 Blade Turbine 4 shown in the following drawing. The finish and accuracy of the channel that turns the flow like a blade was better than I got on the rotor 3D printed out of nylon by Shapeways. All the critical surfaces were very smooth and the accuracy of the channel was good enough to keep the flow from the nozzle in the narrow channel with the very tight clearances. The accuracy of the outer surfaces was also good enough to allow the very close clearance between the rotor inner face and the housing. The PLA machined to a very smooth finish without wiping over the edges. 3 Blade Rotor 4 was still supported the same way as 3 Blade Rotor 3 so I was not able to reduce the deflection of the rotor and close the clearances any further. I updated the following spreadsheet to show the test of 3 Blade Turbine 4. Getting the flow passages more accurate and smooth increased the efficiency of 3 Blade Turbine 4 over 3 Blade Turbine 3 from 8.0% to 13.9% as shown in the following spreadsheet.


I glued Rotor 6 PLA shown in the last post to a shaft and ran it in Tangential Turbine 6 shown in the following drawing and spreadsheet. I made an error in guessing where to glue Rotor 6 PLA on the shaft which resulted in getting much higher compression on the spring than I wanted, but as you can see in the spreadsheet the performance wasn’t that bad for the first test. Normally I would run several tests to find the optimum position of the rotor in the housing and the best spring compression before adding the performance in the spreadsheet. When I disassembled the turbine to reposition the rotor on the shaft, I found that the extension of the rotor on its outer face had broken off. I mentioned in the last post that the rotor was designed to be cast in bronze and had several areas that were two thin for a material like PLA. I am in the process of trying to fix the rotor assembly but it will require enough changes that it will have to be called a new assembly.
The last few posts have been for turbines with rotors 3D printed by me from PLA. Now that I have learned some of the more important print settings and speeds to machine the PLA, I have been getting rotors that probably perform close to what I could obtain with rotors machined from metal. This allows me to try different ideas, small improvements, and combinations of improvements until I get the best performance I am able to obtain for the type of rotor 3D printed in PLA. I only show in this thread the best performance I have obtained for a given concept and often it takes many attempts. It took me a few attempts to make Rotor 6 PLA discussed in the quoted thread that explained the rotor needed to be designed for 3D printing in PLA. Rotor 6 PLA R1 shown in the following drawing and spreadsheet was redesigned to make it stronger and try some ideas to improve the performance. After trying a few different things Rotor 6 PLA R1 reached the maximum performance for all the ideas I could think of. You can see from the drawings and spreadsheets in the quoted post and this post the changes that were made and the resulting improvement in performance.


Photos of the two rotors discussed in the previous post are shown below.


I was looking through the spreadsheet shown in the last post and noticed that on the test of 8/1/2025 for Tangential Turbine 6 R1 that it didn’t show the R1. Revision 1 made quite a few changes so it needs to be shown on the spreadsheet. I also noticed that the test of Tangential Turbine 5B on 12/17/2022 showed a nozzle size of 0.041” and the next test gave a test date of 11/30/22 with a nozzle size of 0.043”. It was obvious that the test date was wrong and the change in performance seemed way too large for such a small change in nozzle size. I checked when the nozzle size got increased and the test results and found that the test date was 5/24/2024 and pressure required to turn the GWS 2508 EP propeller at 28,000 rpm was 11.5 psig not the 10 psig shown in the spreadsheet of the last post and therefore the increase in performance was not as great as shown. Since Tangential Turbine 5B has not had any changes since the 5/24/2024 test, I ran another test today and got the same results. I updated the spreadsheet shown in the last post and show it below. The update also added the R1 on Tangential Turbine R1.

Since the performance of Axial Turbine 4A and Tangential Turbine 5B have been approximately the same for several tests, I went back through my test results and found that I made a test on 10/29/2024 that got the 30.7% efficiency for Tangential Turbine 5B I thought was too high in the last post. The test sheet showed that it was made after new bearings were installed and bedded in so it represented the best performance for this turbine. Since this was quite a bit higher performance than the 26.1% turbine efficiency I got in the test made for the last post, I tried retesting Tangential Turbine 5B. When I made the test described in the last post I positioned the rotor as shown in the following drawing. This was the position when Tangential Turbine 5B got its best performance. Since I have run many tests removing and reinstalling the rotor and testing other rotors with the same bearings they have loosened up quite a bit. This causes the rotor to tilt more and requires extra clearance. When I did the new tests I adjusted the position of the rotor a step at a time until I found the position that gave the best performance. I found that I had to increase the dimension labeled (x) in the following drawing from 0.452” to 0.456”. This increased the clearance between the rotor and the inner face of the housing 0.004”. In this position the pressure required to run the GWS 2508 EP propeller at 28,000 rpm was slightly over 10.5 psi only about 0.5 psi higher than the test of 10/29/2024 that got the best performance for Tangential Turbine 5B. Getting almost the same performance after about a year or running indicates the test of 10/29/2024 was valid and I added it back in the following spreadsheet with the correct test date.


I gave Radial Turbine 1 to my brother-in-law because he liked it so much and I thought I was finished with all the testing I wanted to do with it. Radial Turbine 1 was very nicely machined for its cost and I have wanted to test larger diameter rotors and using a speed reducer so I bought another one. The second Radial Turbine 1 looks exactly like the first Radial Turbine 1 and the dimensions I recorded for the first one match what I measure on the second one. I tried testing it with the gear speed reducer and it would just verily spin and would not spin at all in some positions with the maximum pressure of 40 psig. I thought the binding might be due to the gears, so I removed the speed reducer. The turbine would still not spin in certain positions and only up to a speed of about 3,000 rpm if I spun the GWS EP 2508 propeller to start it. It appeared the shims were getting the clearance too small between the rotor and the covers. There were only 3 shims used, all three were 0.5mm thick. I reassembled the turbine with just one shim on each side. The speed increased to around 6,000 rpm with just the two shims so the extra clearance doubled the speed but it was way below the 22,500 rpm speed I was able to obtain with the first Radial Turbine 1. It also allowed way more clearance than was needed. I noticed that the bearing bores in the covers did not have a counterbore for clearance of the inner race of the ball bearings. The bearing bores of the second Radial Turbine 1 showed wear where the inner races of the ball bearings had contacted the covers. I decided to add a counterbore for clearance of the inner races of the ball bearings as shown in the attached drawing. I also purchased some shim washers with thicknesses of from 0.1mm to 0.5mm. The best speed I was able to obtain was 13,500 rpm with a 0.3mm shim on the front cover bearing and a 0.5mm plus a 0.3mm shim (0.8mm total) on the back cover. This was quite an improvement of speed but still way below the 22,500 rpm obtained by the first Radial Turbine 1. It seemed to me that there was more vibration than I remembered, so I balanced the rotor and it raised the speed to 14,000 rpm. This increased the speed about 500 rpm but still was way below the 22,500 rpm I got with the first one. The rotor seemed to rotate very freely when I spun it by hand which indicates there was no binding so I decided to check if the nozzle was blocked. The nozzle throat diameter was approximately 0.74mm on the new one and was 0.94mm on the first one. This raised the pressure for maximum flow from my airbrush compressor from 25 psig to 40 psig which raises the supersonic velocity and might have caused a shock wave in the second turbine. I tried increasing the bore size of the existing nozzle of my last turbine with a #68 (0.79mm) drill but the size increased to over 1.35mm without any noticeable slowing of the drill. This sudden increase in size indicated it broke loose something very thin. I made an insert to fit in the existing inlet to get the nozzle bore size to 0.94mm that the last turbine had. The following drawing shows the added insert. The new nozzle raised the speed to approximately 14,500 rpm so it was slightly more efficient than the nozzle that came with the new turbine. The last thing I tried was new ball bearings but I could not tighten the covers because the allen wrench would slip on some of the screws when I tried to fully compress the O-rings in the covers. Even without being able to fully compress the O-rings the speed increased to approximately 24,500 rpm, a significant increase in performance over the first Radial Turbine 1 that had a maximum speed of 22,500 rpm. It appears the original ball bearings were damaged when this last turbine was assembled by the factory and was the cause of the very poor performance I first got. The new nozzle and new ball bearings increased the performance substantially. I ordered some hex head bolts to replace the socket head screws. I should be able to remove and install the hex head bolts several times without wrench slipping.
I will find the optimum position of the rotor and update the drawing after the new hex bolts arrive. I will also update the spreadsheet comparing the performance of the turbines running on air.

I received the hex head bolts for Radial Turbine 1 that I mentioned in the last post. These bolts allowed me to fully compress the O-rings in the covers and eliminated the excess clearance between the rotor and covers. I was able to try various positions of the rotor and found that a 0.3mm shim between the front ball bearing and the rotor and a 1.0mm shim between the back ball bearing and the rotor gave the best performance. The following drawing was updated to show the changes. These were the same shim thicknesses that gave the best performance for the first Radial Turbine 1. Because of the changes I made in the second turbine I call it Radial Turbine 1 R1. The changes that affected the performance the most were making a new nozzle and adding new ball bearings. Balancing the rotor and adding clearance for the inner races of the ball bearing also helped. The following spreadsheet shows the improvement in performance with these changes. The power increased from 2.2 watts to 3.7 watts and the efficiency increased from 7.2% to 12.4%.


I mentioned in the 29 September 2025 post that I want to use the housing and covers of Radial Turbine 1 R1 to test rotors larger in diameter than will fit it in my other turbine housings. I believe that with the rotor and nozzle efficiencies I have obtained for my best turbines a larger diameter rotor could give even higher efficiencies. This assumption is based on what the windage losses have been for some of the rotors and the estimated increase in performance with higher rotor speeds. My estimate for the optimum diameter for a rotor running at my highest test speed of 28,000 rpm is approximately 41mm. To obtain the higher efficiency, the rotor and nozzle would need velocity coefficients at least as good as were obtained in the smaller housings and rotors with low windage losses. To obtain the necessary rotor velocity coefficients, new nozzle and exhaust positions will be required. Before I alter the housings or covers I decided to 3D print a tangential and radial rotor out of PLA and see how they performed with the existing housing, covers, exhaust and inlet. The following photos show the two rotors I 3D printed. The radial rotor had the same blade shape as the RT1 rotor but both sides of the blade were covered and the blade height was reduced to lower the windage loss. It still required the flow to pass through the blades twice and it got the same performance as the RT1 rotor so whatever gain was made in reducing the windage loss was offset by restricting the flow through the rotor. The tangential rotor was compromised by the position of the nozzle which needs to be positioned like shown in the following drawing of Tangential Turbine 6 R1 close to the OD of the rotor. The existing exhaust port also blocked the flow out of the rotor. Even with these compromises, the tangential rotor got the same performance as the RT1 rotor but well below the performance the rotor in Tangential Turbine 6 R1 got. I was pleased with the dimensional accuracy and finish of these last 3D printed rotors and plan to try adding a new nozzle and exhaust to the housing and covers of Radial Turbine 1 R1 and see if I can get improvements in performance.


I added a new nozzle to Radial Turbine 1 R2 as shown in the following photo and drawing. The nozzle was added at the outermost radius that has given me the best performance with the tangential turbines so it is not ideal for radial flow. The only change in this revision was adding the new nozzle. You can see on the drawing comparing Inlet 3 and Inlet 4 that the further the nozzle is from the center the more the thickness of the blades blocks the flow. Even with the additional blockage, inlet 4 performed better than inlet 3 as shown on the following spreadsheet. Radial Turbine 1 R1 that used Inlet 3 had an efficiency of 12.4% and Radial Turbine 1 R2 that used inlet 4 had an efficiency of 15.8%


Another interesting set of data. Am I right in thinking that you had to throttle the supply in test 2 because the slightly larger nozzle (0.041″ versus 0.037″) was passing too much air? Was it the combination of throttling and larger nozzle that caused the lower pressure (19 versus 25 psi)? Do you think the 25% lower inlet pressure might have resulted in an improved nozzle efficiency in addition to any change in rotor efficiency?
Mike
Hi Mike,
You are right. I had to throttle the air because the larger nozzle was able to supply enough energy for Radial Turbine 1 R2 to turn my smallest propeller up to its maximum speed. The 26.5 watts of available energy for Radial Turbine 1 R2 was less than the 30.2 watts of energy available to Radial Turbine 1 R1 but still turned the same propeller to a higher speed. I am guessing that the better performance of inlet 4 was due to running just over sonic velocity and having less distance for the air to expand after leaving the nozzle before contacting the rotor. The space for the expansion of air provided by inlet 3 works for inlets that are designed to run with much higher pressure. Inlets like inlet 4 have given me the highest efficiency for lower pressures that result in exit velocities close sonic. These nozzles don’t require the space for the gas flow to expand to supersonic velocities. The inlets similar to Inlet 3 work better when the pressures result in supersonic velocities. The supersonic velocities have a substantial effect on nozzle efficiency especially in the tiny nozzles of our model turbines.
Thanks for the input,
Byron
I placed Inlet 4 that was used in Radial Turbine 1 R2 in the position shown in the last post because it was similar to what I used in Tangential Turbine 6 R1 that gave the best efficiency of any cast or printed rotor I have tested. I planned on making a rotor similar to the one used in Tangential Turbine 6 R1 shown below and use it with the housing, covers, inlets, and exhausts of Radial Turbine 1 R2 and call it Tangential Turbine 7. The following drawings show the details for Tangential Turbine 6 R1 and Tangential Turbine 7 to show the similarities of these turbines. I have not been able to get Rotor 7 3D printed in PLA even though I had no problems making Rotor 6 PLA R1 shown in the following photo. If I can’t get the problems resolved in 3D printing Rotor 7 I will probably machine one from aluminum like most of my other tangential rotors. I want to resolve the printing problems because my intent is to try many different 3D printed rotors in Tangential Turbine 7 and 3D printing them is the fastest and least expensive way to do this.


I was able to get a usable 3D print of Rotor 7 by doing the following three things. The first was to clean the nozzle of my 3D printer. The second was to make the distance shown on the following drawing as 0.48 (0.53)mm very small. This distance on the original design of Rotor 7 shown in the drawing in the last post was 4.18mm. I made this distance very small to limit the number of layers that would be printed before the pockets would start being formed. The accuracy of the distances from the face the rotor is being printed from decreases the larger the number of layers. This is because each layer has a tolerance and the layers from one face to another combine all these tolerances. The third thing I did was to make the minimum dimension 0.48mm in the path the printer nozzle follows while making the pockets. This is four times the 0.12mm thickness of the layers when using fine print. I thought that would ensure there was enough room for the printer nozzle to make the required changes in direction while forming the pockets. The following photo is a closeup view of the pockets that were made on this print of the rotor. The dimensions of the pockets of this rotor are very small so a closeup view shows all the imperfections and some surfaces look much worse than they actually are. The surfaces that turn the gas flow are the most important and look very good even in the closeup view.


I damaged the ball bearings of Tangential Turbine 7A described in the last post by trying to run too small of a clearance between the rotor and the ball bearings. I ran the new ball bearings long enough to break in and found the best location of the rotor as shown in the attached drawing. The attached spreadsheet shows the performance. I was able to obtain an efficiency of 21.1% that was lower than the efficiency of 24.9% obtained by Tangential Turbine 6 R1 that had the same type of rotor. Apparently the rotational losses of the larger rotor and ball bearings of Tangential Turbine 7A are higher than the increase in torque from the larger radius. I used the oil I bought that was made for the dental ball bearings described in the 16 August 2023 post shown on page 20. This oil was made for ball bearings that were not maintenance free like used in Tangential Turbine 6 R1. This oil has given me the best performance running on air of all the oils I have tried but adds a slight amount of extra resistance compared with maintenance free ball bearings.


In the last post I mentioned that I believe the lower efficiency of Tangential Turbine 7A compared with Tangential Turbine 6 R1 is probably due to increased rotational losses caused by the larger rotor and ball bearings. I decided to see if I could reduce the rotational losses of Rotor 7A by reducing the large clearance on the backside of the rotor. Most sources say reducing the side clearance to the minimum value will give the minimum rotational loss for rotors. I 3D printed a spacer to fill the space between the backside of the rotor and the back cover. The following photo shows the spacer press fit on the rotor shaft and pushed against the rotor. This was the only change I made to Rotor 7A so that I could see the effect of reducing the back clearance to the smallest value that gave the best performance. The spacer thickness was large enough to close all the clearance on the backside of the rotor when first pressed on. I held the rotor by the shaft in a collet chuck and turned the back face of the rotor down in 0.1mm increments until I found with the clearance of 0.3mm, the rotor appeared to turn freely in the housing. I then increased the clearance 0.1 step at a time until I found the clearance of 0.4mm gave the maximum speed and a clearance of 0.5mm lowered the speed slightly. The speed with the 0.5mm clearance was about the same as I got before adding the spacer, so closing the clearance to the minimum value had almost no effect on the rotor rotational loss.

Hi Byron, that’s a very interesting result, especially for me because I have been planning to minimise the gap next to the rotor disc(s) of the turbine I am attempting to build.
My understanding of the theory underpinning the idea that gaps should be minimised is that gas (i.e. steam or air etc) adjacent to the rotor disc takes energy from the disc as it becomes accelerated in a circumferential (tangential) direction. But the same gas also moves outward radially and so more gas moves towards the rotor disc at its centre and that gas then also becomes accelerated, thereby drawing more energy from the rotor. Gas at the rotor periphery moves away from the rotor towards the stationary casing where it loses kinetic energy in friction and returns back to the centre. This circulation is said to cause the loss in efficiency.
Do you think that your result suggests that in very small turbines the gaps are already too small to allow such patterns of circulation to occur to the extent seen in large turbines, especially with rotors of such small diameters? In miniature turbines I can imagine that genral turbulence in the gas resulting from frictional drag could overwhelm any tendency to form significant flow in the radial direction.
Mike
Hi Mike,
I looked at an article describing the importance of tight clearances. The picture shown at the start of the article was the cross section of the rotor showing the tight clearance is only needed at the blades. The clearance below the blades was very large. This is very typical of some of the rotor cross sections shown in my books. I have found this to be true for axial turbines where I have needed to keep this clearance of the blades as small as possible. The rotor you made for me shown in the following drawing of Tangential Turbine 5 required getting the clearance between the inlet plate and the rotor down to 0.002” (0.05mm). The clearance between the exhaust plate and rotor on this turbine was 0.021” (0.53mm). Changes in the exhaust clearance hardly affected the performance, so I believe the small gap on the inlet side was needed to prevent leakage of the flow from the nozzle. The exhaust clearance will be more important for your turbine since you are pressure staging. The effects of the gas entering the bottom of the blades and being forced out the top of the blades by centrifugal force will probably have much less effect because of the tiny height of the blades in your rotor.
My last tests indicated that once the gap became greater than 0.5mm it didn’t affect the performance of a flat disc. I got the same performance with a 4mm gap as I did with a 0.5mm gap. That is probably why they make the gaps very large below the blades to save material and reduce the weight.
Thanks for the input,
Byron

Hi Byron
I’m sure you are correct regarding the need for close clearance only at the blades. In Kearton’s textbook he provides the following drawing to illustrate the radial flows and he cites earlier publications that report that the losses for a plain disc spinning in open air are greatly reduced when the disc is enclosed. In Church’s textbook it states that the centrifugal pumping action can be greatly reduced by making clearance to the sides of the disc as small as possible.
In at least one article about model turbines (possibly by Prof. Cahddock?) it has been stated that close clearance for the whole disc improves efficiency. I assume this type of comment arose because of the above statements in the text books. I was planning to follow the same advice but your result makes me think that the principle does not apply to high speed miniature turbines and there are three reasons for this. Firstly, Church states that the benefits of close clearance is most noticeable at low speeds, whereas we are using high speeds. Secondly I think that any loss due to the centrifugal pumping is mainly seen when the clerance gap is much greater than is found in most miniature turbines without taking any special precautions to make it narrower. Thirdly, I believe that the centrifugal pumping effect is most effective with much larger rotors than we are using.
Do the above thoughts seem correct?,
Mike

Hi Mike,
None of my books or documents that give formulas for calculating the windage loss of rotors with or without blades include the side clearance. Church’s book gives equations for the windage loss for rotors with and without blades and the side clearance is not included in either one. In the report WINDAGE RESISTANCE OF STEAM-TURBINE WHEELS by E. Buckingham, Stodola stated the following:
“Reducing the clearances, especially round the blades, reduces the windage. In some cases the amount of this reduction may be estimated from Table 10 but no general quantitative statement is possible. The reduction affects mainly the blade term”.
Stodola used 19.88” OD rotors with blade lengths 0.797” and 2.361” running at 2000 rpm with axial clearances of 0.157” in Table 10 and got windage loss reductions of 0.55 and 0.38 respectively compared with running open. This indicates what you stated about the large reductions in windage loss were found at low speeds with large clearances is probably true.
Hope this helps,
Byron
Home › Forums › Stationary engines › Topics
Started by: Nigel Graham 2
in: Manual machine tools
Michael Gilligan
Started by: barryblundell
in: Workshop Tools and Tooling
Michael Gilligan
Started by: Kevan Shaw
in: General Questions
John Purdy
Started by:
Richard S2
in: Related Hobbies including Vehicle Restoration
Richard S2
Started by: jaCK Hobson
in: Workshop Tools and Tooling
Charles Jambon
Started by: wigan2026
in: Workshop Tools and Tooling
howardb
Started by: wigan2026
in: Introduce Yourself – New members start here!
noel shelley
Started by: Peter Simpson 3
in: Beginners questions
Adam Harris
Started by: wigan2026
in: General Questions
wigan2026
Started by: wilson logan 1
in: CAD – Technical drawing & design
george baker 1
Started by: Andrew Skinner
in: Manual machine tools
DC31k
Started by: Martin Johnson 1
in: Traction engines
Martin Johnson 1
Started by:
David George 1
in: CAD – Technical drawing & design
David Jupp
Started by: Greensands
in: Beginners questions
Alan Charleston
Started by: Baldric
in: The Tea Room
Nigel Graham 2
Started by:
Neil Wyatt
in: General Questions
Nigel Graham 2
Started by: rikt
in: Manual machine tools
Nigel Graham 2
Started by: Richard B
in: Traction engines
JasonB
Started by:
JasonB
in: 3D Printers and 3D Printing
JasonB
Started by: Graham Meek
in: Manual machine tools
Graham Meek
Started by: karl07
in: Beginners questions
karl07
Started by:
Neil Wyatt
in: Model Engineer & Workshop
Neil Wyatt
Started by:
dean clarke 2
in: I/C Engines
dean clarke 2
Started by: Thomas Clarke
in: Beginners questions
Nigel Graham 2
Started by: oilyrags
in: Locomotives
oilyrags


