The Golden Age of making

The Golden Age of making

Home Forums General Questions The Golden Age of making

Viewing 6 posts - 1 through 6 (of 6 total)
  • Author
    Posts
  • #817246
    Dave S
    Participant
      @daves59043

      I’m not sure which forum area this belongs in, so Im putting it here.

      I had an idea for a watch case. Not too fancy, but a good trial for my improving CNC skills.

      So I made the model in Fusion360.

      IMG_7789

      I had curves, chamfers, 1mm radiuses and multiple levels of ‘steps’ to hold the gubbins inside.

      In short a PITA to make on a manual machine.

      I could have at this point gone straight to metal., but there were a couple of features I wasn’t certain about.

      Hurrah for 3D Printing!

      Take the model, bung it through a slicer and make a plastic one.

      Great advantage of 3D printing – no need for multiple setups, tool changes and other faffing. It has got to the level of send the model to the slicer, press print and come back in an hour or 2.

      IMG_7790

      Yes it’s a bit rough, but it did show me that a tweak or two was required. There’s a square ended, round bottomed trough for instance, which is trivial in CAD, not a problem for a 3D print, but would have been ‘somewhat challenging’ for a CNC machine.

      with the changes made I flipper Fusion into ‘manufacture’ and proceeded to make tool paths:

      IMG_7794

      I happen to have some 50mm (or maybe 2″ actually) brass bar stock, so that’s the blank Im making this from.

      So many tool paths. This is a bit of the learning Ive done – as with manual machining there are many ways to skin the cat, but some are better than others.

      Anyway, on with the making.

      Im very grateful to the late JS for many things, one of which is the price of this hacksaw. 1 pint of beer (delivered!).

      IMG_7680

      Chunk cut it was off to the lathe to make it the right thickness and parallel sided.


      IMG_7683
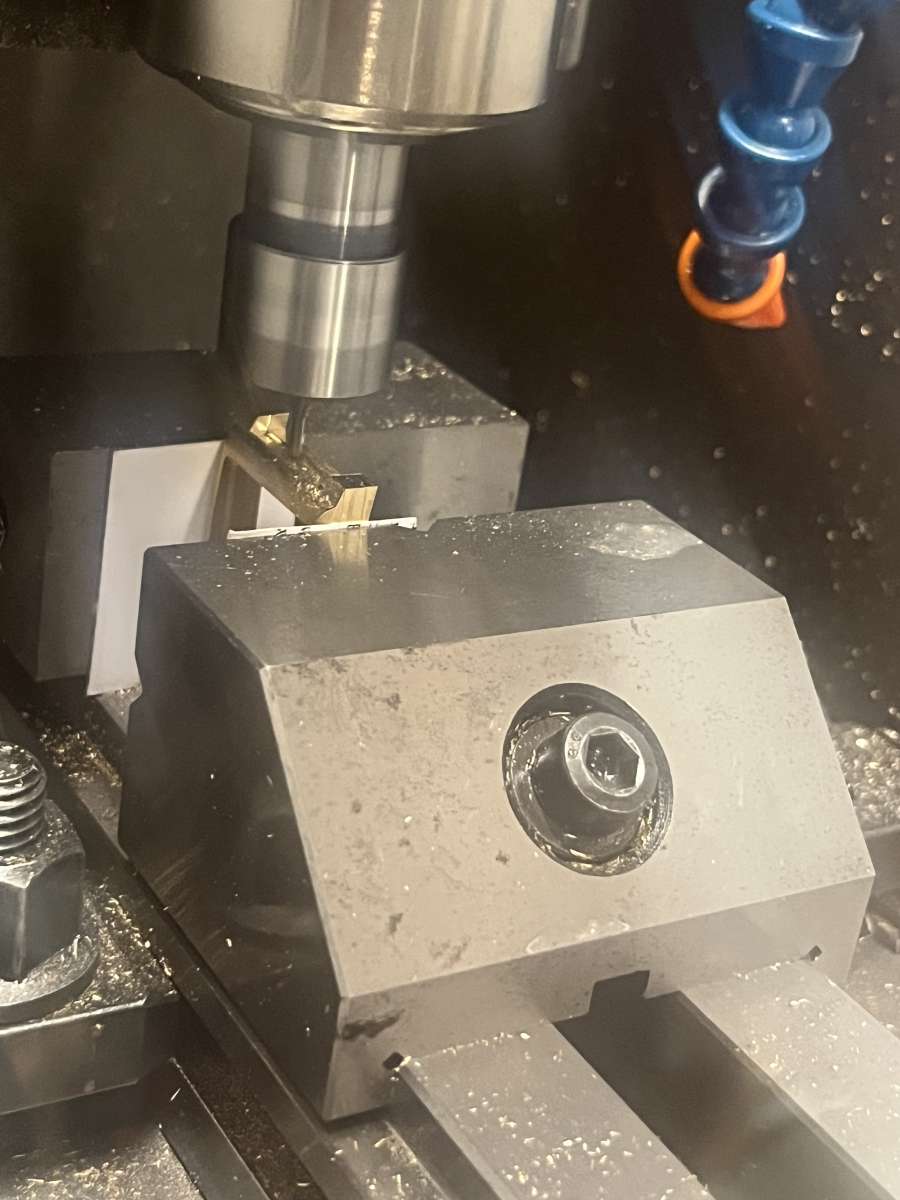
One thing I didn’t really appreciate before CNC was the stock definition. On my manual machines I ‘just’ hack off the bits which don’t look like the part – because I can compensate for the extra sticky out bit here and there. The computer is not so smart…

      Blank into the Mill, find where it is an tell (the still not so smart) computer and away we go, tool 1 (3mm 3 flute end mill) IMG_7688

      Yes, brass is usually cut dry, but in this case I wanted to flush away the swarf, and keep the whole thing cool. Plus I designed the mill with an enclosure so flood only means on the parts 🙂

      Tool 1 done:

      IMG_7694

      There followed a brief side project (these things always happen…) where I made a way to change the tool from the 3mm to a 1mm without losing my Z reference, which you may notice I have machined away.

      IMG_7697

      Problem solved it was onto tools 2 and 3 (1mm flat and ball nose). Setup 1 done.

      Now setup 2 was the other side. so a new Z reference, but I can still use the round bar to give me a center for X and Y. Except I did stupid and used a hacksaw to cut of the ‘ears’ so I didn’t have to turn them into needles of brass swarf.

      IMG_7728

      More learning 🙂

      I was quite nervous about the Z heights, as the tool paths from setup. and 2 ‘meet’ around the outside. I set operation 2 to be 0.1mm up, figuring that it would leave a thin flange which I could remove easily manually.

      It was whilst the first operation was running I remembered that I didn’t go very deep on the inside of the case in the first setup, as the internal flange is biased towards the top. This is the end of the first tool path:

      IMG_7732

      This was very nearly a big oops moment. The cleanup tool path for the inside didn’t have a roughing tool path to remove the bulk of the material. Im pretty sure that would have led to the snap Bu&&er moment. I caught it and inserted the missing tool path into the run, phew!

      2 more tool changes (1mm flat and ball) and op 2 is done:

      IMG_7750

      The Z heights were pretty good, the flange was 0.0045″ instead of 0.004″

      IMG_7753

      Feels like Im getting the hang of this CNC lark now, Setups 3 and 4 sort out the ends of the case.

      Continued in next post as image limit.

      Dave


      #817289
      Dave S
      Participant
        @daves59043

        After removing After removing the ‘flange’ I setup for ops3 and 4 – they are the same, just on each end.

        IMG_7772

        This video:

        https://youtube.com/shorts/FqcsI3eQcUE?feature=shared

        shows the cutting of the round bottom groove that the 3D print helped me spot was not machinable.

        And this shows how hard it is to take a pic of a shiny hemispherical hole:

        IMG_7776

        and then there were a couple of holes to drill:

        https://youtube.com/shorts/ywIbX4VPhe4?feature=shared

        Ive written code to generate peck cycles in a previous job, but this is my first go with fusion. seemed to work ok – no drills were broken 🙂

        That’s pretty much the case done.

        IMG_7787

        It needs a cleanup and a bit of deburring, then no doubt countless hours to obtain a mirror polish.

        Next up the rest of the watch gubbins….


        Before CNC and 3D printers I think this case would have taken me at least a month, probably more. I don’t actually know how I would achieve some of the geometry with my manual machines, although I believe it is possible.

        I started with the idea about a week ago. It’s amazing what the capabilities available to ‘ordinary’ people are.

        I know we engineers are not necessarily ‘ordinary’, but this is a hobby not a business, and all the software side I am using is ‘free’

        Dave

        #817299
        Nealeb
        Participant
          @nealeb

          Dave – as you are using the free version of F360 (as I understand it), are you having any issues with the restrictions in it? I’m thinking of only one tool per setup, and loss of rapid feeds within a toolpath. The first one is not too difficult to work around but the second one I found very frustrating as it can add quite a lot of time to a cut. I actually use a free add-in which pretty much gets round these. I have an automatic tool height gauge so use manual toolchange but automatic tool-length calibration on each tool change. The add-in also fiddles with various G0/G1 lines of code to speed up tool-return movements. Just interested in comparing notes.

          What you are doing is a great example of the use of modern technology, though. Good stuff!

          #817313
          JasonB
          Moderator
            @jasonb

            Looking good, does it need the pin holes for the strap?

            Although I often use the top of the stock as my Datum if a job needs that to be removed I will try and find another point or you can even measure the height of the stock above say the vice and then set your tool to the vice but enter that difference rather than zero. Another option with a lot of spare stock would have been to leave a small “post” in the waste material and use that for height setting, easily added as part of the design by just drawing and extruding a circle.

            Regarding using free F360 I tend to do as much metal removal as possible using adaptive cuts. With those you can set the “non engaged” speed higher than the feed so if I’m feeding at 500mm/min I will set the non engaged to 1000mm/min and the tool moves back to the start of the next cut at 1000mm which is similar to what the rapids are set at. You can also play with stay down distance and percentages which reduces the amount of time the tool has to lift and drop back down. Two way cutting also reduces rapid moves but I find the machine sounds a lot better climb cutting so tend to just select that.

            For things like drilling then reducing the feed height from the default 5mm and setting a faster retract speed will save run time as the tool is not moving as much when not cutting so less time at the slower feed rate.

            If using small cutters then a high speed spindle helps a lot as you can run a faster feed rate for the same given chip load and the “rapids” will be at that feed rate so a 20K spindle will see the restricted rapids 4 times faster than a machine with 5K spindle, with teh added bonus that teh actual cutting also takes 1/4 of the time.

            The main thing is to get a few yellow lines on the toolpaths as possible.

            #817314
            Diogenes
            Participant
              @diogenes

              Thanks for the pics and descriptions – another watching with interest.

              #817360
              Dave S
              Participant
                @daves59043

                @Nealeb:

                Ive not (yet?) had any problems with the hobbbiest restrictions. Im not sure why you think you can only put one tool in a setup:

                Screenshot 2025-09-25 at 12.03.17

                I only post 1 tool per file, but that’s part of how my machine process is – I don’t have a changer, so tool changes are manual. I prefer the machine not to be halfway through a file when I do that.

                As fo rapids – as Jason said my clearing is using the Adaptive tool path, so the tool mostly stays down anyway. I don’t think rapids loses me much time – the size of the parts is small, so the travel time difference from one end to the other isn’t huge.

                I 2 way cut on the initial facing and on the parallel finishing, but the rest is climb.

                @Jason The holes in the ends are for the strap attachment. Im not putting normal springbars on this one, but trying a new attachment method.


                Dave

              Viewing 6 posts - 1 through 6 (of 6 total)
              • Please log in to reply to this topic. Registering is free and easy using the links on the menu at the top of this page.

              Latest Replies

              Home Forums General Questions Topics

              Viewing 25 topics - 1 through 25 (of 25 total)
              Viewing 25 topics - 1 through 25 (of 25 total)

              View full reply list.