Roughing End Mills

Roughing End Mills

Home Forums Beginners questions Roughing End Mills

Viewing 17 posts - 1 through 17 (of 17 total)
  • Author
    Posts
  • #859137
    Colin Teasdale
    Participant
      @colinteasdale

      The mill is a Sieg SX2P with, if memory serves, a 500W brushed motor.

      I have ordered a set of roughing end mills, to see if they are any good, and have now realised that I have no idea what depth of cut or side-step I should use with them. The set comprises M6, 8, 10 & 12 diameter mills.

      All info gratefully received.

      #859151
      JasonB
      Moderator
        @jasonb

        Try 1xD vertical and 0.1xD sideways stepover, the 10 and 12mm may not go to that on the X2 in steel so reduce the sideways stepover

        #859156
        Colin Teasdale
        Participant
          @colinteasdale

          Thanks for that, Jason.

          Delivery is due tomorrow, so I’ll try the suggestions and report back.

          #859173
          Julie Ann
          Participant
            @julieann

            Do you really mean roughing endmills, with serrated cutting edges, as these can be run harder than standard endmills? If you are not sure what I mean I can post a picture tomorrow. Not going into the workshop now in my dressing gown!

            Julie

            #859183
            Colin Teasdale
            Participant
              @colinteasdale

              Yup, serrated edges and all – this is the set


              #859187
              Bill Phinn
              Participant
                @billphinn90025

                The end mills pictured are made by Xinan Tools.

                I was weaned on their brand of end mills. They’re generally OK but are budget HSS and quickly lose their edge. I remember when I graduated to more upmarket end mills (those from more respected brands and with added cobalt) wondering whether I’d notice any difference.

                It was night and day. I could hardly even hear the cutters at first as they effortlessly chewed their way through ferrous materials.

                Anything that cuts with less effort, produces less noise and vibration, better surface finishes, and puts less strain on your machinery is a big bonus for me.

                When you’ve tried your Xinan Tools milling cutters for a while, fork out for some upmarket ones. I think you’ll be pleasantly surprised.

                #859191
                JasonB
                Moderator
                  @jasonb

                  Although they will take off more material with a suitable machine you are not going to be pilling up the swarf much more with an X2. Start with what I suggested and then work up to see if you can get more material removal rather than go straight in with a big cut and cause problems.

                  Although I have some I seldom use them as you need to go back with another cutter to get a smooth finish and square internal corner if needed. I mostly use Carbide now and hardly ever use HSS unless its an imperial size that I need like a keyway

                  Books give you a heavier cut than a similar standard cutter, here I went with approx the suggested 0.3D sideways but only half the suggested 1.5D depth. That is about as much as I would want to push my X3 and steel may reduce the cut more. So would expect the X2 to take less unless you like the smell of smoke.

                  Going by the photos on the e-bay listing I would not expect them to cut as well as the better brands so that again would reduce what they might be able to take off. https://www.ebay.co.uk/itm/206419623184

                  Feed rate looks to be in the region of 150mm/min which is another variable, if the mill is not struggling then you can wind up the feed rate rather than increase the DOC. Or go to carbide and run 3 times faster and feed at a similar increased rate.

                  #859202
                  Julie Ann
                  Participant
                    @julieann

                    Roughing endmills have scallops on the cutting edge that results in lower cutting pressures for a given radial DOC. So the DOC could be increased over that for a conventional endmill, resulting in increased stock removal rate.

                    Another advantage is that the swarf comes off in small curls, not the needle like swarf from a conventional endmill, making the swarf easier to handle.

                    In the past I have used roughing endmills a lot, primarily for pocketing out aluminium boxes for electronics equipment, where time saved is important. Also the poorer finish was perfectly adequate so no need to waste time going round with a conventional endmill afterwards.

                    The use of roughing endmills is really up to the individual user and the job in hand taking into account potential savings and tradeoffs.

                    Julie

                    #859212
                    Colin Teasdale
                    Participant
                      @colinteasdale

                      Thanks to all for the comments / education.

                      I knew the set I ordered were at the cheap end of the market, which I’m fine with as the purchase is something of an experiment. If I find I get on with them, then I’ll get more expensive sizes of the size(s) I end up using. It’s rather like when I first started model engineering, I got boxed sets of drills and then bought more expensive individual sizes as I wore them out.

                      #859275
                      Colin Teasdale
                      Participant
                        @colinteasdale

                        So, the mills arrived a couple of hours ago, so I set to with the 12mm cutter on a skanky piece of 12mm steel. Spindle speed was 800 rpm, feed rate was what felt comfortable to turn one handed.

                        The first cut was a skim to introduce the two to each other, followed by cuts of 0.5mm, 1.0mm and, finally, 1.2mm working up to Jason’s suggestion of 0.1 times diameter step-over. The machine dropped a couple of tones on the 1.2mm step-over, but seemed to handle it OK, so I tried a 1.5mm set-over. This dropped another couple of tones, a brush that was on the milling table was shuffling about a bit, so it was clearly working hard but there were no wisps of smoke nor other obvious signs, or sounds, of distress. That said, I’m not sure I’d try a larger step-over, at least not initially, but then maybe I’m too mechanically sensitive!!

                        All in all, first impressions are positive.


                        Thanks for all the comments.

                        #859364
                        Martin Johnson 1
                        Participant
                          @martinjohnson1

                          How does one sharpen a roughing cutter?

                          I have several blunt roughers plus a home brewed amalgam of Stent, Quorn and Worden concepts but no idea where to start.  Ordinary milling cutters are easy enough but…….

                          Martin

                          #859368
                          JasonB
                          Moderator
                            @jasonb

                            I would imagine the cutter needs to move in a helical path against the grinder so the leading edge of each flute can be sharpened which would maintain the serrated OD

                            #859372
                            Julie Ann
                            Participant
                              @julieann

                              JasonB is correct, roughing endmills are sharpened by grinding the inside edge of the flute, not on the outside as with conventional endmills. The ideal is a spiral grinding attachment as made by Clarkson and others. It is one of the Clarkson accessories I don’t have. Alternatively a finger can be used on another flute to guide the operation.

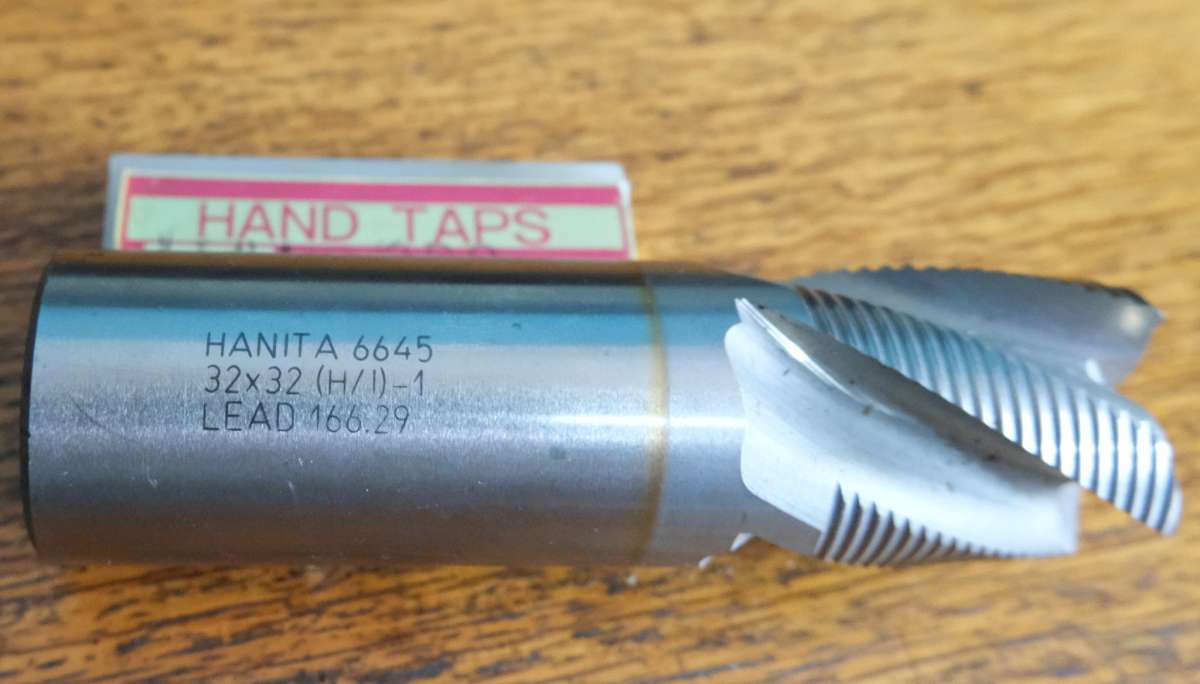
                              Roughing endmills have the lead engraved on the shank to aid in setting up the grinding process:

                              Roughing Endmill Lead

                              Julie

                              #859381
                              Bazyle
                              Participant
                                @bazyle

                                “Roughing endmills have the lead engraved on the shank to aid in setting up the grinding process:”

                                eeeek. I would expect the lead to be something I could easily set up with change wheels. Where would one start with a number like 166.29?

                                #859385
                                JasonB
                                Moderator
                                  @jasonb

                                  You could work it back as you know the diameter so easy enough to work out thehelix angle, some cutters have the angle  rather than the lead.

                                  Stick that into your CAD and produce a sleeve with the helix, 3D print it out and use that to rotate the cutter holder as it is advanced against the grinder. Simples. Similar methods are used to cut helical gears.

                                  Or just use some simple maths which will get you quite close. Say you have a leadscrew of 0.100″ pitch. 166.29/2.54 = 65.35 so for every turn of the cutter you need 65.35 turns of the lead screw.

                                  #859399
                                  Diogenes
                                  Participant
                                    @diogenes

                                    ..so if you had a stepper rotating a spin indexer on an X-traversing table could the system be configured to ‘read’ the table feedscrew turns..?

                                    #859405
                                    Mark Rand
                                    Participant
                                      @markrand96270

                                      The lead the grinder uses won’t have to exactly match the original lead on the endmill. It’ll just mean that you grind a bit more of at one end or another. After that, you can use the same lead again for further sharpening

                                    Viewing 17 posts - 1 through 17 (of 17 total)
                                    • Please log in to reply to this topic. Registering is free and easy using the links on the menu at the top of this page.

                                    Latest Replies

                                    Home Forums Beginners questions Topics

                                    Viewing 25 topics - 1 through 25 (of 25 total)
                                    Viewing 25 topics - 1 through 25 (of 25 total)

                                    View full reply list.