How do I cut this out??

How do I cut this out??

Home Forums Beginners questions How do I cut this out??

Viewing 16 posts - 1 through 16 (of 16 total)
  • Author
    Posts
  • #83845
    Wolfie
    Participant
      @wolfie
      OK its all marked out nicely, but how the hell do I cut this out without it looking like a donkey’s hind leg (Obviously I can do the inner circle)
       

      #5920
      Wolfie
      Participant
        @wolfie
        #83847
        Michael Gilligan
        Participant
          @michaelgilligan61133

          Hope you have a Rotary Table !

          Slitting Saw for the straight cuts.
          Slot Drill for the curves.

          If it needs sharp corners, finish by hand.
          If not, keep the Slot Drill radius … to avoid “stress-raisers”

          MichaelG.

          #83848
          jason udall
          Participant
            @jasonudall57142

            Rough out with favourite saw etc. Leave “handle ” at 3 oclock..remove later.Vertical peg on mill table .Pilot hole to match in center of stock.Rotate stock on peg using mill to mill outer perimeter. Depending on cutter choice might need nut on top of ‘peg’

            #83850
            Nobby
            Participant
              @nobby

              Hi

              After you machined the centre out . clamp to rotary table from inside the hole . I presume you don’t have CNC milling machine .On the manual M/C Having centred it you can Machine the profile. There is no indication of sizes here . Anyway start from Radius R P1 of Ist lug to the outside Dia P2 going anti clock wise with cutter that’s with the rotary table turning clockwise to the 2nd lug P3.

              To be continued !!

              Regards Nobby

              #83855
              JasonB
              Moderator
                @jasonb
                You could always just file it, the practive will do you no harm.
                 
                Another way is to fabricate, turn a ring the size you have marked out then machine slots at 12,3 & 6 o’clock positions and silver solder in some blocks of brass, that way all the curves are done on the lathe. I used the same method on the engine below but just used a round spigot for the rod.
                 

                J

                #83861
                Wolfie
                Participant
                  @wolfie
                  No rotary table (Yet, I’m gonna make one)
                   
                  By hand?? I don’t have any curved files!
                  #83862
                  Terry Lane
                  Participant
                    @terrylane

                    Have a look here Wolfie, particularly the second page. Once again, files and filing buttons.

                    #83864
                    John Stevenson 1
                    Participant
                      @johnstevenson1
                      Drill the centre for a decent sized bolt say 10mm, I’m guessing sizes here and what mill you have. Bolt to mill table with a packing piece underneath but smaller than the OD you are cutting.
                      Then drill say 6mm close to the edge at one of the six start points. Free of the bolt and turn to another start point and repeat, do all 6 points. DO NOT MOVE the table, just rotate the blank and securely bolt again before drilling. Set the stop so you can’t hit the bed
                       
                      Now swap the 6mm drill for a 6mm slot drill or centre cutting end mill and rotate the blank about a 1/3 of a hole and plunge down. Again set the stop so you can’t hit the bed.
                       
                      Keep moving round until all three pieces have been removed, then it’s now an easy job to carefully file all the bits left on by the slot drill.
                       
                      Hold in the chuck and bore centre out to suit.
                       
                      Simples.
                       
                      John S.

                      Edited By John Stevenson on 04/02/2012 19:36:22

                      #83878
                      Wolfie
                      Participant
                        @wolfie
                        @Tel those are interesting pics but I can’t work out why you have the strap and the filing buttons in the vice like that. Do you file across the strap then. So how come you don’t simply get a succession of flat spots?
                        And don’t the filing buttons simply file down along with the job when you get to them or are they hardened? (Aye I know this is brass but other jobs aren’t)
                         
                        Might have a go at Johns suggestion too
                        #83896
                        jason udall
                        Participant
                          @jasonudall57142
                          john has put it more thoughly than I but in essence the same
                           
                          by bolting firmly only and leavin some stock to grip the final finishing is done by rotating the part about the pivot [bolt/pin whatever] as if you were using a rotary table.
                          LIGHT CUTS ONLY
                          use this on outside ; then and only then bore out inner…..
                           
                          before removing any clamps or part from chuck…CHECK YOU HAVE FINISHED…..always pain to re-setup …
                           
                          #83899
                          Terryd
                          Participant
                            @terryd72465
                            Wolfie,
                             
                            A bit of advice, you have, in my experience, done this in the wrong order, I was going to say that no-one has mentioned that you should cut the part in half first, rough out the two parts, machine the two mating faces so that you can drill and tap the flanges then bolt them together as they will be finally. Then you can mark out, shape and bore the piece however you finally do it. If you don’t do it in that order the final part will not be circular as you will remove material when cutting in half.
                             
                            Not really so important on the outer profile that’s just cosmetic, but if you bore before doing that, the material you remove when cutting in half will cause it to be out of circular and pinch the eccentric.
                             
                            Tel shows the process on the first page of his photographs. BTW you don’t need ‘curved files, file a series of flats close to the finish line with flat files then create the curves by twisting the file with your wrist as you file or with the method Tel suggested in an earlier thread.. A bit of bench work practice wouldn’t go amiss.
                             
                            Regards
                             
                            Terry
                            #83907
                            Terry Lane
                            Participant
                              @terrylane

                              It’s all in the wrist Wolfman! As Terry has pointed out. And the filing buttons are soft and used in conjunction with a Mk I (spectacle assisted) eyeball.I know a lot of folk advocate hardening them, but I never do – mainly out of respect for my files- and unless you planned on doing a run of the same item, say 20+, there is no real need.

                              #83909
                              JasonB
                              Moderator
                                @jasonb
                                Terry the eccentrics on the S50 and a lot of other small model engines do not use a split eccentric strap, they have a pin or the end of teh rod engages in a groove in the sheave. The ones in that picture I posted being another example.
                                 
                                J
                                #83915
                                Terryd
                                Participant
                                  @terryd72465
                                  Hi Jason,
                                   
                                  Thanks for that, I’m unfamiliar with the engine, it was just the fact that Wolfie’s marking out shows bolting lugs and I assumed that the strap was split. I was using Tel’s photo’s as an example. However I think that it is a good idea for relatively inexperienced model engineer to understand that there is often a strict sequence of operations in manufacturing and that a lot of planning often has to go into it.
                                   
                                  Best regards
                                   
                                  Terry
                                  #83922
                                  blowlamp
                                  Participant
                                    @blowlamp
                                    Wolfie.
                                     
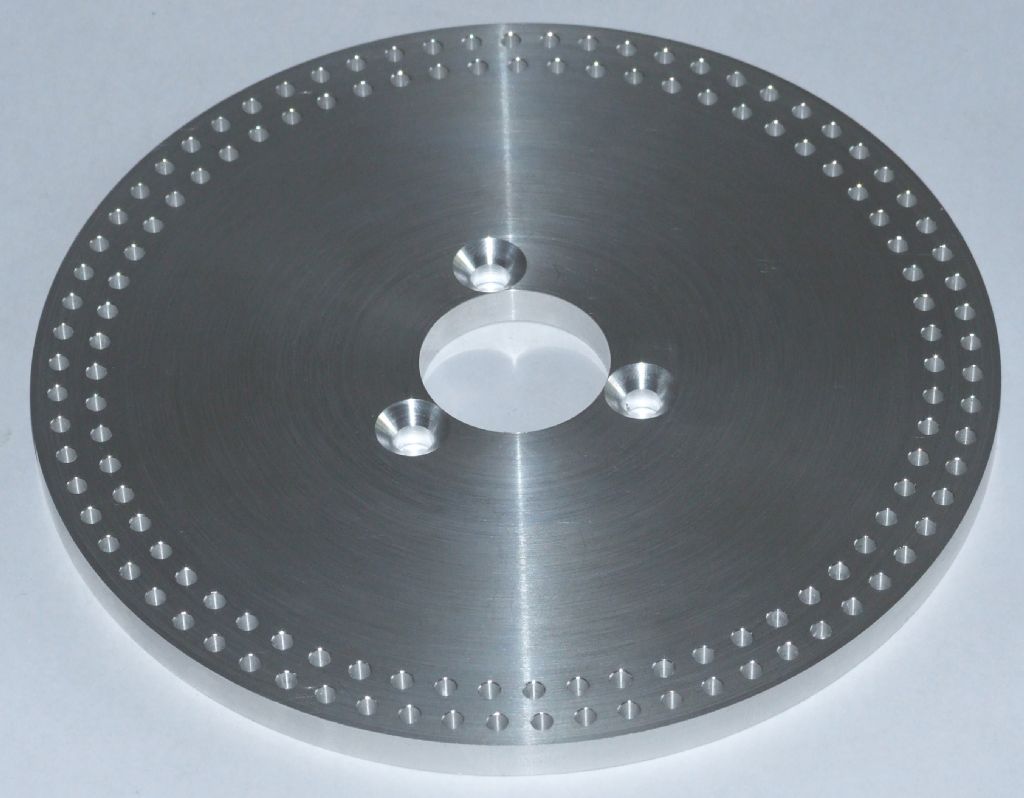
                                    I might be inclined to ‘chain drill’ away the excess material.
                                     
                                    Basically do as John S says with a hole though the middle and bolted down – but still able to rotate. Then drill a series of holes around the circle/arcs and other shapes, as close together as you dare, but without overlapping. It should look like a row of holes from a dividing plate, but more closely spaced if possible . See here: http://www.model-engineer.co.uk/wp-content/uploads/sites/4/images/member_albums/70420/dividing%20plate.jpg
                                     
                                    This removes the bulk of the metal quickly and allows you to use a coping saw to whizz around the profiles to get the waste out of the way.
                                     
                                    With some forethought you could cut off the waste from the outside and return the part to the machine to clean it up by milling.
                                     
                                    It’s hard to be sure from the picture, so just an observation, not a criticism, but try and be more accurate with your marking out, because for instance, the centre you’ve made doesn’t seem to coincide with the centre lines which offsets it to everything else.
                                     
                                    If your marking out is dead neat, then that’s reflected in the finished job.


                                    Martin.

                                    Edited By blowlamp on 05/02/2012 12:19:51

                                  Viewing 16 posts - 1 through 16 (of 16 total)
                                  • Please log in to reply to this topic. Registering is free and easy using the links on the menu at the top of this page.

                                  Latest Replies

                                  Home Forums Beginners questions Topics

                                  Viewing 25 topics - 1 through 25 (of 25 total)
                                  Viewing 25 topics - 1 through 25 (of 25 total)

                                  View full reply list.