

How to mark out and machine a radius
How to mark out and machine a radius
- This topic has 11 replies, 9 voices, and was last updated 1 May 2013 at 14:29 by
 Ian S C.
 Ian S C.
 richard oates
 Bazyle
 JasonB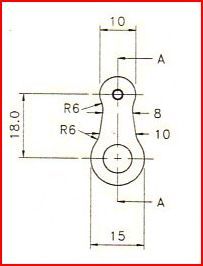
 but say what machines and tooling you have available as there are always more than one way to do the job.
 Chris Heapy
 Sub Mandrel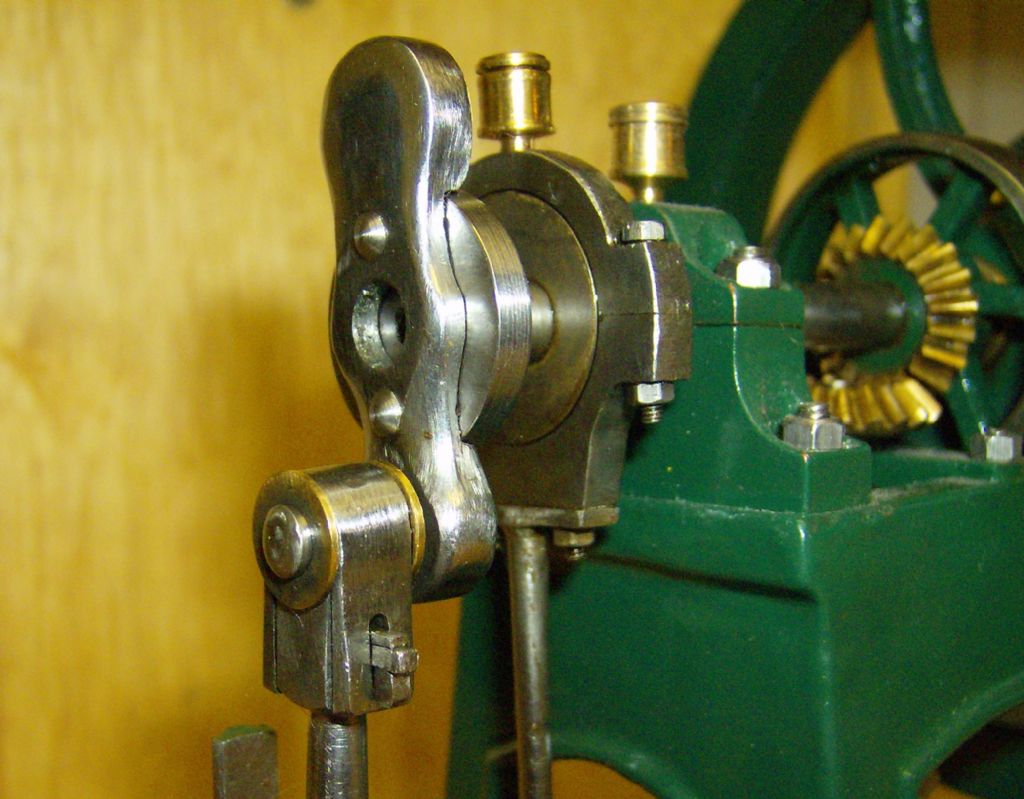
 Rick Spaidal
 Weary
Weary Anonymous
 Ian S C
- Please log in to reply to this topic. Registering is free and easy using the links on the menu at the top of this page.
Latest Replies
-
- Topic
- Voices
- Last Post
-
-
LAzar egde finder
Started by:
ian Holdsworth
in: Beginners questions
- 10
-
22 October 2026 at 23:58
Ches Green UK
-
Small (ish) horizontal mill identification “Howdle”
Started by:
Rainbows
in: Manual machine tools
- 12
-
22 October 2026 at 23:39
Rainbows
-
Re Inserting Angled Features – Completed The Alibre Model
Started by:
Nigel Graham 2
in: CAD – Technical drawing & design
- 1
-
22 October 2026 at 23:04
Nigel Graham 2
-
Workshop Insurance.
Started by:
Andrew Tinsley
in: General Questions
- 8
-
22 October 2026 at 23:01
Mark Rand
-
What Did You Do Today 2026
1
2
…
9
10
Started by:
JasonB
in: The Tea Room
- 55
-
22 October 2026 at 22:57
Mark Rand
-
Change old AC motor to BLDC motor in Sieg C6
Started by:
Jens Eirik Skogstad 1
in: Electronics in the Workshop
- 8
-
22 October 2026 at 22:27
Huub
-
What is this tool?
Started by:
jaCK Hobson
in: The Tea Room
- 3
-
22 October 2026 at 22:25
Nigel Graham 2
-
PHP
Started by:
Michael Gilligan
in: Website Questions, Comments, and Suggestions
- 3
-
22 October 2026 at 19:36
Mark Rand
-
Does anyone have any info about these vices
1
2
Started by:
bjcolyer
in: Introduce Yourself – New members start here!
- 13
-
22 October 2026 at 18:57
renardiere7
-
Stuart twin compound
Started by:
teamricky
in: Stationary engines
- 5
-
22 October 2026 at 17:56
teamricky
-
Layerling – new free CAD software for 3D printing
Started by:
Graham Stoppani
in: CAD – Technical drawing & design
- 9
-
22 October 2026 at 16:14
Fulmen
-
Close-coupled Tees (Underfloor heating)
Started by:
Andy Stopford
in: The Tea Room
- 7
-
22 October 2026 at 15:55
Macolm
-
Rivetting with a hydraulic press
1
2
Started by:
Martin Johnson 1
in: Workshop Tools and Tooling
- 19
-
22 October 2026 at 15:33
DC31k
-
ML7 change gear caluclator
Started by:
drnewcomb
in: Manual machine tools
- 8
-
21 October 2026 at 16:47
ega
-
Making a Lathe Bench for a Myford ML10
1
2
Started by:
starjump
in: Beginners questions
- 11
-
21 October 2026 at 15:33
starjump
-
Coventry Diehead CH Reassembly
Started by:
Tony Ray
in: Workshop Tools and Tooling
- 4
-
21 October 2026 at 12:46
Jan Raap
-
John Haining 2″ Ruston
Started by:
Pixel_Porpoise
in: Help and Assistance! (Offered or Wanted)
- 4
-
21 October 2026 at 11:01
Dave Halford
-
Pencil Sharpener
1
2
Started by:
Vic
in: The Tea Room
- 18
-
20 October 2026 at 23:10
Nigel Graham 2
-
Trying a new controller
Started by:
John Haine
in: CNC machines, Home builds, Conversions, ELS, automation, software, etc tools
- 4
-
20 October 2026 at 21:54
Huub
-
Model Turbines
1
2
…
26
27
Started by:
Turbine Guy
in: Stationary engines
- 28
-
20 October 2026 at 19:56
Turbine Guy
-
Model seed drill.
Started by:
colingp125halls
in: Introduce Yourself – New members start here!
- 3
-
20 October 2026 at 16:12
JasonB
-
ML10 and Chuck cleaning Information
1
2
Started by:
starjump
in: Beginners questions
- 10
-
20 October 2026 at 01:45
Grindstone Cowboy
-
carbide insert lathe tools
1
2
Started by:
davidwf
in: Workshop Tools and Tooling
- 16
-
19 October 2026 at 20:30
old mart
-
Coventry die head
Started by:
lug lord
in: Workshop Techniques
- 8
-
19 October 2026 at 18:27
John MC
-
The Latest INDEX to Model Engineer & Workshop (Also past issues of MEW)
1
2
3
Started by:
David Frith
in: Model Engineer & Workshop
- 7
-
19 October 2026 at 17:04
David Frith
-
LAzar egde finder
 ian Holdsworth
  Ches Green UK
 Rainbows
  Nigel Graham 2
  Andrew Tinsley
  Mark Rand
 JasonB
  Jens Eirik Skogstad 1
  Huub
Huub jaCK Hobson
  Michael Gilligan
  bjcolyer
  renardiere7
 teamricky
  Graham Stoppani
  Fulmen
 Andy Stopford
  Macolm
 Martin Johnson 1
  DC31k
DC31k drnewcomb
  ega
ega starjump
  Tony Ray
  Jan Raap
 Pixel_Porpoise
  Dave Halford
 Vic
Vic  John Haine
  Turbine Guy
  colingp125halls
  Grindstone Cowboy
 davidwf
  old mart
 lug lord
  John MC
 David Frith
 Latest Issue
Newsletter Sign-up
Latest Replies
- LAzar egde finder
- Small (ish) horizontal mill identification “Howdle”
- Re Inserting Angled Features – Completed The Alibre Model
- Workshop Insurance.
- What Did You Do Today 2026
- Change old AC motor to BLDC motor in Sieg C6
- What is this tool?
- PHP
- Does anyone have any info about these vices
- Stuart twin compound

