Regulator problems

Regulator problems

Viewing 19 posts - 1 through 19 (of 19 total)
  • Author
    Posts
  • #838093
    Zan
    Participant
      @zan

      am on the final assembly of my 71/4 Beattie well tank 2 4 0 no.314, as reboilered   in 1892

      Before  putting the boiler into the chassis I thought it prudent to test that all the fittings held pressure, glad I did as several problems materialised, all solved except for the regulator.   This is mounted in a tall dome, and it’s a real pain to get it off the boiler, some 34 fixings along with bushes, glands and gaskets etc.   it takes quite a while to get it fitted and everything  in correct orientation.  I know this  because I’ve had it out several times already.

      The trouble is, the thing just won’t seal.  I thought I’d got it today, after careful lapping with Timsaver abrasive. This is a brilliant product  because it breaks down in use and becomes inert so the risks from not fully removing it doesn’t exist.   The sliding valve felt very smooth and totally free from any indication of  grit or problems.  It pumped up to 50 psi, then I got very wet from the discharge from the superheaters.  The air went very blue!

      I’m now at a total loss of what to do short of making another regulator to a different design  or trying to modify this one .  The body  and spring are from bronze  with a brass slider.

      Any suggestions, or perhaps some idea of a suitable alternative design which could be modified to fit?


      IMG_1392IMG_1391IMG_1386

      #838127
      Nigel Graham 2
      Participant
        @nigelgraham2

        It’s an unusual design, perhaps based on the full-size.

        Full-size regulators commonly were slide-valves but usually rectangular. The unequal size ports ease opening the valve and give some sensitivity.

        Can you scan its drawings and post them here? That might reveal some inherent design weakness making it very difficult to make the sliding part seat properly.

        I wonder if the action of the link may push the lower end of the slide outwards, or twist, it a fraction possibly not even visible by eye, but enough to leak. Especially if the various pins are nice neat bearing fits!

        You could assess any such unwanted movement with a DTI: lubricate the faces first with soapy water so as not to score them.

        #838128
        Dave Wootton
        Participant
          @davewootton

          There’s a few good ideas over on the model engineers proboards site, if you search “Stroudley regulator problems” in general chat, on page two there is a great idea by Adam Cro which you may be able to adapt. Also just searching “regulator” will bring up information on replacing Stroudley type regulators with ball valves fitted inside the dome. I have replaced the sliding block in a Gresley type regulator with Peek filled PTFE which has lasted a good number of steamings and seals well enough for the boiler test. Reposting the question on there would be worthwhile, there is a wealth of practical loco experience on that site. Good Luck, these things can be so frustrating!

          #838145
          stephen goodbody
          Participant
            @stephengoodbody77352

            If you’re absolutely sure that both faces are absolutely flat (don’t lap them against each other, they should both be lapped independently against a really flat surface – I use a mirror glass) then there are really only three other options:

            1. The faces are being ever-so-slightly separated by the operating linkages.

            2. There is some dirt or swarf trapped between the two faces.

            3. The leak is coming from somewhere else: perhaps a porous regulator casting, or a leak in one of its soldered joints,  or a leaking joint in the steampipe, either at the regulator or smokebox end.

            I had to fix all of these before I finally got my own Stroudley regulator to seal properly.

            Steve

            #838147
            duncan webster 1
            Participant
              @duncanwebster1

              When I had a leaky regulator problem I made up a test rig so it could be tested with air off the loco, saved a lot of messing.

              #838222
              Zan
              Participant
                @zan

                Well there’s a lot to think about.

                Dave, I’ve only just joined the clearing house so searches don’t yet work, but I can’t find Adam’s post on that page 2

                Srtephen, I’ll check with a dti later for the face lifting but I doubt the linkage is causing the problem.  The body is cut from solid so not porous.  The steam pipe outlet at the moment is sealed with PTFE tape  which is ok to 200 c well above the boiling water temperature

                At the moment I can’t find Gordon Smiths designs, which I see has had very positive comments but there’s an interesting one in EIM august 2012   Pp 59( photo 1.  It uses a stainless ball lifted from the top, actuated via a cam which could feature a shape to give a minimal lift at the start.  I like the look of this  and perhaps a filled PTFE seat would give a certain seal     I did think about a o ring seal on a flat or tapered seat, but there’s too mush risk of it being thrown off by the steam leaving a dangerous runaway loco!IMG_1397IMG_1395IMG_1396 
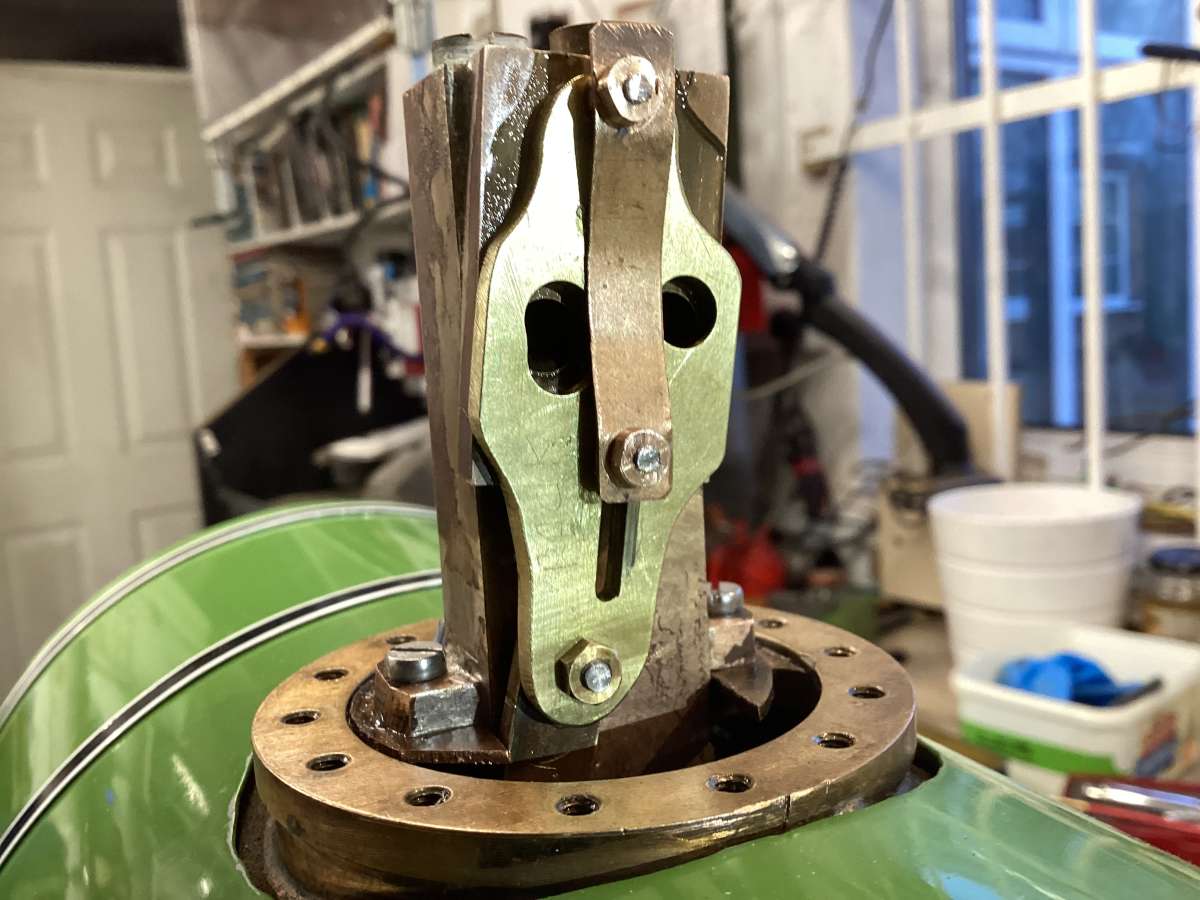
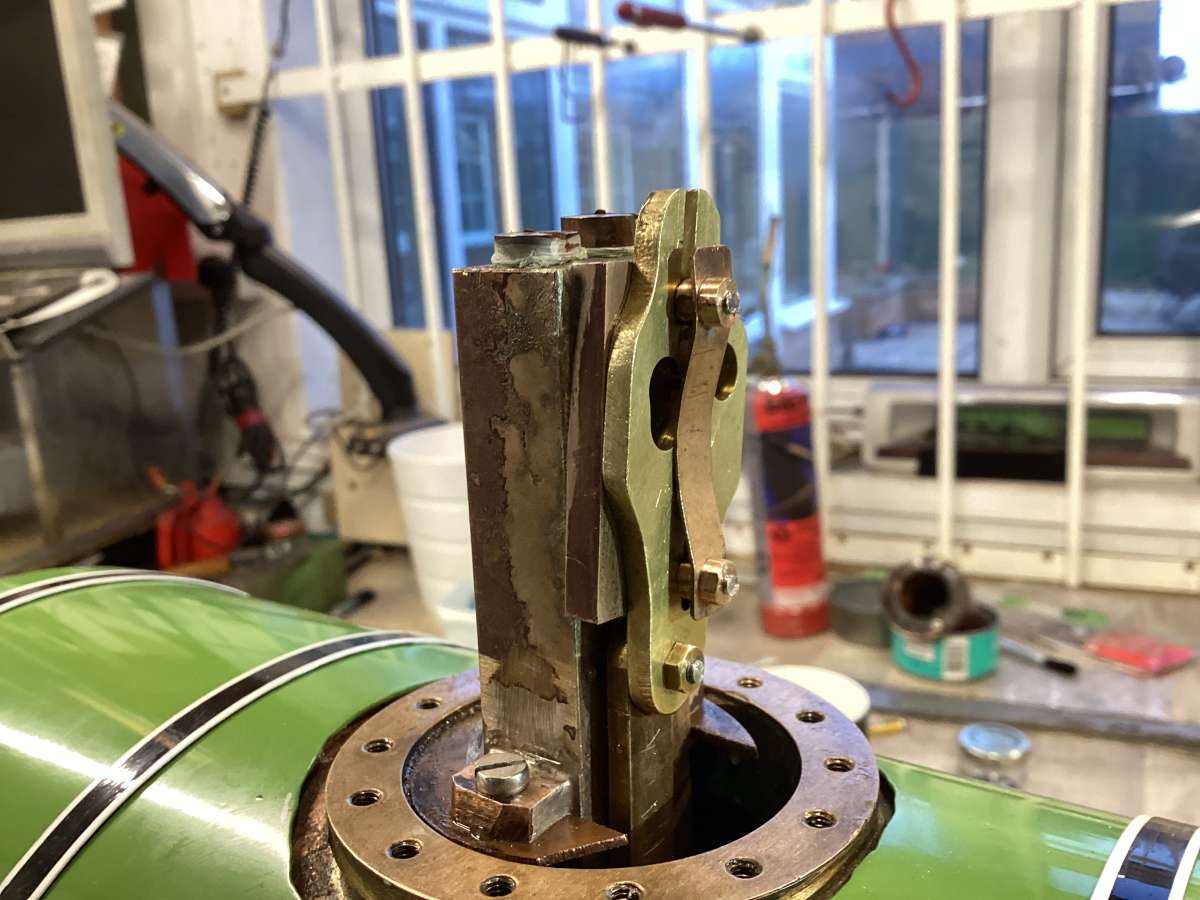
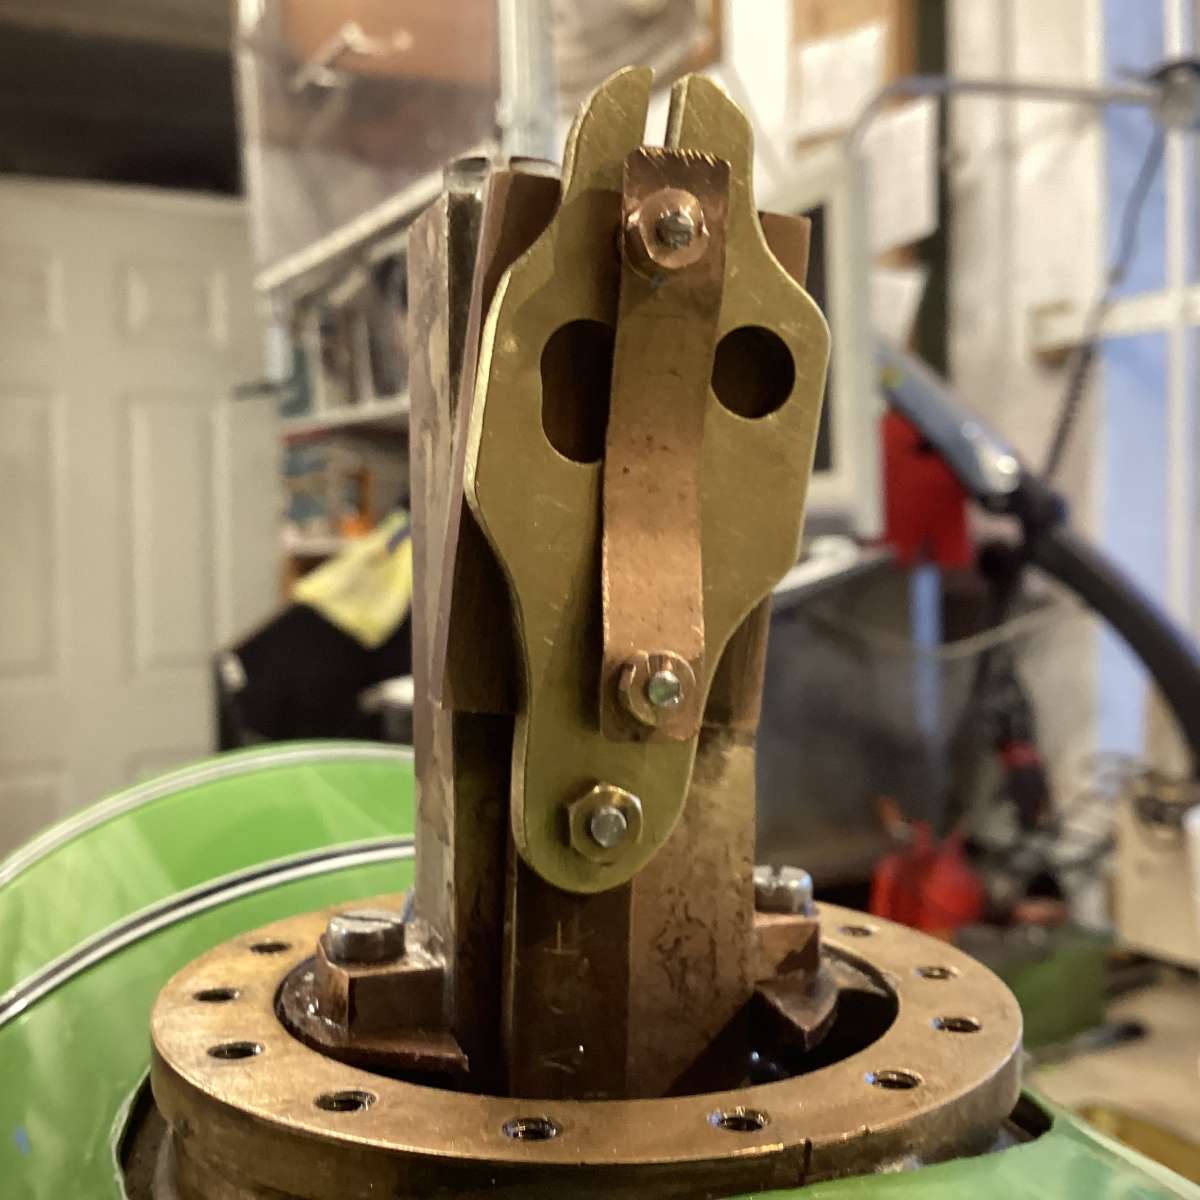
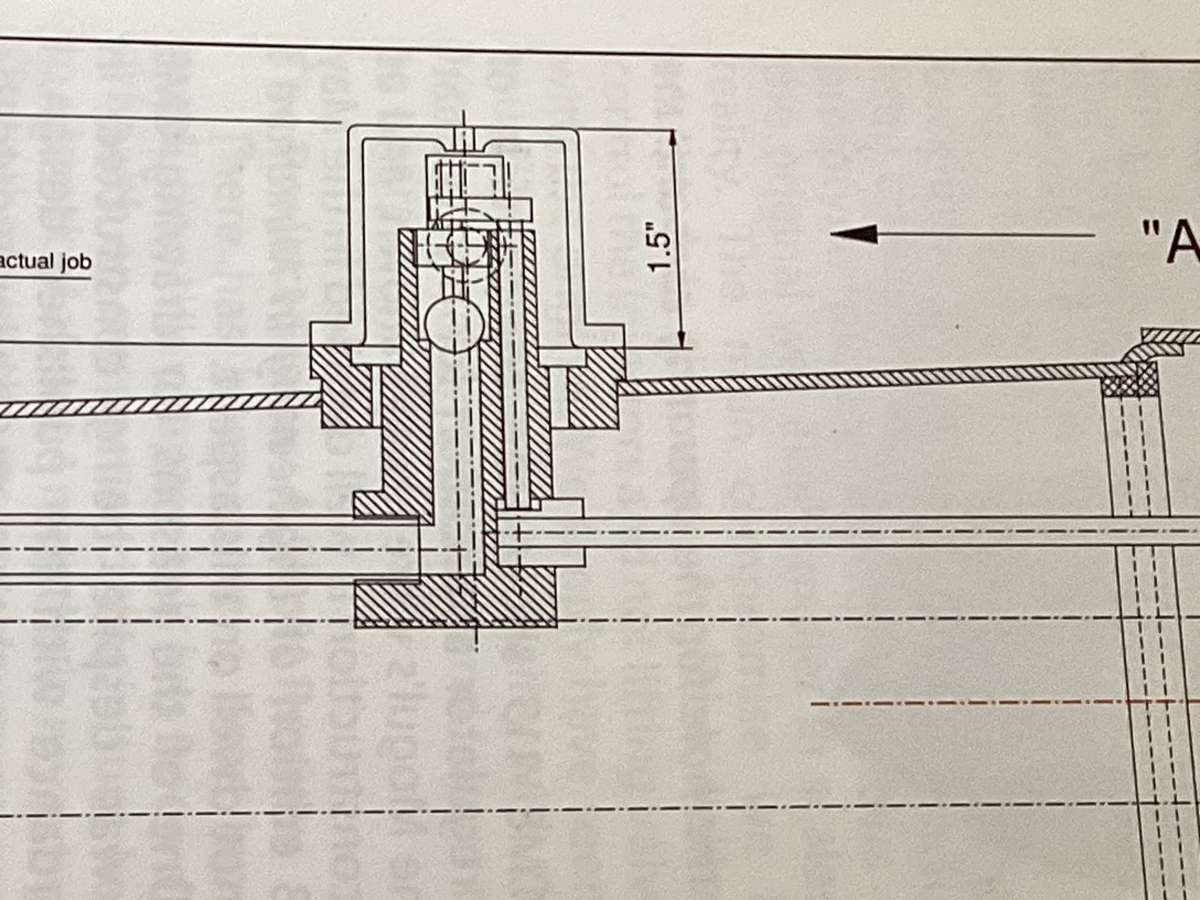
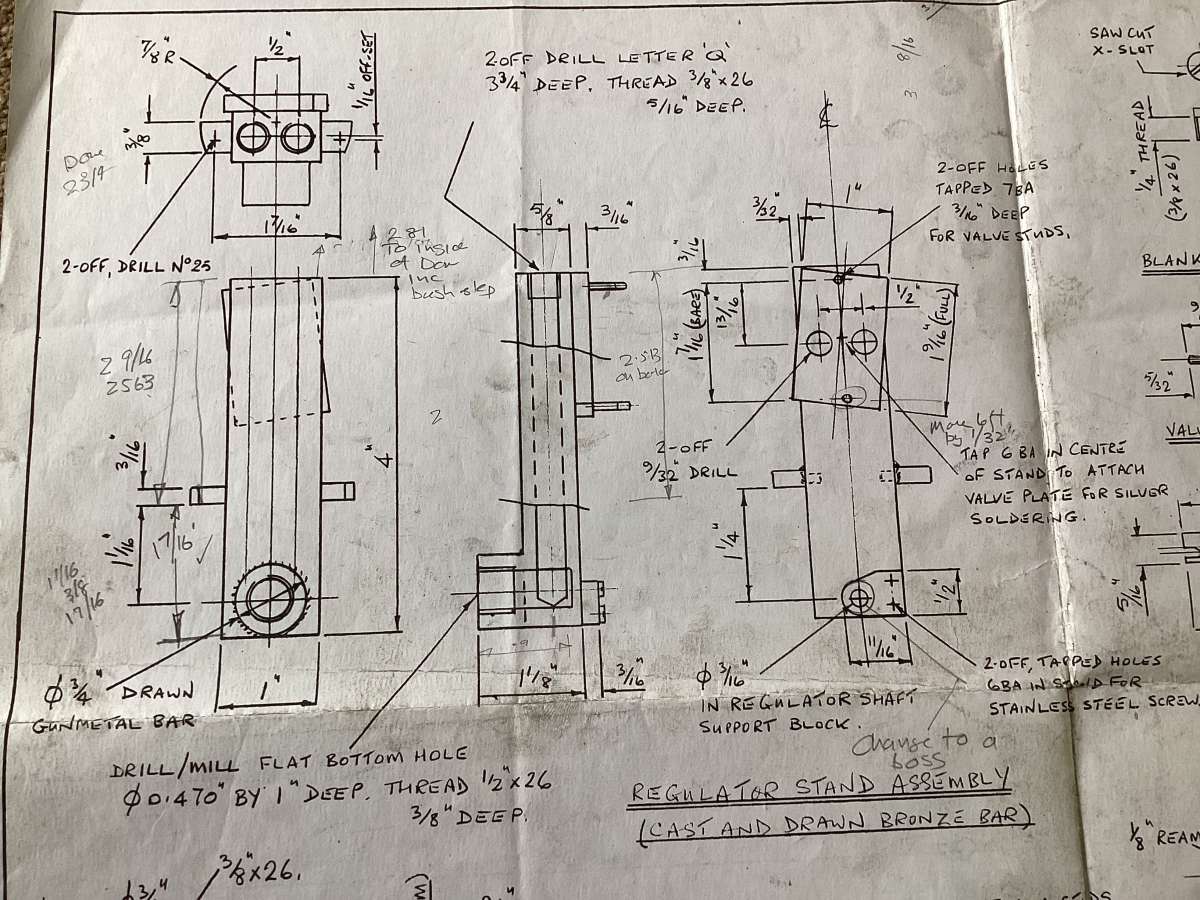
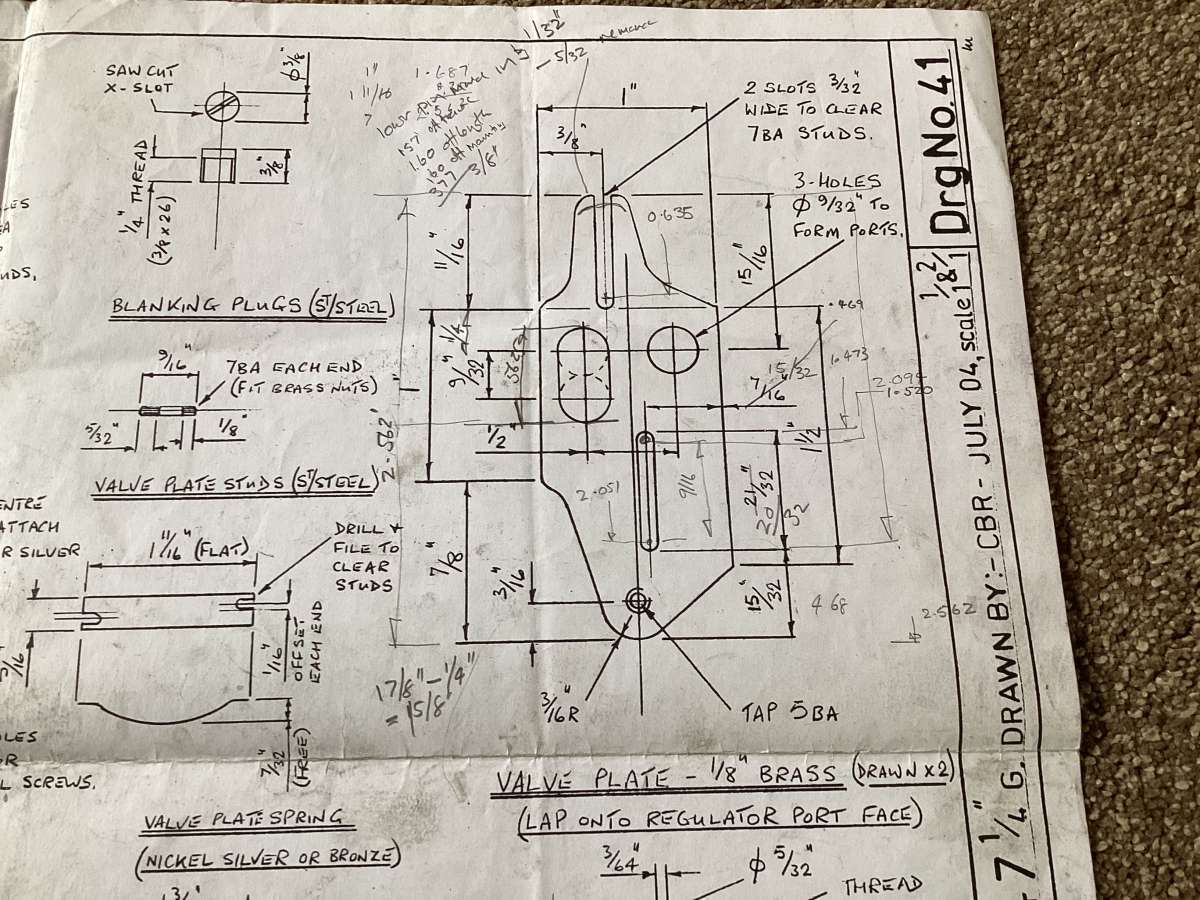
included.  This one uses a 3/8 ball , I think I would need a 1/2”   However I don’t really want to start re engineering unless all else fails

                #839531
                Nigel Graham 2
                Participant
                  @nigelgraham2

                  No, there’s so much work gone into it that we don’t want to replace the whole regulator if we can cure the problem!


                  Stephen –

                  Aha!

                  You could be on the case there, now Zan’s shown us the drawing.

                  It recommends lapping the Valve Plate and Port Face to each other.

                  That is a recipe for introducing tiny concave / convex faces that separate the components when operated. Especially given the Valve Plate is an odd shape and a lot bigger than the Port Face, making it difficult to lap them together to sufficient accuracy.


                  {Ghastly dimensioning “system” that CBR used for this odd-shaped part!}


                  Zan – 

                  Try as Stephen suggests: lapping the two parts on a third, flat surface.

                  I’d test them first by blueing the surfaces then rubbing them on the lapping-plate to see if that shows anything. Use marking-out fluid or felt-tip pen.

                  …..

                  [The old, or original, way to make surface-plates and similar was to scrape or lap three at a time to each other in rotation: Plate A to Plate B, B to C, A to C.  Using just two risks a concave / convex match.]

                  ……

                  Regarding the regulator not closing on the run, if that happens pull the reverser straight into mid-gear and apply the brakes. Not the opposite gear except in emergency, as that can damage the locomotive.

                  I had to do that on our club’s loco on its first ever event – for a somewhat similar fault though its regulator is the rotating disc type. I forget what we eventually diagnosed, but I think it was slight un-flatness. We didn’t need replace anything, just improve what was there.


                  #839552
                  Charles Lamont
                  Participant
                    @charleslamont71117

                    I can’t think why Nigel suggests blueing using marking out fluid or a felt tip. Testing for flatness and fit realy needs ‘engineers blue’ which is quite different, being a paste of fine pigment carried in a grease, such as ‘Stuarts Micrometer’ brand.

                    #839608
                    Martin Johnson 1
                    Participant
                      @martinjohnson1

                      Make sure the pivot and slot have plenty of play.  If either are a bit tight they can tilt the puck and hance the leak.

                      Alternatively, inspect all the non moving joints from regulator body onwards in case you are barking up the wrong tree.

                      Martin

                      #839638
                      Dave Wootton
                      Participant
                        @davewootton

                        Hi Zan

                        No need for a search or to be signed in on Proboards to find the post, Just go to page 2 of General Chat, and it is at present the top posting ” Regulator” original thread started by Miken, on page 2 of that post.

                        Dave

                        #839694
                        Nigel Graham 2
                        Participant
                          @nigelgraham2

                          Charles – 

                          I know the marking paste you mean, but made my suggestion as purely a preliminary test of flatness.

                          #839719
                          Charles Lamont
                          Participant
                            @charleslamont71117

                            A helpful feature of a model loco regulator is an initial very fine opening. On yours, the rounded ports mean it opens initially with a lenticular crack, which is good, but I think it might be improved by filing a small V-shaped notch at the bottom of the oval port.

                            #839752
                            Nigel Graham 2
                            Participant
                              @nigelgraham2

                              With respect, I think it might be improved rather more usefully by identifying and curing the leak!

                              At least some full-size regulator designs have pilot valves or ports to ease the effort needed to operate them; but I doubt the real value of such refinements in miniature. This design as it stands, (based on the original?) has something of that graduable-aperture quality already.

                              Besides, extending the port as you suggest will almost certainly need the control modifying…. and what else?

                              Cure the leak, not the design!

                              #839772
                              MichaelR
                              Participant
                                @michaelr

                                You have a seal at 50psi and you say it leaks at a higher pressure, just a thought have any of those pivot studs / stud broken through into the steam port and causing a weep into the port at the higher pressure.

                                MichaelR

                                #839844
                                Zan
                                Participant
                                  @zan

                                  Hi guys been trying to find a solution and not been online , thanks for  all the advice but:-

                                  Dave I had eventually found the posts  on the other website and  tried the top hat PTFE bushes thinking this as you say would solve any lack of a poor mating fit mating fit between the body and the valve.   I was very careful with the finish on the working face.
                                  no different yet again which was a real surprise, I tried a thicker rim and larger diameter with a good clearance into the valve holes for a second attempt, failed again.

                                  checked the connection to the superheaters, no problem

                                  lapping done on a glass plate and on a precision ground flat. No difference used  engineers  blue to test fits but I didn’t use the fitting of three  item method as in producing surface plates ( in one session )

                                  eased all the pins to check for binding  pivot studs bottom in the holes

                                  Never really had a true seal , once the drops of water starts with any rapidity at about 50 psi it then drops slowly continuing to drip

                                  iv just made a wood model of a new regulator based on Gordon Smith’s design to ensure it would go in it’s very tight. I have  done most of the cad work, but got to modify again as the 4.1mm and over 3” deep  hole for the push rod would be virtually impossible to a keep straight, the side walls would have to be only 1/16” wide,  but it wouldn’t fit it’s the extra width and it won’t fit through the bush. ( see my first photo for the setup)
                                  The rod will now be in guides on the rear face of the regulator  making the body 5/16” less front to back.    I have a suitable bar of lg2 (sae660?) for it, which I got for a song years ago, just checked the current price — couldn’t believe it! Over £50!

                                  The main difficulty with this design is ensuring a good seal with a 1/2” ball, would a PTFE seat seal  pressed in work? PTFE does tend to expand under load and would this seal round its edges?

                                  OH……just thought about the plugs at the top, could they be the problem? As it’s all stripped down yet again,  I’ll  clamp a plate with a neoprene gasket onto the body to seal the ports then hydraulic  test from the outlet boss  that will also check all the silver solder joints which was suggested as a possible fail point made earlier.


                                  #839857
                                  Nigel Graham 2
                                  Participant
                                    @nigelgraham2

                                    The plugs – yes – examine them. One might be leaking down its thread.

                                    Seal it with ‘foliac’ or similar high-temperature coumpound. Not PTFE tape, which can send tiny strands into untoward places.

                                    Once the engine has been steamed that screwed joint might seal itself further.

                                    #841834
                                    Zan
                                    Participant
                                      @zan

                                      Solved!!!!

                                      it took a long time with several different tests and modifications.
                                      the final solution proved to be the top hat bushes and a new valve plate.

                                      The photo shows an acrylic trial plate to ensure the PTFE bushes would seal the original holes in the regulator body. An initial trial with the bushes in the original valve plate as in the intro photos proved to be no good as the regulator lever was closed where it was open, and thus removed access to valves on the boiler manifold.


                                      as it was there was only just enough room to get things in place, seal the delivery holes and allow a steady opening.  Even now the holes are not fully uncovered.

                                      i had a good look at Gordon Smith’s design with the poppet valve, and drew it up in Fusion 3d.  The trouble was it only allowed a very small opening round the ball and not a lot of lift. The net result was a fully open setting having only 8 to 10% of the original design

                                      guys

                                      All in all its a great relief and final assembly of the loco  to completion SHOULD BE relatively easy…..

                                      Thanks for all the help

                                      IMG_1401

                                      #841838
                                      Zan
                                      Participant
                                        @zan

                                        Ps Gordon Smiths great design, EIM august  2012

                                        #841842
                                        Colin Teasdale
                                        Participant
                                          @colinteasdale

                                          Perseverance pays off, so well done for keeping at it and getting it solved!

                                        Viewing 19 posts - 1 through 19 (of 19 total)
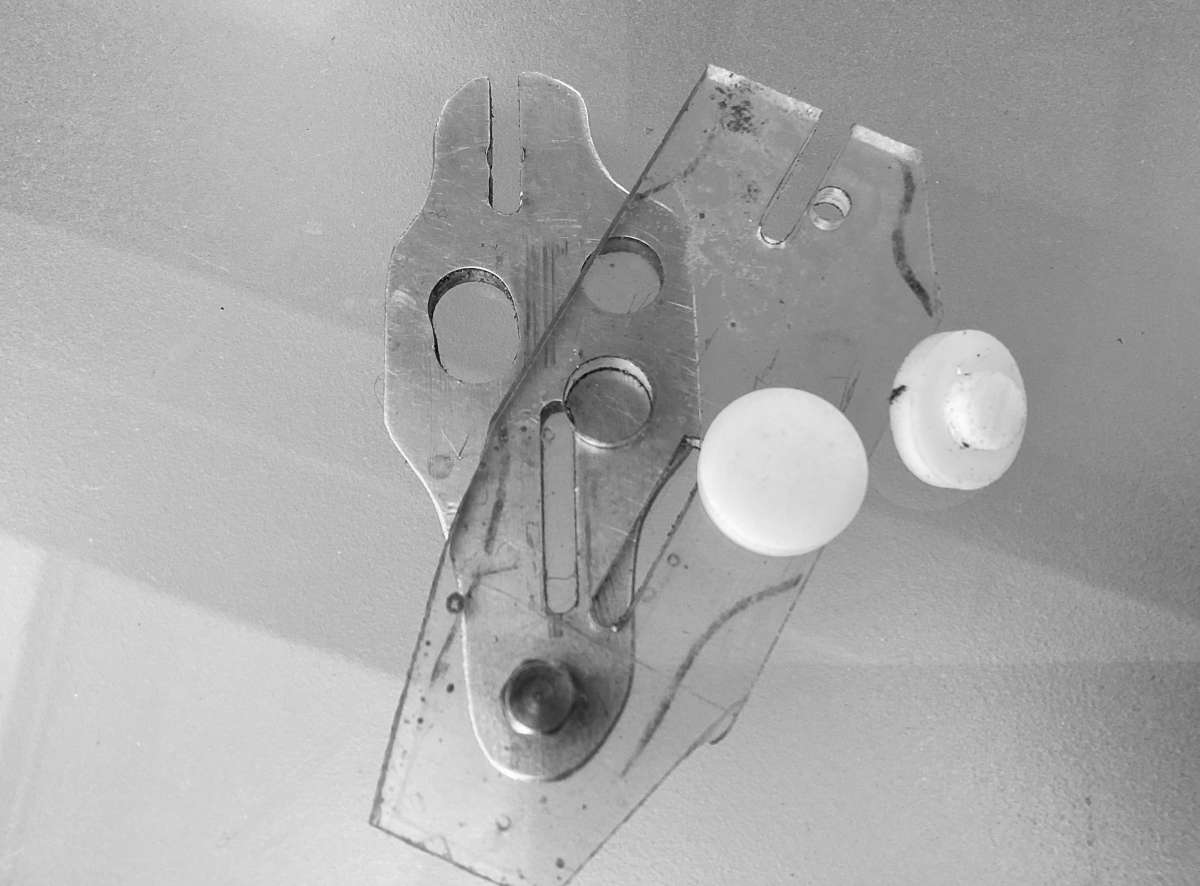
                                        • Please log in to reply to this topic. Registering is free and easy using the links on the menu at the top of this page.

                                        Latest Replies

                                        Viewing 25 topics - 1 through 25 (of 25 total)
                                        Viewing 25 topics - 1 through 25 (of 25 total)

                                        View full reply list.