What Did You Do Today 2026

What Did You Do Today 2026

Home Forums The Tea Room What Did You Do Today 2026

Viewing 25 posts - 126 through 150 (of 152 total)
  • Author
    Posts
  • #855541
    KEITH BEAUMONT
    Participant
      @keithbeaumont45476

      Sory, cant see how to do it.

      Keith

      #855576
      Nigel Graham 2
      Participant
        @nigelgraham2

        I have returned to servicing my Myford VMC mill, the subject of my query on the ‘Manual Machine Tools’ section.


        I’ve finally made the quill slide nicely in the casting. There were a few bruises in it, which I removed by careful use of a flat, very fine stone. There was also a faint but peculiar longitudinal “flat” that might be scarring from something (the quill lock perhaps); and a general feeling that either the quill or the bore, or both, were not truly cylindrical radially and axially.

        The pinion teeth were bunged up with solidified grease. White spirit, an old paint-brush and where necessary, gentle scraping with a small screwdriver sorted that.

        To help fit the new radial bearing, in place of the original I had to remove to replace the worn-out R8-tool locating pin hidden under it, I put the spindle in the freezer overnight. (I fitted the new pin under the easily-removable thrust-bearing instead.)

        Then used a large puller and two specially turned steel pressure-pads. I was going to put this assembly in the freezer with the oven-ready chips again tonight, to shrink it slightly for putting back into the quill. Then realised the large amount of frost that forms on it would have nowhere to go when it thaws, once inside the quill. Where I don’t want water, and nor does it.

        So it’s in the coollest part of the house (front porch, North facing), and I’ll use some of this excess of Old Sol to expand the quill just that tiny bit it can to help.*

        The top of the spindle carries a notched nut in a shallow recess. I don’t have the proper tool for that so concocted a peg-spanner by hacksawing and filing a slice of old scaffold tube, to hold in a large die-holder. (Make three more and paint two black, and there are the rooks for a new chess-set!)

        ””’

        *Expansion…

        Out of curiosity.

        Am I right thinking that the expanded diameter of a heated metal cylinder is found by applying the normal linear-expansion formula to the cold circumference, then dividing the new circumference by pi?


        #855589
        Diogenes
        Participant
          @diogenes

          Keith, if you click on Mike’s name above, it’ll take you to his ‘profile’ page where directly underneath the main grey header-strip / banner thingy there are two faint grey rectangular ‘buttons’ that offer the option of a public or private message..

          HTH

          #855594
          John Haine
          Participant
            @johnhaine32865
            …….

            “*Expansion…

            Out of curiosity.

            Am I right thinking that the expanded diameter of a heated metal cylinder is found by applying the normal linear-expansion formula to the cold circumference, then dividing the new circumference by pi?”

            If you really want to but you only need to apply the formula directly to the diameter. Your way you first multiply diameter by pi then the coefficient then divide by pi again.


            #855605
            KEITH BEAUMONT
            Participant
              @keithbeaumont45476

              Thank for help ,HTH. I have sent a  few in the past OK, but at the moment am not my “old self”as, apart from the heat, I have just spent nearly 3 weeks in Hospital due to a nasty reaction to the Covid booster

              #855613
              KEITH BEAUMONT
              Participant
                @keithbeaumont45476

                Mike , Have sent you a PM.

                KEITH.

                #855630
                alecs
                Participant
                  @alecs
                  On KEITH BEAUMONT Said:

                  Thank for help ,HTH. I have sent a  few in the past OK, but at the moment am not my “old self”as, apart from the heat, I have just spent nearly 3 weeks in Hospital due to a nasty reaction to the Covid booster

                  Glad to hear I’m not the only one with whom the Covid booster does not agree. And glad to hear you are back home. I haven’t had to go to hospital but every year it knocks me off my feet for 10 days or so and I swear I will never do it again, but somehow my doctor talks me into it.


                  #855694
                  Alexander Smith 1
                  Participant
                    @alexandersmith1

                    Re Covid booster reaction.

                    Several years ago, I had a reaction to the Covid booster (skin rash which persisted for months). I blamed it on the adjuvant which they had just included in the vaccine that year to make it more effective for us oldies (over 65). For a few years my GP was happy for me to have the under-65 vaccine and I had no problems. Recently, I haven’t bothered and have had no problems.

                    Might be worth asking your GP if you can try the under-65 vaccine – it might help.

                    Sandy


                    #855703
                    Nigel Graham 2
                    Participant
                      @nigelgraham2

                      John Haine –

                      Circle expansion: Thankyou.

                      ….

                      Well, I re-assmebled the milling-machine’s quill and spindle but something seems odd. It is very hard to know what’s actually happening inside a cylinder with three bearings in it and I have no idea if there should be any pre-load on the threst-bearing, nor what it should be, nor hwo to measure it.

                      I am sure it didn’t quite go back together as it came apart because the bottom, radial, bearing is now sunk into its recess, the top one into its recess, yet the retaining nut near the top end of the spindle is hanging on by just one turn although screwed down as tight as it will go. It’s as if the spindle has shrunk by about half an inch! The innards are hidden so I don’t know what’s happened in there.

                      Still, it rotates freely, and there is no end-play. Though thinking about it, there can be no end-float anyway, not in an arrangement like this uses with the bearings sunk into what are effectively counterbores.

                      Nothing for it but to re-grease the moving parts (there is no way to lubricate this thing properly without dismantling it), re-fit the assembly to the machine and hope for the best.


                      The quill spring holder is held to the casting by four counter-bored M5 screws. I think the originals are actually an almost identical ANC size, but I lost one. To faciliate rotating it to load the spring I tapped two of its holes M6 (the tapping size is 5mm) for screws to act as temporary peg-handles.

                      I switchd the machine on and it ran smoothly, admittedly with no load, so I assume it’s survived. The quill even just about returns by spring power – I set it approximately balanced but without tooling.

                      A couple of small parts to re-fit, then it’s a matter of re-tramming the head.

                      #855709
                      Diogenes
                      Participant
                        @diogenes
                        On Nigel Graham 2 Said:

                        .. …I am sure it didn’t quite go back together as it came apart because the bottom, radial, bearing is now sunk into its recess, the top one into its recess, yet the retaining nut near the top end of the spindle is hanging on by just one turn although screwed down as tight as it will go. It’s as if the spindle has shrunk by about half an inch! The innards are hidden so I don’t know what’s happened in there… ..


                        It sounds as if one of the bearing ‘inners’ may not have ‘gone home’ on it’s seat on the spindle correctly – Nigel I hate to be a bore but you should summon up the will to investigate & remedy before you run it up..

                        *the ‘half inch’ you mention – that would be about the thickness of a bearing seat..? check you don’t have a half inch more spindle showing at the bottom?

                        #855716
                        Nicholas Farr
                        Participant
                          @nicholasfarr14254

                          Hi Nigel Graham 2, I don’t know if this Myford VM-C service manual would be of any help.

                          Regards Nick.

                          #855843
                          Nigel Graham 2
                          Participant
                            @nigelgraham2

                            Thankyou Nick.

                            Actually I have copy of that (one of Tony Griffiths’ photocopies).

                            Note that it shows only the Morse Taper spindle, not the R8 equivalent, though I assume the spindle differs only by the bore.

                            Nor does it advise how to service the machine. It’s more a specifications and parts list than a rival to Haynes, with its famous assumption that machinery always goes back together just as it came apart.

                            #855886
                            Nigel Graham 2
                            Participant
                              @nigelgraham2

                              Diogenes –

                              Sorry, I’d not spotted your post earlier.

                              No, the spindle is where its it should be relative to the bearing. The latter seats against a flange on the shaft.

                              The “half-inch” is only a bit exaggerated. I’m pretty certain most of the retaining-nut thread was exposed previously. I should have measured things before dismantling but having studied the drawings saw no reason to do so.

                              The problem with this bearings recessed into both ends of a cylinder, is you cannot inspect the innards without pulling it apart, which is very difficult to do on this example and likely to ruin the bearings in the process. Removing the spindle and its bearings requires considerable force on the top end of the spindle, so loading the inner race of the lower radial bearing. That bearing is was an extremely tight force-fit on the shaft, and fairly tight in the quill, so thinkinhg about it, the spindle cannot move axially and the thrust-bearing is either under considerable compression or does nothing!

                              I think the machine was designed to be relatively inexpensive to build and basically not repairable. Myford does not sell spares for these mills apart from cross-slide screws and dials, although the bearings are stock commercial items. Nor doies it website offer any repairs service, otherwise I could have entrusted the work to them. (Delivering only the head!)


                              @@@@@

                              However, this is the “What Did You Do Today” thread.

                              A day at the Club track, to give the club’s loco (a “Wren”) its boiler’s ‘Steam Accumulation Test’ combined with testing modifications to the vacuum-brake system.

                              This revealed some small leaks in auxiliary plumbing joints, including possibly explaining why the ejector was not producing any nothing.

                              So after tea an evening in my own workshop, on pipework mending, and injector and ejector cleaning.

                              +++

                              Opened the kitchen door and there lay an immature gull. The horrible creature / poor thing had fallen from its nest way up on the chimney. It’s at learning-to-fly stage but as it shuffled away from me by using its wings and one leg I realised it had broken the other leg in the fall; that limb sticking out at a strange angle.

                              It could be anywhere in the garden by morning, putting me at risk of attack from Mr. or Mrs. Herring-Gull as they are too dozy to see I am harmless. I managed two or three trips to and from the workshop without incident, and prepared to use the locked side gates if necessary.

                              Its sibling had already fallen too, but is unhurt and existing on my neighbour’s ground-floor kitchen, a single-storey “South Wing” with pitched roof. The natural home for these animals is a ledge on a sea-cliff, and having watched how they learn to fly, I can only guess the fatality rate for the young birds must be very high.

                              So what now? I think there comes a time when the parent gulls actively shoo the youngsters away, or at least abandon them. That appeared to be happening, noisily, around the nearby roofs. I can’t look after it, but left alone it might die slowly and painfully from its injury plus thirst and starvation. I think there is a local animal rescue charity that can handle these things.


                              [PS. I think there’s a football match on somewhere. It’s nearly 1am but I can hear occasional choruses of shouts and whoops from the local screen-infested pub.]

                              #856036
                              duncan webster 1
                              Participant
                                @duncanwebster1

                                Spent several hours writing some code to tell my chiming mechanism what time it is via the USB rather than having to press a button at exactly 13:00. I always forget, so it’s been sat on top of the cupboard inactive for days.  Now that I’ve got the code written I don’t see why it took me so long.  Put it down to general incompetence. Then got distracted into putting a curtain rail back up, must tell 3 year old grandson that swinging on curtains is not a good idea

                                #856258
                                jaCK Hobson
                                Participant
                                  @jackhobson50760

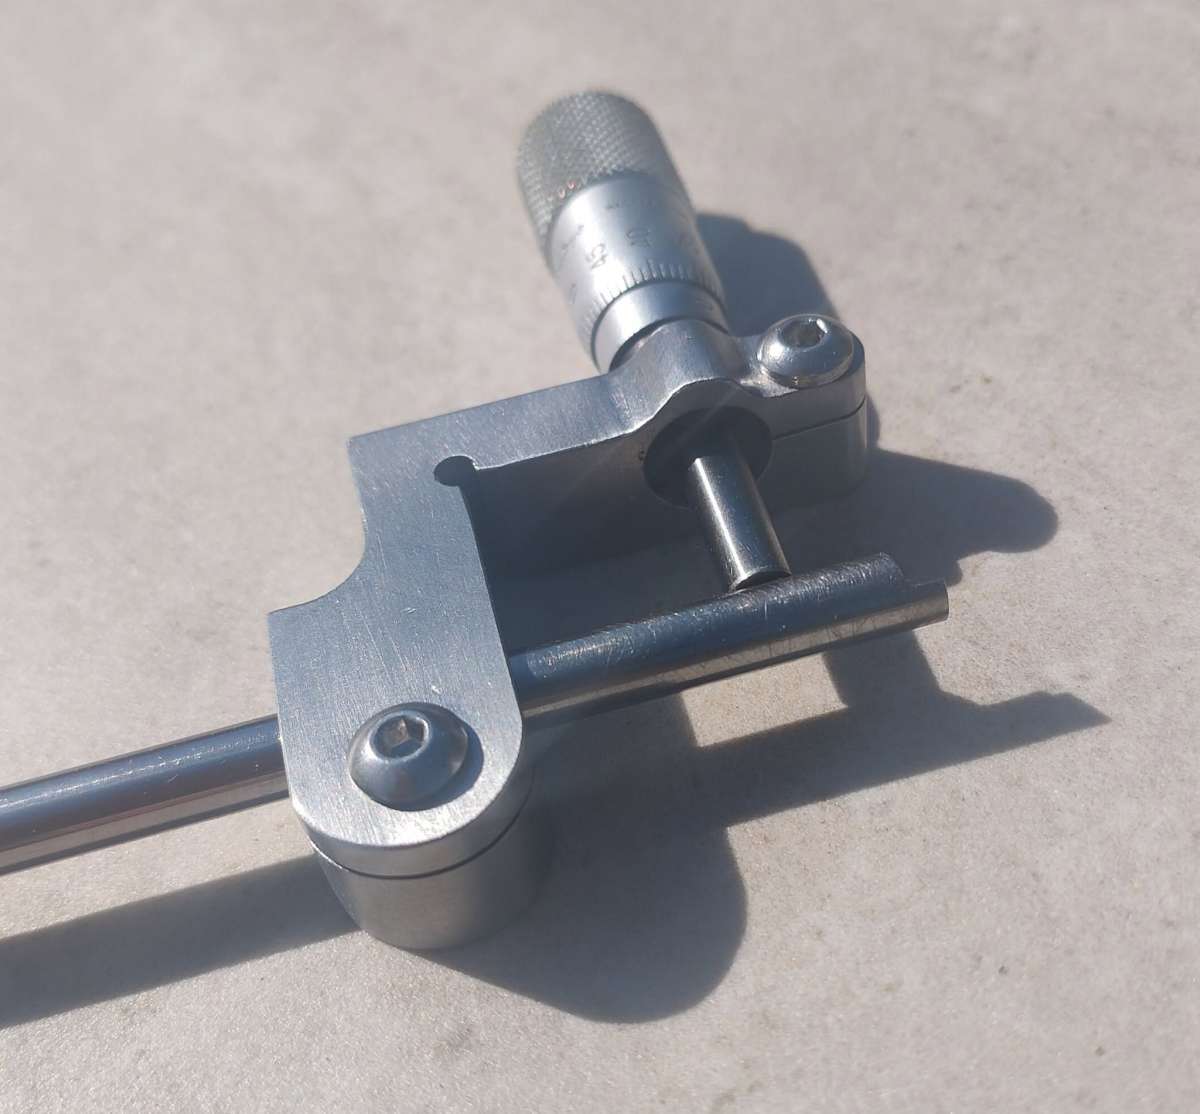
                                  Spent some time on the centre micrometer I bodged to make it look a bit better.

                                  743940520_10243510069831943_1688432836974670175_n

                                  #856338
                                  Nigel Graham 2
                                  Participant
                                    @nigelgraham2

                                    Hardly a “bodge” to start with given the way you have finished it, Jack!


                                    Club business for me. I brought a new steam pipe back from test on the loco to re-solder a leaking joint. Did that last night on my return from the club.

                                    Today – harvested assorted pipe-fittings and made a Test-Set, Hydraulic that uses the hand-pump in my steam-wagon’s tank. Thereby tested the repaired pipe to about 1.2 X w.p. (it supplies steam to the injector so is partially open-ended).

                                    It passed, so I delivered it and the test fittings to a fellow-member and one of the Boiler Inspectors, so he could verify it if wished before re-installing it.

                                    Put the world to rights with him for an hour then celebrated with a delicious coconut ice-cream cone on my way back to the bus-stop. It’s a bad do if you can’t have an ice-cream on your own local sea-front in Summer!


                                    Apart from D.A.G Brown detailing making and using dedicated injector and ejector test-sets in his book, and occasional mentions of testing superheaters, I have not seen much about testing the auxiliaries and associated pipes. Failure of a small pipe-joint is unlikely to have serious consequences though the standard test protocol does include the fittings with the boiler, to ensure proper working.

                                    If nothing else a simple hydraulic test to each sub-assembly before fitting it, may avoid the frustration of its first use ending in having to remove and repair it; and your engine can lend its own pump for this and for a prelimary boiler test in preparing for the formal certifying one.


                                    I centred this pipe-test set around a 1/4″BSP cross-piece and unions lurking in my come-in-handy collections.

                                    One branch takes a pipe connecting directly to the pump outlet, and also acting as a column to raise the fittings above the tank rim. That directly opposite (so vertically above) it holds my own 2″ dia, 0-300psi pressure-gauge.

                                    The third has an adaptor with removable sealing-cap, to suit the club’s pressure-test pump. This pump is a commercial plumbing-trade item.

                                    The fourth spout holds the test-piece itself via a suitable adaptor.

                                    The arrangement can be altered if necessary, using appropriate caps and connectors.

                                    #856349
                                    duncan webster 1
                                    Participant
                                      @duncanwebster1
                                      On duncan webster 1 .
                                      ……. Then got distracted into putting a curtain rail back up, must tell 3 year old grandson that swinging on curtains is not a good idea

                                      Well that didn’t go as planned. Over the window is a Catnik lintel, which has perforations in the web to allow about 20mm of plaster. I managed to cut down some rawlpugs to mount the curtain rail, which held for years until 3 year old grandson got involved. The latest cunning plan was to glue some 100mm dia wooden pads to the plaster and screw the brackets to those. It held for a couple of hours, but the skim plaster has now parted company with the browning depositing the whole shebang on the floor. Back to the drawing board. I’ve temporarily mounted the brackets higher up above the lintel, but this does not meet with distaff approval. I need some way of securing to the steel lintel. Any good ideas? Knowing my luck if I try drilling through I’ll come halfway into an existing perforation which will drag the hole sideways. Last resort is to chip away the plaster, drill and tap holes where perforations aren’t (or perhaps use those spring out wings plaster board fixings), bolt wooden pads on and plaster round, but it all feels a bitt OTT.

                                      #856359
                                      Michael Gilligan
                                      Participant
                                        @michaelgilligan61133

                                        Toggle bolts [if that’s the correct term] should do the job

                                        I will search for a picture of what I have in mind.

                                        MichaelG.

                                        .

                                        https://www.screwfix.com/p/easyfix-spring-toggles-5mm-x-50mm-20-pack/4257x

                                        #856369
                                        Mark Easingwood
                                        Participant
                                          @markeasingwood33578

                                          Welcome to my world.

                                          If they are the original green painted catnic lintels, then they were supplied with clips to secure a roofing lath to the grid of perforations. These were often “missed” because the plasterers/brickies didn’t have any laths, or the clips were lost. The laths may be present, and you might find them by systematic probing by tapping a nail through the plaster.

                                          When I did mine I chopped out a 3 or 4 inch square of plaster and self tapped a square of quality plywood, (might need two layers), plastered over them and then screwed into them. 25 years on they are still solid.

                                          Good luck.

                                          Michael the perforations are only about 3mm dia.

                                          #856379
                                          duncan webster 1
                                          Participant
                                            @duncanwebster1

                                            No lath on the catnik, I know because I fitted them when the extension was built. Originally we had curtain rail with loads of brackets, but now fashion dictates we must have the round things with rings, so only 3 brackets

                                            Those things Michael linked to are what I referred to as spring out wing fixings.

                                            Looks like I’m chipping the plaster out, what a pain.

                                            #856384
                                            Michael Gilligan
                                            Participant
                                              @michaelgilligan61133
                                              On duncan webster 1 Said:

                                              […]

                                              Those things Michael linked to are what I referred to as spring out wing fixings.

                                              […]

                                              Sorry, I missed that line … it’s been a difficult day

                                              MichaelG.

                                              #856799
                                              Speedy Builder5
                                              Participant
                                                @speedybuilder5

                                                Saved by a carbide end milling cutter – There I was, just putting a 1/8″ diameter centre into a piece of steel work that had taken 4 hours to prepare and ‘ting’ the pilot end snapped off. I tried tapping it out, using a dental probe, even my wife’s micro crochet hook for fine lace wouldn’t hook it out.  Then I remembered that a friend had given me a few carbide milling cutters used for shaping glass based circuit boards.

                                                In for a penny and it’s the first time I have attempted drilling out HSS drills. Great success and a happy boy once again.

                                                #857284
                                                jaCK Hobson
                                                Participant
                                                  @jackhobson50760

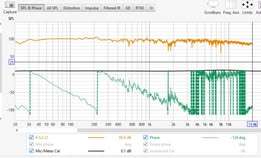
                                                  I’ve been down the workshop for a while, but maybe otherwise off topic for this forum. I’m trying to measure/calibrate some speakers I’ve put together. Another big learning curve.

                                                  754298214_10243671164899219_6851340602634704625_n751871017_10243669774104450_4527325278023421095_n

                                                  This has got me doing tests on my hearing – I’m pretty deaf above 10Khz

                                                  #857324
                                                  bernard towers
                                                  Participant
                                                    @bernardtowers37738

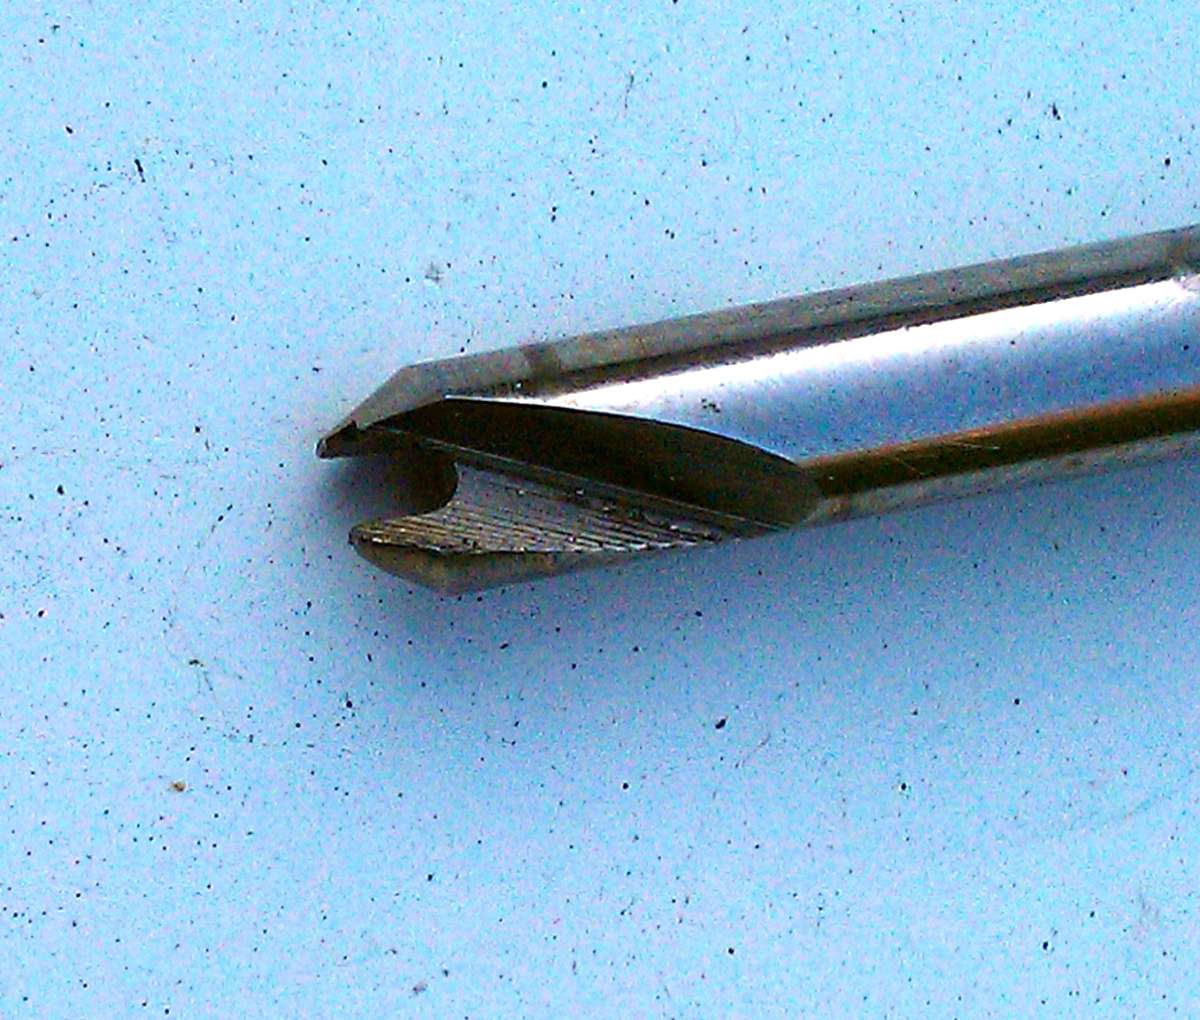
                                                    Hi Speedy builder, it for that very reason that I very rarely use centre drills any more. I use the 1/8” shanks of small carbide drills that are broken and grind 3 facets at 60deg which seems to be all that’s needed for most drills. My drills are all 4 facet sharpened.

                                                    #857331
                                                    Ian P
                                                    Participant
                                                      @ianp

                                                      The end off a 1/4″ centre drill seized is some 316 stainless (after I had foolishly completed some external diameters) and I did not want to start all over again. I Dremel’d a notch and was able to use this to free the snapped off tip.

                                                      Ian P

                                                      Reground Centre Drill

                                                    Viewing 25 posts - 126 through 150 (of 152 total)
                                                    • Please log in to reply to this topic. Registering is free and easy using the links on the menu at the top of this page.

                                                    Latest Replies

                                                    Home Forums The Tea Room Topics

                                                    Viewing 25 topics - 1 through 25 (of 25 total)
                                                    Viewing 25 topics - 1 through 25 (of 25 total)

                                                    View full reply list.