Had Another Go
Had Another Go
- This topic has 358 replies, 22 voices, and was last updated 19 February 2025 at 22:51 by
 Nigel Graham 2.


- Please log in to reply to this topic. Registering is free and easy using the links on the menu at the top of this page.
Latest Replies
-
- Topic
- Voices
- Last Post
-
-
Surface grinders choice
Started by:
greenhills
in: Workshop Tools and Tooling
- 9
-
26 June 2026 at 23:20
Mark Rand
-
Solar panel
Started by:
duncan webster 1
in: Electronics in the Workshop
- 11
-
26 June 2026 at 23:03
Mark Rand
-
Myford VMC Spindle Advice Please.
1
2
Started by:
Nigel Graham 2
in: Manual machine tools
- 10
-
26 June 2026 at 22:30
Nigel Graham 2
-
Traction Engine Metal Colours
Started by:
Dr_GMJN
in: General Questions
- 1
-
26 June 2026 at 21:11
Dr_GMJN
-
Identifying the pitch of threading inserts
Started by:
Bill Phinn
in: Workshop Tools and Tooling
- 5
-
26 June 2026 at 20:55
JasonB
-
What Did You Do Today 2026
1
2
…
4
5
Started by:
JasonB
in: The Tea Room
- 35
-
26 June 2026 at 20:06
Wade Beatty
-
Using VFDs on old motors
Started by:
Andrew Skinner
in: Electronics in the Workshop
- 6
-
26 June 2026 at 19:59
Robert Atkinson 2
-
Introducing myself
Started by:
anoddcog
in: Introduce Yourself – New members start here!
- 4
-
26 June 2026 at 18:21
JasonB
-
Running 380V 3-phase motor on 230V 1-phase
1
2
Started by:
jimalm
in: Electronics in the Workshop
- 16
-
26 June 2026 at 17:51
Robert Atkinson 2
-
Oiling Lathe Ways
Started by:
Blue Heeler
in: Beginners questions
- 9
-
26 June 2026 at 17:41
David George 1
-
3D Printing in the Home Workshop
Started by:
Colin Heseltine
in: 3D Printers and 3D Printing
- 8
-
26 June 2026 at 17:11
David George 1
-
EmcoF1
Started by:
troy h
in: CNC machines, Home builds, Conversions, ELS, automation, software, etc tools
- 2
-
26 June 2026 at 16:52
troy h
-
Big Blue Chips
Started by:
JasonB
in: Workshop Tools and Tooling
- 2
-
26 June 2026 at 16:39
Baz
-
Testing Single Point Thread Fitment
Started by:
berwick
in: Beginners questions
- 16
-
26 June 2026 at 16:36
Steve101
-
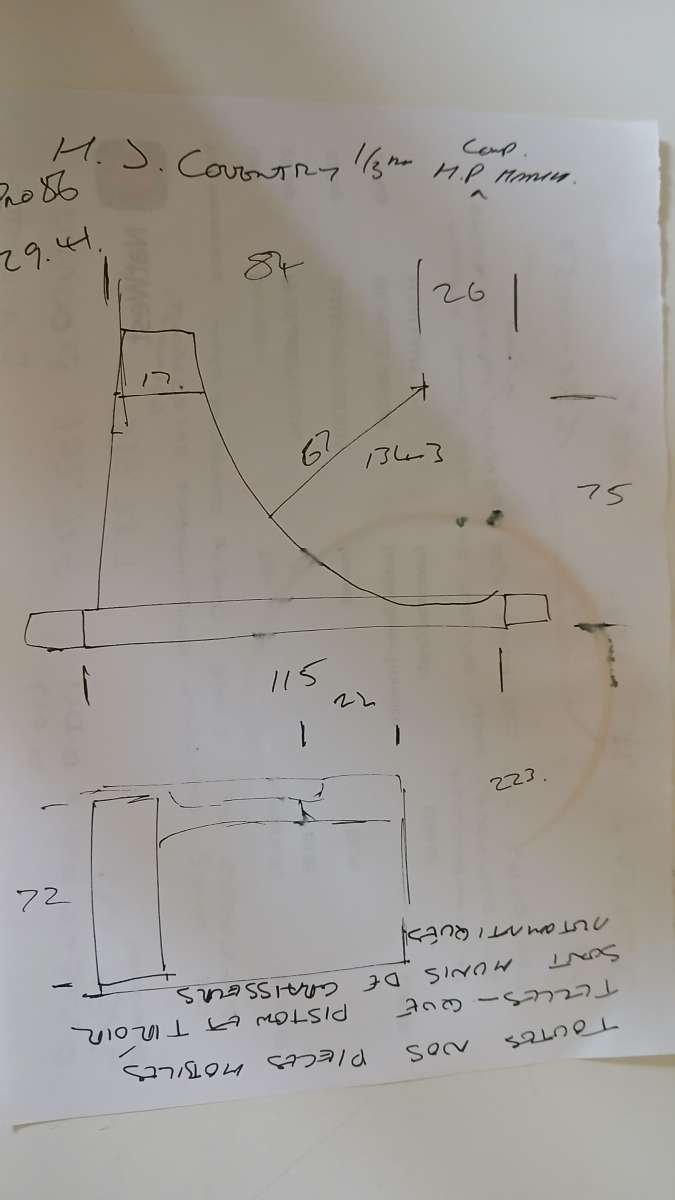
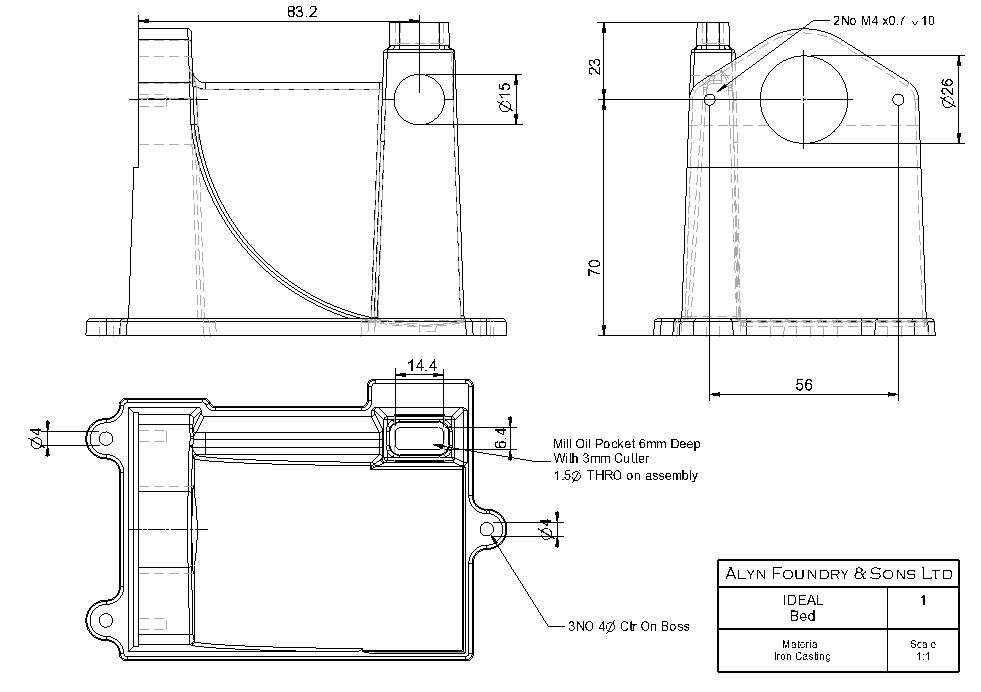
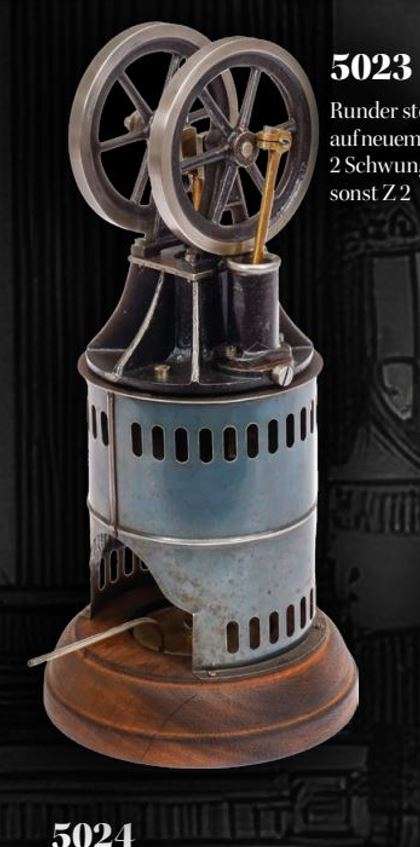
Old Magazines – Countrymans Steam Suffolk Dredging Tractor
Started by:
Tris Summers
in: The Tea Room
- 2
-
26 June 2026 at 15:42
anoddcog
-
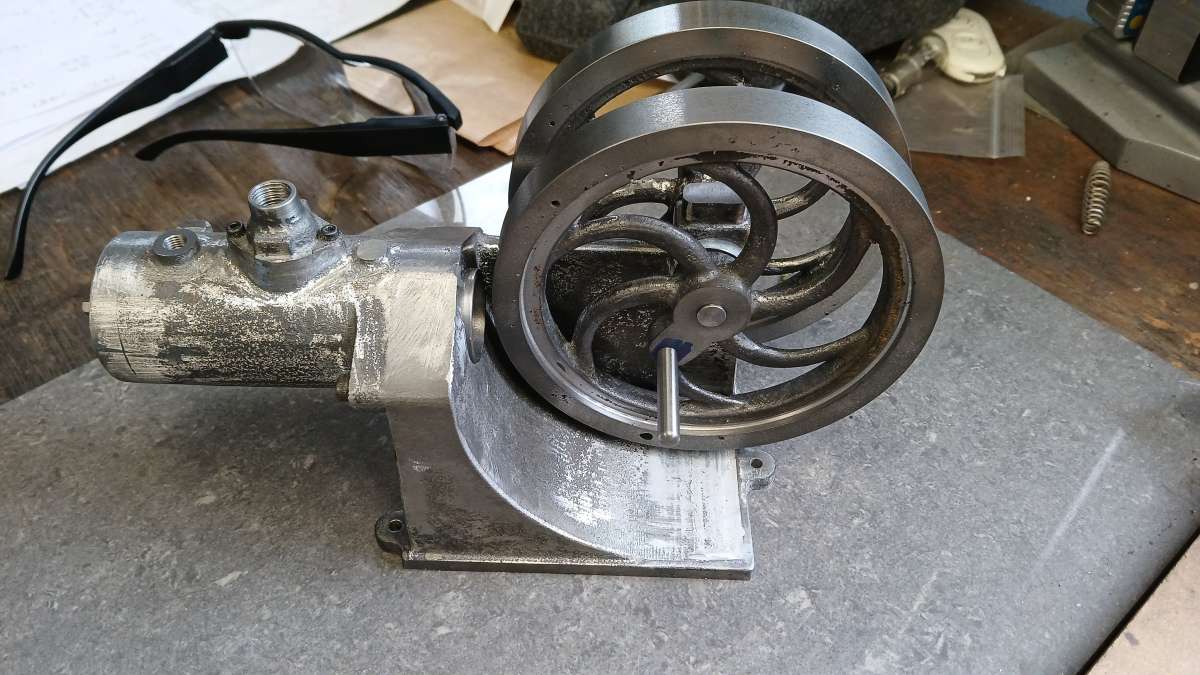
Rob Roy Build
Started by:
Dalboy
in: Locomotives
- 5
-
26 June 2026 at 13:16
Kevan Shaw
-
LINKS FOR WORKSHOP AND MODEL ENGINEERING STLs AND OTHER FILES
Started by:
Neil Wyatt
in: 3D Printers and 3D Printing
- 6
-
26 June 2026 at 13:08
Pete Rimmer
-
Hot radiators in summer
Started by:
Gary Wooding
in: The Tea Room
- 13
-
26 June 2026 at 11:47
JasonB
-
Help please! Workshop clearance
Started by:
ksw
in: General Questions
- 8
-
26 June 2026 at 10:31
Howard Lewis
-
Letters and Parcels Box
Started by:
Michael Gilligan
in: The Tea Room
- 9
-
26 June 2026 at 08:04
Michael Gilligan
-
Emco Compact 5 milling table restoration
Started by:
rikt
in: Manual machine tools
- 6
-
25 June 2026 at 19:36
Pete
-
Rapidor 3XM
Started by:
homecat88
in: Introduce Yourself – New members start here!
- 3
-
25 June 2026 at 18:58
Clive Foster
-
Hot milk variations
Started by:
Gary Wooding
in: The Tea Room
- 12
-
25 June 2026 at 15:31
Oily Rag
-
ML7 – Zeroing the Topslide?
1
2
Started by:
Dr_GMJN
in: Workshop Techniques
- 22
-
25 June 2026 at 14:33
ega
-
How Good Are 3D Printers?
1
2
Started by:
Neil Wyatt
in: 3D Printers and 3D Printing
- 15
-
25 June 2026 at 11:22
Neil Wyatt
-
Surface grinders choice


