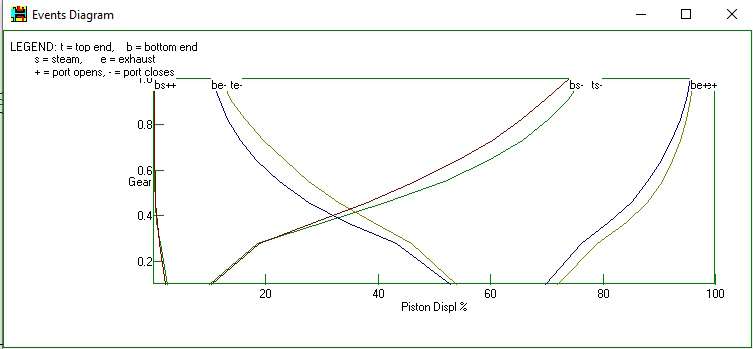
Wallace valvegear simulator
Wallace valvegear simulator
- This topic has 26 replies, 7 voices, and was last updated 21 June 2026 at 21:32 by
 Kevan Shaw.


- Please log in to reply to this topic. Registering is free and easy using the links on the menu at the top of this page.
Latest Replies
-
- Topic
- Voices
- Last Post
-
-
Offen imperial bore mic gauge.
Started by:
Graeme Seed
in: Workshop Tools and Tooling
- 5
-
8 July 2026 at 09:16
JohnF
-
Cotton-covered flex
Started by:
Kiwi Bloke
in: Materials
- 6
-
8 July 2026 at 08:27
bernard towers
-
Impending collapse in NYC
Started by:
Michael Gilligan
in: The Tea Room
- 5
-
8 July 2026 at 08:26
Tony Pratt 1
-
Spindle/bearings fit query for X2 type mill
1
2
Started by:
fingerscrossed
in: Manual machine tools
- 14
-
8 July 2026 at 08:03
teamricky
-
When is a new 90 degree drill not 90 degrees?
1
2
Started by:
Bill Phinn
in: Workshop Tools and Tooling
- 15
-
8 July 2026 at 07:30
Michael Gilligan
-
24cc DIESEL ENGINE FROM SOLID
1
2
3
Started by:
dean clarke 2
in: I/C Engines
- 13
-
8 July 2026 at 06:13
dean clarke 2
-
Flat Surface
1
2
3
4
Started by:
COLIN MARTIN 2
in: Materials
- 36
-
7 July 2026 at 23:34
alecs
-
Hello from new USA member
Started by:
grizmaster
in: Introduce Yourself – New members start here!
- 3
-
7 July 2026 at 22:47
noel shelley
-
Mini-lathe parts source
Started by:
Dunc
in: General Questions
- 2
-
7 July 2026 at 20:37
JasonB
-
McLaren 1,5 inch scale Modl Traction Engine
Started by:
Mike Cooke
in: General Questions
- 1
-
7 July 2026 at 20:08
Mike Cooke
-
Flywheel material
Started by:
Speedy Builder5
in: Materials
- 8
-
7 July 2026 at 19:29
Speedy Builder5
-
Readability / clarity in new combined magazine
1
2
Started by:
Trevor Gale
in: Model Engineer & Workshop
- 19
-
7 July 2026 at 18:24
JasonB
-
Lathe coolant applicators
Started by:
lucerne
in: Manual machine tools
- 13
-
7 July 2026 at 17:32
JA
-
Myford Ml7 Technical Drawings
1
2
3
Started by:
Harry Broadbent
in: Model Engineer & Workshop
- 29
-
7 July 2026 at 14:02
Bazyle
-
1930 Austin 12 with 3rd brush dynamo
Started by:
john fletcher 1
in: General Questions
- 10
-
6 July 2026 at 22:07
Nimble
-
Identifying the pitch of threading inserts
Started by:
Bill Phinn
in: Workshop Tools and Tooling
- 6
-
6 July 2026 at 20:13
old mart
-
Valuatiion of severql models
Started by:
ron vale 3
in: Stationary engines
- 4
-
6 July 2026 at 19:23
Weary
-
Hi there fellow engineers
Started by:
ray1580
in: Introduce Yourself – New members start here!
- 6
-
6 July 2026 at 17:19
Howard Lewis
-
Hallo from Austria
Started by:
wilfried54
in: Introduce Yourself – New members start here!
- 4
-
6 July 2026 at 17:16
Howard Lewis
-
Jaxon Steam Car ride to the next 5 inch rail club
Started by:
Werner Schleidt
in: Traction engines
- 4
-
6 July 2026 at 17:11
Werner Schleidt
-
Unwanted Car Software Update
1
2
Started by:
Chris Crew
in: The Tea Room
- 19
-
6 July 2026 at 16:26
Bill Phinn
-
Accolade
Started by:
Bill Dawes
in: General Questions
- 8
-
6 July 2026 at 00:18
Nigel Graham 2
-
What Did You Do Today 2026
1
2
…
4
5
Started by:
JasonB
in: The Tea Room
- 36
-
6 July 2026 at 00:13
Nigel Graham 2
-
Laser centre finder
1
2
Started by:
Buffer
in: General Questions
- 16
-
5 July 2026 at 21:54
Vic
-
Brass covered steel
Started by:
Dougie Swan
in: General Questions
- 9
-
5 July 2026 at 20:43
Dougie Swan
-
Offen imperial bore mic gauge.
Latest Issue

Newsletter Sign-up
Latest Replies
- Offen imperial bore mic gauge.
- Cotton-covered flex
- Impending collapse in NYC
- Spindle/bearings fit query for X2 type mill
- When is a new 90 degree drill not 90 degrees?
- 24cc DIESEL ENGINE FROM SOLID
- Flat Surface
- Hello from new USA member
- Mini-lathe parts source
- McLaren 1,5 inch scale Modl Traction Engine

