EW lathe tailstock taper

EW lathe tailstock taper

Home Forums Beginners questions EW lathe tailstock taper

Viewing 25 posts - 1 through 25 (of 35 total)
  • Author
    Posts
  • #818875
    jarv
    Participant
      @jarv

      Hi All, I have recently purchased an EW lathe. It had a chuck which appeared to be screwed in. Today it fell out and I realised it was only in about a MM and no thread inside.

      I assume the previous owner put it in, hit it to hold it in long enough for it to look like it was in place.

      It appears that it has a taper that measures 12mm but the depth to the bottom of the hole is 38mm.

      I see a morse taper MT1 is 12mm at the large entry hole.

      I assume it would be imperial so if anybody could help as to what I actually need please.

      #818880
      Chris Crew
      Participant
        @chriscrew66644

        The lathes.co.uk site states the headstock had a 1MT.

        Quote: “Of unusual design, the headstock carried a 0.75-inch diameter spindle, bored through 13/32″ with a No. 1 Morse taper running in plain bearings carried on two entirely separate, box-form, cast-iron posts that were jigged so as to be interchangeable between machines.”

        Unfortunately, of all the information given on “lathes” this is the only mention of the headstock, as far as I can see.

        #818884
        Bazyle
        Participant
          @bazyle

          Be aware that on some lathes, eg I think the Adept, the taper is not full length and that might be the thin bit or the thick bit.
          You description isn’t very clear about the situation. Try a photo perhaps?

          #818891
          jarv
          Participant
            @jarv

            IMG_3784IMG_3783IMG_3782
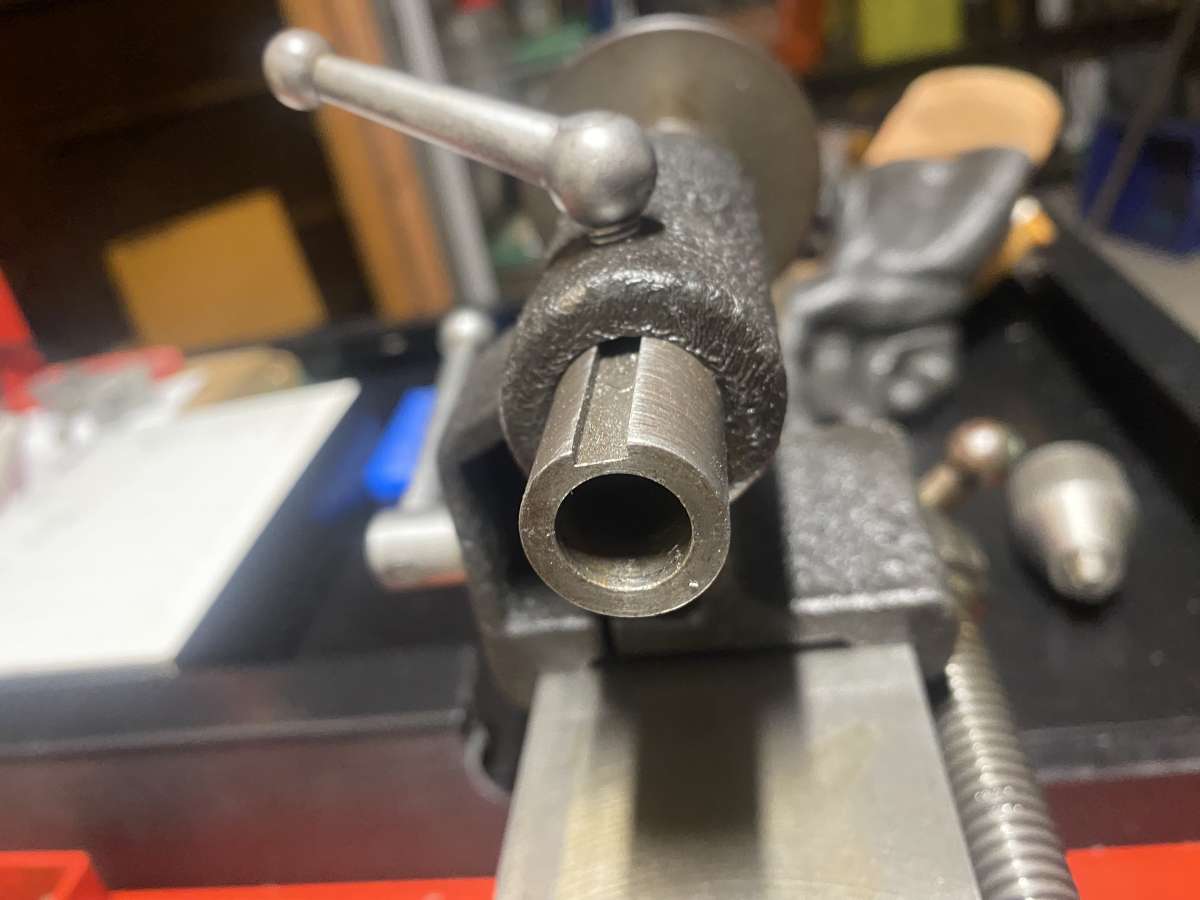
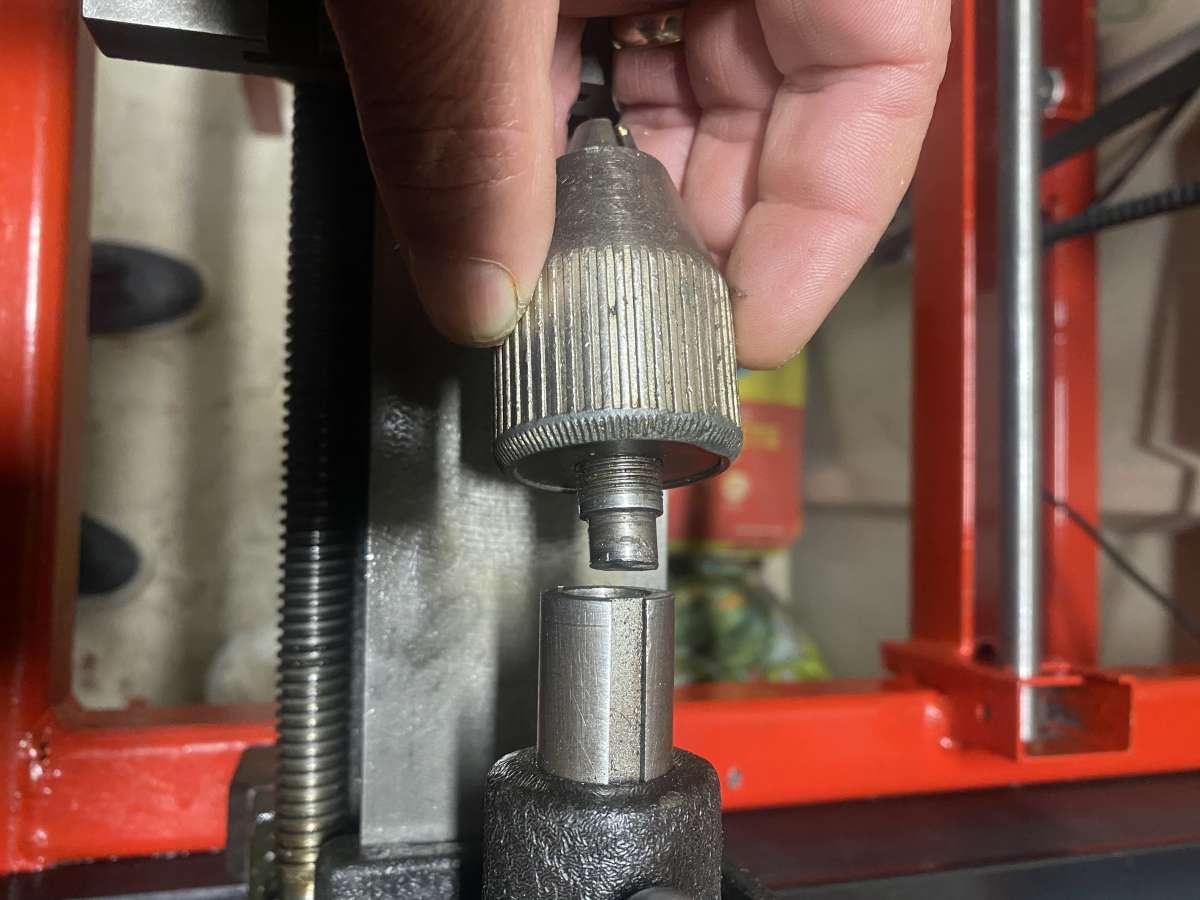
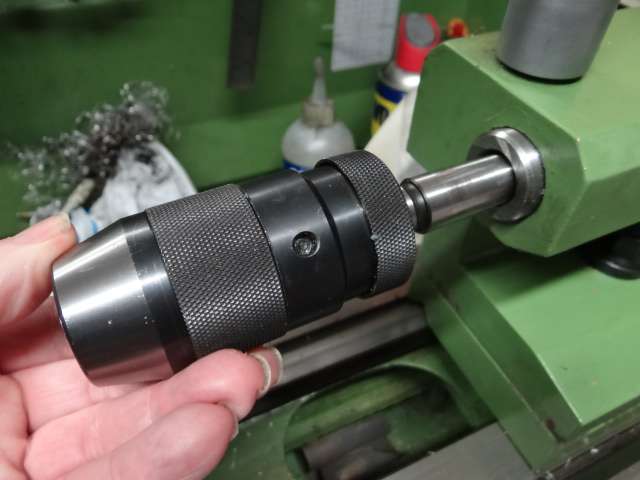
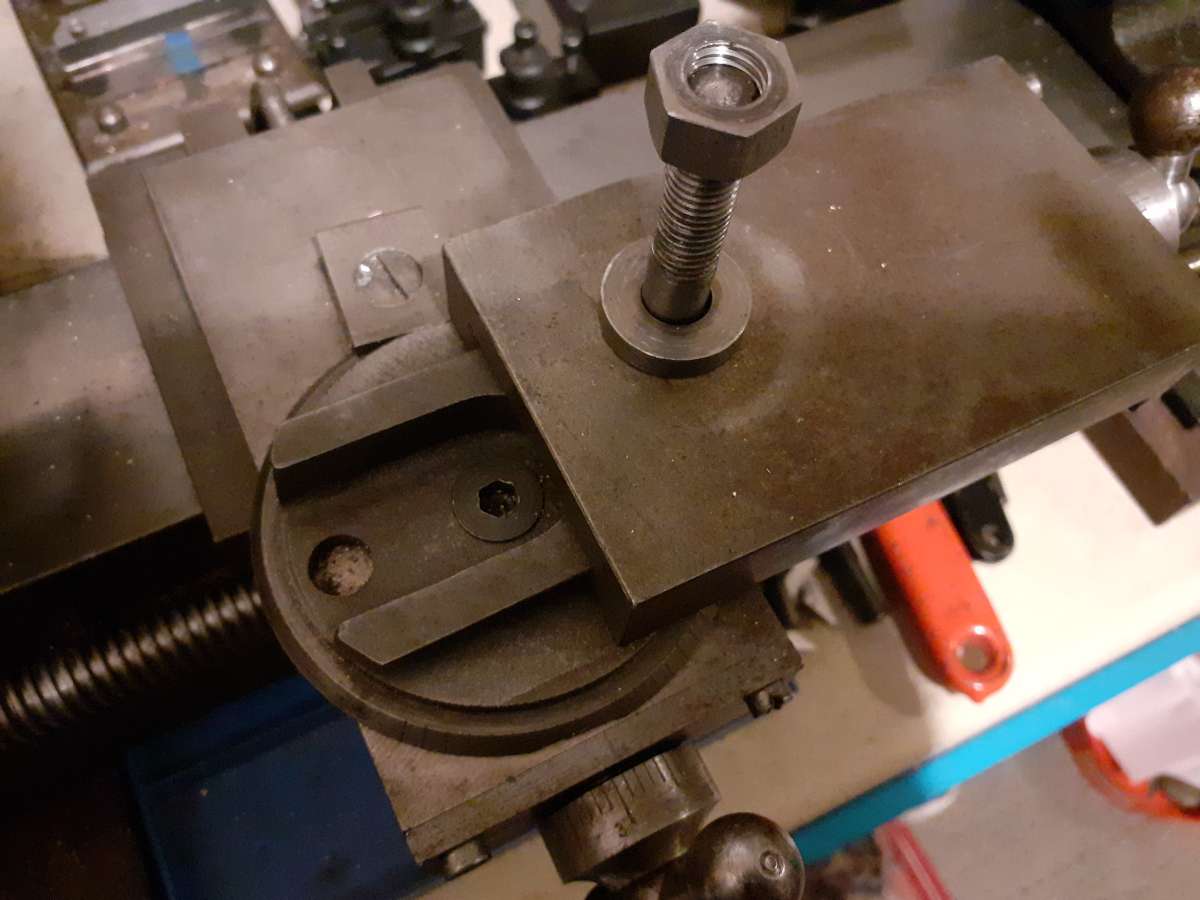
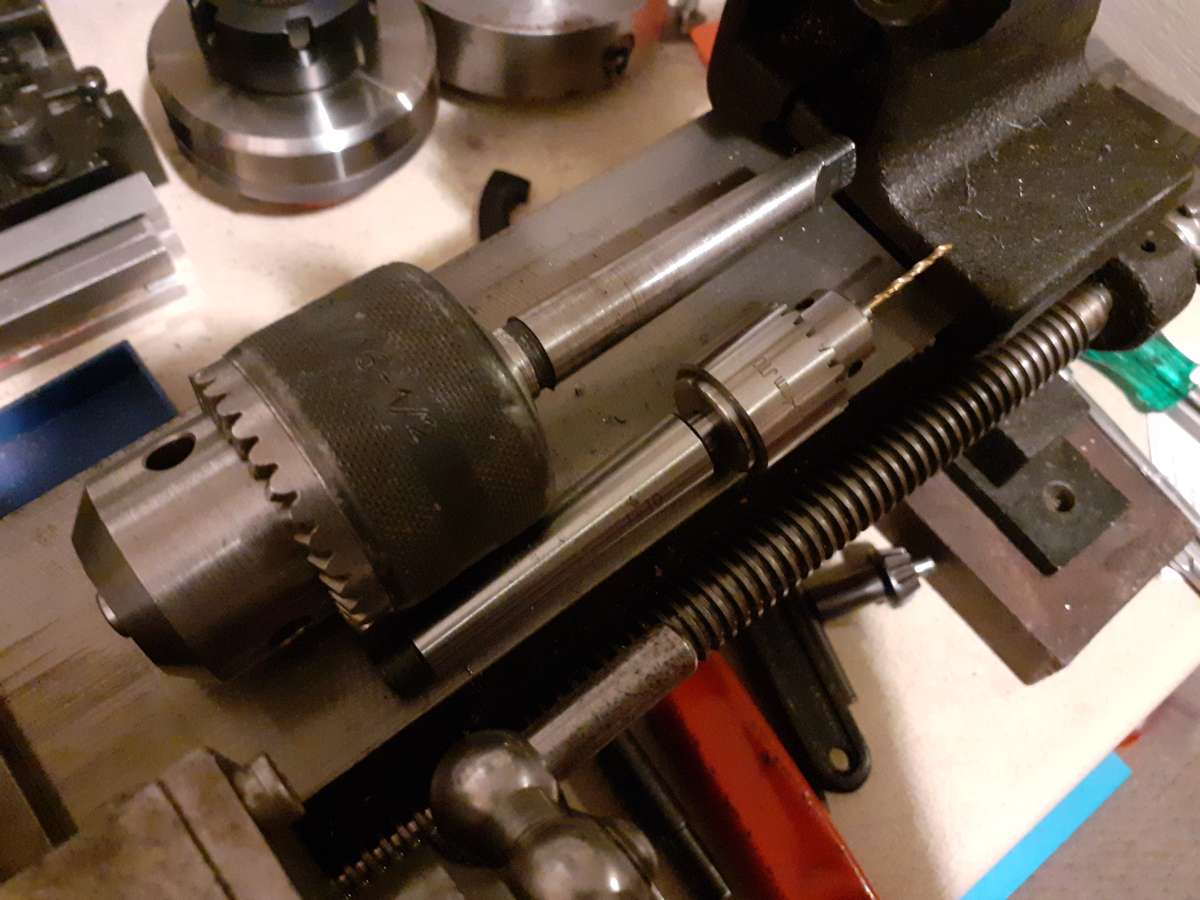
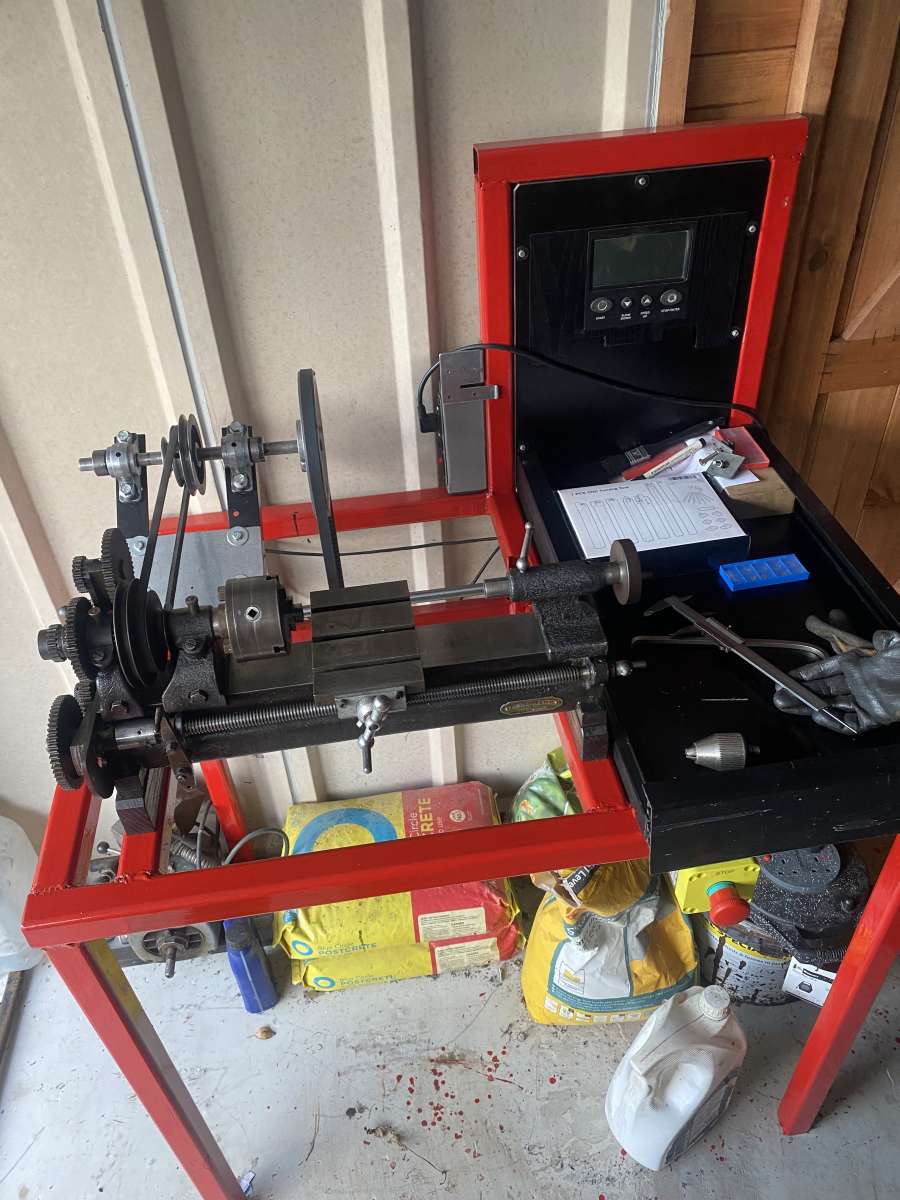
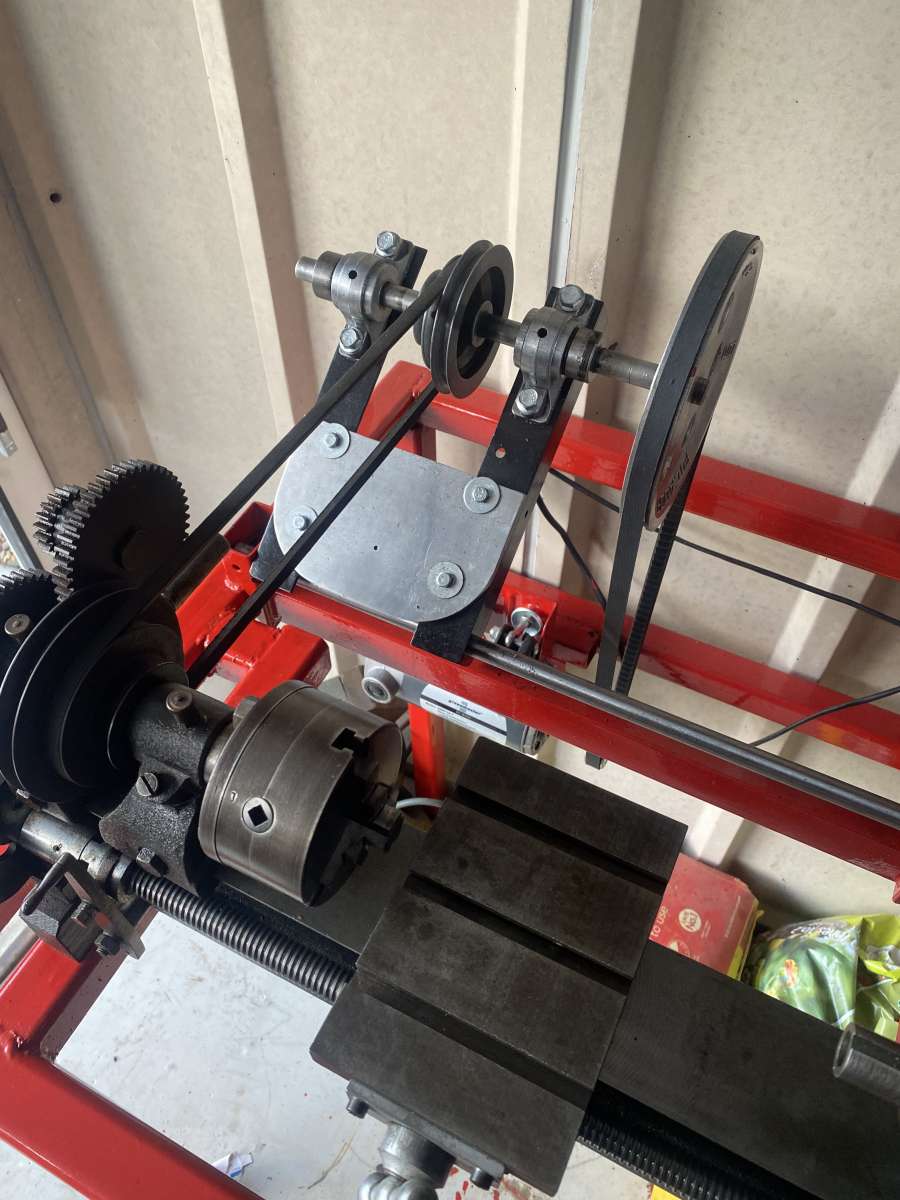
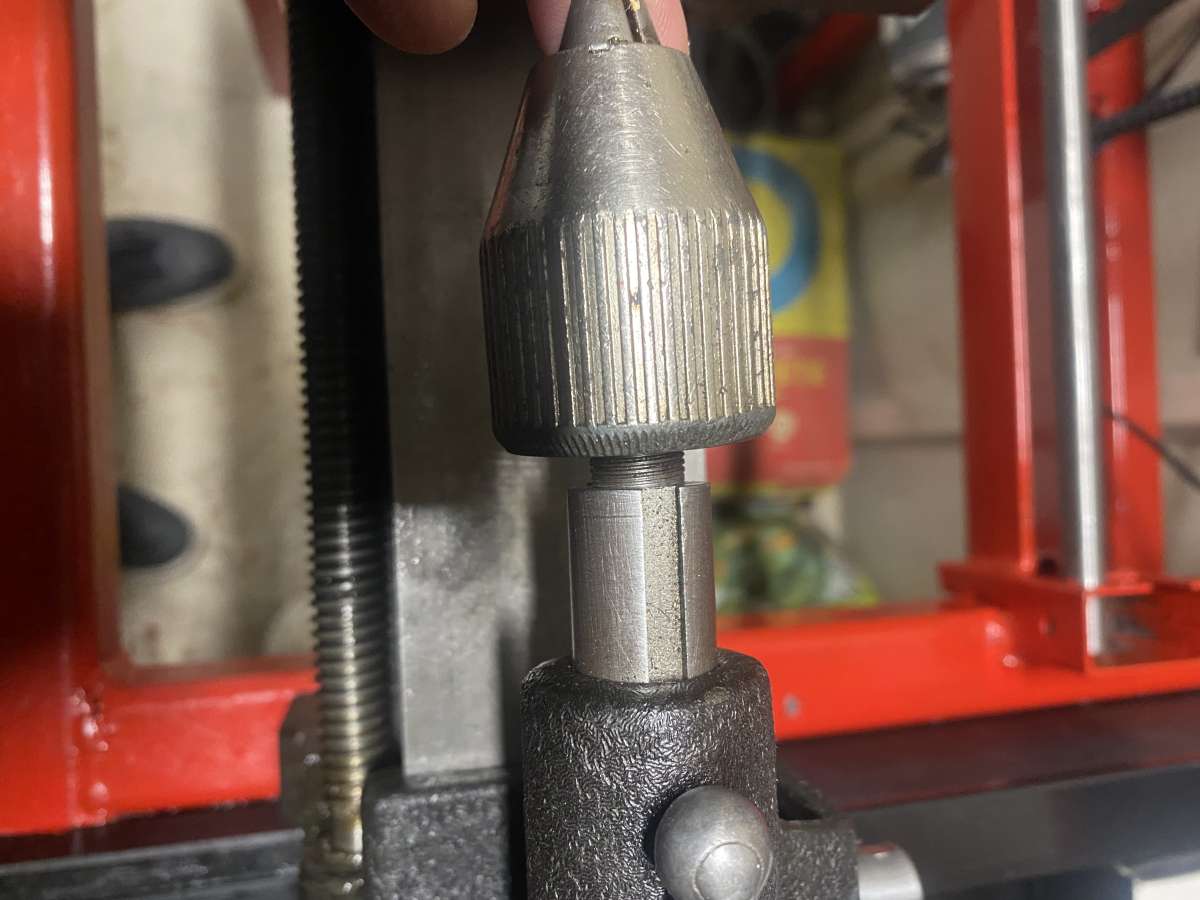
The chuck was just holding on the first thread. The stepped down part is only 10mm. The taper depth is 41mm fully retracted so is to release the taper?

            #818892
            Nigel Graham 2
            Participant
              @nigelgraham2

              No. 1 Morse taper in both spindle and tailstock.

              A taper that meets the tailstock screw will give an ejecting effect but the longer the tool taper the shorter the drilling travel.

              I have just tried it with my own EW.

              I hope that previous owner’s bodge with the chuck has not damaged the tailstock.

              #818894
              jarv
              Participant
                @jarv

                Hi, Thankyou for the replies and help.

                Nigel Graham 2, I am missing the tool holder and the top slide that holds it and I think from pictures I’ve seen a rotating part too.

                Would it be possible to have some pictures of yours please as the old photos I have seen are very old and grainy.

                Im not sure the chances of getting an original though.

                #818895
                Andrew Crow
                Participant
                  @andrewcrow91475

                  What you have there is a drill chuck off something like an old breast drill and not suitable for a lathe tailstock which is what your photos are showing. What you need is drill  chuck mounted on a No. 1 morse taper shank.

                  I would suggest that you look on the lathes.co.uk website for information on EW lathes.

                  Andy

                  #818898
                  SillyOldDuffer
                  Moderator
                    @sillyoldduffer

                    Looks like the taper part is missing. Mine fixes to the drill chuck with another tapers: yours would have a female screw that the male drill chuck matches.

                    DSC06941

                    The drill chuck pushes firmly home into the tailstock like next photo, where it’s gripped by the taper.  Ejection varies, either winding the tailstock back, or maybe tapping a rod in at the other end.

                    DSC06942

                    Options:

                    • find the missing taper.
                    • make a replacement with the lathe,
                    • identify the taper and buy a new drill chuck that fits.   Doesn’t need to match the old one, only the taper has to go into the tailstock.  Might have to cut it to length.

                    I’d buy new, but making one is a good learner project once the basics have been conquered.  Nice thing about lathes is they can make their own spares!

                    Dave

                    #818901
                    IanT
                    Participant
                      @iant

                      Yes – MT1 both ends…

                      The topslide consists of two sliding parts, the lower (rotating part?) screws onto the top of cross-slide. The pictures below show the topslide attached to the ‘normal’ top part of the cross-slide but not mounted. I have a boring table alternative that I often use with a fixed mounting block and toolholder, which is the one shown in use. As the leadscrew is permanently engaged, it is quite possible to use the EW with just the cross-slide and it would be fairly simple to make a tool-block that raises any tool/tool-holder to the required 2.5″ centre height, assuming the cross-slide is complete. The EW is a very good small lathe.

                      Regards,


                      IanT

                      EW - Sept 2014 006


                      EW - Sept 2014 007

                      EW - Sept 2014 005

                      #818906
                      jarv
                      Participant
                        @jarv

                        Hi, Thank you for the pictures Ian.

                        I have been using the cross slide with a tool holder and it seems to do quite well. I’m sure my cross slide is complete but interesting that mine only has three slots for Tee nuts where yours has four. I understand there is quite a few variations as to what was available. Yes that was the rotating part I was referring to.

                        Thanks again.

                        #818907
                        Bazyle
                        Participant
                          @bazyle

                          You need a ‘drill chuck on MT1’ taper. Lots on ebay at silly prices but I’ve seen one at £12 which is fine. Don’t get a keyless type on such a small lathe and don’t be waylaid by fancy makes until you know what is really what.

                          #818910
                          bernard towers
                          Participant
                            @bernardtowers37738

                            Why , Dont get a keyless??

                            #818914
                            IanT
                            Participant
                              @iant

                              Here is a detailed shot of how the top-slide attaches to the cross-slide. A simple counter-sunk hex-screw with a ‘locking’ clamp on the perimeter

                              EW_Topslide_detail

                              I have two drill chucks, a larger 1/2″ one and small 0.3-4mm one. I rarely use drills over 8-10mm in the EW – if I need a bigger hole on the EW, I’ll probably bore it. You can purchase MT1/JT arbours and small JT chucks to go with them.

                              EW_Drill_Chucks

                              There are a lot of very useful small accessories that you can make for your EW. With some MT1 bank arbors you can produce a die holders, slitting saw arbors & milling cutter holders. A drawbar is essential when using cutter holders in the headstock. I have a small 3-jaw ‘scroll’ chuck, as well as 4-jaw & ER32 chucks. I probably use the 3-jaw the most but all are useful.

                              EW - Sept 2014 008  
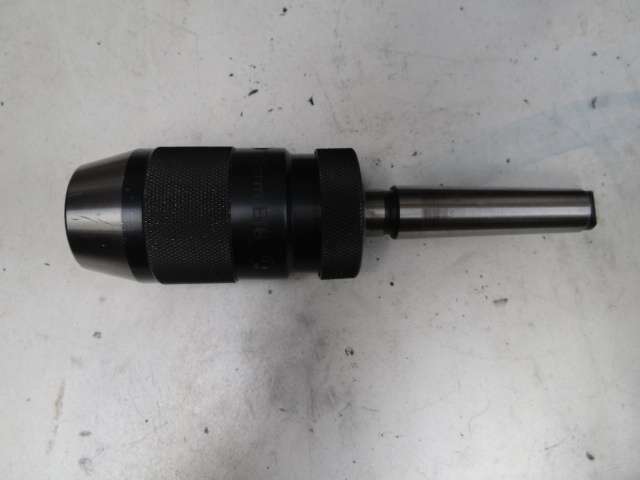
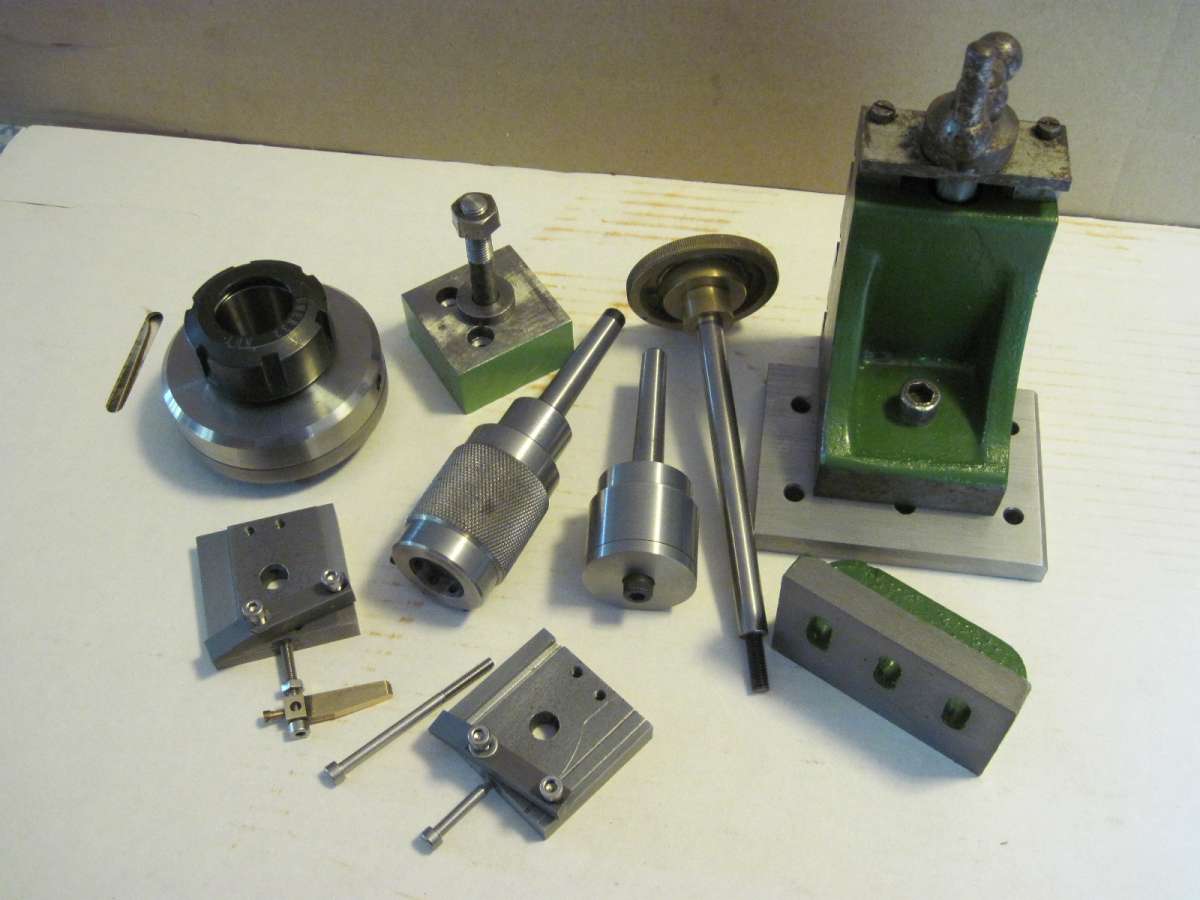
If the EW is your only machine tool, then some small flycutters are very useful – I have about four or five different ones that can be held in a chuck. You can use them with a small angle plate or (preferably) a small vertical slide if you can mount it.

                              I hope this is useful. I’ve had a lot of use from my little EW and although I have larger machines, I still use it a lot!

                              I hope you enjoy yours too   🙂

                              Regards,


                              IanT

                              #818918
                              IanT
                              Participant
                                @iant

                                ” I’m sure my cross slide is complete but interesting that mine only has three slots for Tee nuts where yours has four ”

                                Then I think your EW has come equipped with a version of the boring table, as opposed to a top-slide. As I’ve mentioned above, the lathe is still very useable and mounting cutting tools directly on the cross-slide does make it more rigid in practice. The T-slots also make mounting angle plates, vertical slide, larger work to be milled or bored (and any other bits and pieces) much easier.

                                Regards,

                                IanT

                                #818922
                                jarv
                                Participant
                                  @jarv

                                  Hi, I’m definitely in the right place with all you knowledgeable people.

                                  With having no experience of lathes, this information is excellent.

                                  I assumed the hole down the centre of the headstock shaft was there to clear debris,  now I realise The lathe is capable of so much more.

                                  I have made a bench for the lathe and added a treadmill motor and controller(not for the purists I guess).

                                  I’ll be spending more time in the garage intercepting the delivery drivers before the wife sees them!!!!

                                  #818947
                                  Bazyle
                                  Participant
                                    @bazyle
                                    On bernard towers Said:

                                    Why , Dont get a keyless??

                                    They are longer and use up precious room between centres. It isn’t really that difficult to use a key and that gves you better control of the clamping force.

                                    #818949
                                    Nigel Graham 2
                                    Participant
                                      @nigelgraham2

                                      The spindle’s through-hole does allow clearing swarf but is really to take a long length of material.


                                      My specimen’s boring-table and vertical slide have only three slots each: I did not know Stringer made a  4-slot version too!


                                      A tip on using the vertical slide on the EW…

                                      It relies in its standard trim on a single Tee-bolt to hold it to the boring-table. This can slip in use, and trying to over-tighten the bot risks breaking the top of the tee-slot.

                                      Ian T’s photograph shows one solution: mounting the slide on an intervening plate with several T-bolt holes.

                                      For mine, I made two L-shaped steel blocks (aluminium-alloy or cast-iron would work as well) each with two holes to fit tee-bolts in the broader stem of the “L”.

                                      These fit each side of the slide body, with the foot of the “L” hooked round the back of the casting; thus restraining the slide by its two sides and the back edge.

                                      To square the vertical slide to the cross-slide I wind it down so I can gently push the back of the moving part against the cross-slide edge while tightening all five bolts.

                                      I’ve also made a simple vice for my vertical slide: not particularly high-grade precision engineering but it does work! Its base is a 3/8″ thick steel plate that occupies the entire slide area, and held by two T-nuts and a T-bar, with counterbored, cheese-headed screws.


                                      I made some T-nut bars for mine: T-nut profile but of length equal to the slide width, and with tapped holes at appropriate places. This is easier to use and more importantly, spreads the load over more of the slide.


                                      NB: screws and studs used with Tee-nuts must never bear on the floor of the slot. If they do, tightening them can break the roof of the slot. The usual way is to ensure the nut thread does not run right through. Another is to use studs with that end having a short thread, ideally with a shoulder as well.


                                      Ian also points out the leadscrew is permanently engaged. This can make screw-cutting a bit tedious, but it would not be too difficult to make a mandrel handle so you can slacken the drive belt and rotate the mandrel by hand in both directions, to make this more efficient. That’s if you can’t reverse the motor – and that with care so you don’t have the chuck unscrewing.

                                      The supplied change-wheels (I hope they came with yours) and single-slot banjo seem limited but do allow a surprisingly wide range of threads to be screw-cut. However, they cannot give a normal sliding cut with fine feed.

                                      Some people have fitted motor leadscrew-drives to their EW lathes, or you could make a two-slot banjo to take a compound change-wheel train.

                                      #818974
                                      IanT
                                      Participant
                                        @iant

                                        ” added a treadmill motor and controller”

                                        I assume this is a variable speed drive? How much (roughly) and how hard was it to adapt? 🙂

                                        Regards,


                                        IanT

                                        #819074
                                        jarv
                                        Participant
                                          @jarv

                                          IMG_3787IMG_3788IMG_3786IMG_3785
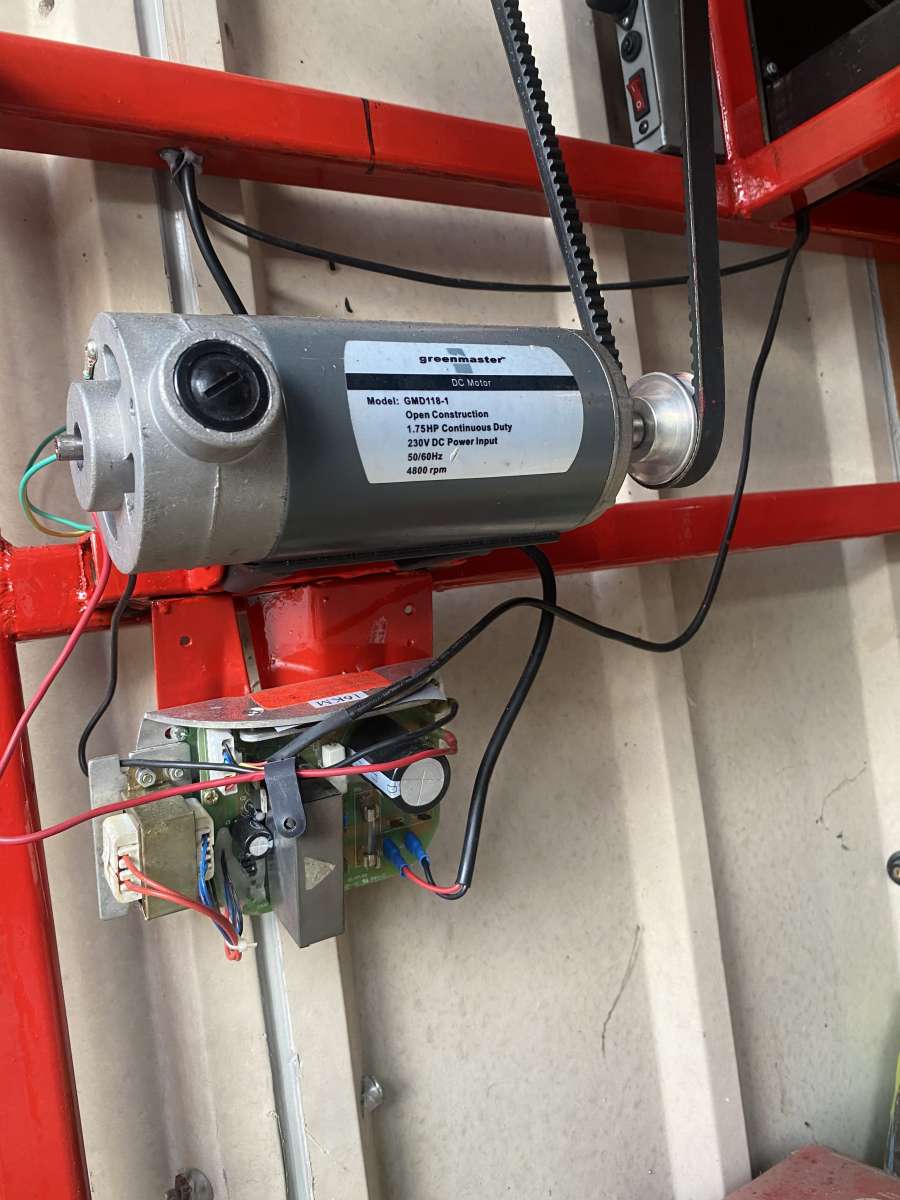
Hi, The lathe came with a single phase motor made by Hoover.

                                          I didn’t really like the idea of it starting at full speed and making speed changes by moving belts onto different pulleys.

                                          I would need a 3 phase motor with a single phase to 3 phase VF drive which could get expensive.

                                          The treadmill at £35 pounds was a bargain. Took it to bits in the sellers shed and kept what I needed.

                                          Motor, Motor control board and the display/speed control.

                                          All you need is 240v input, output to motor(marked on board + & -)and the interface wire from the motor board to the display/speed control.

                                          I’ve chosen to use the display and the original buttons for now. I used the original mounting brackets for the motor and control board, Now need to make a cover. I just added an emergency stop.

                                          You have full speed control with DC motors, using the original display board or a potentiometer.

                                          I also used several other parts from the treadmill that are included in the bench I made.

                                          I am currently looking at another treadmill of the same type for spares that will hopefully future proof the bench(it’s at £70 so hopefully he’ll drop at bit)

                                          #819087
                                          old mart
                                          Participant
                                            @oldmart

                                            I would go for a 1/4″ or not over 10mm keyed chuck rather than keyless, they take up less length on a small lathe. And if the tailstock is self extracting, do some measuring tp find whether the small end of the MT1 can be shortened, which may allow the tailstock quill to be withdrawn further before it self extracts.

                                            You could do with a tray under the lathe bed to catch swarf and to protect the motor.

                                            #819092
                                            jarv
                                            Participant
                                              @jarv

                                              The tray is there too and I have two Channels that need mounting, that will enable me to slide it in/out. I will get this and the motor board cover done before I use it anymore. Couldn’t resist a quick try.

                                              Your advice on the chuck is correct of course, I’ve just received my MT1 and heavy duty chuck 1-13mm and It’s way too big and heavy.

                                              I’ll probably keep it as I have it now but will order the smaller one.


                                              #819120
                                              Nigel Graham 2
                                              Participant
                                                @nigelgraham2

                                                Jarv –

                                                Ian beat me to it with the photos! And his are better than I could have managed anyway.


                                                Changing speed by moving the belt on a small lathe like this is not a problem; but make sure the motor can’t start while you are in mid-move!

                                                Does the countershaft have a lock to hold it in position? It should, to avoid over-stressing the belt and bearings. The belt should never be fully taut: you should be able to depress the middle of the span a bit, by light finger-pressure, without anything else moving.

                                                (This applies to all vee-belt drives. A plate on my Meddings bench-drill specifically warns against exceeding the belt tension set by a built-in spring. Car service-manuals advise on setting the alternator, etc. belt. It is particularly important on a machine like the EW lathe whose spindle runs directly in the headstock castings.)

                                                Your countershaft is not original E.W. Stringer but clearly well-made. The original is an H-shaped casting pivoted at the base, the shaft through the tops of the ‘H‘, and adjusted by a threaded stay-rod carrying a knurled nut. Looking at your photograph I would suggest a spar joining the two side-rails above the plummer-blocks, to take a central, adjustable stay descending from that to a pivot on the bench frame below it.


                                                Although I have fitted ‘Newton-Tesla’ 3ph conversion sets to my other machine-tools I still use their mechanical transmissions in conjunction with the new motors. Such a conversion is not a be-and-end-all replacement for the belts or gears if you need use the machine’s full speed range; and on a little lathe like the EW running at modest power and speed, it is not really justifiable.

                                                That variable-speed d.c. drive, yes. Mine uses a modern, conventional, enclosed 240V 1ph. a.c. motor but I am thinking of a simple d.c. conversion – though overhauling its worn headstock and spindle is far more important.

                                                #819130
                                                Howard Lewis
                                                Participant
                                                  @howardlewis46836

                                                  With the three sheave pulleys on countershaft and spindle, you have three speeds, and if you engage back gear, you have three more (about 1/6th of the other speeds)

                                                  You do not change belt positions with the motor running, nor lock the spindle by engaging back gear, with the bull wheel still pinned to the spindle. Those who do this so that they can slacken a stuck chuck (To unscrew it) will end up breaking teeth off the gears; and they will not have been available as spares for MANY years. There are other less lethal ways of removing a stuck chuck!

                                                  You can calculate the speeds, by looking at the plate on the motor to see what the speed is (probably something like 1450 or 1470 rpm) Then measure the motor pulley diameter and that of the driven pulley on the countershaft. Simple arithmetic will tell you speed at which the countershaft will rotate, and measuring the three sheave pulleys will allow you to calculate the spindle speeds (probably one reduced from countershaft speed, one at countershaft speed, and the third above countershaft speed.

                                                  Engaging back gear will reduce these by a factor of 6.

                                                  With relatively primitive bearings, keep the spindle well oiled, and avoid high speeds, and excessive belt tensions. As long as the belt does not slip, it is tight enough. Excess tension can wear the bearings, and shorten belt life. (And you do not want to be stripping out the spindle to change the secondary belt!)

                                                  As a newbie, buy at least one book on using a lathe (Stan Bray “Basic Lathework”  No 45 in the Workshop Practice Series, or Harold Hall “lathework, A Complete Course” WPS No 34)

                                                  L H Sparey “The Amateur’s Lathe” used to be the “go to” book. It is based around the Myford ML7, but the basic principles are the same for virtually all lathes.

                                                  The books will show you how to grind lathe tools.

                                                  It will be useful practice to make a Centre Height Gauge. This make setting tools on centre height easier. An off centre tool will not cut well, if at all, and even if it does, will leave a “pip” in the middle when you face the end of a bar.

                                                  You will also find a set of Zeus Charts useful (Still using mine from 1958!)

                                                  If you haven’t got any, you will need measuring equipment. A digital calliper, will probably be best.

                                                  Remember that if you put on a 0.010″ cut, the bar will reduce in size by 0.020″ when the lathe removes metal from the other side of the bar as it comes round.

                                                  0.010″ is twice the thickness of a human hair. You are not going to be removing 1/8″ a side on an old small, low powered lathe! This is essentially a hobby machine, not intended for industrial work!

                                                  Learn the skill of rotating the handles slowly and steadily  to produce a good surface finish.

                                                  Being an old British machine, the EW will use Whitworth and BSF threads, (And possibly BA for gib strip adjusters)

                                                  To begin with, just become familiar with using the machine to cut metal, then gain experience by making simple tools, which you can use in the future.

                                                  Make your mistakes (You will; we all do!)on relatively cheap material (mild steel) rather on on an expensive casting from a kit

                                                  Take things slowly and learn in easy stages.

                                                  Good luck

                                                  Howard

                                                  #819132
                                                  Howard Lewis
                                                  Participant
                                                    @howardlewis46836

                                                    Where are you located? You might benefit from some face to face guidance.

                                                    Looking at the photographs, it looks as if the motor is capable of 4000 rpm, but the electronics underneath and the display suggest that the speed can be varied electronically.

                                                    So you have a wide choice of speeds, fir all the 6 mechanical ratios.

                                                    Driving the lathe with a treadle will prove to be tiring, and you are unlikely to be able to provide a consistently steady speed. An electric motor will do a better job.

                                                    Eventually, you find a need for a 4 jaw independent chuck, in which case, you will need to add a magnetic base and at least one DTI to the shopping list. EVENTUALLY!

                                                    HTH

                                                    #819135
                                                    jarv
                                                    Participant
                                                      @jarv

                                                      Hi, I’m in Peterborough, Cambridgeshire.

                                                      To answer some questions.

                                                      The counter assembly at the minute is tensioned by the motor tensioner. It did have an adjuster to move it away from the lathe to tension it(very crude). But the suggestion to control the tension in either way is an excellent way to the protect the headstock spindle etc. so that will be done.

                                                      I will invest in some books, I do have a back copy of Model engineer magazine on the way(modifications to the EW).

                                                      Knowing what an MT1 is has become a revelation and to now know it can be accommodated in the tail and headstock opens the lathe potential to much more capabilities than I first thought(Thanks to you guys).

                                                      The motor starts(according to the treadmill at 0.5mph)( chuck creeps around) then adjusts speed from there.

                                                      I have an RPM gauge, With health and safety I can no longer use it at work(elevator engineer). However said gauge is in a “Safe place” hopefully will find it soon.
                                                      While my eyes just about still manage it, I will stick with non digital vernier but I am getting tempted.

                                                      I do need a dial gauge and a centre gauge

                                                      one more question, The chuck thread is right hand, normally anything would turn in the direction that always would tighten it but am I right in assuming that the chuck should rotate anticlockwise thus when you’re machining, the tool in affect is tighten the chuck if that makes sense.

                                                      Not anticlockwise for all operations I understand.

                                                    Viewing 25 posts - 1 through 25 (of 35 total)
                                                    • Please log in to reply to this topic. Registering is free and easy using the links on the menu at the top of this page.

                                                    Latest Replies

                                                    Home Forums Beginners questions Topics

                                                    Viewing 25 topics - 1 through 25 (of 25 total)
                                                    Viewing 25 topics - 1 through 25 (of 25 total)

                                                    View full reply list.