lathe;mounting a squarish sheet of metal to be cut into a disk?

lathe;mounting a squarish sheet of metal to be cut into a disk?

Home › Forums › Beginners questions › lathe;mounting a squarish sheet of metal to be cut into a disk?

Viewing 19 posts - 1 through 19 (of 19 total)
  • Author
    Posts
  • #863911
    modmechengine1333
    Participant
      @modmechengine1333

      Working on creating a disk with a lip on its border, this will be my first real lathe project. Starting stock is flat Galvanised sheet, roughly 100x100mm, 2mm thick. I’ll be making these in small batches, always the same size

      I have chosen to go with the Colchester Master lathe at my hackerspace, as it seems ideal, and I want to scale up my competence with Lathes.

      The hackerspace offers training, so I got that covered, I have also watched a ton of YouTube, trying to understand Lathes, and their processes

      Where am stuck on; my workpiece is just a sheet of metal and I need to find a way of securing it not just for safety but also to prevent bending, shearing, etc.

      All the videos and texts I have found for lathes out there deal with workpieces that have significant depth to them, allowing them to be clamped easily.

      Questions I’m chewing on:

      – Are sheets of metal outside the scope of Lathes?
      – Best way to mount a square flat blank for a first operation, faceplate?
      – At 2mm thick, is this thin enough to need a proper backing/support setup, or is it fine as is?
      – Any tips for making sure the pocket cut never breaks through into whatever’s behind it?

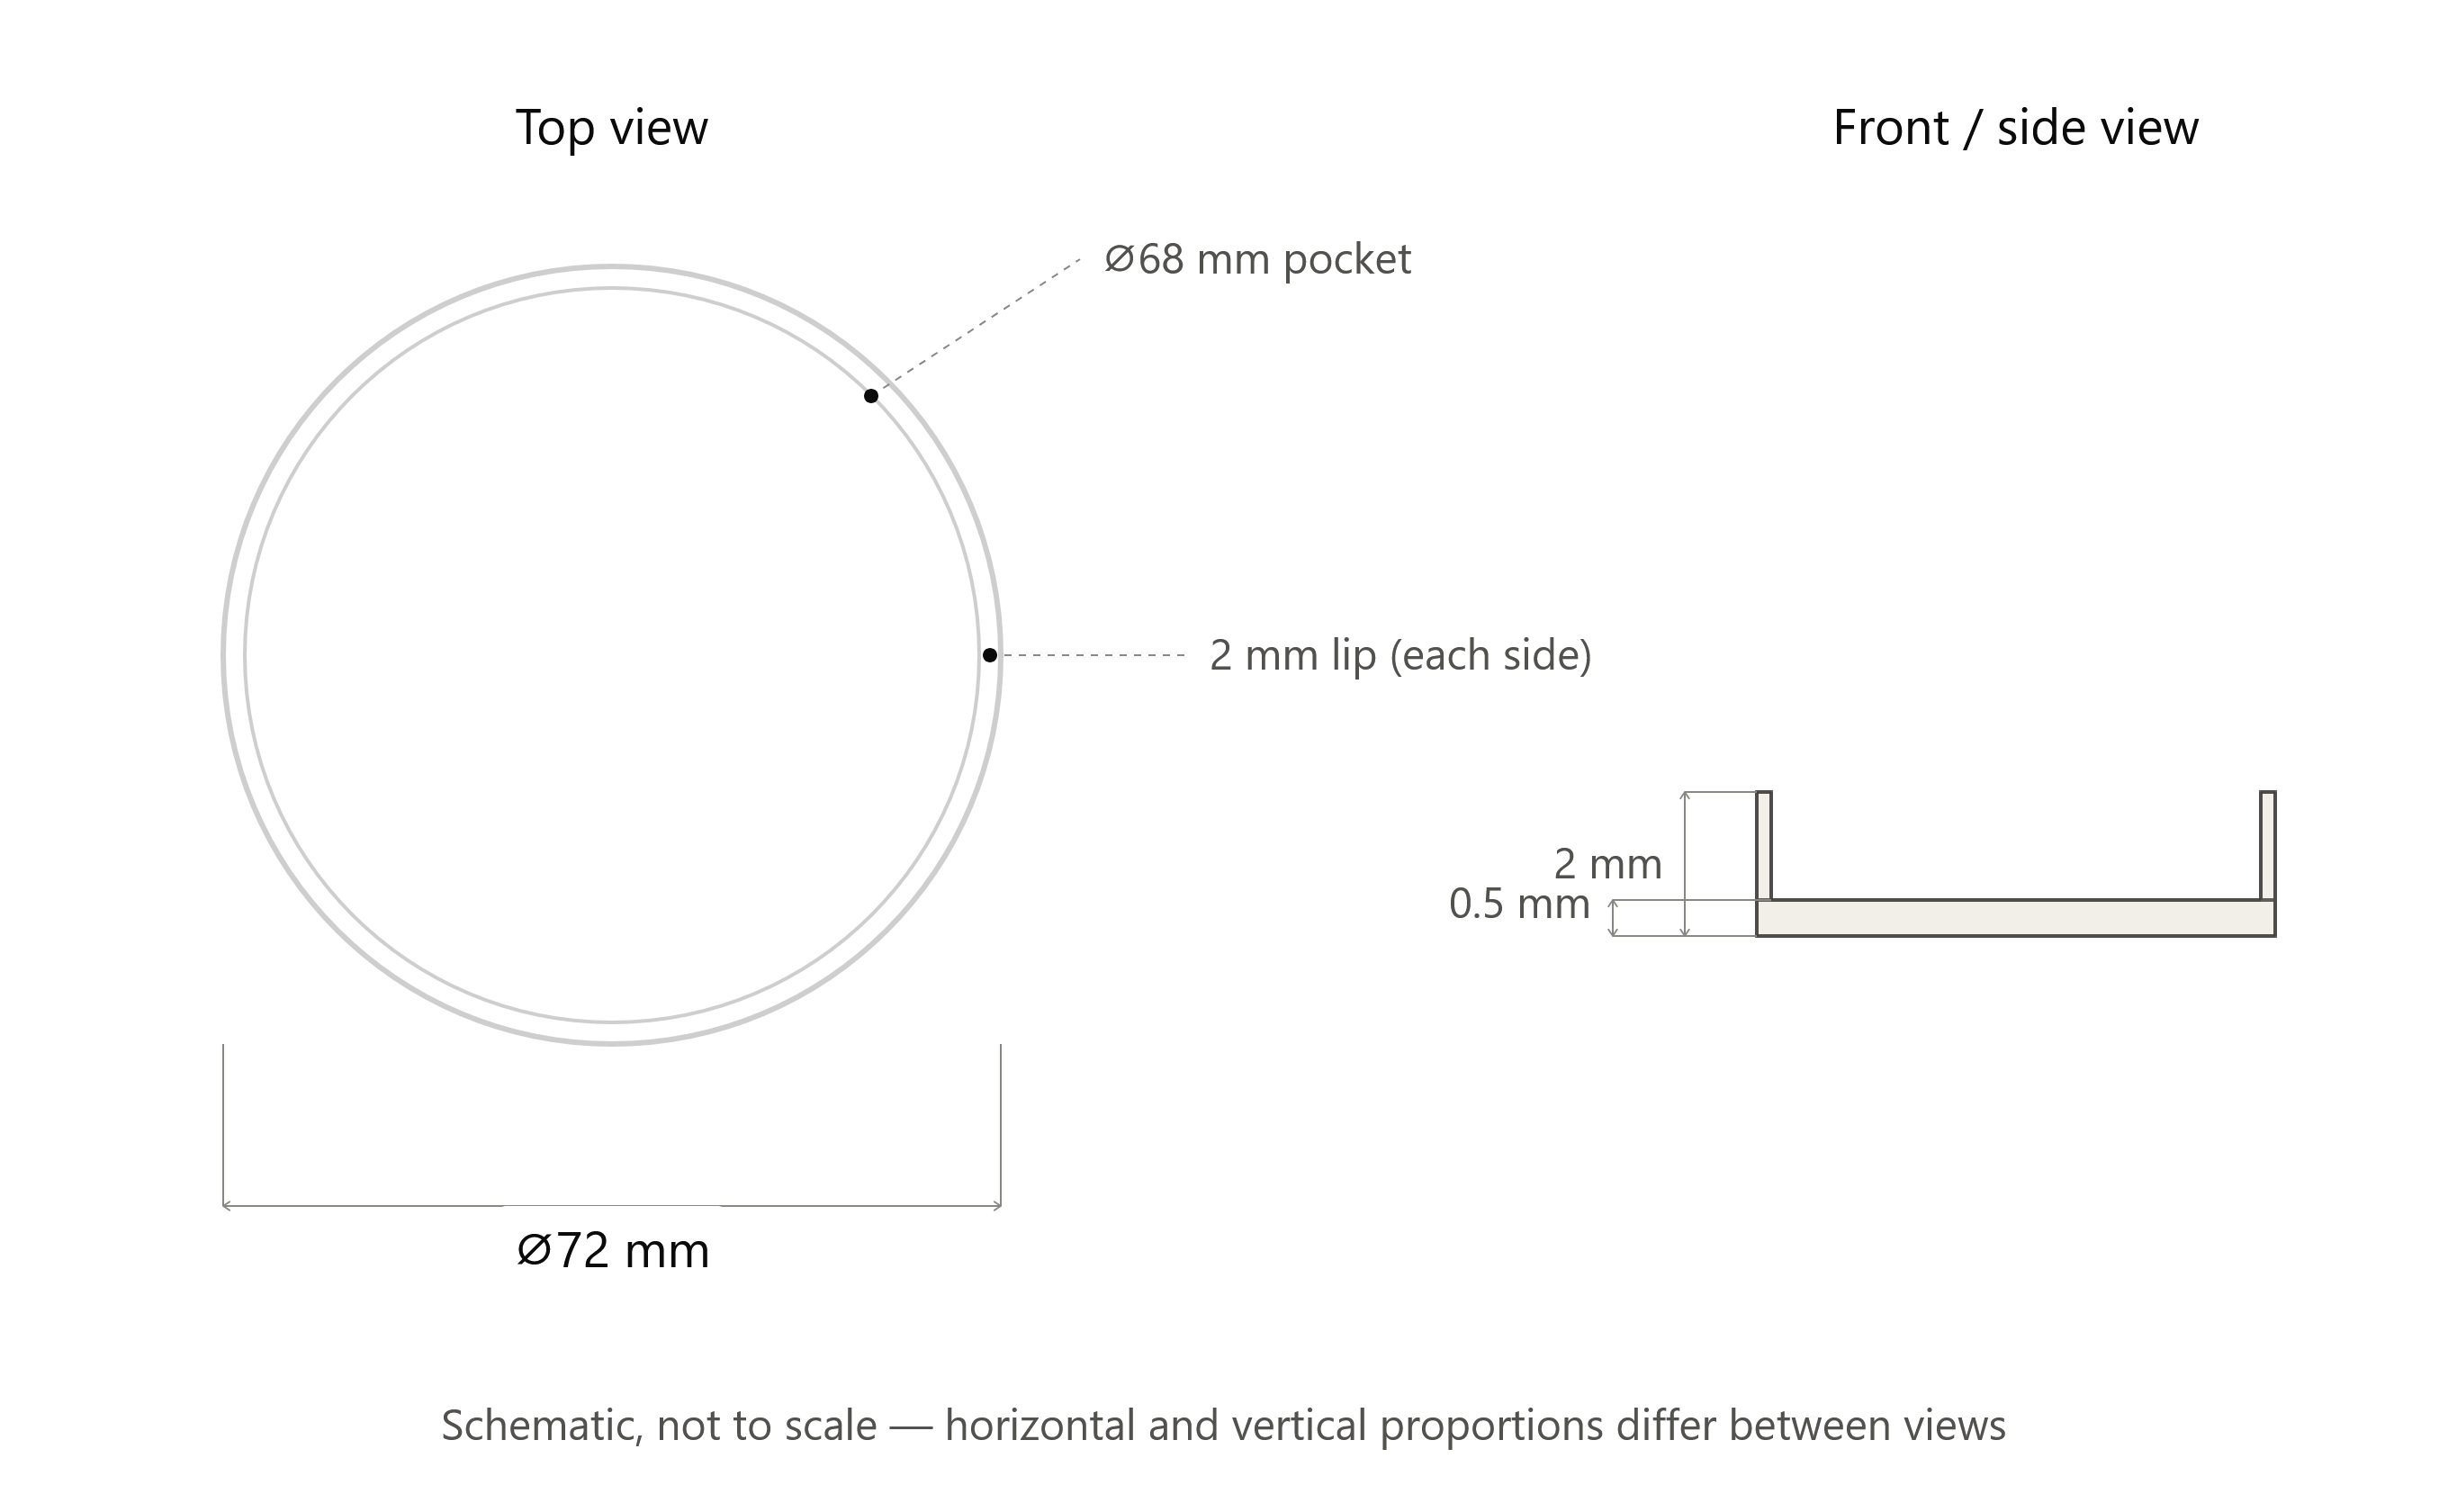
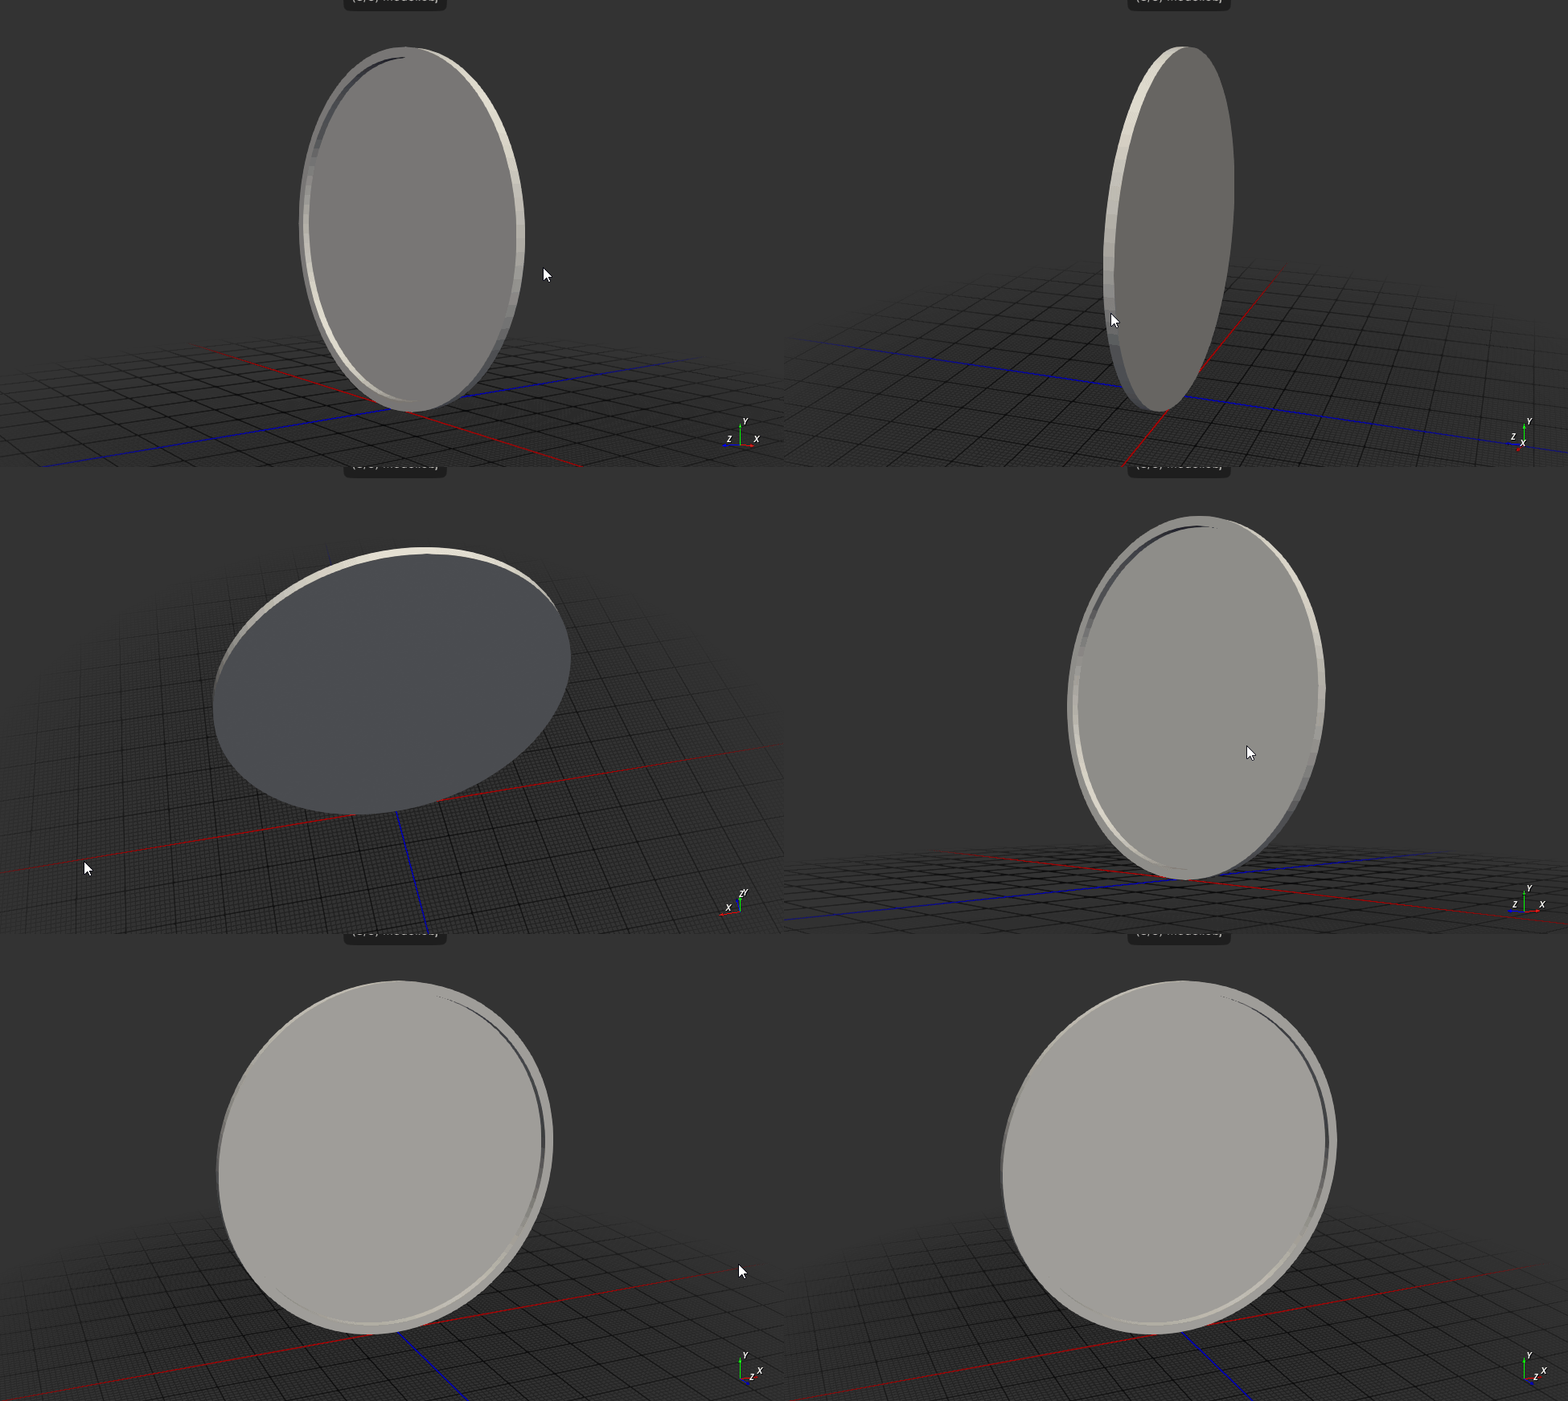
      plan and 3d model view of the project;

      https://i.ibb.co/F4mRQMvC/plan.png

      https://i.ibb.co/XrbbTjzk/f3d-kllvr-D5s-L7.gif

      #863925
      John Haine
      Participant
        @johnhaine32865

        You may get away with supergluing each blank to a flat sacrificial piece of wood which will be discarded. With luck it would hold enough to withstand cutting forces if you take very light cuts very slowly with a sharp tool. Hold the backing in a 4 jaw. Heat to separate (boil) and expect to need a new backing for each one.

        Why are you using 2mm sheet when the total depth is 2.5mm?

        Cut the outside to a rough circle by sawing, an interrupted cut on the corners would break the glue bond.

        I suspect galvanised sheet steel will be horrid to machine.

        Frankly, I think turning this object from sheet steel is going to be hard. If the application permitted I would use engraving brass and mill it, profiling the outside with holding tabs. Expensive material though.

        #863926
        JasonB
        Moderator
          @jasonb

          There are several ways to hold thin sheet but looking at your design I think that will be the least of your problems. If I understand the drawing you want to recess the face of the disk to leave a 0.5mm thickness to the base in gummy galvanized steel sheet.

          One method is to bond the sheet to a backing such as a piece of MDF which in turn can be fixed to a faceplate. However the heat and your thin final thickness is likely to see the bond break or at the very least you will get an uneven 0.5mm bottom. That can be improved uppon by drilling the corners of your square plate for some small screws which will take the drive loads but I still worry about the thin base lifting.

          If you do get the base machined then to cut the OD You can trepan it from the sheet while still screwed and bonded to the backing. Or remove from backing, saw off the corners to reduce the amount of turning. Then use a pressure pad to push the work against the backing and turn the OD to size.

          Spinning or pressing 0.5mm sheet would be a better option to turn up the sides if 0.5mm thickness is OK for them.

          Also why use galv steel as you will only be left with thebottom galvanized once the rest has been machined?

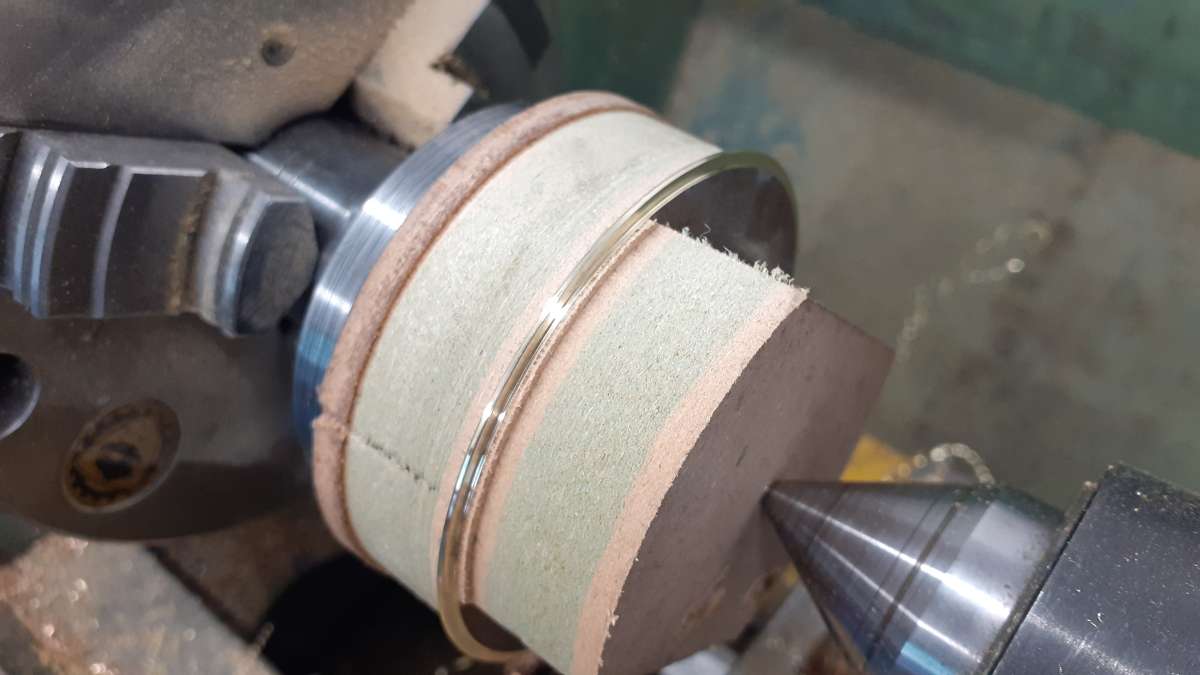
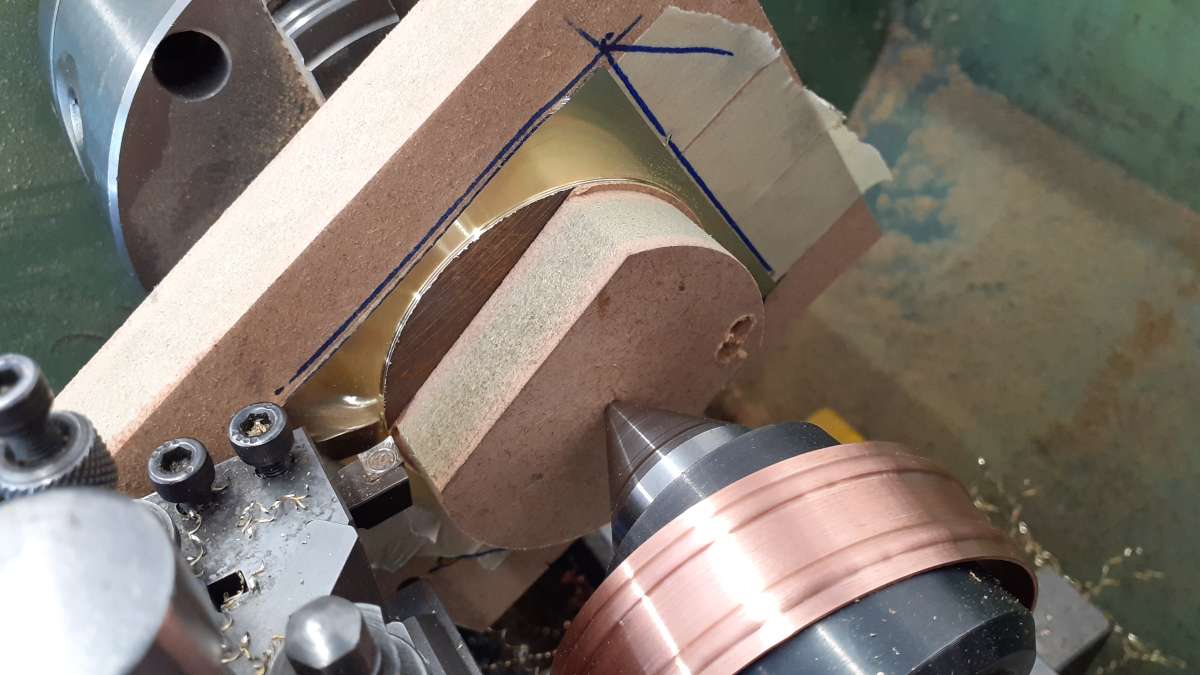
          Couple of shots of a pressure pad in use

          20230625_095025

          20230625_134552Although this shows acrylic sheet the method works with metal. Tape is applied to the backing board and also the work. You then superglue the two taped surface stogether and when dry can turn the item. Backing board held in a chuck in this case. You don’t need to heat/boil the superglue to break the bond the tape will peel off so the same backing can be used multiple times.
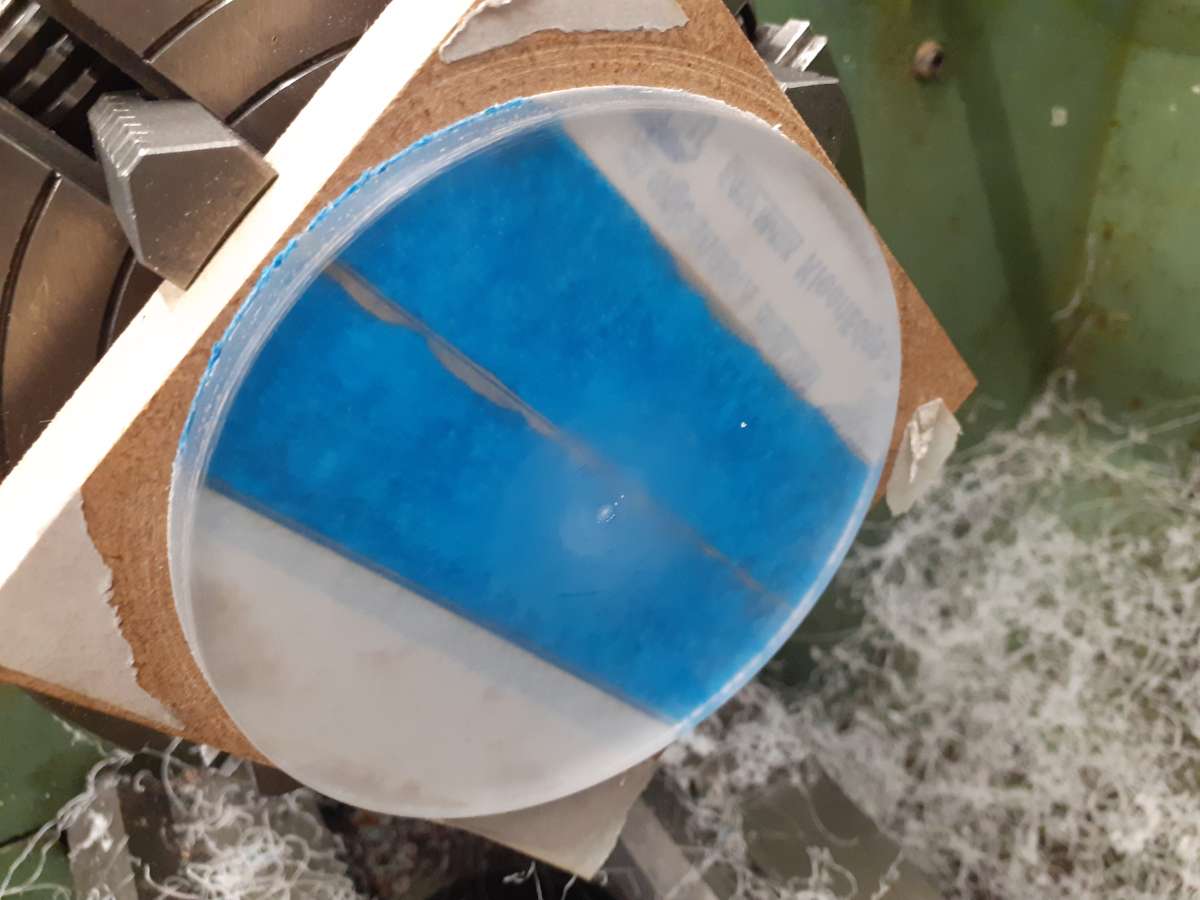
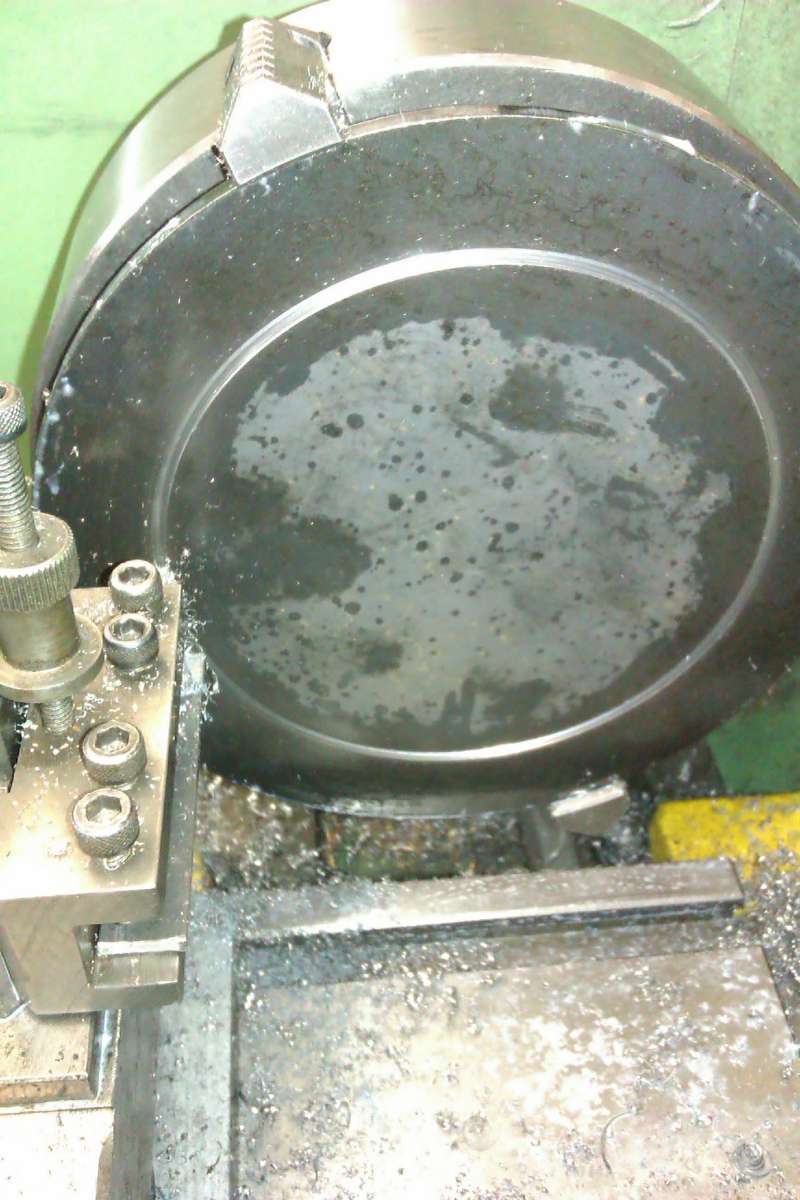
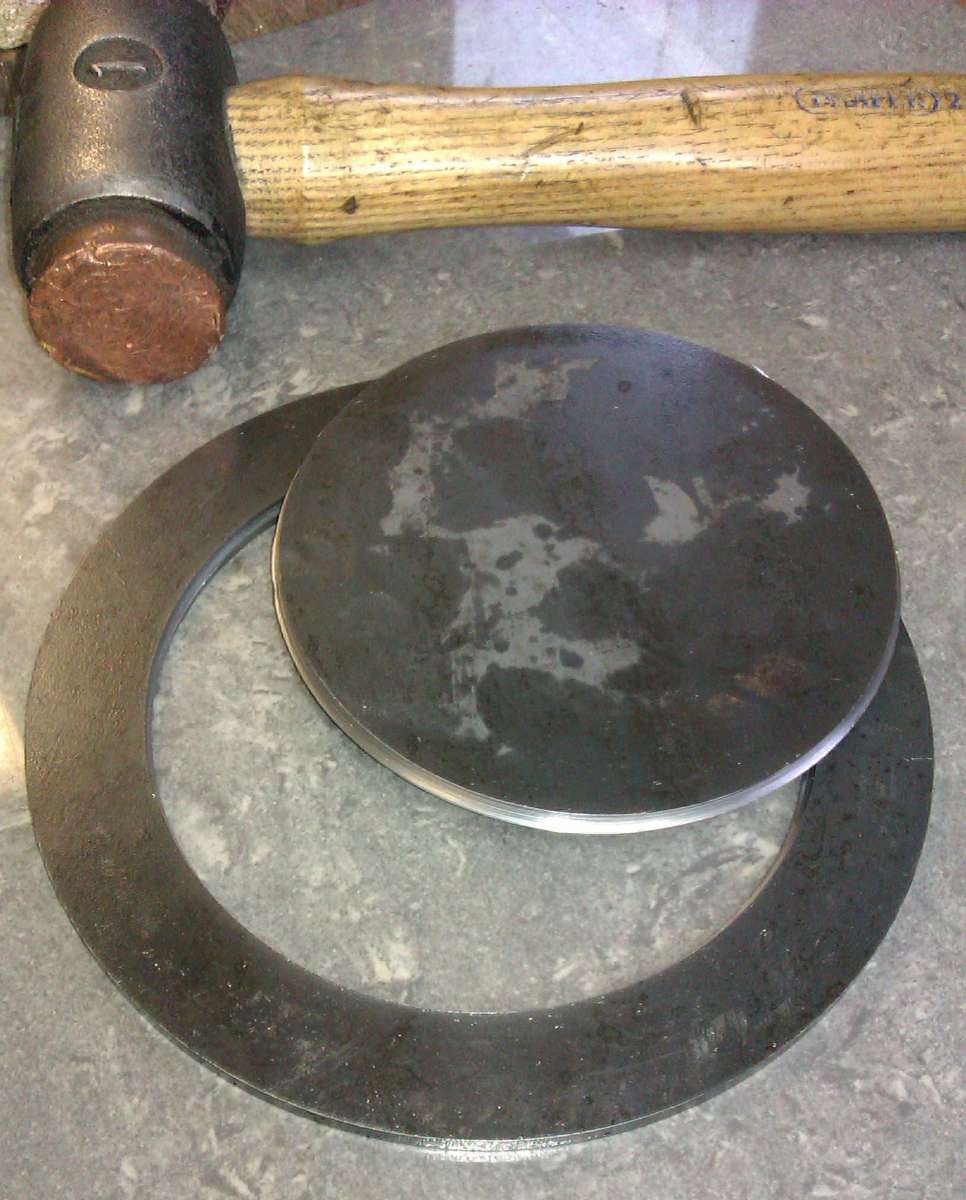
          20201029_140324

          Trepanning is using a thin tool to cut in from the face.

          IMAG2178

          IMAG2182

          #863927
          JasonB
          Moderator
            @jasonb
            On John Haine Said:


            Why are you using 2mm sheet when the total depth is 2.5mm?

            John, overall is 2mm thick

            #863933
            Andrew Crow
            Participant
              @andrewcrow91475

              I think Jason has covered most options for machining your required item, the only thing I would add is about the material you are using.

              Any thin sheet steel contains many stresses in it’s surfaces caused by the manufacturing process, by cutting on only one side those stresses will be changed and the part will almost certainly not be flat when removed from whatever holding fixture you use. You may be able to alleviate this problem by prior heat treatment to stress relieve the blanks, but I’m not sure how this will effect the galvanised steel you are proposing to use.

              Andy

              #863940
              noel shelley
              Participant
                @noelshelley55608

                If you are going to use galvanised material then you need to understand the galvanising process and machining 3/4 of thickness away will leave you with the base being 3 layers, a zinc layer, zinc iron alloy and the parent metal iron all in .5mm – not ideal. The zinc/iron layer will be brittle. I would reconsider the material for this job.  Noel.

                #863941
                Frances IoM
                Participant
                  @francesiom58905

                  seems ideal task for printed metal – stainless steel – you haven’t stated its intended function – eg if to hold liquid then an annular ring soldered to thin sheet might work

                  #863952
                  Nigel Graham 2
                  Participant
                    @nigelgraham2

                    Andy –

                    Heat-treatment will destroy the galvanising. Though I don’t understand why you are using galvanised steel anyway unless this project is using existing “stock”, because only one end-product surface will still be galvanised anyway!

                    If do try it – risking considerable distortion – be aware that the zinc vapour is poisonous.

                    ====

                    I have successfully machine thinner steel discs than that but was able to use holes both intended in the finished itemand drilled in the off-cut areas, to screw the material to a shuttering-ply disc bolted to the faceplate. Put big washers under all the screw heads to spread the loads hence improve the grip.


                    #863970
                    ega
                    Participant
                      @ega

                      The blank could be produced with a suitable holesaw.

                      #863976
                      Howard Lewis
                      Participant
                        @howardlewis46836

                        “Squarish” and suggests using shears to bring the blank closer to a circle, before tackling the problem of how to hold it and machine away a tiny bit of metal.

                        Being thin blank, it is not going to be easy to machine.

                        As said, a sacrifical wooden backing, sharp tool on centre height, VERY light cuts and the power cross feed set to bring the Boring? tool outwards at the finest possible feed per rev, (0.002″ if you can manage it)

                        Since you are thinkiing in terms of “batches”, you are going need a lot of backing pieces

                        Since the material is thin, maybe metal spinning, or pressing, might be an easier way, once the blank  has been turned to round.

                        Howard

                        #863995
                        Charles Lamont
                        Participant
                          @charleslamont71117

                          Reply to party seeking directions: “Well, I wouldn’t start from here.”

                          The material seems to be unsuitable for the job. I think it would help if we could go back a couple of steps and ask some questions.

                          What is it you want to make (what is it for)?

                          What are the reasons for the choice of material?

                          About how many does ‘small batches’ mean, and how often would you make a batch, or how many in all?


                          #863996
                          JasonB
                          Moderator
                            @jasonb

                            The other question is what will they sell for? Not much point in spending an hour making something if your price point is a couple of quid.

                            #864009
                            Dave Halford
                            Participant
                              @davehalford22513


                              Work holding. Cut a disc of 1/2″ ply say 80mm dia and mount in the chuck, Drill two 1/2″ 3mm deep holes on the 73mm recess line to facilitate removal of work from plywood with screwdrivers. Bore out a recess 2mm deep 73mm dia.

                              My first op would be cut the 73mm x 2mm disc from the square stock with the little Parkside Plasma cutter because I have one and it’s a very fast process. BTW 1mm steel from an old computer case does not distort

                              Second op.Tap into the workholder ply and bore out the centre to drawing by setting the top slide parallel to the bed and forwarding the tool till it’s limit then back out 1.5mm, moving the carriage till the tool touches the work then lock the carriage. that gives your 1.5mm depth repeatably.

                              Third op. When cold after boring, lever out the work and mount on the inside and gently finish the outside to 72mm


                              #864202
                              modmechengine1333
                              Participant
                                @modmechengine1333

                                Thank you for all the replies and help, really appreciate the range of suggestions.

                                I realise I got ahead of myself by not explaining what the project is for and what it needs to do, so let me back up and cover that properly, along with answering the questions raised.

                                What this is for

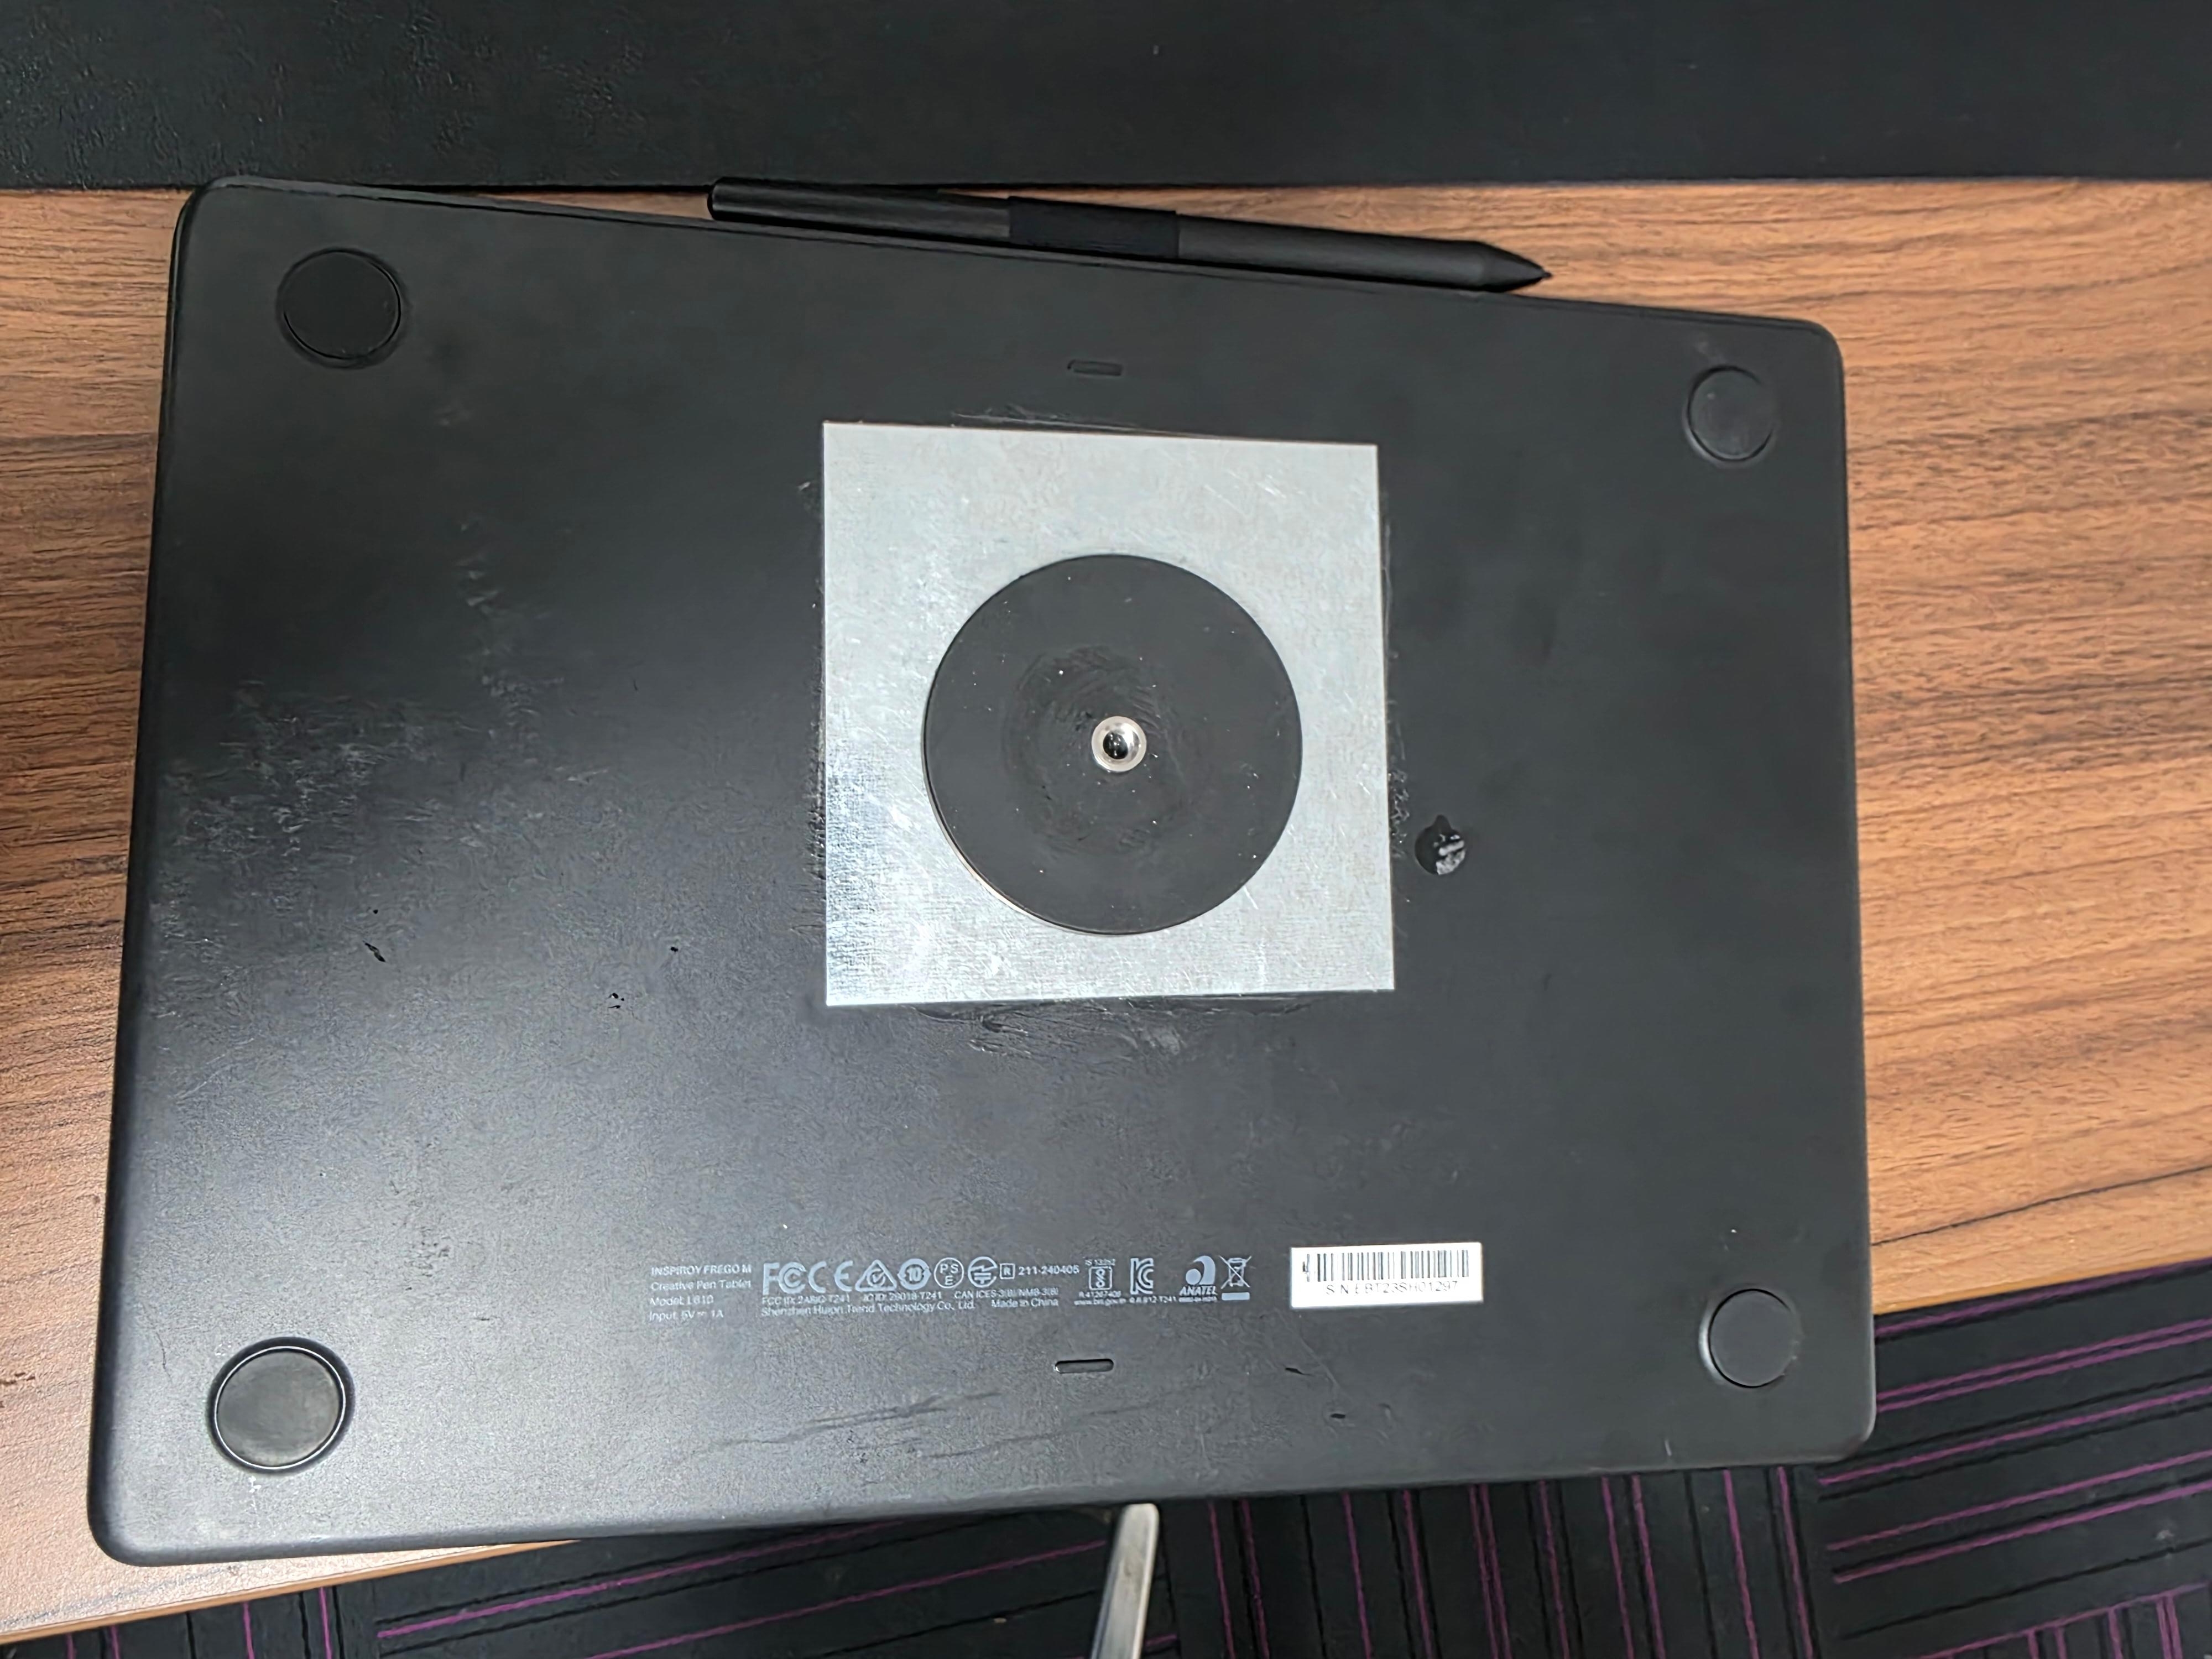
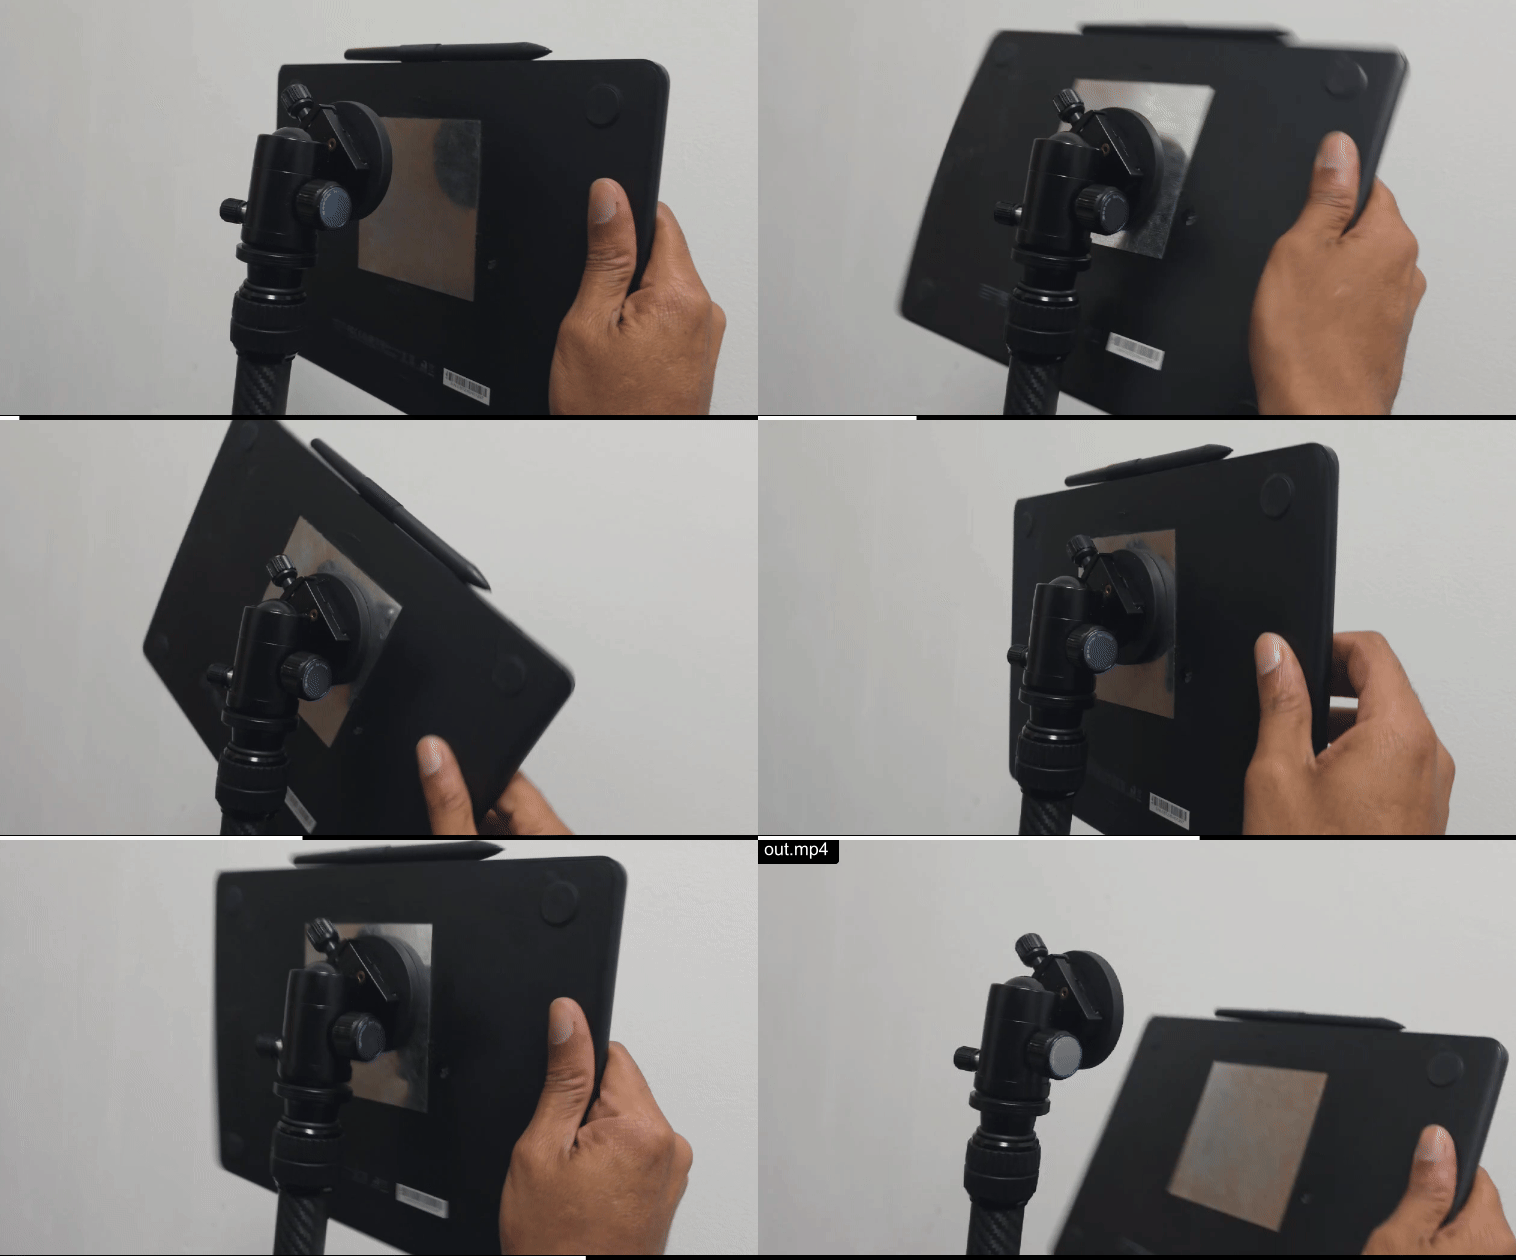
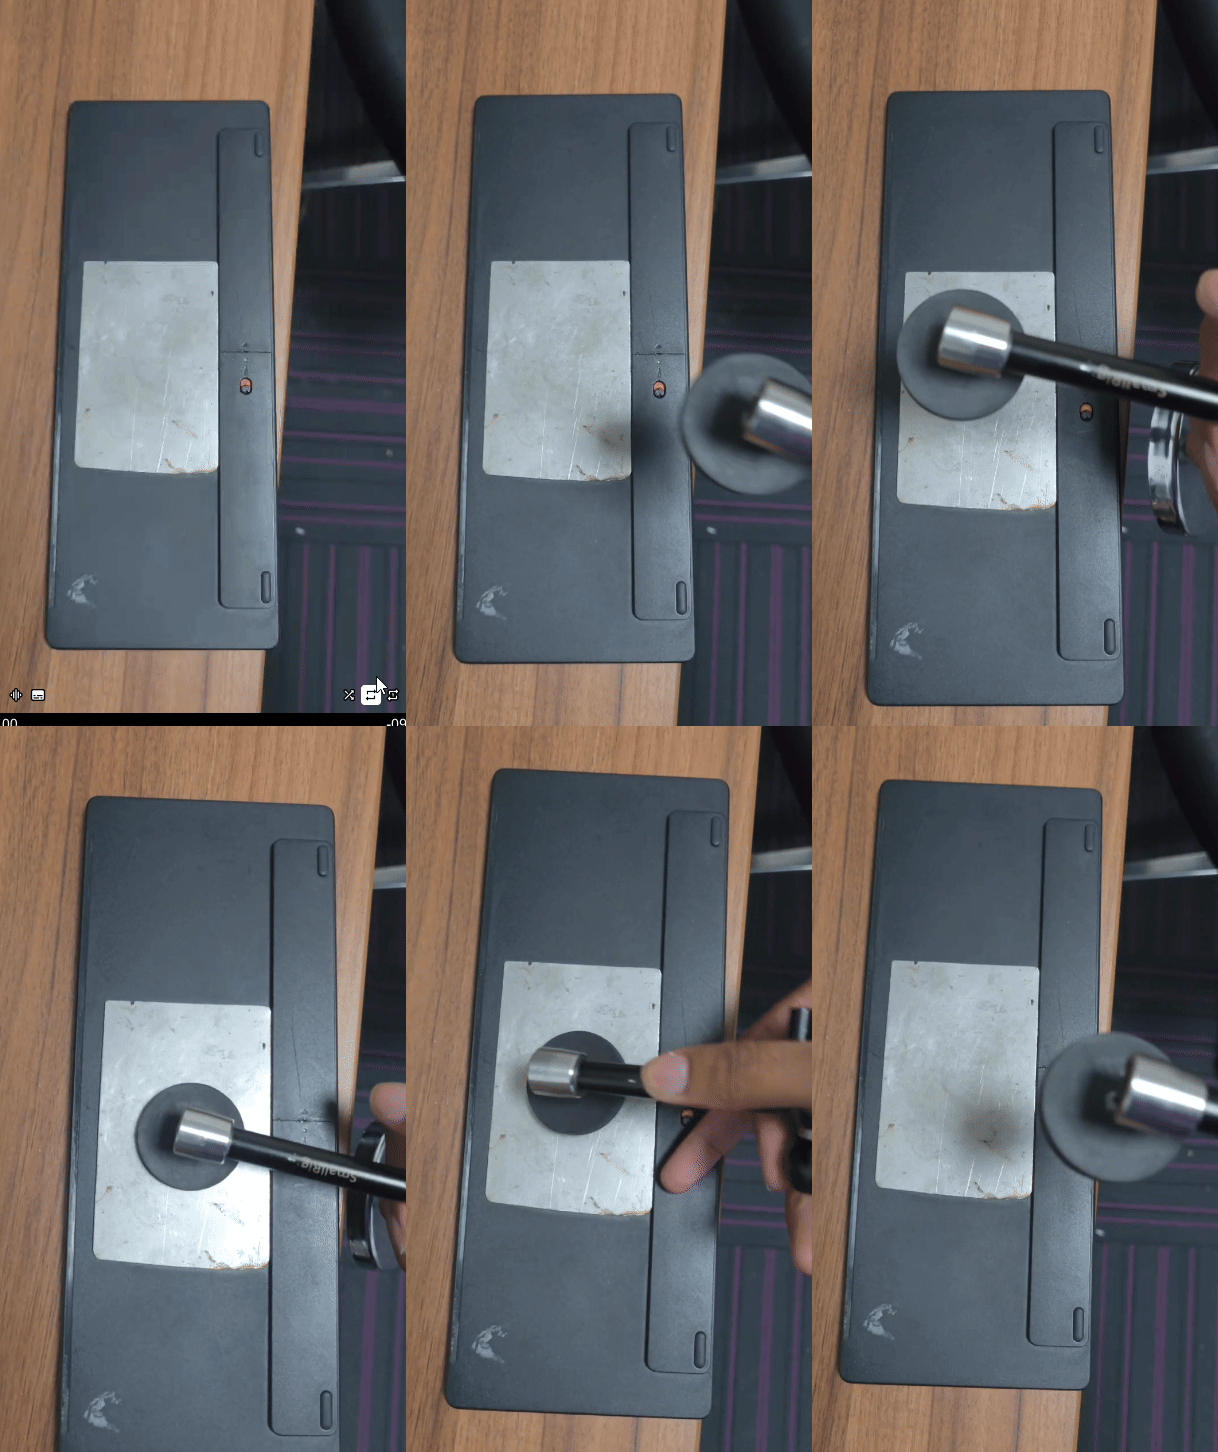
                                For a few years I’ve been using a “quick mounting system”; a steel sheet glued to the back of a device with 3M tape, and a magnet attached to whatever is holding it, a tripod head, a repurposed monitor arm, a chair arm, a friction arm. The idea is to temporarily mount things like a tablet, keyboard, MIDI keys, monitor, painting easel, paint mixing surface, sketchbook holder, and dismount with a pull/tear force. I’m constantly switching between projects through the day in my studio, and this is what’s worked best for that.

                                Photo of it installed on the back of a drawing tablet;

                                above drawing tablet being mounted and dismounted on a tripod;

                                Same design on a keyboard, mounted on a mini friction arm:

                                For heavier devices like monitors, I step up magnet strength, up to a switchable on/off magnet, but the disk design stays the same throughout.

                                In the case of heavy items like monitors, I will be using vesa, holes, etc to mount the disk. but this is not that important of a distinction, as heavy items are indoors only.


                                the weight and thickness of the magnetic disk
                                This is a big part of why I landed on 0.5mm/thin proportions in the first place, not an arbitrary choice. I’m deploying this extensively outdoors on my painting setups, permanently mounted to the backs of painting easel, graphics tablet, ipad, sketchbook holder or laptop. Weight is a real constraint when it comes to my bag and bike.

                                The lip solves the sliding problem I’ve had, that is gradual rotation as I adjust viewing angle causes the sheet to walk off the magnet, a circular lip would trap the magnet.

                                On JasonB Said:

                                The other question is what will they sell for? Not much point in spending an hour making something if your price point is a couple of quid.

                                Thank you for your earlier post, especially for your images. it answered questions I had about lathe’s as well as my project.

                                To answer your question, this isn’t for sale, its entirely for private use. I need about 10 to start, covering my current device line up, then add 1 or 2 more at a time as new devices get added.

                                The other core requirement is universality. The same disk needs to behave identically whether I’m indoors or outdoors, the sheet is never removed once it’s mounted to a device. It’s a permanent fixture on each device, glued once and left. Consistency between units is why am focused on a repeatable process rather than eyeballing each one.

                                On JasonB Said:

                                Also why use galv steel as you will only be left with thebottom galvanized once the rest has been machined?

                                On Nigel Graham 2 Said:

                                I don’t understand why you are using galvanised steel anyway unless this project is using existing

                                On Charles Lamont Said:

                                What are the reasons for the choice of material?

                                I chose galvanised purely because it’s magnetic and came in convenient pre-cut sizes on eBay, before I had access to any machining tools this makerspace now gives me.

                                I’m entirely open to switching material if there’s something that solves the brittleness issue while staying magnetic and doesn’t add meaningful weight versus what I’m using now. Would plain mild steel sheet be the straightforward fix here, or is there a better option once am not constrained by “whatever ships pre-cut”?


                                #864203
                                John Haine
                                Participant
                                  @johnhaine32865

                                  If the lip is just to stop “walking”, is there an easier way to achieve the same objective? For example, if the makespace has a 3d printer just a ring that glues on to emulate the lip?

                                  #864207
                                  JasonB
                                  Moderator
                                    @jasonb

                                    Well now we know a bit more I would go to one of the online laser cutting services and get a dozen or so 72mm discs cut  from uncoated 2mm mild steel. This will save having to turn the square into a circle.Any sheet steel will not have the ideal machining properties but will be magnetic and easier then slices cut from a more machinable round bar.

                                    Online price from Lasermasters about £4.50 each for 72mm you could will find cheaper if you go for a standard size off ebay, 75mm would cost £2.50ea

                                    While you are ordering get a single disc of say 5mm steel cut to 0.5mm smaller dia. Same if off ebay, just file 3 flats at 120deg to clear the chuck jaws as detailed below

                                    You can then use a standard 3-jaw chuck, slip the 5mm backing plate in first as this will stop the thing 0.5mm bottom deflecting away from the tool. Then put a blank disc into the chuck pushing it well back against the 5mm plate and chuck jaws while you tighten the chuck.

                                    A boring type tool or insert boring bar with CCGT insert can then be used to cut therecess starting from the inside out. If the design would allow a small say 5mm hole in the middle that would make it a lot easier to use the boring tool a syou can feed into the hole to put on a cut and then move outwards.

                                    As said by someone else set the top slide parallel to the lathe axis. Touch the tool against the work and zero the handwheel dial (or dro) and then you can use the dial to make sure you only cut 1.5mm deep or 0.060″ if it has old imperial divisions

                                    https://www.ebay.co.uk/itm/236784205505

                                    https://www.lasermaster.co.uk/pages/online-order

                                    #864212
                                    John Haine
                                    Participant
                                      @johnhaine32865

                                      Look, now we know why the lip is there it is obvious that there are other ways to achieve the same objective which would be much easier than machining a shallow pocket into an already thin disc. For example, three pins on a PCD just greater than the magnet diameter. The pins could be short csk screws inserted into csk threaded holes from the rear side so they have a short projection. Or press 3 dimples into the sheet. Or my 3DP ring. Or csk rivets from the “back” with a hemispherical head formed on the front.

                                      I would also visit my local fastener shop and ask about large penny washers. Might be an easy way of getting ready cut plated steel discs.

                                      And I’ve just twigged that your magnet is circular!  If you use a steel disc of the same diameter the magnetic force will keep it in place with no tendency to “walk” – just try pushing a well fitting keep plate on a magnet sideways to see what I mean.

                                      If the reason for using a square plate is for better adhesion, then making the square dimension the same as the magnet diameter will give the same effect with a sticking area 33% greater. If using double-sided sticky tape as opposed to an adhesive, “Gorilla” make a much stronger product.

                                      #864227
                                      John Haine
                                      Participant
                                        @johnhaine32865

                                        So, one final point.  I’d contact these people:

                                        https://www.modelengineerslaser.co.uk/

                                        and ask for a quote to laser cut discs from 1.5mm mild steel. I’ve used them a couple of times, great service and not expensive.  For small items they aggregate jobs and fit them into the material.  All you need to do to get a quote is supply a dxf file and the material spec, and the number needed. What comes back is cut very cleanly with little visible oxidising from the heat near the cut.

                                        #864240
                                        Grindstone Cowboy
                                        Participant
                                          @grindstonecowboy

                                          Just a suggestion for sticking the plates to the various devices – 3M VHB tape, various types available depending on materials involved. And I concur with John’s suggestion of a plate the same diameter as the magnet to prevent sideways “walking” – but not sure about rotation, although I haven’t noticed anything in your current or proposed system that addresses this.

                                          Rob

                                        Viewing 19 posts - 1 through 19 (of 19 total)
                                        • Please log in to reply to this topic. Registering is free and easy using the links on the menu at the top of this page.

                                        Latest Replies

                                        Home › Forums › Beginners questions › Topics

                                        Viewing 25 topics - 1 through 25 (of 25 total)
                                        Viewing 25 topics - 1 through 25 (of 25 total)

                                        View full reply list.