Etched brass thickness for O gauge coaches?

Etched brass thickness for O gauge coaches?

Home Forums Beginners questions Etched brass thickness for O gauge coaches?

Viewing 10 posts - 1 through 10 (of 10 total)
  • Author
    Posts
  • #225820
    Ed Duffner
    Participant
      @edduffner79357

      Hi everyone,

      I have an old O gauge Slater's kit of a GWR S9 coach I think it is …and would like to have a go at scratch building another using the kit as a reference. I have already made the end bulkheads from platicard but woud like to have a go at making some brass etched sides and possibly redo the ends as well.

      I would probably laser print the designs, iron them onto the brass and etch with Ferric Chloride. I'd need to do a two stage etch as there will be holes and relief designs required.

      My question is what is a good thickness brass to use for this?

      Cheers,
      Ed.

      #8012
      Ed Duffner
      Participant
        @edduffner79357
        #225968
        Jonathan Mead
        Participant
          @jonathanmead91773

          Ed, a long time ago I did a little home etching of copper clad circuit boards using resist and ferric chloride with very variable results. I would suggest that trying to do coach sides this way is unlikely to be successful, especially using ironed on photocopy toner. I know that some have advocated this method, but I've only seen it used for small components.

          I'd suggest having a look at the Worsley Works web site. They do a large number of etched coach sides in a variety of scales, and will scale up or down as necessary to 7mm, so if you find one in 4mm scale, they can do it for you in 7mm. If you already have the sides drawn, Worsley may be able to work them up and produce the sides for you. This way you know you are getting something that will work.

          I have produced etched parts in 16mm scale doing the artwork myself and then having it commercially etched. I have found that the thickness of metal depends on the degree of detail you want. So for example, you cannot etch a hole for say a handrail that is smaller in diameter than the thickness of the brass. Similarly things like nameplates have to be etched onto thinner material in order to keep the sharp edges of the lettering. Most of the etching was done for me by PPD – they have a website which has guidance on how to design and draw for etching.

          So, my advice would be to have a commercial company do the etching of your design. They will look at your artwork and decide the best thickness to use.

          Edited By Jonathan Mead on 18/02/2016 18:16:37

          #226443
          Ed Duffner
          Participant
            @edduffner79357

            Hi Jonathan,

            Thanks for your reply and kind advice. I had a look at the two web sites you referenced and it's an interesting option, however this is something I've always wanted to try. I build scale kit models as well from time to time and it would be good to be able to make some custom photo etched parts for those too.

            I have some brass and chemicals now, I just need to play with the laser printer to obtain the maximum resolution, or I should say optimal print. I'm finding a high resolution Tif file prints better than vector graphics.

            Kind regards,
            Ed.

            #226463
            Russell Eberhardt
            Participant
              @russelleberhardt48058

              I have found the laser transfer process to be rather hit and miss. Large black areas tend to have low density.

              For me dry film photoresist sheet exposed through a master made by printing in reverse on overhead film with an ink jet printer in photo mode gives better results.

              Russell.

              #226466
              Neil Wyatt
              Moderator
                @neilwyatt

                And never forget a small weight to ensure the film is in close contact with the brass!

                I've used the transfer approach too, with modest success compared to photo-etch. Photo-etching is brilliant

                22 after about four and a half hours a satisfactory depth of etch is achieved.jpg

                #226472
                John Fielding
                Participant
                  @johnfielding34086

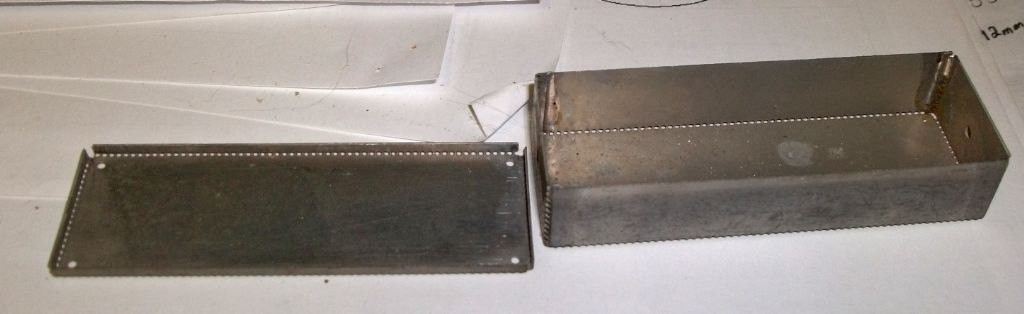
                  Here is a picture of an etched brass box we used to make at the old salt mine about 20 years ago. It is 0.25mm brass shim stock and was made as a 4:1 enlarged version. The artwork used sprocket tape from an old pre-CNC tool and the perforated holes meant it always folded correctly along the dotted line. We made dozens of different screening boxes and other parts in house as we had our own PCB plant and could make double-sided boards very cheaply.

                  The secret is to etch from both sides at the same time, so you need a double etch resist pattern screened on the sheet. Without this the holes have a distinct taper and need attention with a fine file. The tricky part is to get the two etch resist screens lined up, but we did this all the time and the jigs catered for this operation.

                  The box has been kicking around in my junk box for almost 20 years so the nickel plating is a bit scruffy now.

                  By making the artwork 4-times bigger we could reduce the size in incremental steps, this box is a 1/4-scale version of the full size one. It measures 3" x 1". Our LittleJohn plate camera could enlarge or reduce in 0.1% increments, so making different sizes was easy, one artwork did for all of the boxes..


                  etched box.jpg

                  Edited By John Fielding on 22/02/2016 16:08:13

                  #226515
                  John Fielding
                  Participant
                    @johnfielding34086

                    Forgot to mention one item.

                    Most printed circuit board manufacturers make etched brass screens for applying solder paste onto surface mount component printed circuit boards. They can etch to some pretty impressive tolerances, modern surface mount ICs have very close pad spacing and the etched brass has a tiny bit between the pins. Again the etching is done from both sides to reduce the degree of taper in the hole.

                    The best thing is to look up in Yellow Pages for your local PCB manufacturers and enquire if they can etch "Solder paste stencils". If they answer in the affirmative then they should be able to do your carriage etching without any difficulty.

                    #226651
                    Ed Duffner
                    Participant
                      @edduffner79357

                      Thank you all for your input and suggestions, much appreciated.

                      I had a first go at etching tonight with the design I drew up in Coreldraw of the coach sides and ends. I forgot to rub a key into the surface for the toner to bite into initially and I think it may have caused the toner to lose its grip after about 20 minutes in the chemical. The fine edges of the windows started to etch nicely then began to narrow a tiny bit. I cleaned off the brass sheet and ironed another toner layer on to get a bit more depth with a second etch.

                      I'll need to drill out and file the windows, although I will be having another go soon with some thinner sheet. This was 0.9mm

                      Here are a couple of photos.

                      Thanks again,
                      Ed.

                      #226659
                      John Fielding
                      Participant
                        @johnfielding34086

                        Hi Ed,

                        That looks pretty good so far. 0.9mm is a bit thick for etching, for your application something more like 0.3 to 0.5mm would be more suitable. The secret is to have a good etch resist coating that won't peel off or be attacked by the etchant and to use hot ferric chloride. The etching baths we used ran at +60C and used a different etchant, can't exactly remember the name after all those years, but it walked through brass like a hot knife through butter. A compressed air supply with aerating nozzles caused a stream of air bubbles to rise from the bottom of the tank, this speeds up the etching by about 50%. RS Components used to sell a small etching tank with such a feature and it worked very well. Not sure if they still sell this beast.

                        Some folks use hydrochloric acid (pool acid) mixed with hydrogen peroxide as rapid etchant, not tried it myself but those who have say a PCB etches in a few minutes and the line definition is good.

                        At the old company in the UK they used chromic acid as an etchant, but that is violent stuff! To etch a board was measured in seconds not minutes and again it was hot not room temperature.

                        Again the secret to making clean holes or slots in brass is to etch from both sides with accurate registration of the two etch resist coatings.

                      Viewing 10 posts - 1 through 10 (of 10 total)
                      • Please log in to reply to this topic. Registering is free and easy using the links on the menu at the top of this page.

                      Latest Replies

                      Home Forums Beginners questions Topics

                      Viewing 25 topics - 1 through 25 (of 25 total)
                      Viewing 25 topics - 1 through 25 (of 25 total)

                      View full reply list.