Parkside Electronics

Parkside Electronics

Home › Forums › General Questions › Parkside Electronics

Viewing 21 posts - 1 through 21 (of 21 total)
  • Author
    Posts
  • #693598
    Clive Steer
    Participant
      @clivesteer55943

      I was wondering if anyone knew if Parkside Electronics, who make electric locomotive controllers are still in business. I haven’t been able to contact  them on their landline nor had a reply to an email although their website appears to still be accessible.

      I’ve been asked to have a look at one of their controller that isn’t working. A circuit diagram would be helpful and especially any details of the control unit that plugs into a 7 pin DIN socket as I don’t have this to hand at the moment. I believe it is likely to consist of a speed control potentiometer plus a forward/reverse selector switch and a control inhibit switch.

      CS

      #693620
      Michael Gilligan
      Participant
        @michaelgilligan61133

        Frankly, Clive … the message on the home-page doesn’t look encouraging:

        http://www.parksiderailways.co.uk/index.html

        MichaelG.

        .

        Edit: __ see also

        https://gardenrails.org/viewtopic.php?t=13560

        #693625
        Clive Steer
        Participant
          @clivesteer55943

          Thanks Michael. I hadn’t noticed that on the home page as somehow I didn’t get to their site that way.

          Oh well. Good old fashioned reverse engineering needed. With just one LM399 hopefully it is a simple circuit.

          CS

          #753119
          tmcc
          Participant
            @tmcc

            Hi Clive, did you ever find a circuit for this? I’ve just picked up a controller in need of repair and again I. In need of a circuit.

            Thanks.

            Tom

            #753478
            Michael Gilligan
            Participant
              @michaelgilligan61133

              Tom

              I don’t know the controller in question, but here’s all you need to know about LM399

              https://www.analog.com/en/products/lm399.html#part-details

              MichaelG.

              #753519
              tmcc
              Participant
                @tmcc

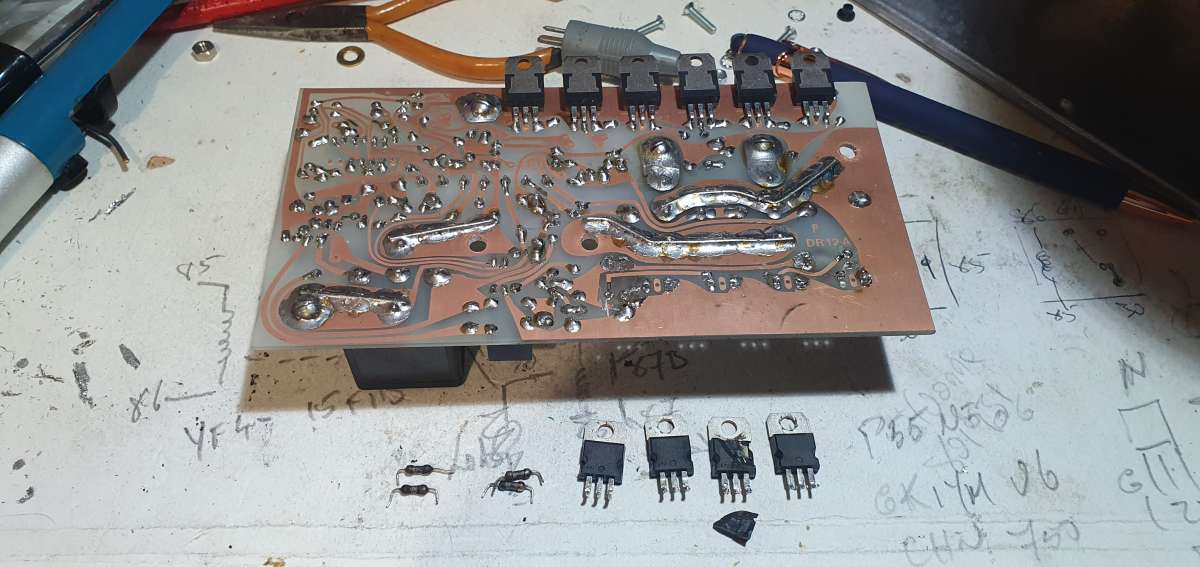
                <p style=”text-align: left;”>Thanks Michael, it a 24V 100A controller and it’s more the MOSFET side that is the issue. Not sure what’s happened to it but at least 4 of the mosfets are short and the gate resistors ore burnt out. One if the mosfets is completly blown apart.20240913_191947</p>

                #753528
                Michael Gilligan
                Participant
                  @michaelgilligan61133
                  On tmcc Said:
                  Thanks Michael, it a 24V 100A controller and it’s more the MOSFET side that is the issue. […]

                  Oops … no sign of the aforementioned LM399 there

                  MichaelG.

                  #753545
                  tmcc
                  Participant
                    @tmcc

                    Hi Michael, yes there is an LM339 in the circuit but hopefully that side ok but haven’t got to looking at this side yet.


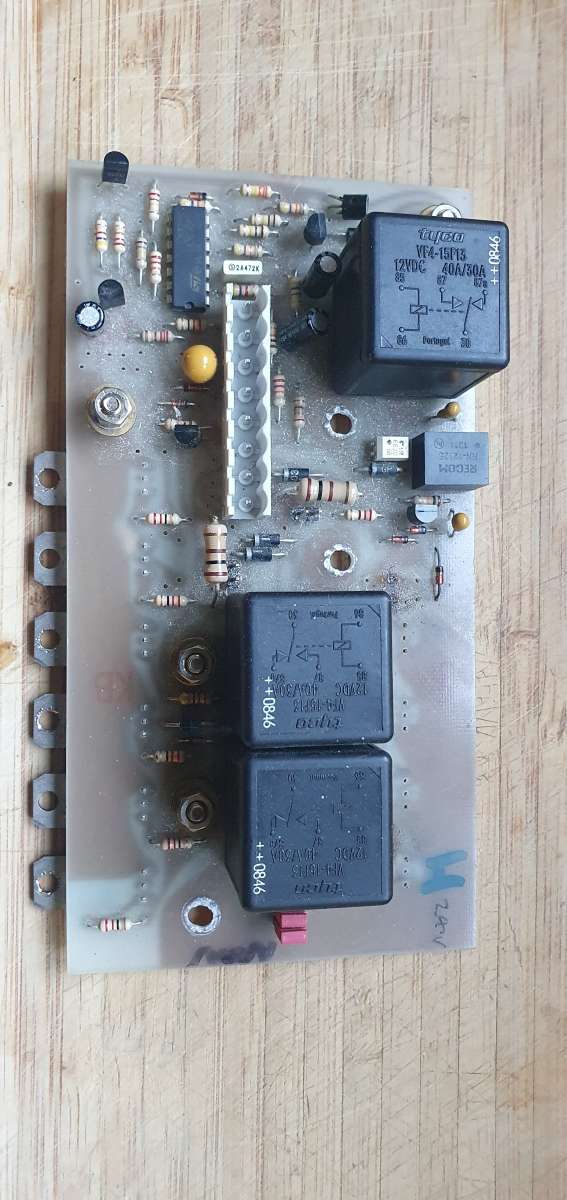
                    20240914_175353

                    #753547
                    Michael Gilligan
                    Participant
                      @michaelgilligan61133

                      Aha … catching-up slowly

                      MichaelG.

                      #755788
                      Phil Barber
                      Participant
                        @philbarber30745

                        Any more info on this topic would be interesting.

                        #755795
                        tmcc
                        Participant
                          @tmcc

                          Hi  Phil,  unfortunately no additional info or circuits etc. I have identified 7 out of the 10 mosfets are blown. Waiting on replacements to arrive before working out what the connections are and power it up.

                          Tom.

                          #755831
                          Bazyle
                          Participant
                            @bazyle

                            The 339 is probably rigged as an oscillator with variable mark space ratio with the relays providing reverse rather than a bridge setup. Check the relays aren’t burned out and work. One failing to switch when the other did might have shorted the fets.

                            #755835
                            Clive Steer
                            Participant
                              @clivesteer55943

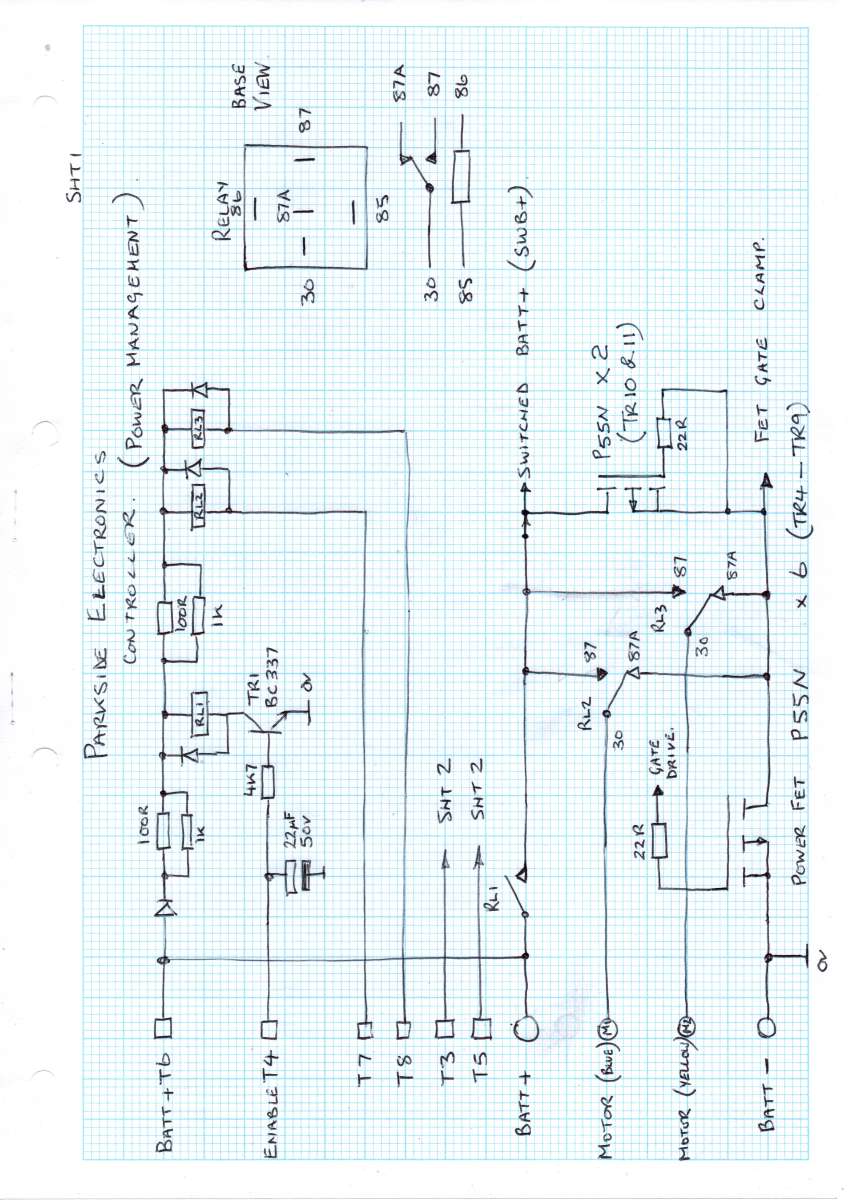
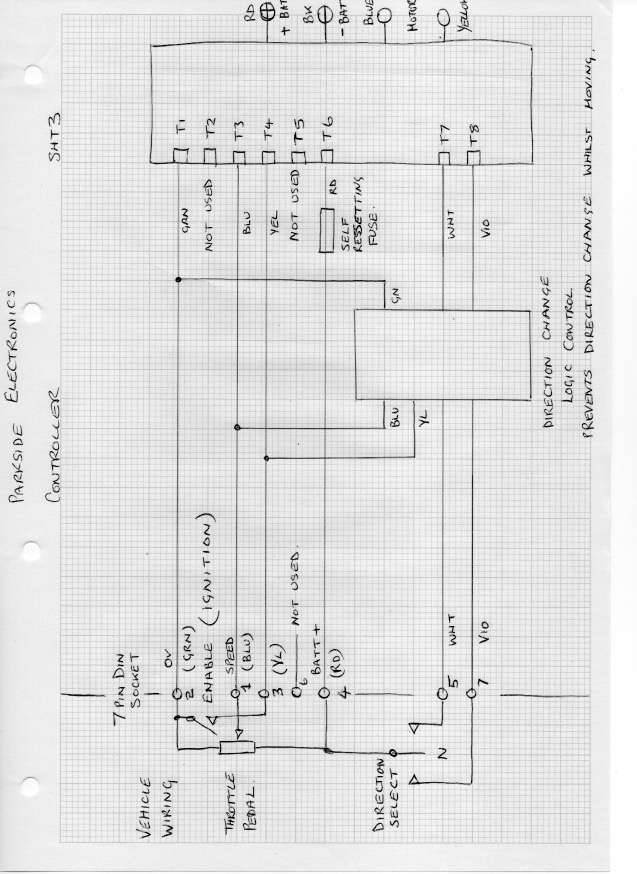
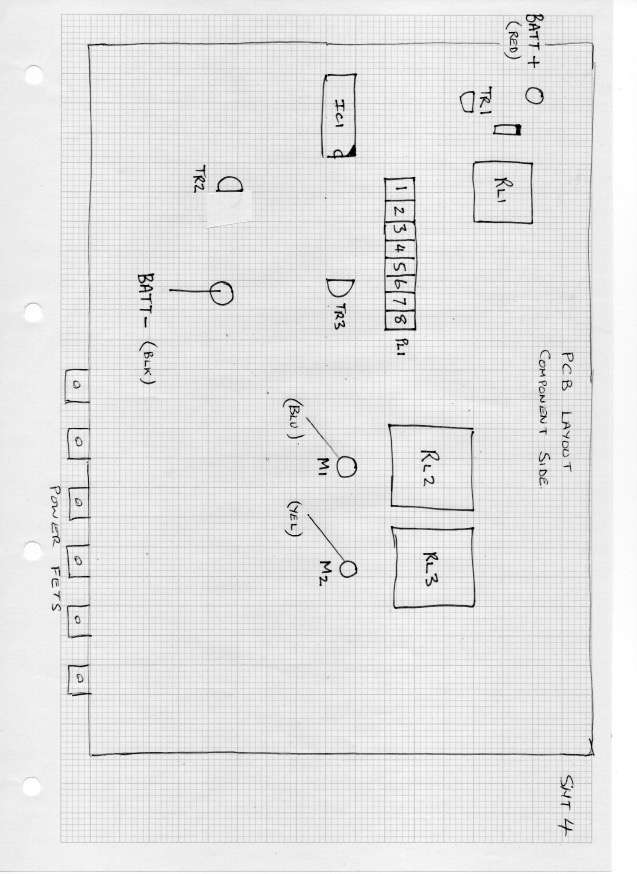
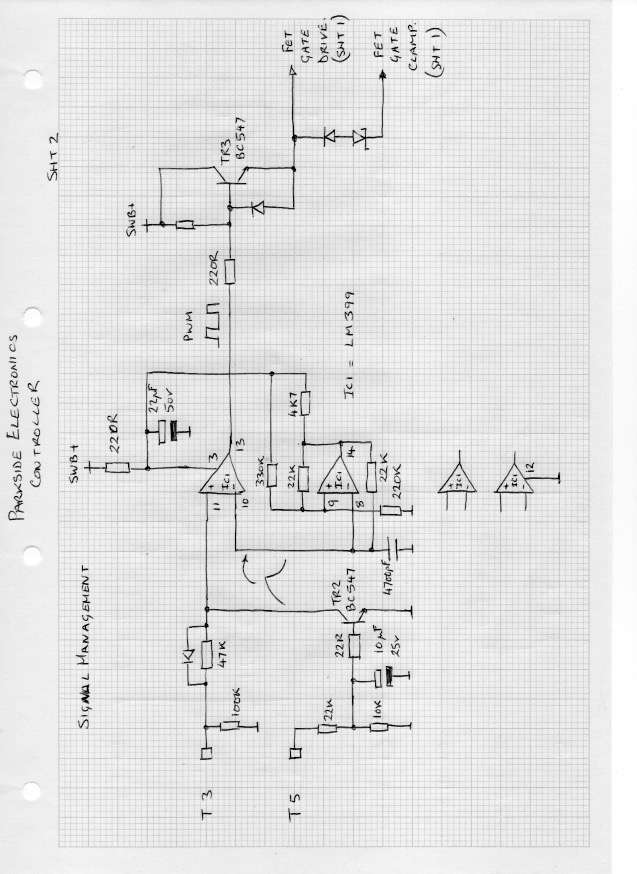
                              I’ve attached schematics of the Parkside controller I had a look at. The circuit is very simple with one section of the LM399 being used to generate a sawtooth wave which is fed to another section to convert the variable DC control voltage into a PWM signal to drive the MOSFET’s. It appears 2 MOSFET’s are used to provide braking. In my case the controller was working OK and the issue lay elsewhere in the vehicle ( a Childs electric car)

                              I hope this helps.


                              CSParkside con sht1Parkside con sht3Parkside con sht4

                              #755840
                              Clive Steer
                              Participant
                                @clivesteer55943

                                Somehow the upload left out sht 2.Parkside con sht2

                                #755936
                                Phil Barber
                                Participant
                                  @philbarber30745

                                  Many thanks Clive,  this is really useful.

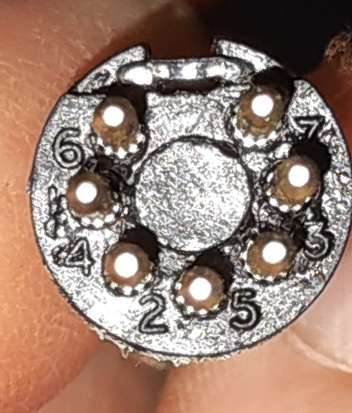
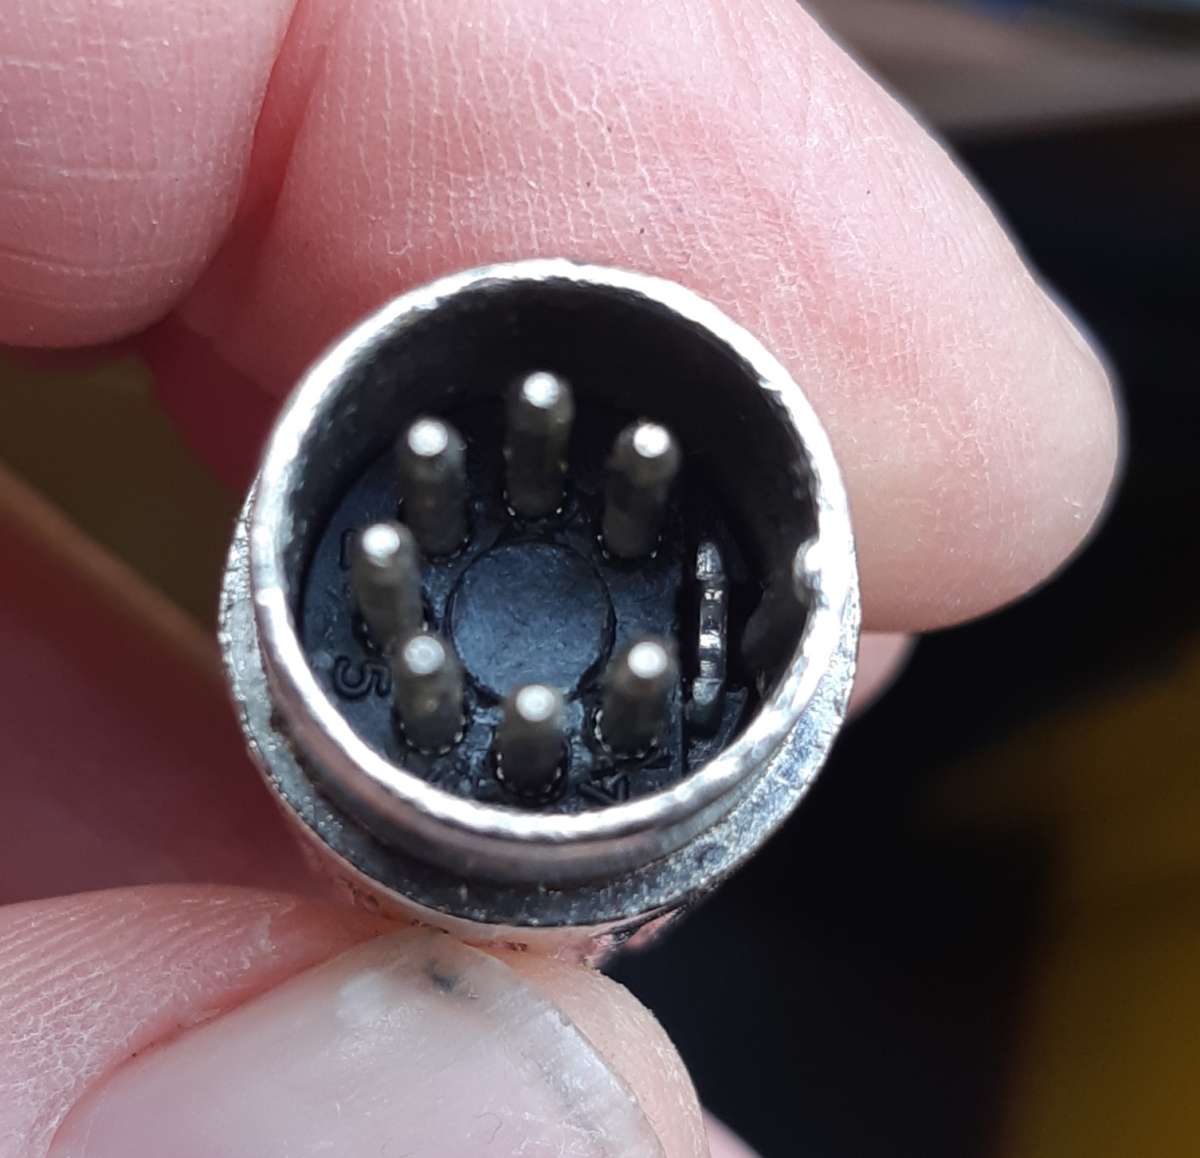
                                  I’m wondering how long I can extend the 7W DIN lead, so I can “pipe through” wagons for push-pull operation.

                                  Also, the PWM provides too much current control with the motor I have, so its difficult to maintain a constant low speed.  A small movement in the control sends the loco accelerating off.  Anyone any ideas how to make it more like a tram / DC  electric, with a notch or two slowly moving the train to a constant speed, before a weak field simulation is applied?

                                  … also attached a couple of photos for reference.


                                  20240925_14482620240925_14492720240925_16521020240925_165638

                                  #755947
                                  Michael Gilligan
                                  Participant
                                    @michaelgilligan61133
                                    On Bazyle Said:
                                    The 339 is probably rigged as an oscillator with variable mark space ratio […]

                                    I wish I understood how that ^^^  could be 

                                    Are there two different devices called LM339 ??

                                    MichaelG.

                                    [ see data-sheet linked earlier ]

                                    .

                                    Edit: __ Don’t worry LM339 vs LM399

                                    #755953
                                    Bazyle
                                    Participant
                                      @bazyle

                                      The control lead will probably be all low voltage low current so you can probably extend it as far as you like. Beware a loose unconstrained lead though as they have a lemming like desire to leap under the wheels.

                                      The sudden start problem may be the control potentiometer just not providing a smooth progression from a low value which is not uncommon. Assuming all 3 wires from the potentiometer are used try putting a resistor, say 1k between the wiper connection and the connection at the end when it is stipped, probably battery -ve. This will help the voltage be lower at the start.

                                      #755959
                                      Phil Barber
                                      Participant
                                        @philbarber30745

                                        Hmm,  the pot on mine is a centre biased joystck,  with fwd and brake.  The additional analoge board is possibly a level shifter / brake control circuit?

                                        My reading of the MOSFET stage is a simple pull to ground transistor (4-9) with 10 & 11 as flywheel diodes.  The relays can switch this to either motor wire.  The other switched to positive.   If the relays are not delivering power, then they short the motor … reheostatic brake.  This is pretty neat!

                                        00  – short motor

                                        01 – FWD

                                        10 – REV

                                        11 – short motor.

                                        #794872
                                        mjbarratt
                                        Participant
                                          @mjbarratt

                                          I know that this is an old thread but I recently came across it and, because I have a Parkside controller like the one being discussed, I thought that the following might help.
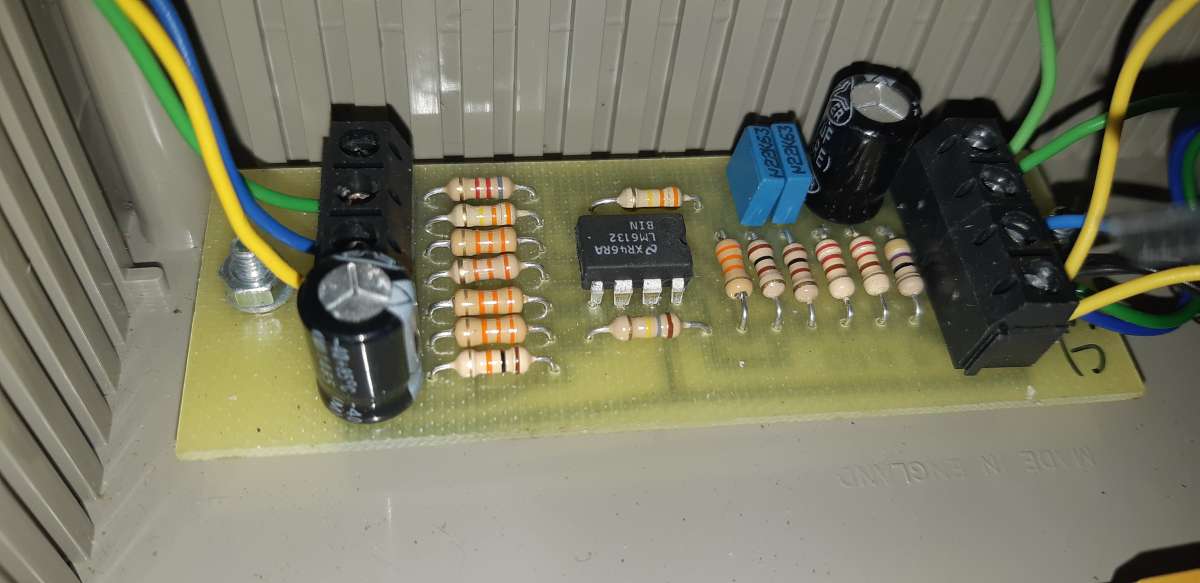
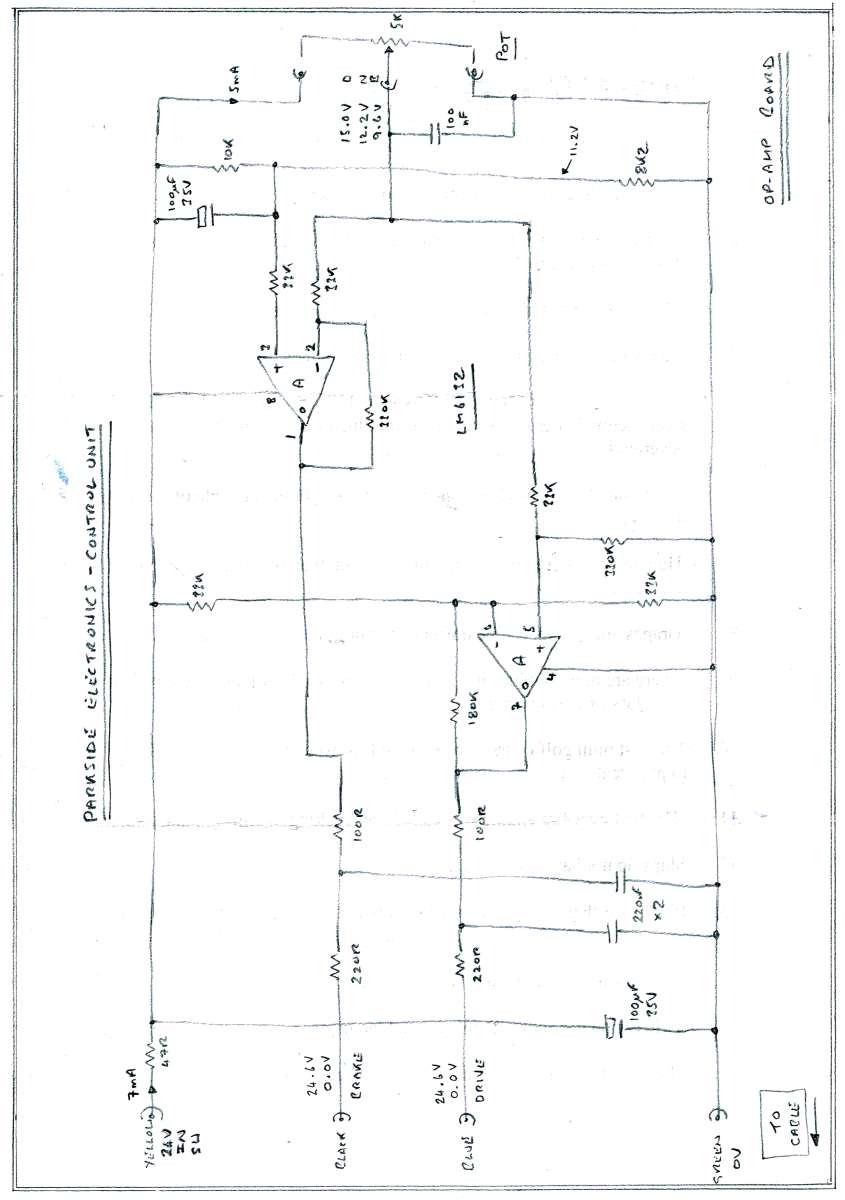
                                          My controller system consists of a ‘Power Unit’ – like the one pictured – housed in a die-cast enclosure and a separate, remote ‘Control Unit’ that provides both Forward:Reverse and Drive:Brake control functions. This contains two PCBs and appears to be similar to the one shown in PhilBarber’s post above…mine differs in that it also provides a ‘Horn’ function controlled by an eighth wire in the DIN plug. I have traced out the circuit diagrams of the two PCBs and they are attached below.

                                          The OpAmp Board provides two mutually exclusive control voltages both of which idle at 0V when the Control Pot is centred. As the Pot (joystick) is moved in either direction – Drive or Brake – the respective control signal (Drive:Blue Wire / Brake:Black Wire) ‘lifts off’ 0V and rises toward its maximum value of about 24V. On my unit the joystick output voltage ranges from about 9.6V (full Brake) to about 15.0V (full Drive) with the Neutral position giving about 12.2V. This approximately +/-2.5V swing is amplified by about x10 by the two op-amps to provide the two separate 0-24V outputs to the Power Unit.

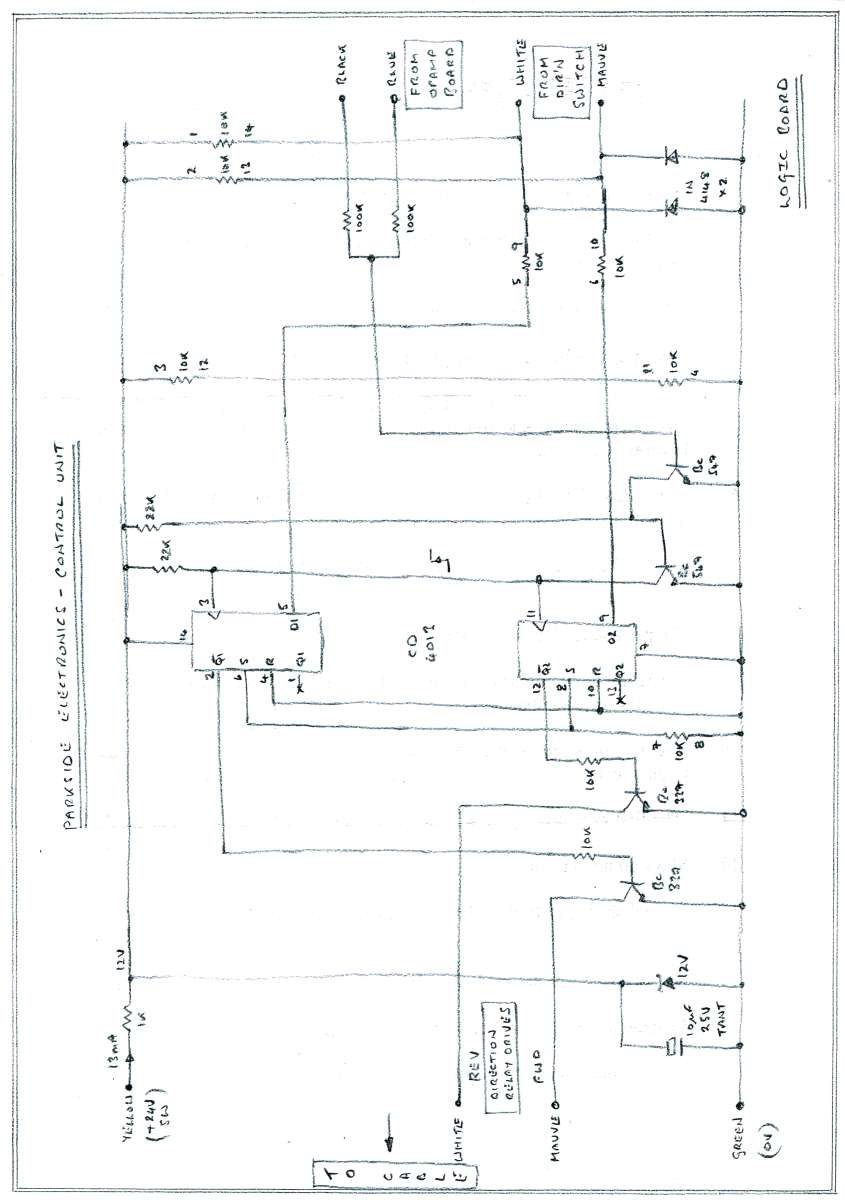
                                          The Logic Board provides the circuitry for the Direction Change Control Logic shown on Clive’s SHT3 drawing and works as follows:-
                                          The Direction Control switch and its pull-up resistors (2 x 10k) provide the ‘D’ inputs to the two halves of the CD4013 flip-flop – a logic low in the selected position, Fwd or Rev, with the level at the other gate at a logic high. With the joystick centred – and so both the Drive and Brake control voltages are at 0V – the flip-flop’s CLOCK inputs are at a logic low. Moving the joystick a fraction in either direction lifts one of the control voltages off 0V and causes a positive-going clock pulse. This latches the current state of the Direction Switch and provides a mutually exclusive drive to the direction control relays in the Power Unit. Additionally, because the positive-going edge of the clock pulse can ONLY be produced as the joystick leaves the Neutral position, motor direction changes can only be actioned under conditions of ‘zero-drive’.

                                          A couple of points on Clive’s drawings:
                                          1. I think that the ENABLE switch shown on SHT3 should be connected to BATT+ not 0V. When closed this would apply 24V to the base circuit of TR1 turning it on, closing RL1 and so applying power to the MOSFET stages.

                                          2. I think that the left-hand end of the 100R:1k resistor pair feeding RL2 and RL3 shoud be connected to the cathode of the upstream reverse polarity diode. The relays used have 12V 90ohm coils and the resistor-pairs (100R||1k = 91 ohms) are used in series with the coils to permit operation from a 24V supply. As an aside, the 100R resistors dissipate about 2W and both of them show signs of overheating in my unit – two 180R in parallel would probably have been a better choice.

                                          I hope that some of this helps.

                                          Martin.

                                          PS: I’m sorry that the images are not particularly clear but I hope that you can read them OK.

                                          PECU-OpAmpPECU-Logic

                                          #868318
                                          shayodon
                                          Participant
                                            @shayodon

                                            First thanks everyone for your posts/diagrams on this

                                            Its the beauty of these types of forums someone like me can find this valuable info a few years later.

                                            this is the second time over past few years I have had to try and get this controller fixed on a loco we run at the Donegal Railway museum in NW Ireland dosnt run far just up and down streight bit of track (but we do have big plans thats a story for another day) as its staff that take the kids for a ride the hand control tends to get bit bashed now and again,

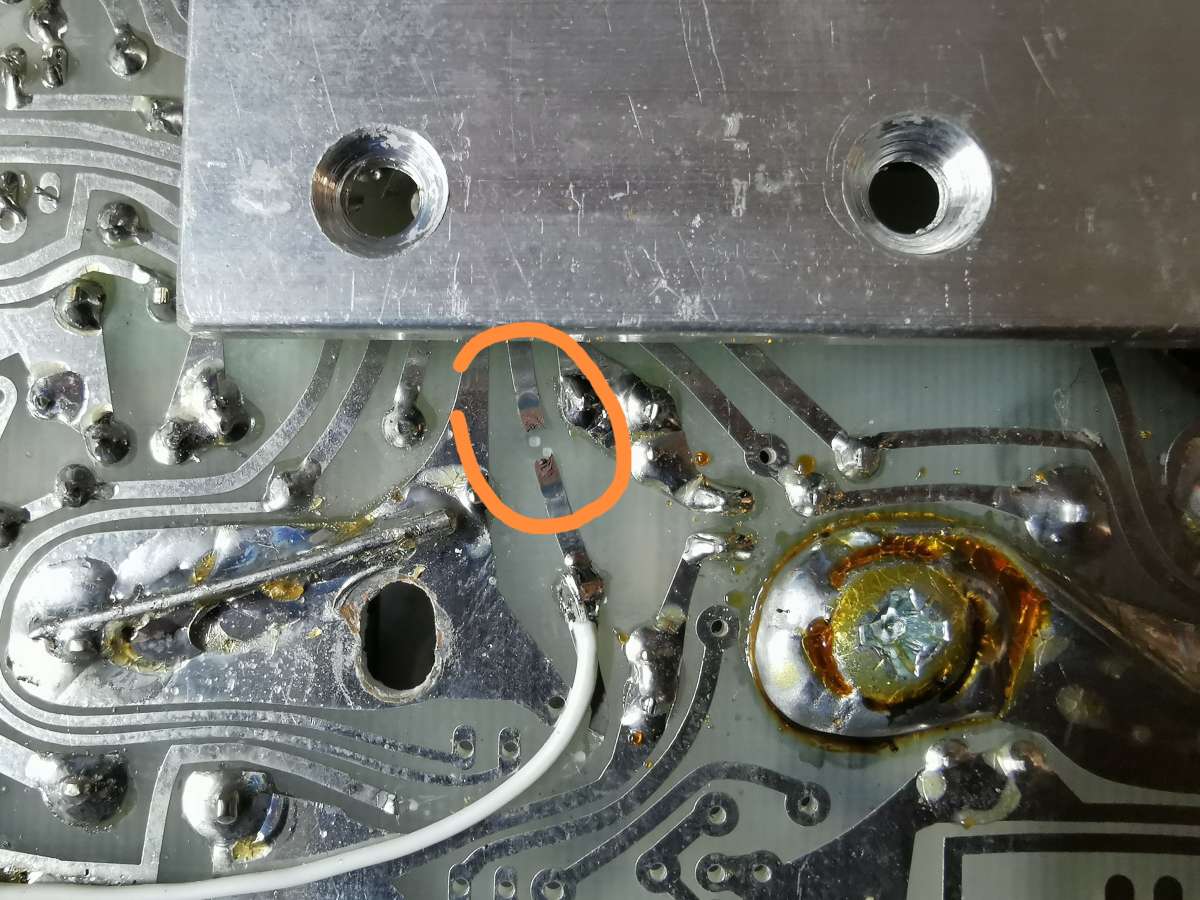
                                            The first time wires got pulled out even after repairing them it was still dead turned out to be a burnt PCB strip on the main control board (alum box), between the Battery + and the red wire on the green plug. was real pain to strip pcb out and put back toegther but bit of wire fixed it.

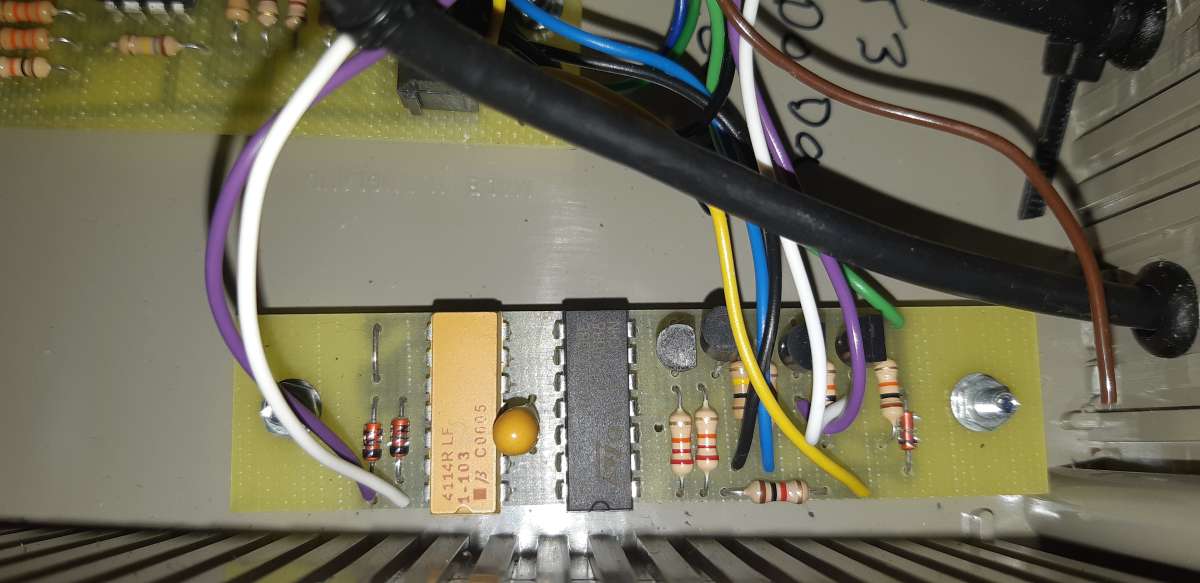
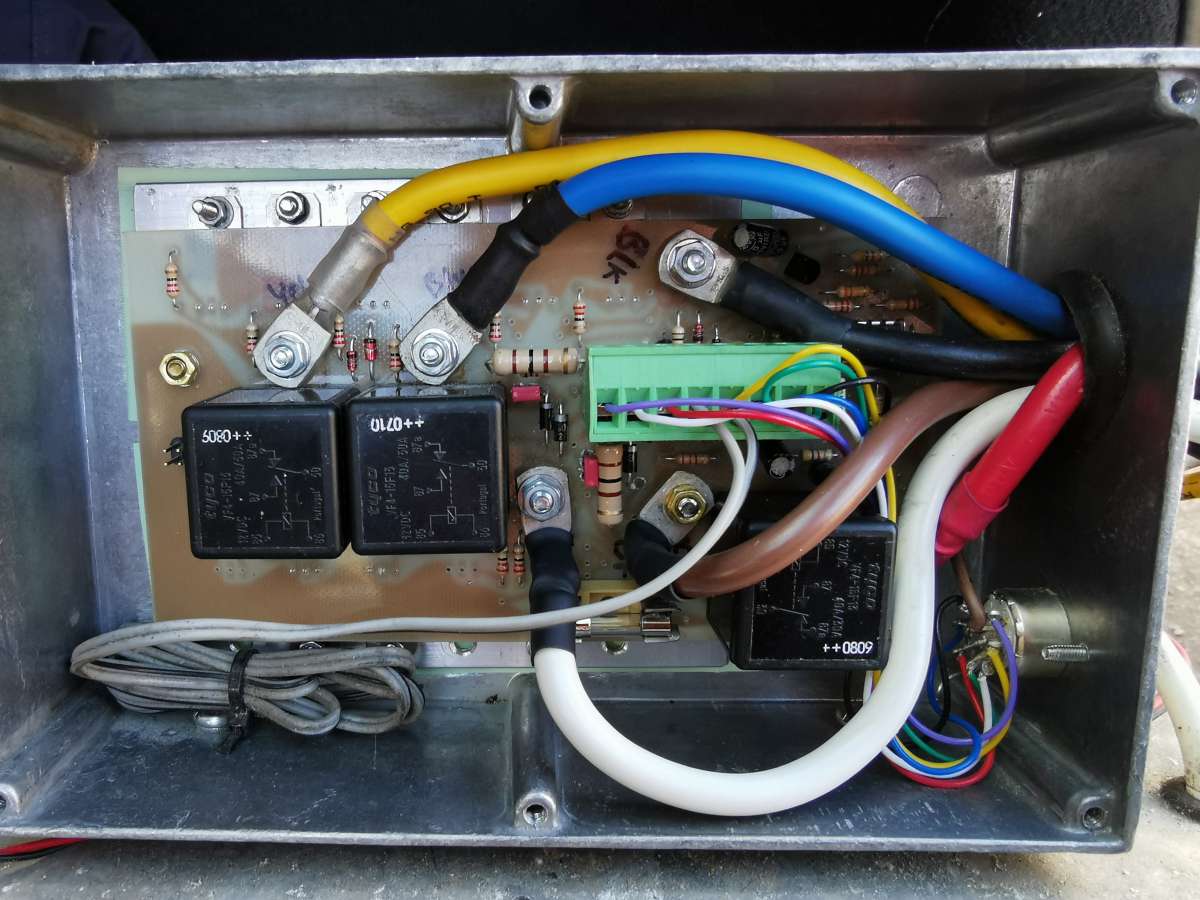
                                            Similar happened again last week wires pulled out plus broken resistor on the yellow wire its a 22R on ours (47R on martins drawing above) as its a 12v system not 24v, also one of the diodes on the logic board that go to the direction switch was also broke. It must have again shorted out as it burnt the same pcb strip on the main board so this time I made a mod to add a fuse here so if it happens again just matter changing fuse than stripping out the PCB.

                                            One note on the logic board diodes on martins drawing these are shown as 1n4148 diodes on mine they are 12v zener diodes BZX55C12 which I dont have so I robbed the one at the input of the board and replaced it with a 6V2 and a 5v6  in series.  Have it all back together but minute I switch it on an turn the pot it starts up full speed I can only stop it by turning off the key, direction switch makes no difference going forward all the time, you also dont hear the normal tone you get as you start to move the speed control lever/knob.  Cant imagine its anything to do with my series zener its 11.8v but would think that this one is just to keep stable voltage for the IC.

                                            Dont know if its another fault in main board or something else on logic/amp boards Ive missed.

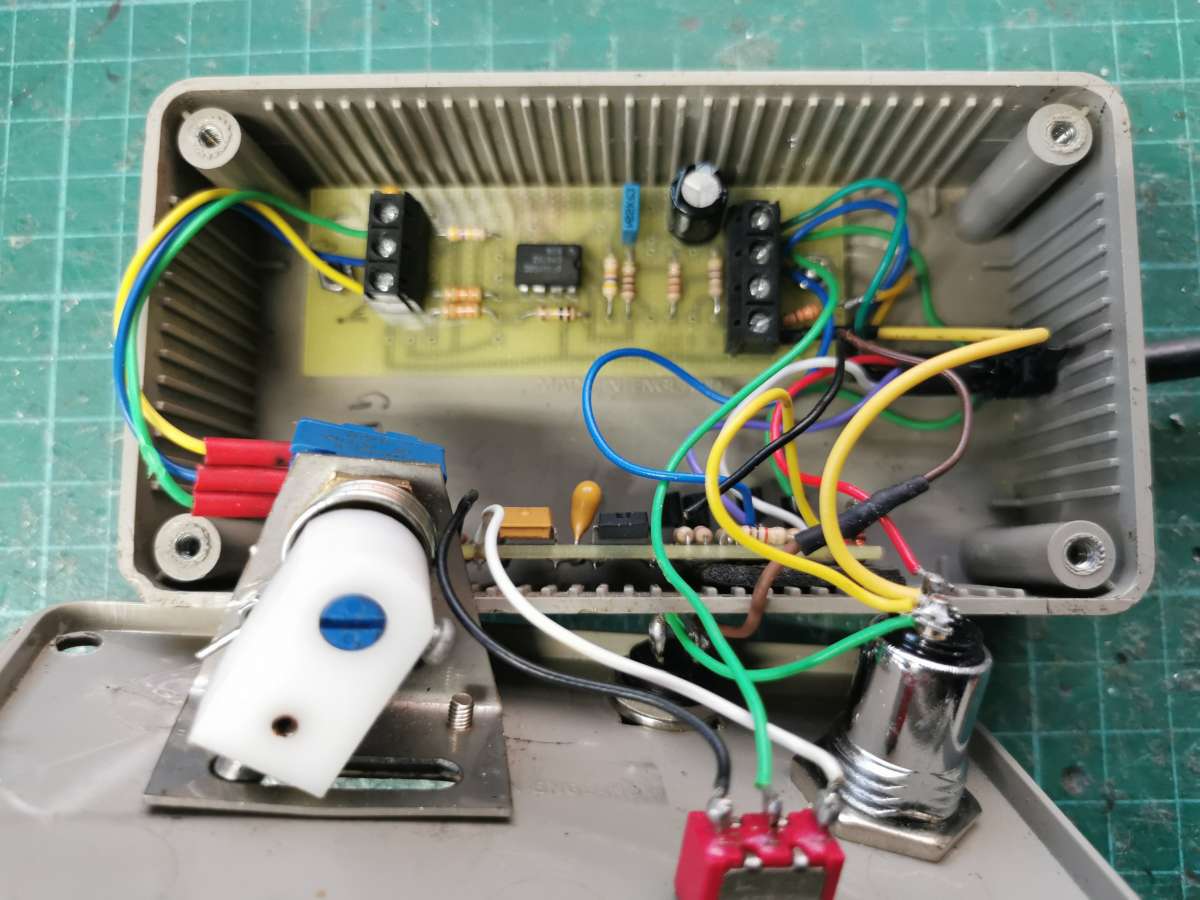
                                            pics below showing my setup you can see burnt pcb strip and the white wire the repair from first time, re assembled main board showing fuse holder at bottom, the motor on this one is a 3 phase I think going by the 4 big cables

                                            IMG_20261007_183321


                                            IMG_20261006_205326

                                            IMG_20261007_150212

                                            #868333
                                            Robert Atkinson 2
                                            Participant
                                              @robertatkinson2

                                              Sounds like shorted MOSFET(s). Do you have a multimeter?

                                            Viewing 21 posts - 1 through 21 (of 21 total)
                                            • Please log in to reply to this topic. Registering is free and easy using the links on the menu at the top of this page.

                                            Latest Replies

                                            Home › Forums › General Questions › Topics

                                            Viewing 25 topics - 1 through 25 (of 25 total)
                                            Viewing 25 topics - 1 through 25 (of 25 total)

                                            View full reply list.