Hardened Silver Steel Shattered – How to Avoid?

Advert

Hardened Silver Steel Shattered – How to Avoid?

Home Forums Beginners questions Hardened Silver Steel Shattered – How to Avoid?

Viewing 25 posts - 1 through 25 (of 38 total)
  • Author
    Posts
  • #399276
    SillyOldDuffer
    Moderator
      @sillyoldduffer

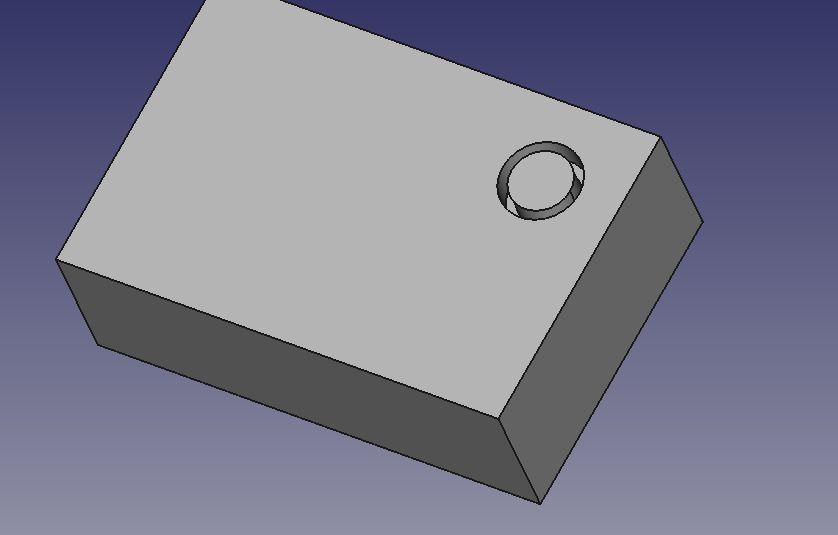
      I want to core drill a brass plate thus:

      plate.jpg

      The central pillar is 4mm diameter and the slot 1.6mm wide and 4mm deep.

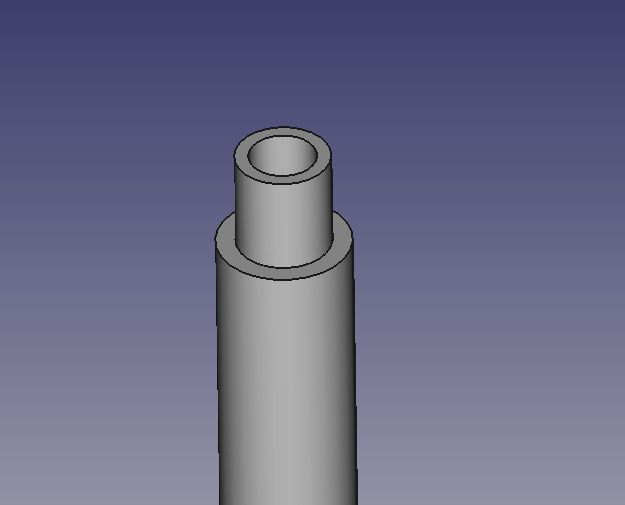
      I made a core drill out out of silver steel as shown but with teeth filed into the cutting edge. (Failed to draw a crown in FreeCAD and cant't do it in Fusion 360 because I've broken Windows10 as well. Not having a good day.)

      trepansaw.jpg

      I heated the silver steel bright red and plunged it into cold water. Testing with a file showed the steel was still a bit soft so I repeated the treatment, holding the steel red-hot longer (over a minute) before cooling in water again. This time the drill resisted the file.

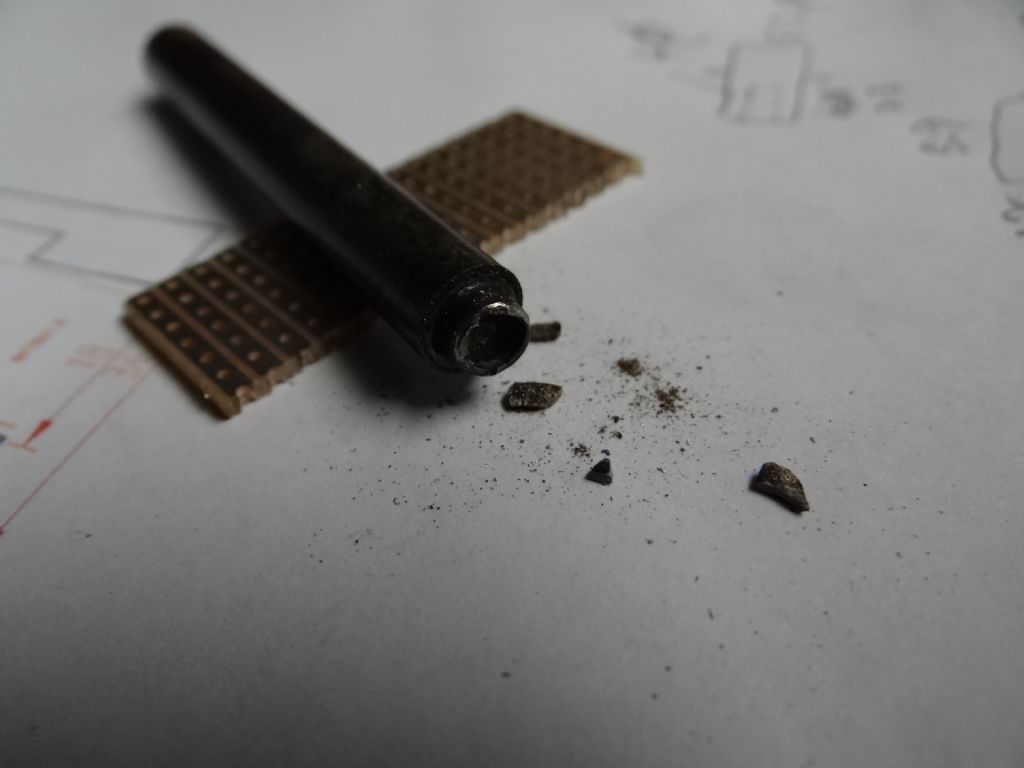
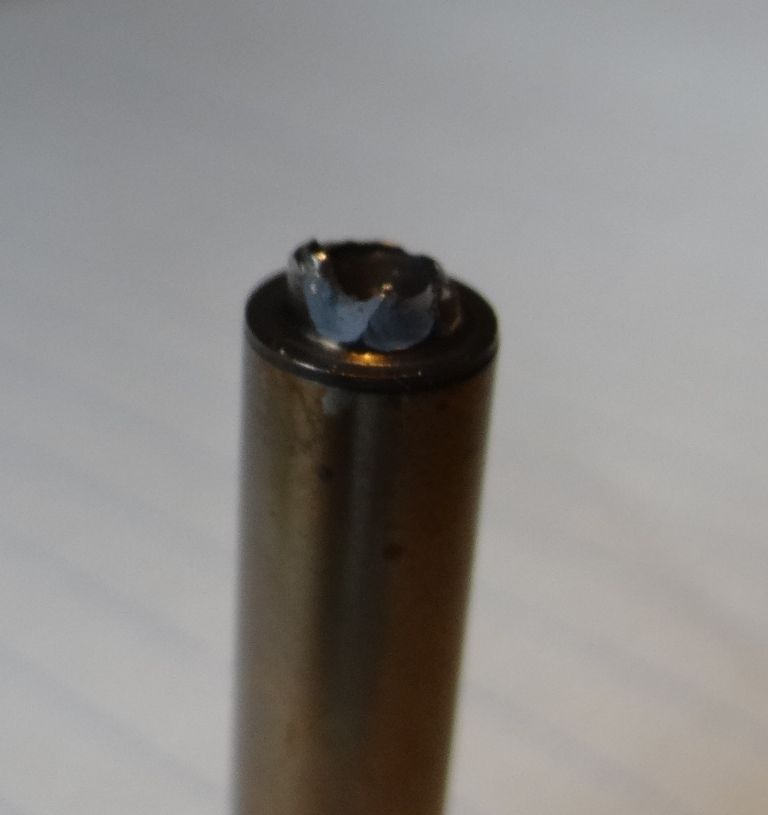
      At first drilling into the brass plate went well but after about 2mm the end of the drill disintegrated. Nothing jammed in the hole – the bits fell out.

      dsc05949.jpg

      I suspect the heat treatment made the silver steel very brittle, a problem I've not had before. Any ideas what I'm doing wrong?

      Ta,

      Dave

      Advert
      #9569
      SillyOldDuffer
      Moderator
        @sillyoldduffer
        #399277
        Andy Carruthers
        Participant
          @andycarruthers33275

          Would tempering help? or plunging into oil instead of water

          #399279
          ega
          Participant
            @ega

            I wonder whether after the first, unsatisfactory, hardening you should have first annealed the work before having another go?

            I assume you tempered after hardening?

            Edited By ega on 08/03/2019 16:53:49

            #399280
            not done it yet
            Participant
              @notdoneityet

              It is what happens when trying to use a cutting tool in the brittle hardened state. smiley Temper it.

              Also did you add any clearance? – the chips need to go somewhere, so I expect they jammed the cutter while trying to 'disappear'!

              #399283
              Mick B1
              Participant
                @mickb1

                I've also found I needed 2 tries to harden a silver steel cutter I was making, and I too had to soak it for a minute or so at red heat for it to 'take'.

                Tempering is a careful re-heating till you get a light-straw surface oxide colour – obviously you gotta polish up enough surface to be able to see that..

                As NDIY says, the chips have to go somewhere and arguably the teeth you file need to be a good deal deeper than the groove you're cutting to give them an escape route. I'd go for 2 teeth on first try and maybe turn up a couple of blanks to allow for failures.

                It'd be difficult to provide side clearances to the teeth, and hopefully you might get away without. I'd guess the biggest risk is the centre column of the brass getting hot and expanding inside the cutter to jam its teeth?

                Edited By Mick B1 on 08/03/2019 17:23:46

                #399285
                Mike Poole
                Participant
                  @mikepoole82104

                  Plunging from red heat into cold water should make the steel glass hard and brittle, to make a tool that will not shatter then further heat treatment is required. The tempering process to relieve some of the hardness and improve the toughness involves cleaning the steel so it is bright and heating gently until you see the steel surface change colour. Colours will range from a light straw through to a dark blue. Light straw keeps most of the hardness for some improvement in toughness and dark blue will trade the most hardness for the greatest toughness.

                  Mike

                  #399288
                  Martin Connelly
                  Participant
                    @martinconnelly55370

                    Were you clearing out the chips to avoid clogging the gullets?

                    Martin C

                    #399291
                    Brian Wood
                    Participant
                      @brianwood45127

                      If I might add a comment or two as well.

                      The teeth need some 'set' on them both inwards and outwards, like the teeth on a wood saw, to give them some clearance from the plate. It doesn't need to be much but it will prevent the plate material grabbing the cutting tool as the depth increases. Do all that shaping before the heat treatment

                      Some inaccuracy in tooth spacing is also a good design feature as it adds a random nature to the cutting and prevents chatter and ringing getting established.

                      I would also recommend building a shallow dam round the site with plasticine or something like it to drill the hole submerged in water. Low speed, frequent chip clearing and enough end loading to keep the teeth cutting

                      Regards

                      Brian

                      Edited By Brian Wood on 08/03/2019 18:06:49

                      #399303
                      Anonymous

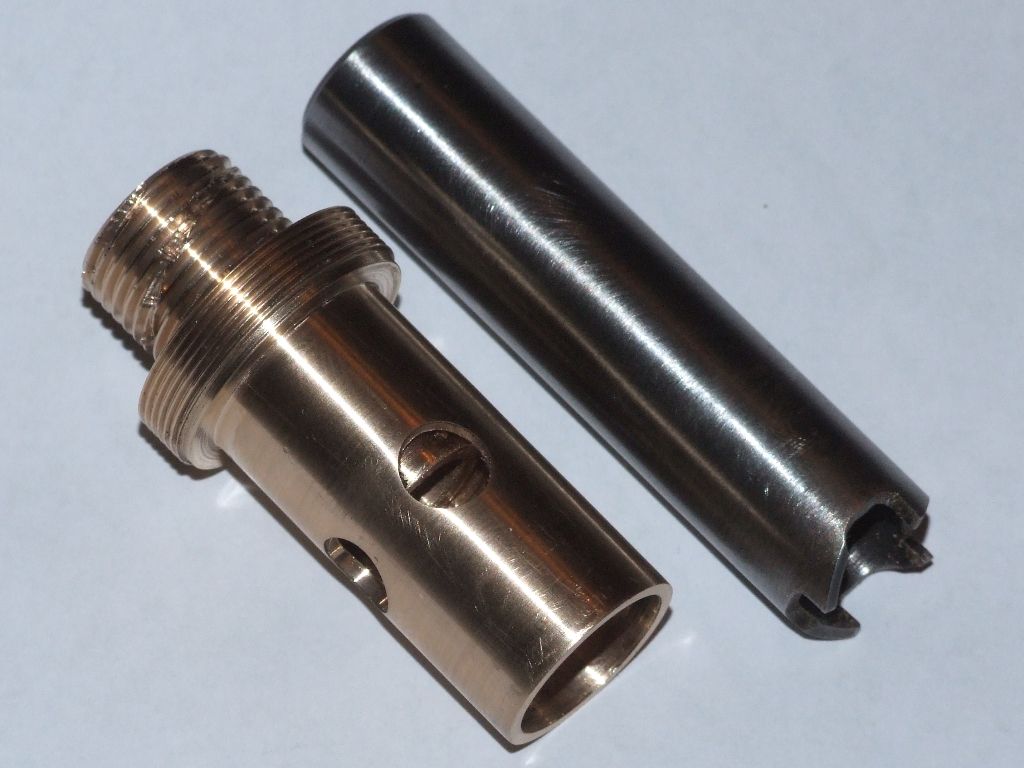
                        I've done something similar in brass, albeit larger diameter, about 1/2", and deeper, 3/8", at the bottom of a 3/4" hole:

                        valve body and tool.jpg

                        First on hardening and tempering; you will not get anything like full hardness simply plunging into water. You need to agitate vigorously so that the cold water quickly replaces the steam that is generated. I use brine rather than water as it gives a less explosive quench, but you still need to agitate. Doing the above should give a hardness better than 65Rc. The tool then needs tempering to remove brittleness. I can't remember what temper I applied to the above tool, but probably a straw colour around 220 degrees Centigrade.

                        The teeth were hand filed before hardening and tempering. I didn't bother with any tooth set and had no problems with grabbing. I did my cutting in the lathe with the tool in the tailstock – straightforward apart from frequent withdrawal to release the swarf.

                        Andrew

                        #399312
                        JohnF
                        Participant
                          @johnf59703

                          Hi Dave [SOD] I use this type go cutter a lot cutting steel, gauge plate EN45 or EN9 mainly, some diameters similar to yours but not as deep, also some with a much smaller centre pin. For my purpose the cutter is a rougher and I finish machine the part in the lathe.

                          I use silver steel, harden in oil and temper to a pale straw in DAYLIGHT – not artificial light. I have made 4 tooth cutters but from experience make your cutters with only 2 teeth this gives more room for chip clearance, you need plenty of oil and clear the chips frequently. Probably for brass you can cut dry ? I cut the teeth by hand with hacksaw and file, it can be done by machine if time permits, however in my apprentice days we were taught how to make spot face and reverse spot face, countersink cutters etc by hand.

                          One more point is bore the centre hole of your cutter to the size you want, don't rely on drills and or reamers — there is always a small bell mouth. For my smaller centre pins where its not so practical to bore I face off say .100" to negate the probability of a bell mouth.

                          John

                          PS I'll take some photos tomorrow

                          #399316
                          Martin Hamilton 1
                          Participant
                            @martinhamilton1

                            For 40 years when i built & raced tethered hydro's i done a lot of hardening & tempering of silver steel. The ball & socket couplings that we made needed to be hard but tough including a very small pin in the ball side of the couplings, used to heat red hot & plunge into cold water. That made them very hard but to brittle, to temper them down i would clean the outer surface of the bit of scale that had formed with emery cloth to bring the metal back to a shiny colour then heat to straw colour & plunge into oil. Old used motor oil used to work well but also used new motor oil if i had no old stuff about, never ever had any coupling failures or excessive wear.

                            #399319
                            Martin Hamilton 1
                            Participant
                              @martinhamilton1
                              Posted by Martin Hamilton 1 on 08/03/2019 19:42:56:

                              For 40 years when i built & raced tethered hydro's i done a lot of hardening & tempering of silver steel. The ball & socket couplings that we made needed to be hard but tough including a very small pin in the ball side of the couplings, used to heat red hot & plunge into cold water. That made them very hard but to brittle, to temper them down i would clean the outer surface of the bit of scale that had formed with emery cloth to bring the metal back to a shiny colour then heat to straw colour & plunge into oil. Old used motor oil used to work well but also used new motor oil if i had no old stuff about, never ever had any coupling failures or excessive wear.

                              I said that the wrong way round ( senior moment ), part would be heated to red hot & then plunged into oil. Then cleaned up & reheated to straw colour & then plunged into cold water, brain cooked with all the methanol in the fuel.

                              #399324
                              Chris Trice
                              Participant
                                @christrice43267

                                Most household ovens go up to tempering temperatures so no need to check colours or trying to heat evenly with a flame and potentially undoing all the good work hardening it. Put it in, cook it for a while at top temperature and then remove.

                                #399330
                                Martin Hamilton 1
                                Participant
                                  @martinhamilton1

                                  When i used to make waterscrew hydro props cut from solid bar i used to harden & temper in the same way as the couplings that i described above except the tempering was done slower in the oven to straw colour over a longer period in the household oven. I done this in the oven so that the very thin blades were an even temp all along the props, using a direct flame got uneven heat in the thin blades towards the tips of the blades. These props were not silver steel as silver steel was not tough enough due to the loads put on them turning @ 30000rpm in water, i used en24T for props to cut them from followed by the hardening & tempering.

                                  Edited By Martin Hamilton 1 on 08/03/2019 21:05:20

                                  #399349
                                  duncan webster 1
                                  Participant
                                    @duncanwebster1

                                    Get hold of a copy of Tubal Cain's book on hardening, tempering and heat treatment, it explains everything. You can borrow mine if you want, but I want it back as it's very good.

                                    #399357
                                    Hopper
                                    Participant
                                      @hopper

                                      I think I would look at simplifying the way the job is made and do away with the need for a special tool.

                                      As we have no idea of the application I'm only guessing, but something like drill a hole through the square block then turn up a stepped pin that is then held in place by press fit/Loctite/silver solder etc. Or drill and bore a stepped hole through the square block and secure a straight 4mm diameter pin in place similarly. You could even drill and tap the hole so the pin is screwed into place and then then loctited.

                                      #399375
                                      SillyOldDuffer
                                      Moderator
                                        @sillyoldduffer

                                        Brilliant answers as always chaps! My Mk 1 tool had six teeth, which would have weakened the drill considerably, especially as the heat treatment needs attention too, Two teeth next time. Also, I seriously underestimated the need for very frequent swarf clearance. Believe it or not I had the idea it would go up the hole inside the drill: pretty stupid huh.

                                        I've got lazy about tempering. Usually my silver steel efforts are specials only used a few times on brass or plastic and I've not had a failure before. I think they've been tough enough to do the job only due to luck.

                                        Can't get into my workshop until Monday but I'll report back asap. Meanwhile, my attempts to fix Windows 10 have made the problem much worse.

                                        Thanks,

                                        Dave

                                        #399377
                                        jaCK Hobson
                                        Participant
                                          @jackhobson50760

                                          For the current application I think the tool would be fine if you just added a tempering cycle at 220C as suggested.

                                          A few guidelines for next time:

                                          You need to heat until the steel is non-magnetic at least – that is easy and reliable to check. "'red' heat looks different depending on how bright your surroundings are.

                                          Speed of cooling also depends on size of part – bigger parts may well need brine and agitation. A watch pivot would probably be hard in air cooling.

                                          Toughness depends on grain size in the material. You can manipulate with heat treatment. Heating too high and too long will increase grain size. Repeating treatments just above critical / non magnetic will decrease grain size. Fine grain is much better for toughness. Big grain makes it a bit easier to harden. My experience with silver steel is that it is difficult to get really fine grain (compared with O1) – I speculate that this may be intentional to help machining?

                                          You can get a soft skin on heat treated material due to carbon depletion – an initial file test can fool you – sometimes you will find it is hard under the skin. More likely to happen if part was heated high for a long time (as could happen if you forged something or in initially creating the raw stock).

                                          #399382
                                          Brian Wood
                                          Participant
                                            @brianwood45127
                                            Posted by SillyOldDuffer on 09/03/2019 09:43:33:

                                            Also, I seriously underestimated the need for very frequent swarf clearance. Believe it or not I had the idea it would go up the hole inside the drill: pretty stupid huh.

                                            Dave.

                                            My wife's grandmother had a refreshingly simple view on life in general having escaped the Russian Revolution to come to England, along with her son and the clothes on their backs

                                            She used to comment on such set backs as: " You live and learn and die a fool " No reflection on you of course but it is a term I use whenever I make a rather silly mistake!

                                            Brian

                                            #399384
                                            Anonymous

                                              To add some more detail on hardening silver steel, although I'm fortunate to have an electric furnace curtesy of Fleabay. I heat to about 780°C and let it soak for tens of minutes depending upon thickness. I then quench in brine with vigorous agitation. Then I let the furnace cool to tempering temperature and let the part sit at tempering temperature for at least an hour. Then quench in brine.

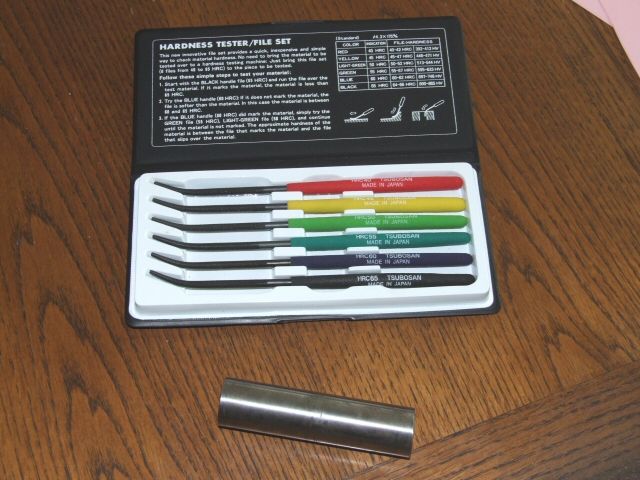
                                              SInce I agree with Lord Kelvin on measurement and understanding I use a set of special files to measure hardness:

                                              hardness_sized.jpg

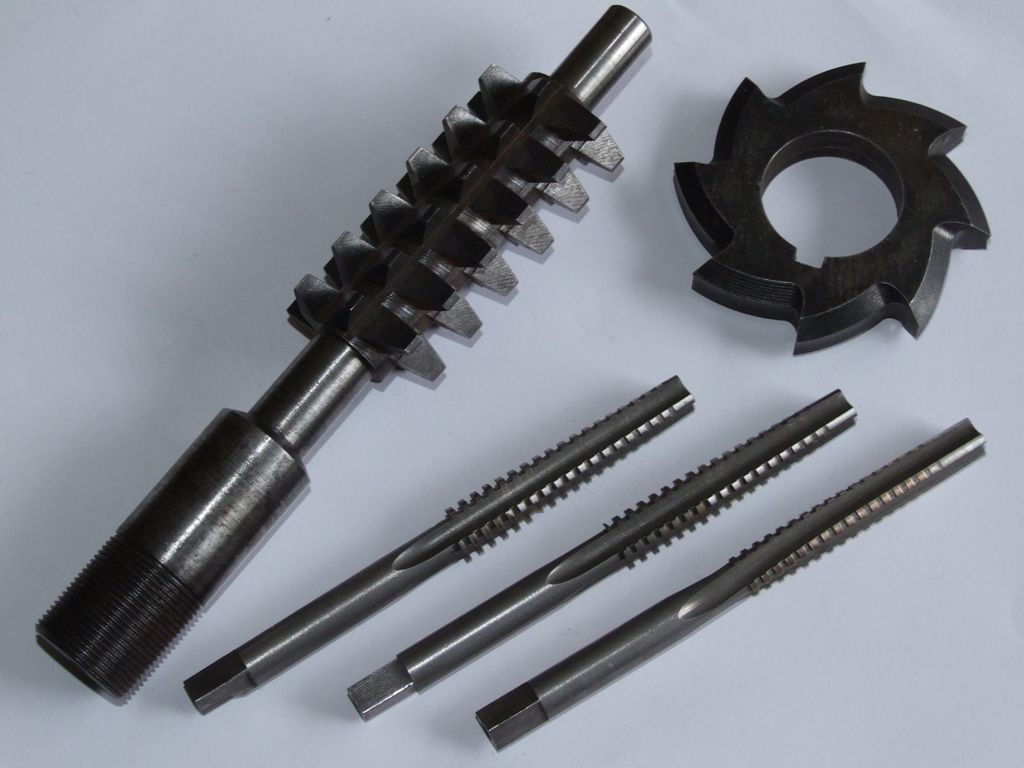
                                              Tests show that if you vigorously agitate the part when quenching you can achieve a hardness better than 65Rc. if you don't agitate then the part is more likely to be around 40Rc. In this picture of home made cutting tools the tap bottom right illustrates what happens if you don't harden properly:

                                              cutting tools.jpg

                                              Andrew

                                              #400217
                                              SillyOldDuffer
                                              Moderator
                                                @sillyoldduffer

                                                Reporting back with another silver-steel under achievement:

                                                dsc05953.jpg

                                                The focus isn't quite right, but you can just about make out the crystalline look of another brittle failure.

                                                After polishing this one went in the oven for 20 minutes at 220C. As it turned a nice straw yellow I was confident. With plenty of reversals for swarf removal it cut well into brass for about 3mm, then the end disintegrated without warning.

                                                I believe my mistake was leaving the quenched bit cold overnight before tempering it. It seems quenching and tempering should be done at the same time, ideally while the metal is still uncomfortably hot to hold from the quench. Try again tomorrow…

                                                Dave

                                                #400236
                                                Nigel McBurney 1
                                                Participant
                                                  @nigelmcburney1

                                                  I think some of the problem is due to the change in section of the job,a big mass of steel too close to the the fine cutting part,heat transfers to the mass so the red hot end of the tool starts to cool before it has a chance to get quenched, also if the tool is plunged into water sharp end first there is a tendency for an airlock as the tool has a blind hole ,(a centrally drilled hole through the tool wood get rid of trapped air),so may tend not to quench so well on the ID of the cutter. My first employer used a lot of silver steel tools mainly pin cutter and large counterbores on the capstan lathe as most the work was brass and nickel silver,hardening was primitive ,paraffin blowlamp,and a bucket of water ,and we were taught to plunge vertically and keep the lamp flame on the tool until the tool was close to the surface of the water to maintain heat,crude but it works,and the tools wood last for years on thousands of the lens retaining parts of microscope eyepieces, resharpening was done on a cutter grinder.Tempering was done by polishing the tool wth emery until it chaged to straw . I still use a calor torch and water for hardening at home.

                                                  In those days nearly everyone one used Stubbs Silver steel ,which was very good,and always marked with the stubbs name at one end,and it was drummed into us,always cut the piece you want off the unmarked end,so that you know that the piece left was marked silver steel,so there would be no errors by using the wrong material.

                                                  #400252
                                                  Mick B1
                                                  Participant
                                                    @mickb1

                                                    I wouldn't've thought leaving it before tempering would affect the issue.The change of section may have introduced stresses and microcracks on quenching, which tempering would obviously not remove. It might've been better to taper out the cutter diameter to the parent bar at 30 degrees included or suchlike, using a tool with a bit of a tip rad. You really only want the cutting surfaces of the teeth to be hard, so it might work just to get the tooth tips bright red and hold it for half a minute prior to quenching – then polish and temper light straw.

                                                    I can remember milling a stepped rectangular forming punch out of BS1407 on a Bridgeport when I was a (helluva) lot younger, heating and soaking it red hot, then tipping it into a bucket of oil and wondering why it cracked on the inside angle of the step. There was a lot more steel in that, though.

                                                    #400253
                                                    Hopper
                                                    Participant
                                                      @hopper
                                                      Posted by SillyOldDuffer on 08/03/2019 16:48:24:

                                                      I heated the silver steel bright red and plunged it into cold water.

                                                      From your OP. Might be a source of some of the problem. Quenching in oil will tend to give a less brittle result than water. Anything form old motor oil to a tin full of cooking oil will do the job.

                                                      On your piece, I would heat the main shank with the torch and let the colour run up to the cutting tips then quench as soon as the colour hits the tips.

                                                    Viewing 25 posts - 1 through 25 (of 38 total)
                                                    • Please log in to reply to this topic. Registering is free and easy using the links on the menu at the top of this page.

                                                    Advert

                                                    Latest Replies

                                                    Home Forums Beginners questions Topics

                                                    Viewing 25 topics - 1 through 25 (of 25 total)
                                                    Viewing 25 topics - 1 through 25 (of 25 total)

                                                    View full reply list.

                                                    Advert

                                                    Newsletter Sign-up