Denbeigh K1 pillar drill

Advert

Denbeigh K1 pillar drill

Home Forums Workshop Tools and Tooling Denbeigh K1 pillar drill

Viewing 15 posts - 1 through 15 (of 15 total)
  • Author
    Posts
  • #291767
    simon Hewitt 1
    Participant
      @simonhewitt1

      I am restoring a Denbeigh K1 pillar drill. Does anyone know anything about this machine? It looks to me to be post war, but pretty old, and enormously heavy. And any help on:

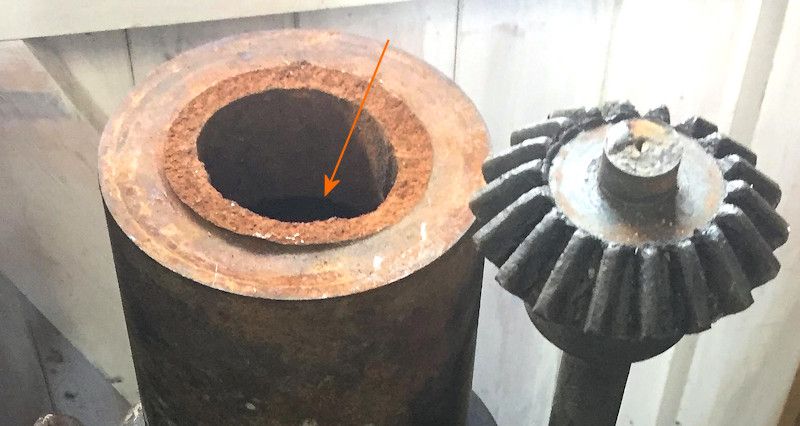
      1) The main column is 4 1/2 inches diameter, with a 3" spigot that the drill head fits onto. This has snapped clean through! So I need some 5" diameter solid round to make a new spigot. Any idea where I can get 4 " of 5" diameter round?

      2) The return spring in the handle is missing. Like a big clock spring, about 1/2" deep – any idea where to get a replacement, or spring steel to make one?

      3) The quill is 7/8 diameter, and has a thread in the middle that is flush with the shaft! Its clearly there to lock the bearings in place, but what sort of nut fits onto a flush thread? split in two? anyone got one, seen something similar, or got any ideas?


      see photos here http://imgur.com/gallery/kL20h

      Edited By simon Hewitt 1 on 02/04/2017 10:56:46

      Edited By JasonB on 02/04/2017 13:25:52

      Advert
      #18469
      JasonB
      Moderator
        @jasonb
        #291824
        Jonathan Garside
        Participant
          @jonathangarside40968

          Simon

          You might find out more if you spelt it as DENBIGH

          Jonathan

          #291825
          Chris Evans 6
          Participant
            @chrisevans6

            Steel supply depends on your geographic location. I am in the Midlands and have a good choice of stockholders, you may have to settle for 130mm diameter.

            #291889
            Brian Oldford
            Participant
              @brianoldford70365

              Would it not be possible to bore out the broken end of the column and make a circa 3" (80mm) diameter steel insert? Of course you may not have access to a machine big enough to take the column, but is there anywhere nearby that could do the job for you at an acceptable cost?

              #291890
              daveb
              Participant
                @daveb17630

                Clock springs for drills are available on the internet, many different sizes, not expensive. Dave

                #291900
                Journeyman
                Participant
                  @journeyman

                  Simon, looking at the images in your album the pillar shows, if you look carefully, a ridge down from the broken spigot.

                  pillar.jpg

                  Is it possible that the spigot is a separate bit that has been fixed into the top of the pillar? If so it might be removable, look for rivets or possibly a push fit . It would seem unlikely that the pillar is one casting with that sort of sharp internal detail.

                  Just a thought, if it is a separate bit then you just need a few inches of 3" tube.

                  John

                  Edit: Spelling

                  Edited By Journeyman on 03/04/2017 10:27:28

                  #291932
                  simon Hewitt 1
                  Participant
                    @simonhewitt1

                    John

                    No it's definitely cast in one piece, but machined all over, hence the sharp detail – which may have led to it snapping there. I have extracted the spigot, and it sits quite snug on top of the break, so I am going to try to bolt it up, with a 20mm thick plate lowered through the hole and rotated to bear against the internal shoulder, and a top-hat piece in the spigot, 4 10mm 8.8 studs to hold it in place. May work, may not.

                    Brian – boring it out, would be great but it is huge, 42 inches long, with an even bigger round foot piece, about 10" diameter. I could probably bolt to the mill table and turn the head 90 degrees to be horizontal, and bore out with a boring tool – in fact like a horizontal boring machine. I may try that if the bolts don't work.

                    #291968
                    Brian Oldford
                    Participant
                      @brianoldford70365
                      Posted by simon Hewitt 1 on 03/04/2017 15:23:48:

                      John

                      No it's definitely cast in one piece, but machined all over, hence the sharp detail – which may have led to it snapping there. I have extracted the spigot, and it sits quite snug on top of the break, so I am going to try to bolt it up, with a 20mm thick plate lowered through the hole and rotated to bear against the internal shoulder, and a top-hat piece in the spigot, 4 10mm 8.8 studs to hold it in place. May work, may not.

                      Brian – boring it out, would be great but it is huge, 42 inches long, with an even bigger round foot piece, about 10" diameter. I could probably bolt to the mill table and turn the head 90 degrees to be horizontal, and bore out with a boring tool – in fact like a horizontal boring machine. I may try that if the bolts don't work.

                      The first option sounds like a plan. Would it be possible to refine this further by inserting a thick disk all the way up from the bottom to spread the load over the whole of the internal shoulder?

                      It's probably too good a machine to write off without a fight, so good luck and let us all know how you get on with the repair.

                      #291986
                      simon Hewitt 1
                      Participant
                        @simonhewitt1

                        Thats a good idea! The column bolts to the base so it should be fairly easy to do that.

                        #292048
                        Journeyman
                        Participant
                          @journeyman

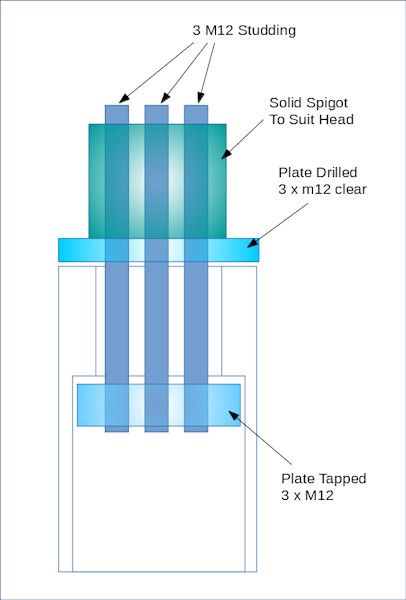
                          Simon, as an alternative rather than trying to align the old spigot how about a new one. Grind off the broken area to leave a flat top to the column. A dremel, angle grinder if careful or even a file should make short work of it. Then fit a plug inside and use studding to secure a new spigot for the head to fit on. Might be more secure than using the old bit of column. Something like:

                          column.jpg

                          Excuse the strange drawing (Libre Office Draw) but it was the easiest way of getting my thoughts into an image! Studs on a PCD to suit the available space probably secure the bottom with Loctite and nuts and shakeproof washers at the top.

                          Also found this – Split Lock Nut which might be what was fitted on the centre threaded shaft.

                          John

                          Edited By Journeyman on 04/04/2017 12:31:10

                          #292118
                          simon Hewitt 1
                          Participant
                            @simonhewitt1

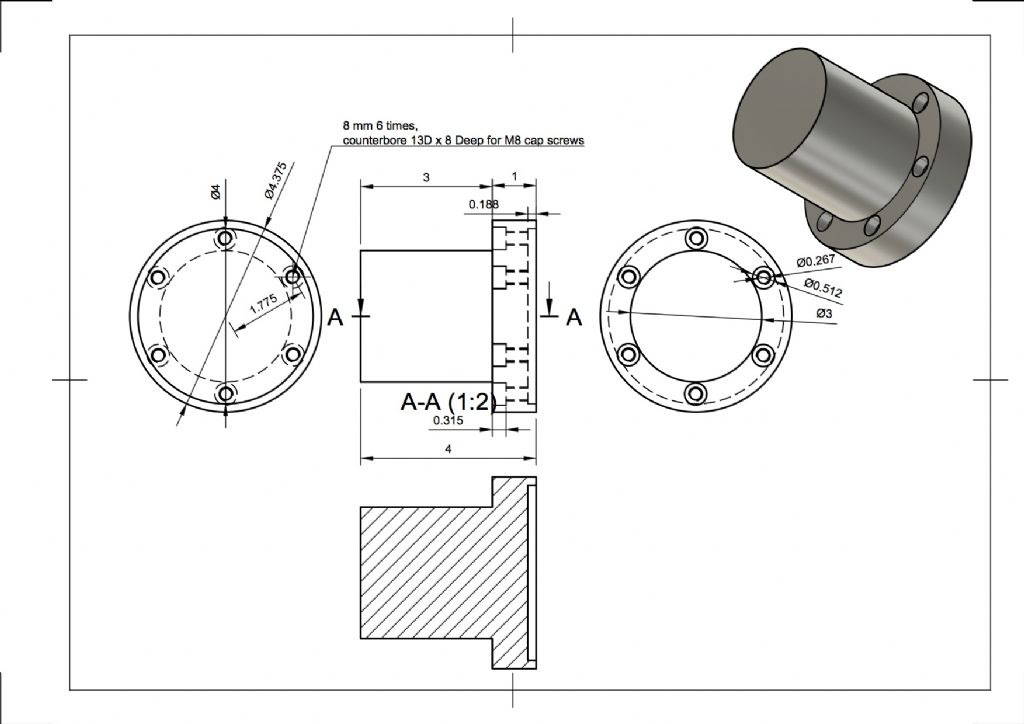
                            My idea was a top-hat replacement, bolted to tapped holes. I think combining these ideas will work best, if just bolting the broken spigot does not work. Bolting through to a thick plate puts the tension in the right place.

                            The centre hole left by the break is very rough from the sand core and nowhere near round, so not useable to locate the spigot, hence the outside lip in my drawing.

                            pillar drill spigot drawing v3_sheet1.jpg

                            #292121
                            simon Hewitt 1
                            Participant
                              @simonhewitt1

                              Also found this – Split Lock Nut which might be what was fitted on the centre threaded shaft.

                              That split nut is fairly amazing, and surprisingly cheap in the USA. Has anyone seen one in the UK? And the chance of a Whitworth seems unlikely, but may be an entertaining thing to make.

                              #292122
                              Journeyman
                              Participant
                                @journeyman

                                The top-hat is a nice engineered approach but needs the column machining. Using three loose parts only needs the old spigot grinding off and can be fitted and lined up easily. The three studs will have plenty of room to pass through the cast in centre hole. All the parts are easy to make with the minimum of turning.

                                John

                                #378054
                                simon Hewitt 1
                                Participant
                                  @simonhewitt1

                                  A bit late, here is the drill complete, an in regular use. It works very well but lacking a bot of torque at low speeds for large drills. There is just one pair of step pulleys, and the lowest ratio is not quite low enough. There is space for a 3 pulley system, maybe a future project.

                                  (Cannot add new photo just added to my gallery?)

                                  Edited By simon Hewitt 1 on 28/10/2018 10:01:03

                                  Edited By simon Hewitt 1 on 28/10/2018 10:01:54

                                  Edited By simon Hewitt 1 on 28/10/2018 10:03:51

                                Viewing 15 posts - 1 through 15 (of 15 total)
                                • Please log in to reply to this topic. Registering is free and easy using the links on the menu at the top of this page.

                                Advert

                                Latest Replies

                                Viewing 25 topics - 1 through 25 (of 25 total)
                                Viewing 25 topics - 1 through 25 (of 25 total)

                                View full reply list.

                                Advert

                                Newsletter Sign-up