How would you make these
How would you make these
- This topic has 29 replies, 12 voices, and was last updated 9 December 2017 at 21:34 by
 Tim Stevens.
 Tim Stevens.
 JasonB
 Neil Wyatt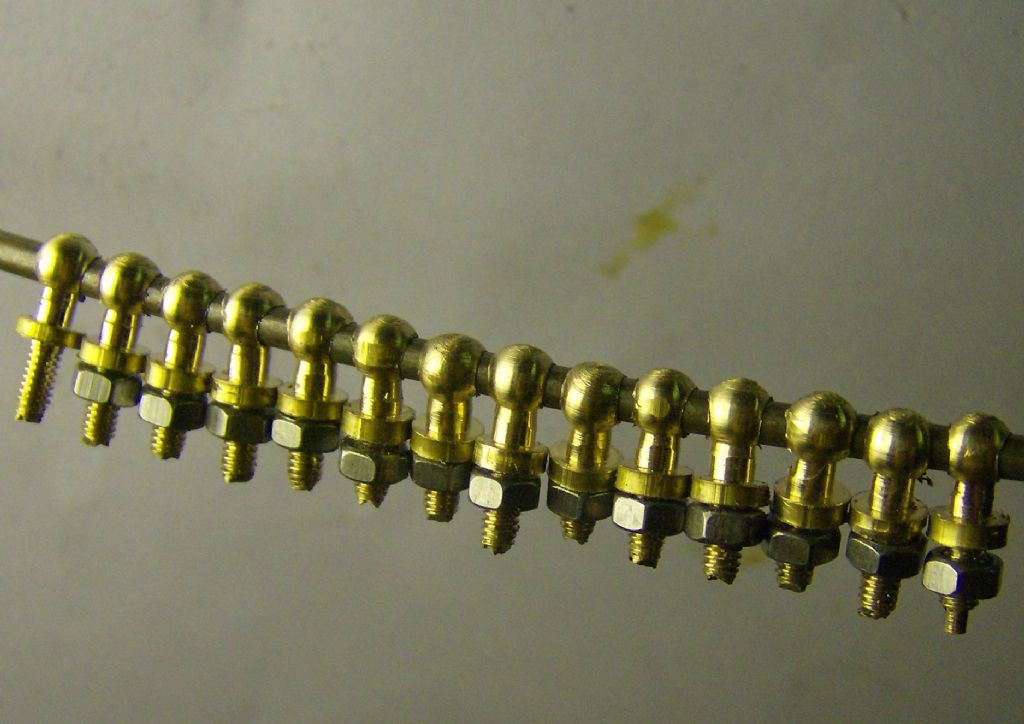
 I.M. OUTAHERE
 Tim Stevens
- Please log in to reply to this topic. Registering is free and easy using the links on the menu at the top of this page.
Latest Replies
-
- Topic
- Voices
- Last Post
-
-
A first for ME&W
1
2
Started by:
Andrew Tinsley
in: Model Engineer.
- 21
-
25 October 2026 at 22:09
Nigel Graham 2
-
Change old AC motor to BLDC motor in Sieg C6
1
2
Started by:
Jens Eirik Skogstad 1
in: Electronics in the Workshop
- 15
-
25 October 2026 at 22:08
Huub
-
Broken Elliot chuck screw
Started by:
davelong22
in: Beginners questions
- 4
-
25 October 2026 at 19:38
old mart
-
What Did You Do Today 2026
1
2
…
9
10
Started by:
JasonB
in: The Tea Room
- 55
-
25 October 2026 at 19:23
Andy Stopford
-
Microswitch accuracy
Started by:
Speedy Builder5
in: Electronics in the Workshop
- 6
-
25 October 2026 at 18:20
Speedy Builder5
-
Posting 1 hour in the future
Started by:
Dalboy
in: The Tea Room
- 2
-
25 October 2026 at 18:03
Nigel Graham 2
-
Emco FB2 Quirks and Additions
1
2
3
4
Started by:
Graham Meek
in: Manual machine tools
- 21
-
25 October 2026 at 17:19
John MC
-
New to castings
Started by:
BOB BLACKSHAW 1
in: Workshop Techniques
- 5
-
25 October 2026 at 15:49
BOB BLACKSHAW 1
-
Dry PTFE Spray
Started by:
Michael Gilligan
in: The Tea Room
- 10
-
25 October 2026 at 15:36
alan ord 2
-
More help with Rachel Wall engine
Started by:
Steve Huckins
in: Beginners questions
- 3
-
25 October 2026 at 15:27
Steve Huckins
-
My EMCO FB-2
Started by:
Ger
in: Manual machine tools
- 2
-
25 October 2026 at 13:48
Ger
-
Free Metal
Started by:
Dalboy
in: Materials
- 6
-
25 October 2026 at 13:30
Dalboy
-
Les Warnett 9f Tender Axle Box Location
Started by:
markcs
in: Locomotives
- 3
-
25 October 2026 at 12:28
markcs
-
Stuart twin compound
Started by:
teamricky
in: Stationary engines
- 5
-
25 October 2026 at 09:05
teamricky
-
Hello from Ukraine – CNC lathe on LinuxCNC
Started by:
odessit
in: Introduce Yourself – New members start here!
- 4
-
23 October 2026 at 22:16
Dave Halford
-
Sherline closing down
Started by:
Peter Cook 6
in: Manual machine tools
- 8
-
23 October 2026 at 17:13
Peter Cook 6
-
Boiler stays
Started by:
Michael Callaghan
in: Beginners questions
- 3
-
23 October 2026 at 17:05
duncan webster 1
-
Mystery mill?
Started by:
Dave Halford
in: Workshop Tools and Tooling
- 3
-
23 October 2026 at 16:00
bernard towers
-
Small (ish) horizontal mill identification “Howdle”
Started by:
Rainbows
in: Manual machine tools
- 14
-
23 October 2026 at 15:02
Oily Rag
-
What is this tool?
Started by:
jaCK Hobson
in: The Tea Room
- 7
-
23 October 2026 at 12:30
Dave Halford
-
Re Inserting Angled Features – Completed The Alibre Model
Started by:
Nigel Graham 2
in: CAD – Technical drawing & design
- 4
-
23 October 2026 at 12:13
Nigel Graham 2
-
Workshop Insurance.
Started by:
Andrew Tinsley
in: General Questions
- 10
-
23 October 2026 at 08:32
JohnF
-
Does anyone have any info about these vices
1
2
Started by:
bjcolyer
in: Introduce Yourself – New members start here!
- 13
-
23 October 2026 at 06:38
Michael Gilligan
-
LAzar egde finder
Started by:
ian Holdsworth
in: Beginners questions
- 10
-
22 October 2026 at 23:58
Ches Green UK
-
PHP
Started by:
Michael Gilligan
in: Website Questions, Comments, and Suggestions
- 3
-
22 October 2026 at 19:36
Mark Rand
-
A first for ME&W
1
2
 Andrew Tinsley
  Nigel Graham 2
 Jens Eirik Skogstad 1
  Huub
Huub davelong22
  old mart
 JasonB
  Andy Stopford
 Speedy Builder5
  Dalboy
  Graham Meek
  John MC
 BOB BLACKSHAW 1
  Michael Gilligan
  alan ord 2
 Steve Huckins
  Ger
Ger  markcs
  teamricky
  odessit
  Dave Halford
 Peter Cook 6
  Michael Callaghan
  duncan webster 1
 bernard towers
 Rainbows
  Oily Rag
 jaCK Hobson
  JohnF
JohnF bjcolyer
  ian Holdsworth
  Ches Green UK
 Mark Rand