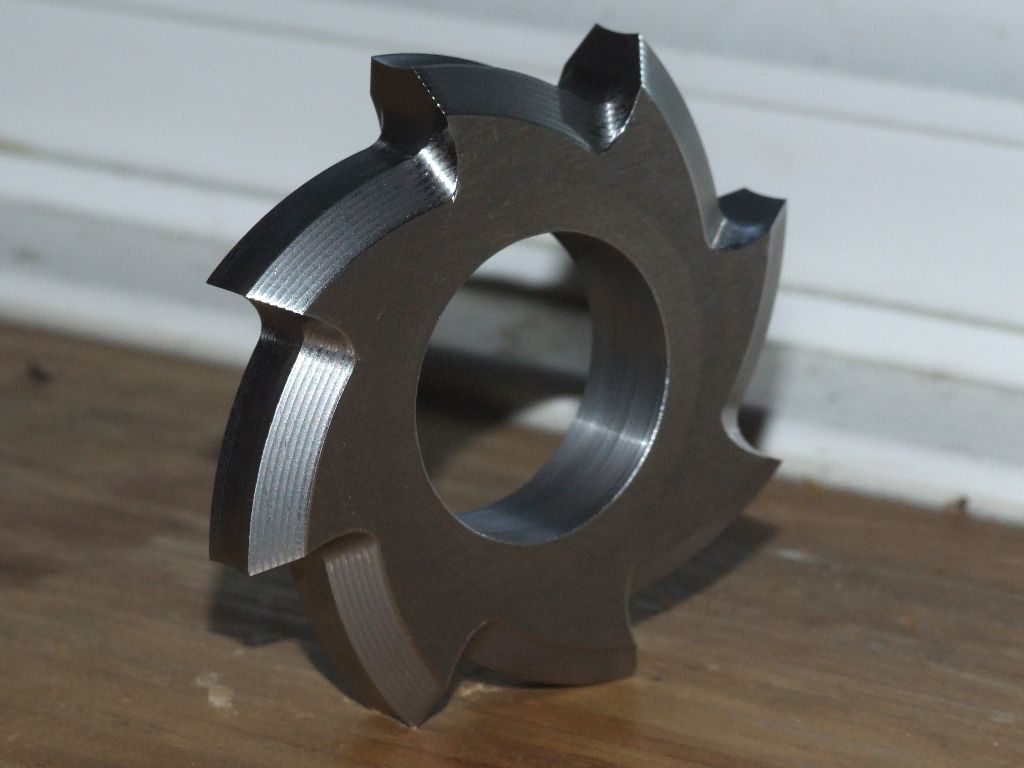
Zytos ,20 DP Gears and Nickel Plate/Rod ?

Advert

Zytos ,20 DP Gears and Nickel Plate/Rod ?

Home Forums Manual machine tools Zytos ,20 DP Gears and Nickel Plate/Rod ?

Viewing 19 posts - 1 through 19 (of 19 total)
  • Author
    Posts
  • #388245
    Paul Kennedy
    Participant
      @paulkennedy14200

      Hey Guys. Top o the morning to ya. Just had breckie and am now thinking about beginning to tackle some of the outstanding issues on my Zyto. So Brian Wood has mentioned in a previous post that he believes that the Zyto uses the same 20 DP as the Myford ML 2/4 but he was unsure if they have the same bore. I've measured a few gears now and i get a small variance but i estimate the reading to be 0.6220 which is just under the 5/8" which is written as 0.625 in the Machinery Handbook in the table on page 1740. So as my digital vernier isnt especially great i am going to accept for the time being that the bore is indeed 5/8" and the same as the Myfords.

      Now I need to tackle the Diametral Pitch (DP). Defined as being the Ratio of the number of teeth to the number of inches of pitch diameter – equals number of gear teeth to each inch of pitch diameter.

      So taking a small 25 tooth gear as an example we have :- 25

      Now measuring the outside diameter of the teeth I get approximately 1.345 which works out to be just over 1 11/32" but also very close to 1.375 which is 1 3/8" ! However i also estimate the Whole Depth to be 7/64 as per my M&W Analoge depth gauge. Its the only thing ive got slim enough to fit the gear teeth. Now i can devide this by two to get the addendium and then subtract that twice from the OD but as the Addendium and Dedendum equal the working depth then its pointless and Im just going to subtract the whole depth from the OD once to get my Pitch Circle. Ok i realise the true Pitch circle should be the OD -(Addendium x2) but as my Measurement of the whole depth is likely of by a margin as I don't think its quite reaching the bottom of the tooth whole depth and is in fact closer to the working depth then I'm fairly close to being on the money. So ..

      1 11/32 – 7/64 or 1 22/64 – 7/64 = 1 15/64 OK so..

      OR

      1 3/8 – 7/64 or 1 24/64 – 7/64 = 1 17/64 lets call it 1 16/64"

      1 16/64 = 1 8/32 or 1 4/16 or 1 2/8 or 1 1/4

      Now where was I. Umm The ratio thats it.

      So. 25 : 1 1/4 ?

      Therefore 25 teeth : 1 1/4"

      so 25 : 1.25"

      Therfore 25 / 1.25 = 20 DP

      Well iwent round the houses with that but its the first time i worked out the DP of a gear so i just wrote my thoughts. However the V over IR or A is true for all formulae, for all maths as far as i know. The all seeing eye right enough.

      So where am i now ! Umm Well ive confirmed that Brian was accurate in his information and ive got a bit more confidence in a myford gear fitting my Zyto if i buy one. Ideally id like to make my own but im a ways from that yet and TBH i doubt i can make them for the cost it takes to buy them. Even a cast iron blank is going to be expensive let alone the tooling, time, postage etc.

      So I need to get on with painting next but before i go can anyone recommend a cheep supplier for Nickel thats not going to ask for minimum order or silly money for postage. Im in a bit of a pickle with work at the moment or the lack thereoff ! :/

      Have fun guys and chill out to some relaxing sounds.

      Advert
      #13385
      Paul Kennedy
      Participant
        @paulkennedy14200
        #388257
        Brian Wood
        Participant
          @brianwood45127

          Hello Paul,

          To save you further mental torture when tying to establish the DP value for a gear, there is a simple formula

          DP = (n+2) / O/D measured in inches. n is the actual tooth count

          For your example n+2 =27 and 27/ 1,345 is equal to 20.07—your Zyto gears are therefore 20 DP which confirms what I suggested that standard Myford change gears will do perfectly well for your lathe

          For information, DP values are always whole numbers and most often in even whole numbers, which does mean you can easily spot an error in calculation.

          The equivalent metric gear classification method is the Module (Mod) which is given in another simple formula of

          Mod = O/D / (n+2) with the diameter across gear teeth measured in mm. Mod values for gears can range from as small as Mod 0,2 up to Mod 1.0; thereafter they increase in units of 0.25

          Regards

          Brian

          #388284
          Paul Kennedy
          Participant
            @paulkennedy14200

            Thanks Brian,

            Out of interest Where did you find the formulae ? Also why does it work ! ? ((N = Number of teeth) + 2) divided by (OD=Outside Diameter) WHY 2 ? Does it work for all teeth counts and all size of teeth ? Why does maths work Ahhh i will be ranting about fibonachi and pine cones next LOL. I would be interested in hearing what source you got the formulae from !
            Happy New Year

            Paul

            #388286
            Brian Wood
            Participant
              @brianwood45127

              Hello Paul,

              Most books on gears and gearing will quote the formulae and Workshop Practice number 17 [Gears and Gear cutting ], by Ivan Law will tell you more about it.

              And yes, it works for all sizes and tooth counts. Why? I don't know the maths to prove it but I daresay Google will have something to say on the subject.

              Again, ask Google for plating information; I'm not sure what you need to plate in small quantities.

              Happy New Year

              Brian

              #388291
              Paul Kennedy
              Participant
                @paulkennedy14200

                Thanks Again Brian,

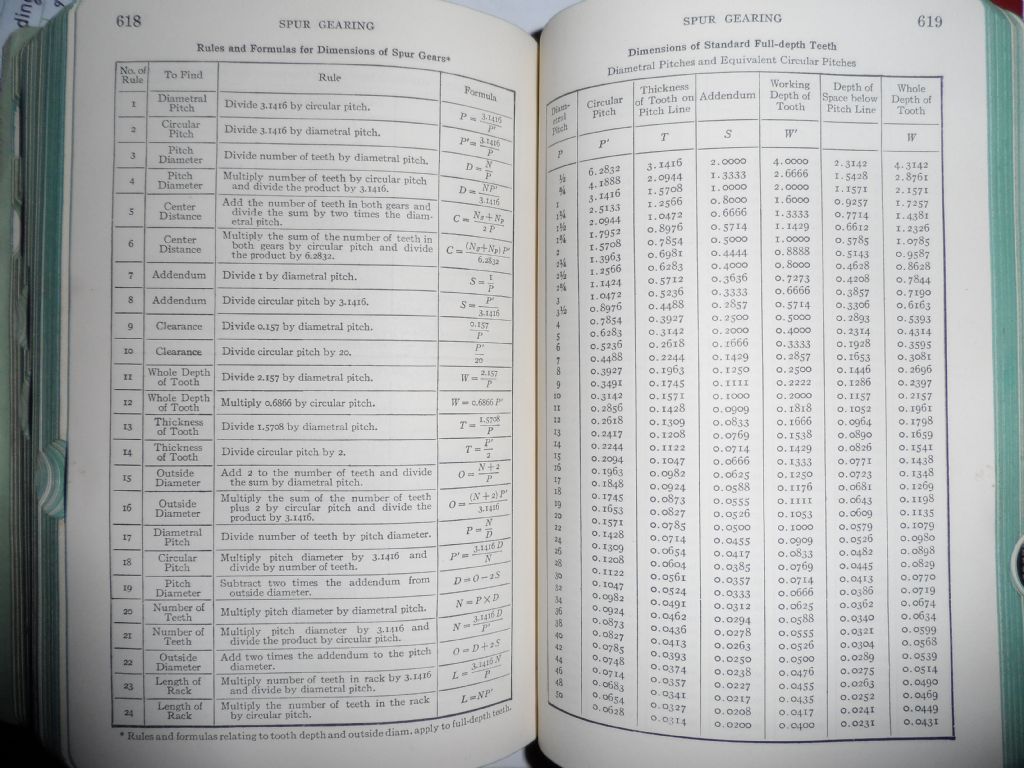
                FYI Look what I just found !! What does the good book say. Look and ye shall find.

                Or does it say Pie = 3.14

                spur gearing formulas.jpg

                Edited By Paul Kennedy on 30/12/2018 15:05:58

                Edited By Paul Kennedy on 30/12/2018 15:06:11

                #388294
                Howard Lewis
                Participant
                  @howardlewis46836

                  Gears for thge Myford ML1,2,3 and 4 and for the 7 Series are 20DP.

                  The difference is that the ealier models connected gears that were compounded by 3/32" diameter pins, whereas the 7 Series used a keyway (1/8" from memory).

                  Converting a 7 Series gear for use on the earlier machines should be simple, if you have an original gear to use as a drill jig.

                  Place the gear to be modified against a shoulder on a 5/8" arbor, (such as an Idler Stud from a early ML).. Place an original gear on the same arbor. Taking care that the hole to be drilled is away from (preferably diametrically opposite) the keyway), drill a 3/32" hole, through. The two gears can now be connected by a 3/32" pin. Myford gears are 3/8" wide, so the pins needs to be 3/4" long to give full engagement, to spread the load over the full thickness of each gear.

                  I think that Myford gears were 14.5 degrees Pressure Angle, rather than the 20 degrees which is more prevalent nowadays.

                  H T H

                  Howard

                  Edited By Howard Lewis on 30/12/2018 15:27:08

                  #388295
                  Mike Crossfield
                  Participant
                    @mikecrossfield92481

                    Paul

                    Diametral pitch (P) is defined as number of teeth(N) divided by pitch diameter (D)

                    I.e. P=N/D

                    Or rearranging, D=N/P

                    Outside diameter (OD) is pitch diameter plus twice the addendum, and the addendum is 1/P.

                    So OD = N/P + 2/P = (N+2)/P

                    Hope this helps

                    #388322
                    Anonymous
                      Posted by Mike Crossfield on 30/12/2018 15:30:01:

                      Hope this helps

                      Beat me to it!

                      There is an erroneous assumption in the original post. The addendum (J) is indeed one over the diametral pitch (DP). In theory the dedendum (K) is the same. But in practice clearance is needed. By convention the dedendum is 1.157 divided by the DP. The working depth is J+K, ie, 2.157/DP. For low numbers of teeth more clearance is needed so the dedendum can be increased to 1.25/DP. The depth of cut (J+K) is often engraved on involute cutters to save confusion.

                      Andrew

                      #388340
                      Paul Kennedy
                      Participant
                        @paulkennedy14200

                        Thanks Guys, I think I managed to work it out. I did make a somewhat haphazard approach to my explanation I guess. Pardon my tardiness. I fully understand that the Addendium and Dedendium extend the same distance from the pitch circle diameter which when comprised together form the working depth of the tooth but the actual depth of cut is stated as the whole depth. I couldn't measure this accurately with my equipment. The depth gauge on the digi vernier was too thick to reach the bottom of the tooth cut and the M&W analoge depth gauge, while better, still bottomed out on the radius at the bottom of the tooth cut so my reading wasnt entirely accurate but i was on the money I think. I'm fairly well schooled for a scot you know Not a qualified engineer or anything but some 20 years on precision machine tools in Aerospace and other industries. Used to make parts for Boeing and Airbus as well as Lynx Helicopters. Was involved in making gears for those bad boys ! Mostly sub contract stuff. All the gubbings the local lads didnt want to do :/ Ie Night shift, crappy machines, dirty jobs etc etc. Looking for my next role for the new Year though so :/ sigh. I don't know where i'm going but i sure know where i've been. Here I go again, Here I go again, Though i keep searching for an answer. Hear i go again on my own on the road again, alone again…. Ahh or something like that. Whitesnake 80's rock. I didnt understand that song when i was a teenager. Oh well.

                        Anyway Next question. How would you measure the pressure angle or if you were making an involute cutter how would you form the teeth to the correct dimensions and form ? Im guessing they will be ground. Cam following grinder perhaps with a template ?

                        #388341
                        Brian Wood
                        Participant
                          @brianwood45127

                          Mike and Andrew,

                          Thank you both for the explanations, useful for the maths involved for Paul and myself as well.

                          Regards

                          Brian

                          #388345
                          Brian Wood
                          Participant
                            @brianwood45127

                            Paul,

                            In answer to your next question, see the Ivan Law book WPS 17 for dimensions of button tools to make the gears.

                            The geometry is not exact; hobbed gears are correct, but for the lathe they are destined for they will run perfectly well.

                            As to measuring the pressure angle, there are special tables ( I forget the name) for measuring across diametrically opposed gear teeth with identical sized pins in the teeth. 20 degree teeth are slightly stumpier in shape than 14.5 degree teeth which makes for a measurable difference as the stumpy teeth hold the pins out slightly further from the tooth root.These tables are in Machinery's Handbook

                            Regards

                            Brian

                            #388366
                            Anonymous
                              Posted by Paul Kennedy on 30/12/2018 18:28:40:

                              if you were making an involute cutter how would you form the teeth to the correct dimensions and form ? Im guessing they will be ground. Cam following grinder perhaps with a template ?

                              I'd draw the proper involute curve in 3D CAD and then use that to create a 3D model of an involute cutter. Then I'd machine it on a 4-axis CNC mill. Not for everyone of course, buttons are simpler!

                              The advantage of hobbing is that for a given pressure angle and DP gears of any number of teeth can be made using a single hob. Hobs do not form perfect involute curves. They approximate the curve as a series of flats, the number of which is tied to the number of teeth per pitch on the hob. That's why precision gears (such as you might find in a lathe headstock) are shaved and/or ground after hobbing.

                              Andrew

                              #388375
                              Paul Kennedy
                              Participant
                                @paulkennedy14200

                                Thanks Brian,

                                Andrew what CAD Software you use ? For quick work i use sketchup. Mostly for figuring out my design and also for exporting to my prusa mendel i3. Offcourse if i need a more professional model or something a little more complex i use inventor but i find my workflow on it isn't as smooth as with sketchup. Possiabally as i dont use it that often. However I do enjoy the power it provides where sketchup often leaves me wanting more. I am somewhat restricted for space and at times cash so no fancy toys for me yet ! I have used a plethora of CNC equipment over the years with Fanuc,Mazak,Siemans and Heidenhim controls althoug rarely did i do any actual programming. I did use some inhouse software for some parametric modeling which exported the geometry to an interpriter which in turn generated the G Code to run on the machine. Mostly the code side of it is mostly fairly rudimentry as long as you understand your product and cutting order, clam p positions, tool lengths, speed, feeds, material etc. None of it is complicated but there is a lot to consider and evaluate. Offcourse one bug or mistake can mean an expensive crash but when ever i got a new program to run we run it at half duty cycle or even lower depending untill the program is proven. Ive run a 5 axis Droop & Rein Gantry Mill with 3 spindles fitted with twin beds each with 3 fixtures for bulkheads for 747's and 737's and they had some fairly interesting g code but at 4 am your not giving a rats. Ive mostly worked on large aircraft. Did some stuff for Airbus A380's as well. The smallest stuff ive done is some parts for err F16 or F22 fighters for the USAF as well on that job. There was the gears for the Lynx offcourse which was kinda smallish but quite expensive as it was calassed as flight critical components. However the only thing you care about is getting to that handle on the clock to point to 6am so you can go home and crash. However i still have a keen interest when im not dog fucking tired. Id love to hear about what you are producing and your workflow / software and tooling. I try to keep up with advancements but its not easy without adequate shop space. Here in the UK we just have no room left. Too many people on too little a piece of land. Ive mostly been involved at the larger end of manufacturing. Aircraft, Ships and parts for ESA among some of the other less glamourous jobs but i enjoy building the complex mechanisms and quality work. The money is in the big stuff though and when im in steel toes 12 – 15 hours a day I prefer the long run times on the bigger jobs as its easier on the machinist as you can get a rest while hogging out a large part. Well sometimes. Some shops expect you too run 2 or maybe even 3 machines simultaneously which goes against everything i was taught by RR&A but commercial environment is a lot different. Depends where you go offcourse. Aye I know everywhere ive been and ive been a few places after 20 years on the tools. Anyway its getting late over here and i still have some tidying up to do. Heads up everyone by the way . Ive just bought another damn lathe A little Portass this time It needs even more work that the Zyto. Well it can wait to next winter but her indoors wont be happy.

                                #388383
                                Clive Foster
                                Participant
                                  @clivefoster55965

                                  Although, as Brian says, accurately measuring gear pressure angle requires precise equipment and precise work there is a DIY method for normal involute gears that adequately determines whether the pressure angle is 14.5° or 20°.

                                  Given the DP of the gear in question take a measurement over any reasonable small number of teeth with whatever equipment you have. 3 to 5 teeth for a chord length of around 1/8 of a circle usually does just fine.

                                  Multiply the cosine of the 'PA' by 3.1416 and divide by the 'DP' add this to your measurement, this should be the measurement over one more tooth if its not the same, change the the 'PA' and try again.

                                  Example:-
                                  10dp 14.5 pa, 30 teeth,

                                  Measurement over 3 teeth .776,

                                  Cos 14.5° = 0.986147

                                  (0.986147 x 3.1416) = 3.04

                                  3.04/10 = 0.304

                                  0.304 + 0.776 = 1.080 which will be the measurement over 4 teeth if the gear is 14.5° PA."

                                  As you only have 14.5° and 20° pressure angles to choose from for general purpose gears the difference is usually pretty conclusive. Its not an exact to umptyfour decimal places calculation, just a nearest to result for separating sheep and goats.

                                  I'd be very careful with gears having heavily modified addendum, dedendum and teeth shape tho'. It works, after a fashion, with stub teeth but some judgement is needed.

                                  There is probably a direct version for module gears but substituting nearest DP is good enough.

                                  Heavily engineered devices such as car and motorcycle gearboxes often include gear pairs which are way outside standard formulae. Especially Japanese motorcycle gearboxes where its not uncommon to find teeth numbers up to one tooth different from what the standard formulas give for gears of that DP or Module and diameter.

                                  Clive.

                                  #388412
                                  Anonymous
                                    Posted by Paul Kennedy on 30/12/2018 21:46:08:

                                    Andrew what CAD Software you use ?

                                    I use Alibre Expert for CAD and VisualMill for CAM. I've not made an involute cutter, but here's a spline cutter I made using the same flow:

                                    spline cutter.jpg

                                    Andrew

                                    #388430
                                    Brian Wood
                                    Participant
                                      @brianwood45127

                                      Paul

                                      which goes against everything i was taught by RR&A

                                      As a complete aside—-In your reply to Andrew on the business of software for gearcutting you mentioned the above organisation. If the RR&A you refer to is based in Derby, I used to work for them 30 years ago.

                                      Regards

                                      Brian

                                      #390247
                                      Paul Kennedy
                                      Participant
                                        @paulkennedy14200
                                        Posted by Andrew Johnston on 31/12/2018 08:24:25:

                                        Posted by Paul Kennedy on 30/12/2018 21:46:08:

                                        Andrew what CAD Software you use ?

                                        I use Alibre Expert for CAD and VisualMill for CAM. I've not made an involute cutter, but here's a spline cutter I made using the same flow:

                                        spline cutter.jpg

                                        Andrew

                                        Thats some nice work you have done there Andrew. What do you do about Heat Treat afterwards ?

                                        #390248
                                        Paul Kennedy
                                        Participant
                                          @paulkennedy14200
                                          Posted by Brian Wood on 31/12/2018 09:51:50:

                                          Paul

                                          which goes against everything i was taught by RR&A

                                          As a complete aside—-In your reply to Andrew on the business of software for gearcutting you mentioned the above organisation. If the RR&A you refer to is based in Derby, I used to work for them 30 years ago.

                                          Regards

                                          Brian

                                          Not Darby Brian. A smaller facility up north named after a famous aircraft but dealing with things under the water rather than above it However I've not worked there in over 20 years. I cant say i enjoyed my time there however It wern't all bad either. I enjoyed the work on the whole and felt i was part of something worth doing. Well to begin with anyway. I enjoyed the training. Although my 2nd year was a disapointment. Left us in a shed for a year ! I dunno, I was young and fairly bright and wanted to do too much maybe and when i got overlooked for a position in the drawing office i just felt let down by them. Now I guess I just want back on the tools making parts. Its what im best at I guess :/ I left shortly after. I had a few problems at the time. GF was a handfull, mother had a cancer scare and I lost the driving license for speeding all about the same time as I left RR&A. It was hard times for a young lad and nobody stepped in to help. Life took a turn after that. Been contracting ever since really. Theres a lot ive not mentioned but.. yea. Life eh ! After 20 Years contracting my back is like a pincussion. I dont know. Some seem to have it so darn easy and have the whole of life sorted and the next guy is used and abused and gets not a lot for his time and efforts. End of the day its not what you know but who you know i guess. Sorry for rant. Im tired.

                                        Viewing 19 posts - 1 through 19 (of 19 total)
                                        • Please log in to reply to this topic. Registering is free and easy using the links on the menu at the top of this page.

                                        Advert

                                        Latest Replies

                                        Home Forums Manual machine tools Topics

                                        Viewing 25 topics - 1 through 25 (of 25 total)
                                        Viewing 25 topics - 1 through 25 (of 25 total)

                                        View full reply list.

                                        Advert

                                        Newsletter Sign-up