What Did You Do Today 2019

Advert

What Did You Do Today 2019

Home Forums The Tea Room What Did You Do Today 2019

Viewing 25 posts - 301 through 325 (of 1,046 total)
  • Author
    Posts
  • #404672
    Jeff Dayman
    Participant
      @jeffdayman43397
      Posted by Bill Phinn on 08/04/2019 22:33:33:

      Posted by Jim Young 2 on 31/03/2019 17:58:10:

      Re brittle strimmer cord, I moaned at my local mower repair place about the short life of coils of strimmer cord. They recommended storing in an ice cream tub in water. Seems to help but of course it soon dries out when left on the strimmer.

      "Jim, I've been using Stihl strimmer line for the last 38 years, and never had a problem with it even when used with my relatively powerful Stihl KM130 brush cutter. I've never had to keep it moist or resort to any other method to reduce brittleness, because it really isn't brittle unless I make the mistake of trying to cut excessively tough material with it such as thick brambles, which, as the manufacturer advises, I would normally use a (Stihl) metal blade to cut.

      Just make sure you buy the right diameter line for whatever cutting head you're using. I use 2.4mm cord (orange coloured) but you may need a thinner one. Your manual should say."

      Water may make a difference to brittleness if the cord is made of nylon. Not sure about UK and Europe but most trimmer cord here is not nylon, it is HDPE or LDPE outer with HDPE inner. Water will make no difference to PE (polyethylene) of any kind. Sun exposure may damage any plastic trimmer cord.

      Best trimmer cord I have used is the 4-ribbed style shown in fig 5 page 2 in the patent at the link below. I have a big spool of it made or orange HDPE like Stihl line but I see it has been superceded in stores locally by simpler square or hexagonal extruded line.

      **LINK**

      Edited By Jeff Dayman on 11/04/2019 22:28:21

      Advert
      #404832
      ken king, King Design
      Participant
        @kenkingkingdesign

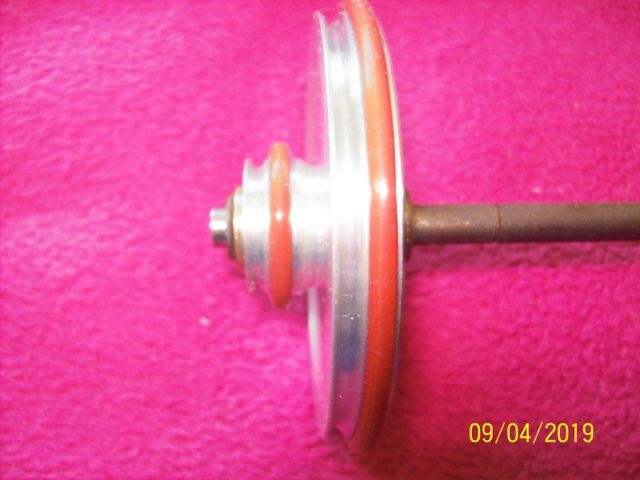
        Now for something Completely Different ! Lightweight and entertainment related, this is a replacement double drive wheel for a jukebox being restored by one of my clients. It's just over 2.5" diameter, so very small beer compared to the majority of subjects in this thread.

        100_5041.jpg

        The original was moulded black rubber with a brass bush, and it was so perished and cracked that it was difficult to decide what the diameters should be. This was important though, if the turntable was to hit 45rpm. The client decided on the use of 'O'rings for drive tyres so I turned an aluminium replacement, suitably grooved, with a bonded-in brass bush.

        100_5042.jpg

        He only sent me one of each size, but has since tested it and decided two are definitely necessary. After a couple of tweaks at his end he has achieved 45.2 rpm, which he reckons is good enough for rock 'n roll !

        #405068
        Anonymous

          I've been faffing about with hot pressing the strakes for my traction engine wheels this weekend; well yesterday actually, today I've been flying the tow plane at the local gliding club. For the moment suffice it to say it gets quite exciting when you drop a strake at 850°C from the furnace.

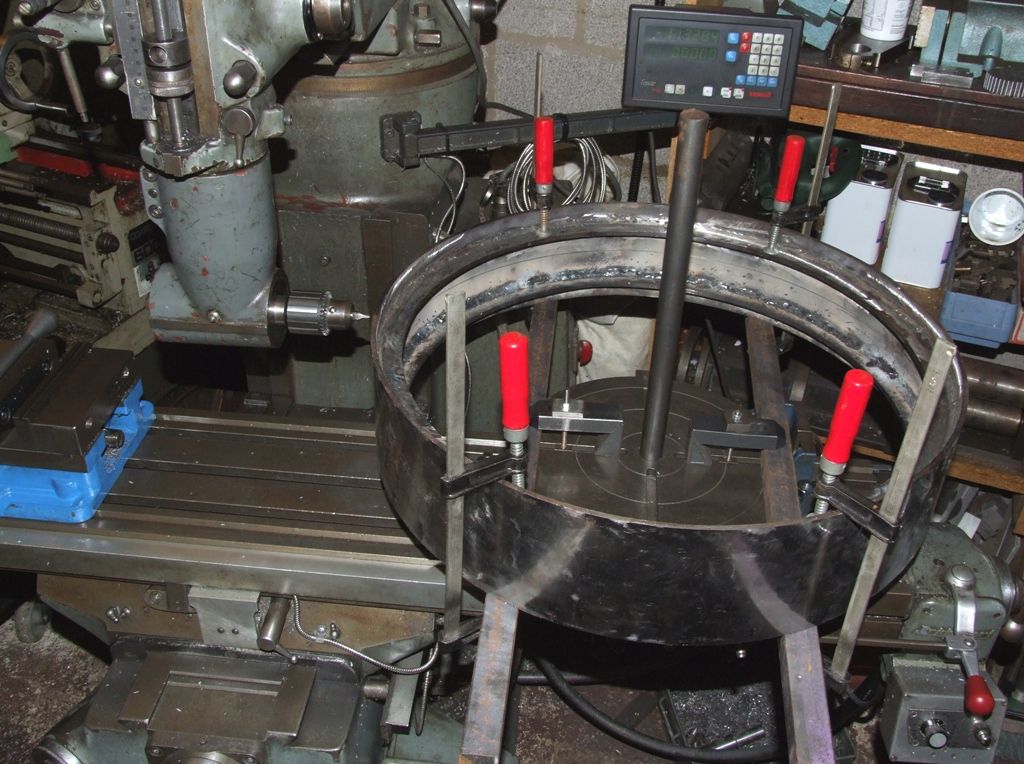
          I also drilled a circle of holes in the wheel rim for the 36 strakes. I only drilled one row, the others will be done using the strakes as a jig. I didn't think using dividers would be accurate enough for marking out – think accumulated errors. So I used a rotary table and a right-angle drive on the mill:

          rear rim drilling me.jpg

          The handle on the rotary table clashed with the rim support bars so I took it off and lined up each hole by eye. Of course 36 is an easy division of a circle so I only needed to line up on each 10 degree line – simples.

          Andrew

          #405075
          Neil Wyatt
          Moderator
            @neilwyatt

            Happiness is deciding to cut a thread… and discovering your lathe already has the right change gears fitted This is for a guidescope.

            Also fitted a new heater cartridge to my 3D printer so back in action (turns out its a dodgy cable not a blown heater cartridge).

            Other activity has been with brown stuff.

            I wanted a case for a new bass, so I got a cheesy bass case I made back in the 80s out of my dad's loft. It was too shallow so last weekend I made a very nice new case (just awaiting hinges). As for the old one I've cut it down to suit my first ever electric guitar (which is very thin bodied), fitted new ends and strips to get the bow out of one hardboard side. Lined with foam, still to add a layer of recycled dog-blanket for full padding. I have the choice of covering it with leatherette, but it has lots of 80s stickers 'No Star Wars', 'Say No To Drugs', 'Heddwych'… not to mention vintage guitar string labels. I might just round the corners and apply thick varnish. It will probably only be used for storage, not transportation.

            Incidentally, the one thing you really want for these cases are stay or stop hinges that open about 95 degrees. They are like hen's teeth in sensible sizes. I got two sets, one too small, the other (widely available) type needs a case at least 2" deep on one side. Finally found some stayless stop hinges as new old stock, not as robust as the stayed type, still waiting for them to arrive…

            Neil

            #405083
            Bazyle
            Participant
              @bazyle

              EDMES ran the portable track at the community association Easter fair where we meet. I managed to arrive too late to help with the track assembly so after a while went inside for some lunch and out of the perishing cold wind. After a prolonged chat trying to recruit a couple of unsuspecting small gauge modellers I returned outside to find they had called it a day and were packing up again. Still we made a few bob for club finds.

              #405312
              Mick B1
              Participant
                @mickb1

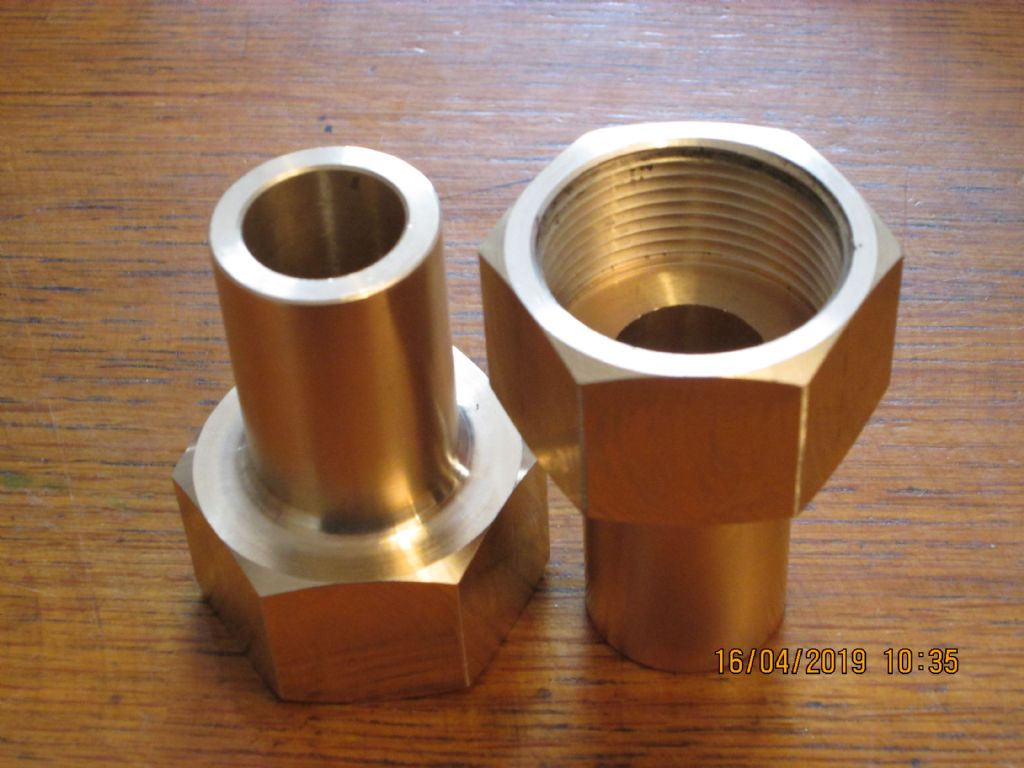
                Finished a pair of water gauge sight glass nuts for the Polish tank engine:-

                PolTankWtrGaStGlNts.jpg

                They're 1.67" AF hex – started from 55mm diameter LG2 round bar. The thread is what I'll call 1.7/16" x 12 TPI, for want of a better description. Hexes were done on a Bridgeport clone with a dividing head.

                I had a sample nut to work from, but without the tubular tail. In the water gauge currently fitted to the engine, the vertical glass tube's enclosed in a rectangular perspex box with a red line painted on it to indicate the water level.

                They don't like this and asked for the tail to go down to water level. When I deliver the bits I'll ask 'em why, 'cos it seems a bit pernickety to me.

                I cut the thread mostly rotating the chuck by hand, because screwcutting under power close up to an internal shoulder, when you can't disengage the halfnuts and it's hard to see the tooltip, seems like courting disaster to me. My metric WM250V has a 63 tooth change gear, not 127, so the 12 TPI setting can only be approximate – but fortunately both nuts screw on to the sample water gauge spigot they lent me – after I'd cut the thread …

                #405323
                Nigel Graham 2
                Participant
                  @nigelgraham2

                  Nut tails down to the proper water level?

                  That seems very odd! Wrong in fact A shroud UP to the minimum level to help give a larger safety margin, yes, but DOWN? Perhaps they are thinking of maximum level to help avoid priming, but still above the red line.

                  Unless I have a screw-cutting tool that gives the full thread profile, I cut nearly to size then finish the thread to size by tap or die. That also completes the profile and would correct very small pitch errors.

                  ++++

                  Writing this over a post-lunch cuppa, in a break from trying to fit a DRO to the Myford mill. The long (X) feed's on and tested, but fitting the Y and Z sensors and strips will need a lot of awkward metalwork.

                  Also, I don't yet know the effect of having a moving magnetic strip and fixed sensor on the long axis, and moving sensor with fixed strips on the other two. It might give opposing negative-going directions making the normal single-corner datum awkward. I'll have to study the handbook carefully to see if the console allows single-axis poling.

                  #405328
                  Ian P
                  Participant
                    @ianp
                    Posted by ken king, King Design on 13/04/2019 00:47:49:

                    Now for something Completely Different ! Lightweight and entertainment related, this is a replacement double drive wheel for a jukebox being restored by one of my clients. It's just over 2.5" diameter, so very small beer compared to the majority of subjects in this thread.

                    100_5041.jpg

                    The original was moulded black rubber with a brass bush, and it was so perished and cracked that it was difficult to decide what the diameters should be. This was important though, if the turntable was to hit 45rpm. The client decided on the use of 'O'rings for drive tyres so I turned an aluminium replacement, suitably grooved, with a bonded-in brass bush.

                    He only sent me one of each size, but has since tested it and decided two are definitely necessary. After a couple of tweaks at his end he has achieved 45.2 rpm, which he reckons is good enough for rock 'n roll !

                    I have a question about the actual 'O' ring you used. The majority of seals easily available are black in colour. I have seed silicone rings which look red/brown and some green 'O' rings, what type are the ones in the picture and who stocks them?

                    Ian P

                    #405329
                    Mick B1
                    Participant
                      @mickb1
                      Posted by Nigel Graham 2 on 16/04/2019 14:24:27:

                      Nut tails down to the proper water level?

                      That seems very odd! Wrong in fact A shroud UP to the minimum level to help give a larger safety margin, yes, but DOWN? Perhaps they are thinking of maximum level to help avoid priming, but still above the red line.

                      Unless I have a screw-cutting tool that gives the full thread profile, I cut nearly to size then finish the thread to size by tap or die. That also completes the profile and would correct very small pitch errors.

                      ++++

                      Yes, the shrouds seem odd. I even suggested slot-drilling a couple of windows over most of the length of the tail so as to observe the level of the water if it was covered, but they said emphatically "no, we certainly don't want that!" Hopefully it'll all come clear…?

                      blush

                      As for finishing off the screwcut thread with a tap; of course, that'd be wonderful if one was available in that oddball size…!

                      #405352
                      Mark Rand
                      Participant
                        @markrand96270
                        Posted by Mick B1 on 16/04/2019 13:30:20:

                        I cut the thread mostly rotating the chuck by hand, because screwcutting under power close up to an internal shoulder, when you can't disengage the halfnuts and it's hard to see the tooltip, seems like courting disaster to me. My metric WM250V has a 63 tooth change gear, not 127, so the 12 TPI setting can only be approximate – but fortunately both nuts screw on to the sample water gauge spigot they lent me – after I'd cut the thread …

                        A 63 tooth gear for metric/imperial conversion gives an error of only 0.0125% if used in the correct direction (63*2.54=160.02). So it's not all that approximate. wink

                        #405355
                        duncan webster 1
                        Participant
                          @duncanwebster1
                          Posted by Nigel Graham 2 on 16/04/2019 14:24:27:

                          Writing this over a post-lunch cuppa, in a break from trying to fit a DRO to the Myford mill. The long (X) feed's on and tested, but fitting the Y and Z sensors and strips will need a lot of awkward metalwork.

                          Also, I don't yet know the effect of having a moving magnetic strip and fixed sensor on the long axis, and moving sensor with fixed strips on the other two. It might give opposing negative-going directions making the normal single-corner datum awkward. I'll have to study the handbook carefully to see if the console allows single-axis poling.

                          You will probably find that there is a menu option which allows you to change the up/down reading direction. On mine you hold down a button whilst you switch it on, can't remember which, but I have the manual I could look it up if it helps

                          #405360
                          Mick B1
                          Participant
                            @mickb1
                            Posted by Mark Rand on 16/04/2019 19:11:00:

                            Posted by Mick B1 on 16/04/2019 13:30:20:

                            I cut the thread mostly rotating the chuck by hand, because screwcutting under power close up to an internal shoulder, when you can't disengage the halfnuts and it's hard to see the tooltip, seems like courting disaster to me. My metric WM250V has a 63 tooth change gear, not 127, so the 12 TPI setting can only be approximate – but fortunately both nuts screw on to the sample water gauge spigot they lent me – after I'd cut the thread …

                            A 63 tooth gear for metric/imperial conversion gives an error of only 0.0125% if used in the correct direction (63*2.54=160.02). So it's not all that approximate. wink

                            Thanks – I thought it'd probably be OK, and it seems to be.

                            #405476
                            Mick B1
                            Participant
                              @mickb1
                              Posted by Nigel Graham 2 on 16/04/2019 14:24:27:

                              Nut tails down to the proper water level?

                              That seems very odd! Wrong in fact A shroud UP to the minimum level to help give a larger safety margin, yes, but DOWN? Perhaps they are thinking of maximum level to help avoid priming, but still above the red line.

                              Yes, the maximum level is what they're interested in – I asked today as I delivered the bits. Apparently this engine has its current water gauge mounted too high, and the convention among cab crews is that any level visible in the sight tube is within limits.

                              So the objective of the tail is to push down the max limit, and the cost of this is more careful maintenance of levels due to the reduced range.

                              #405483
                              Neil Wyatt
                              Moderator
                                @neilwyatt
                                Posted by Mick B1 on 17/04/2019 15:25:20:

                                So the objective of the tail is to push down the max limit, and the cost of this is more careful maintenance of levels due to the reduced range.

                                So at a glance it's hard to tell if the boiler is over full or under full?

                                Ouch…

                                Neil

                                #405491
                                Mick B1
                                Participant
                                  @mickb1
                                  Posted by Neil Wyatt on 17/04/2019 16:14:35:

                                  Posted by Mick B1 on 17/04/2019 15:25:20:

                                  So the objective of the tail is to push down the max limit, and the cost of this is more careful maintenance of levels due to the reduced range.

                                  So at a glance it's hard to tell if the boiler is over full or under full?

                                  Ouch…

                                  Neil

                                  Well, that'd always be true if you didn't see the meniscus and couldn't tell if the tube had water in it or not. The idea is to make sure you can see it, below the tail of the top nut and above the bottom nut. Just the space between the two is reduced from maybe 10 inches to about 8 (memory guesses), so you have to check it a bit more often. The gauge is only mounted a couple of inches high – that's my understanding.

                                  And I'm not going to get into dispute with those guys who've been puffing that engine up and down the line for years…

                                  #405504
                                  Nigel Graham 2
                                  Participant
                                    @nigelgraham2

                                    " if you didn't see the meniscus and couldn't tell if the tube had water in it or not. "

                                    I can see shortening a long gauge-glass might help you maintain a more consistent level, but a contrasting line or stripes behind the glass is a well-proven way to make clear what's water and what's steam. Does the fitting have this?

                                    #405707
                                    martin perman 1
                                    Participant
                                      @martinperman1

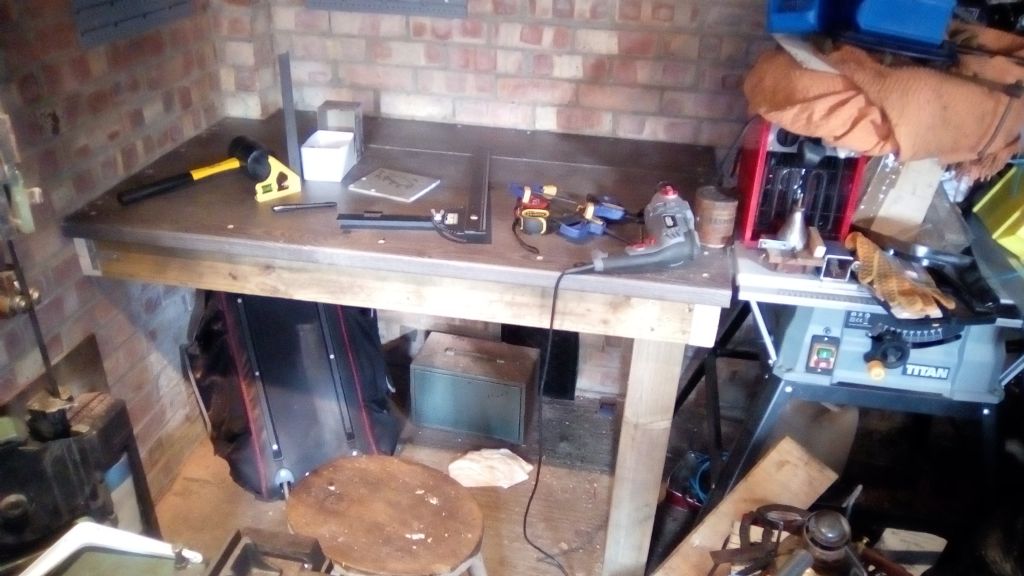
                                      Having sold two of my stationary engines last weekend I now have a space in my garage so yesterday I built a work bench with a storage shelf underneath, the bench is made from a 50mm kitchen worktop and 4" x 2" treated timber.

                                      Martin P

                                      img_20190418_165954.jpg

                                      #405714
                                      Neil Wyatt
                                      Moderator
                                        @neilwyatt
                                        Posted by martin perman on 19/04/2019 15:32:36:

                                        Having sold two of my stationary engines last weekend I now have a space in my garage so yesterday I built a work bench with a storage shelf underneath, the bench is made from a 50mm kitchen worktop and 4" x 2" treated timber.

                                        Take a good long look at that space, my forecast is it lasts about six hours before you never see it again…

                                        #405716
                                        martin perman 1
                                        Participant
                                          @martinperman1

                                          Neil,

                                          I just did and there is more space because I've transfered the contents of the old work tool bag into two tool cabinets, the shelf for under the bench will be made tomorrow and the only time the space will disappear is when I plonk half of my 20 stone frame on a stool and my legs slide under it smiley

                                          Martin P

                                          #405719
                                          mechman48
                                          Participant
                                            @mechman48

                                            Methinks a few of us are going through a minor epidemic of mancavious cleanupitis; I've just spent most of this afternoon cleaning up & lubing my WM250V-F, even to the point of removing the headstock gear guard & hoovering out all the detritus that seemed to have appeared over the past 6 months, followed up with tissue & white spirits wipe over then lubing, I can see Warco green now. surprise. I think I might have a fever as I am going to start on the mill next… smile o .

                                            George.

                                            #405721
                                            daveb
                                            Participant
                                              @daveb17630

                                              Adams oiler was leaking on my ML7, (it's about fifty years old but appeared to be in excellent condition, apologies to other ML7 owners who will know what comes next!) would empty itself over two or three days. I had a good look at it, oil seemed to be leaking past the needle. I removed it from the machine, couldn't see any problem with it, I thought there might be some debris holding the needle off the seat. So it took it apart, I carefully examined the plastic bowl for cracks – nothing! I checked and cleaned the other parts and decided to reassemble. When I picked up the plastic bowl, it fell apart into four pieces, there were cracks radiating out from the hole in the top. It seems that removing the top nut allowed the bowl to change shape and crack. I still don't know why it was leaking but I don't suppose it matters now.

                                              I'm now looking for some 30mm glass tube. Have you seen the price of small drip feed oilers?, 50ml ones are about £3.50 frim China, why are they asking £22.50 for 25ml ones?

                                              Daveb

                                              #405723
                                              Guy Lamb
                                              Participant
                                                @guylamb68056

                                                Me too, been 'bottoming out' my workshop (two days so far) It must be the Spring cleaning bug. Built quiet a sizable scrap heap outside but I know full well that I'll spend tomorrow retrieving most of it as 'too good to throw' probably until next years Spring clean and ditto repeato.

                                                Guy

                                                #405726
                                                Bazyle
                                                Participant
                                                  @bazyle

                                                  Finally wind dropped and not raining so I spent several hours putting up scaffolding to then spend only 15 minutes fixing the slates and had it down in half an hour. Then started putting it up again at a different point to get at some more problems tomorrow.

                                                  Shock horror discovery. It is a little known fact that the authorities have been hiding from us that gravity has increased markedly over the last two years. 21ft poles weren't nearly so heavy last time I moved them.

                                                  #405729
                                                  Colin Heseltine
                                                  Participant
                                                    @colinheseltine48622

                                                    Yesterday I trammed up my nice almost new Gates PBM-2000 (Bridgeport clone), which was delivered last week. My Excel surface grinder and Chester Super Lux have gone to make space. Now need 'T' nuts to fix the vice. Need to find a way to empty the small amount of gunge in the sump (1/2" deep) (looks like oil) before refilling with new suds. It is April 2011 machine but table and spindle looks as though hardly ever been used.

                                                    Today was spent in the fresh air watching the V.S.C.C sprint at Curborough Sprint Course near Lichfield. Lovely warm dry day and over 100 vintage cars from Edwardian era onwards. Fraser Nash, Bugatti T35's, Bentleys, Rileys, you name it and it was there being raced.

                                                    Colin

                                                    #405743
                                                    V8Eng
                                                    Participant
                                                      @v8eng

                                                      Posted by Bazyle on 19/04/2019 18:41:51:

                                                      Finally wind dropped and not raining so I spent several hours putting up scaffolding to then spend only 15 minutes fixing the slates and had it down in half an hour. Then started putting it up again at a different point to get at some more problems tomorrow.

                                                      Shock horror discovery. It is a little known fact that the authorities have been hiding from us that gravity has increased markedly over the last two years. 21ft poles weren't nearly so heavy last time I moved them.

                                                      smiley

                                                      Edited By V8Eng on 19/04/2019 21:24:11

                                                    Viewing 25 posts - 301 through 325 (of 1,046 total)
                                                    • Please log in to reply to this topic. Registering is free and easy using the links on the menu at the top of this page.

                                                    Advert

                                                    Latest Replies

                                                    Home Forums The Tea Room Topics

                                                    Viewing 25 topics - 1 through 25 (of 25 total)
                                                    Viewing 25 topics - 1 through 25 (of 25 total)

                                                    View full reply list.

                                                    Advert

                                                    Newsletter Sign-up