Lathe work

Advert

Lathe work

Home Forums General Questions Lathe work

Viewing 24 posts - 26 through 49 (of 49 total)
  • Author
    Posts
  • #472408
    Pete Rimmer
    Participant
      @peterimmer30576

      John,

      Don't be dismayed it can take a bit of getting your head around.

      Firstly, you don't want to check that the jaws are parallel to the axis of the lathe, they need to be parallel with the axis of the spindle. The spindle might not (probably is not) parallel to the axis of the lathe. The bed might not be free of twist, it might (will) have wear or the headstock might not be exactly aligned with the axis of the lathe – easily possible with the the Myford 7 because of the flat ways. For all these reasons you cannot rely on any measurement which involves moving the saddle.

      Your problem is that the axis of the test bar is not parallel with the axis of the spindle when it's turning. I would suggest that you work through my points 1-5 above and eliminate each in turn. You could start by testing the face and OD of the chuck, because being a fairly good quality item so long as it has been handled well it should run very close to true. If the face runs out, you have a register issue on the chuck or on the spindle. If the OD runs out you might have a burr on either register or trapped swarf in the threads. In any case I would start with that check and if you find an anomaly, remove the chuck and check for dirt, swarf and bruised registers. If you check the chuck and find no runout on either the OD or the face, leave the jaws and check the bar on vee blocks.

      You are quite right in that you will never turn your test bar in the 3-jaw, that is a between-centres job.

      Advert
      #472413
      Hopper
      Participant
        @hopper

        Quick check. Whip the jaws out and check them with an engineers try square held up to the light to make sure the gripping surface is square to the base surface. And mike the distance fron the base to the slot that engages in chuck body to make sure slot runs parallel to base surface.

        I have heard of jaws that were ground out of square before. Vaguely remember someone setting them up on a surface grinder to correct

        Hard to see bed being out of line or twisted if your test cut along a bar held in three jaw with no tail centre turns parallel within a couple tenths of thou as you have said.

        PS if the lug that engages with the threaded chuck barrel interferes with the try square mount yhe jaw on parallels on a flat surface such as surface plate, sheet of glass or lathe bed itself and stand square next to it.

        Edited By Hopper on 17/05/2020 13:33:45

        #472434
        John Baron
        Participant
          @johnbaron31275
          Posted by Neil Wyatt on 17/05/2020 12:53:13:

          If both sides of the parallel run away from the tool holder then it isn't the chuck at fault.

          If the parallel is parallel then opposite sides should go in opposite directions.

          Something is not right with your test.

          Neil

          Sorry Neil, but your post makes no sense ! A parallel is parallel.

          The in the set up the parallel is only pressed up against the face of the jaw nearest to the gauge. There is a dowel pin on the other side to ensure that the opposite face isn't affecting it only holding it square.

          #472439
          John Baron
          Participant
            @johnbaron31275

            Hello Hopper, Guys,

            That is exactly what I have done ! The amount of muck and chippings that came out from behind the jaws surprised me.

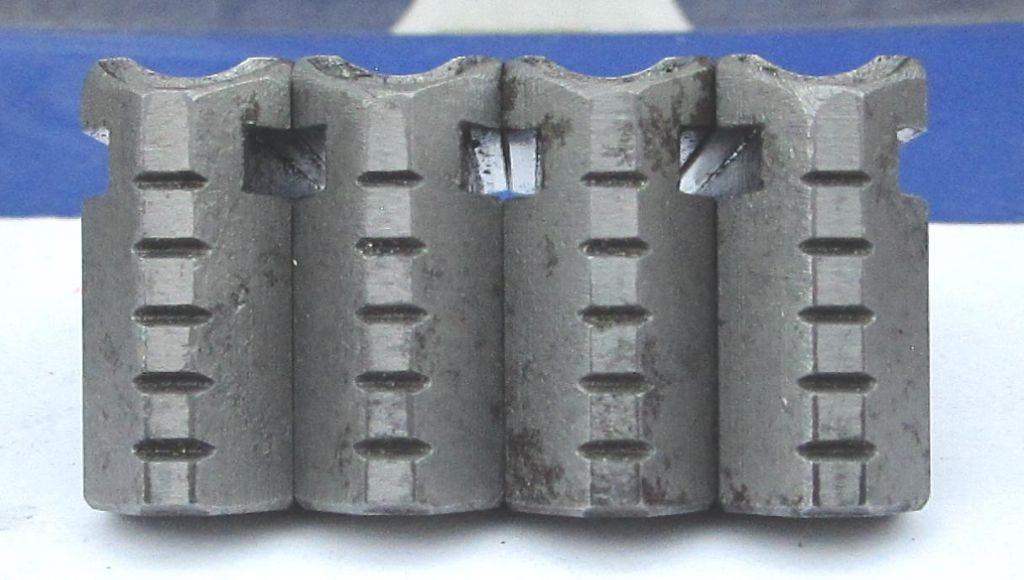
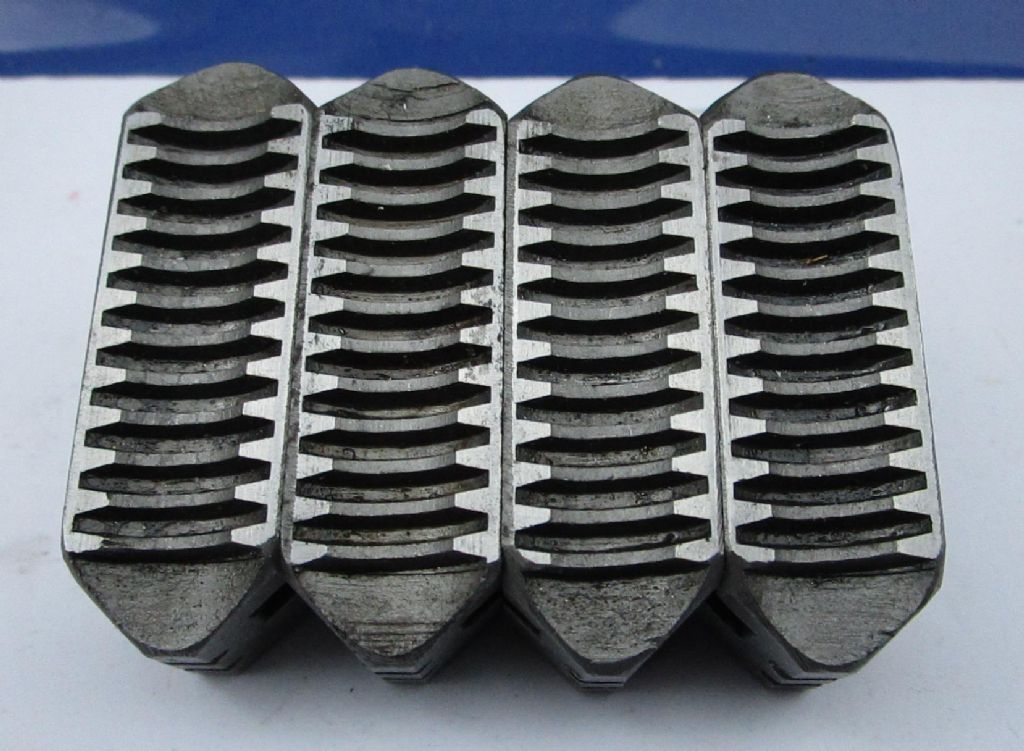
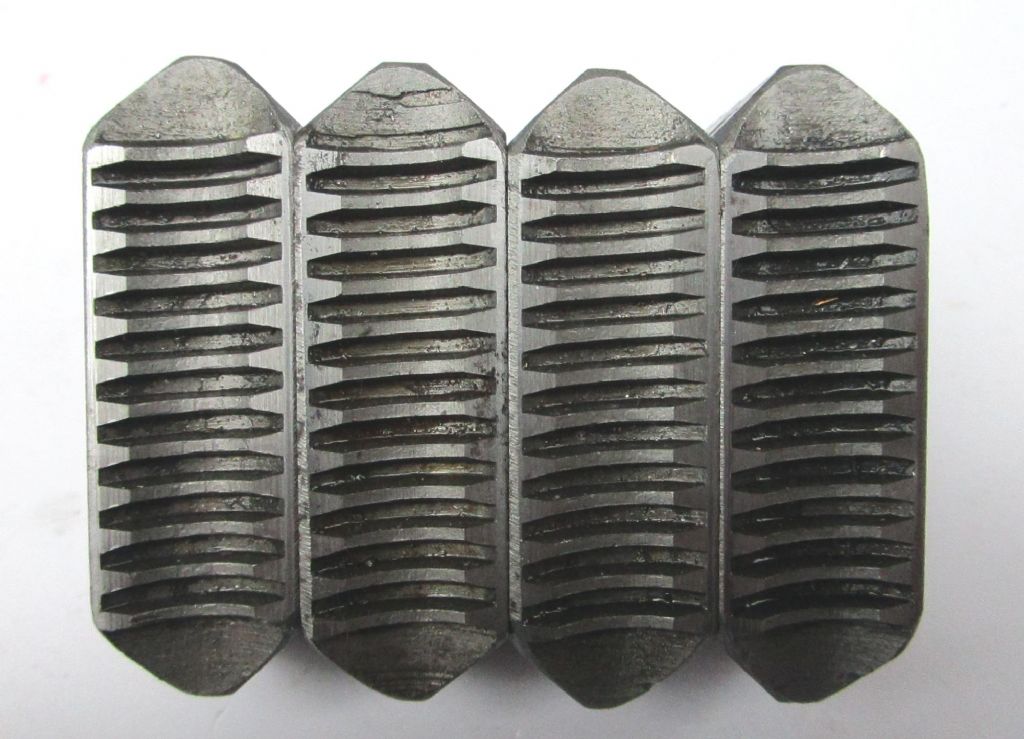
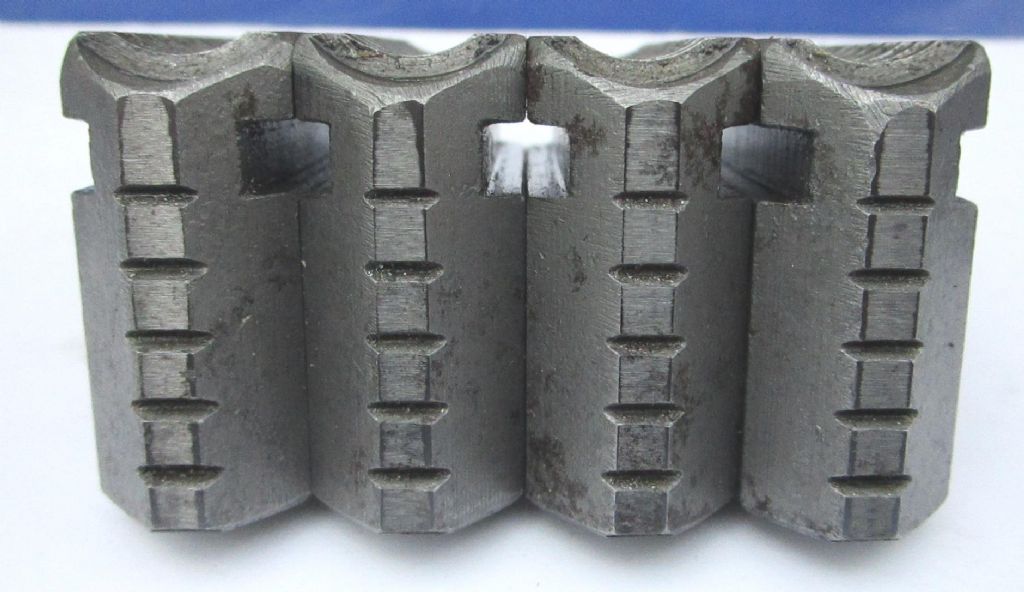
            Thinking about it this is what I should have done in the first place. I've discovered that what I thought should be a matched set of jaws, isn't even though they are all stamped with the same number. Unlike the three jaw chuck where the three jaws have the same ID as the chuck.

            Anyway I believe I confirmed the results of the measurements from the dial gauge.

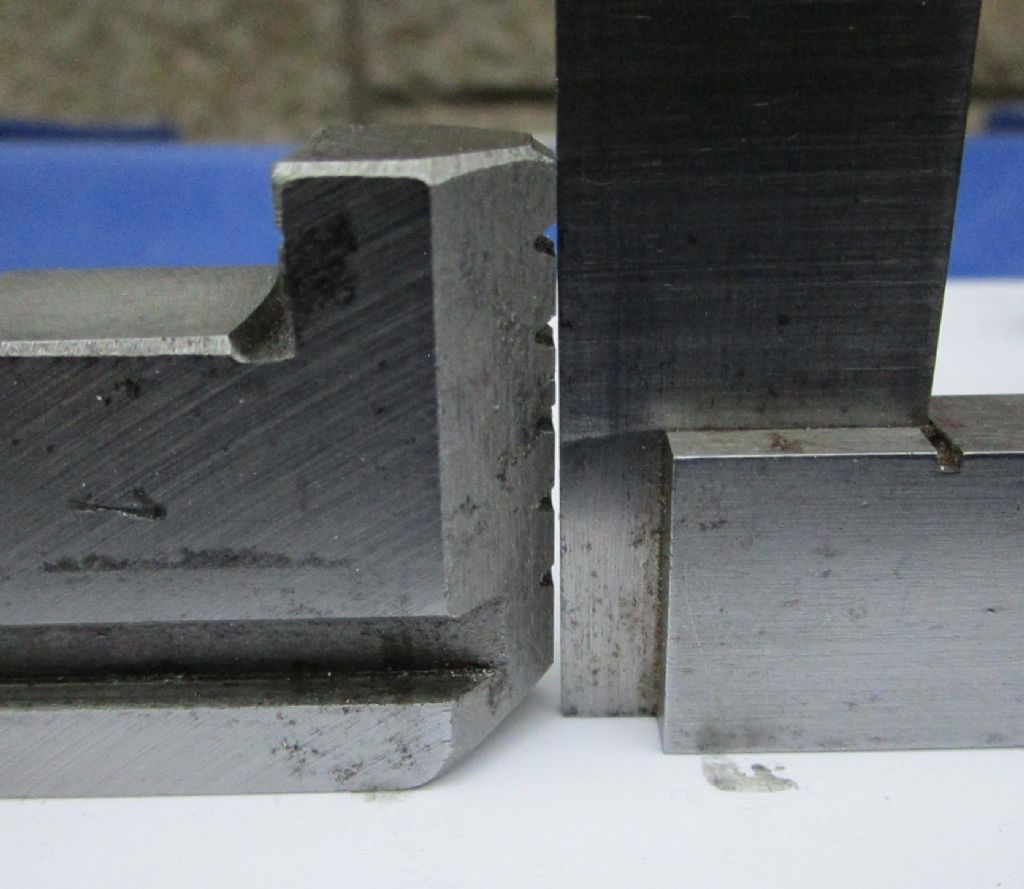
            17-05-2020-010.jpg

            This is jaw number one set against a M&W engineers square.

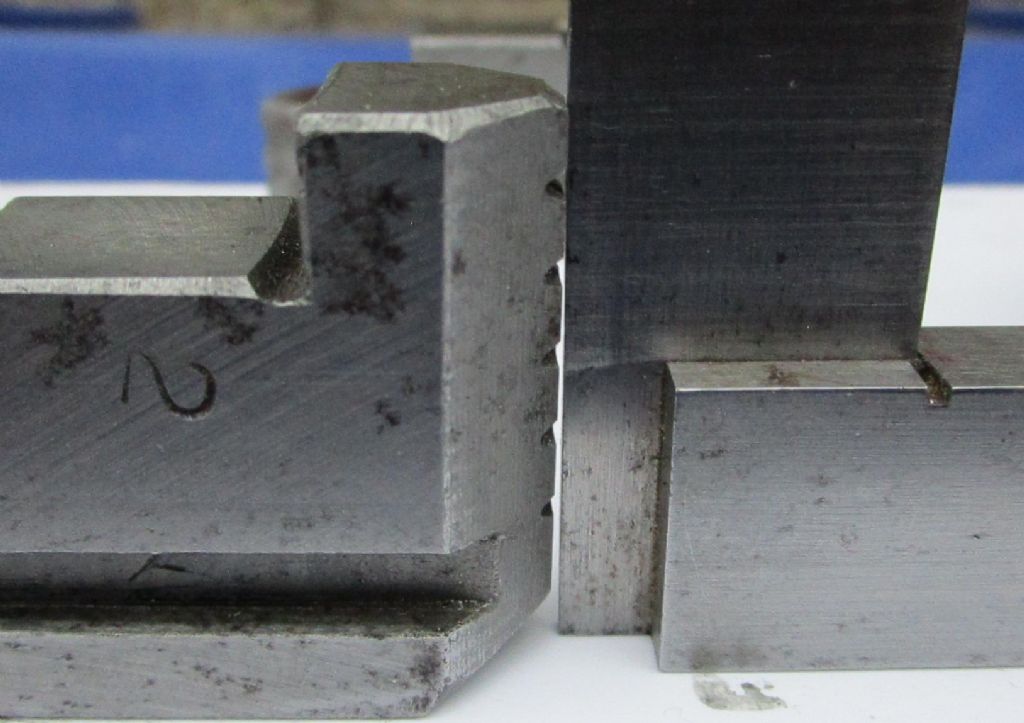
            17-05-2020-011.jpg

            Jaw number 2.

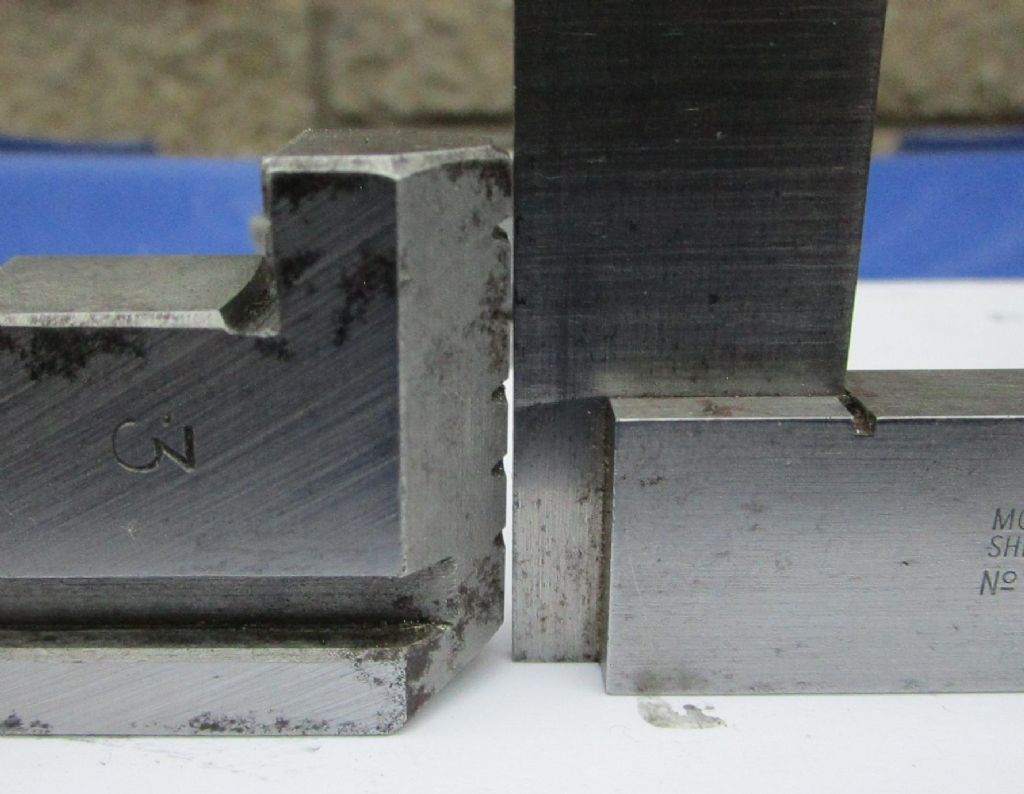
            17-05-2020-012.jpg

            Jaw number 3.

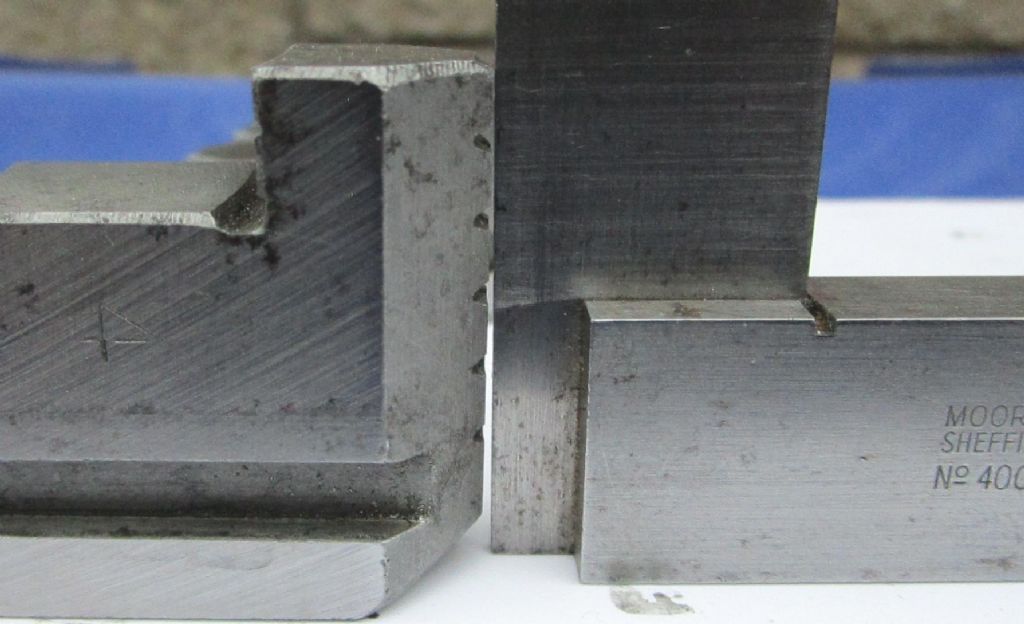
            17-05-2020-013.jpg

            Jaw number 4.

            Some more pictures.

            17-05-2020-006.jpg

            You can see that these are not even or parallel.

            17-05-2020-007.jpg

            If you look closely the third jaw is a fraction smaller and the ground edges are not symmetrical.

            17-05-2020-008.jpg

            A slightly different angle to get a better view.

            17-05-2020-009.jpg

            I think these are horrible ! Nothing like I expected. When I put them back in the chuck, I'm going to turn them round and check the other faces. My opinion is that these jaws are effectively worn out. They should all be the same hight and square.

            Thanks again.

            #472443
            Pete Rimmer
            Participant
              @peterimmer30576

              Give me the dimensions off your jaws I have three loose sets here.

              That is not to say that I am agreeing with your diagnosis, there could be any number of things going on there, but if I have a suitable set you are welcome to them.

              #472447
              John Baron
              Participant
                @johnbaron31275

                Hello Pete,

                First I must thank you for your very kind offer and your wise words. I'll do a cad drawing of the jaws later. But before I take up up on your offer I am going to put them back in reverse direction in the chuck and go through the process of measuring them again. There are a lot of sharp edges on these as well that could do with fettling.

                I wouldn't have noticed the issue if I hadn't been in the process of making a grinding spindle and had machined one end of the body, turned it around and discovered that it was no longer true. Fortunately I've not attempted to machine the other end. I suspect that it will become a piece of expensive scrap.

                To all that have offered their help and comments, Thanks Guys.

                #472472
                Oven Man
                Participant
                  @ovenman

                  Should the slots in the jaws be the measuring datum rather than the base?

                  Peter

                  #472520
                  John Baron
                  Participant
                    @johnbaron31275
                    Posted by Oven Man on 17/05/2020 17:44:18:

                    Should the slots in the jaws be the measuring datum rather than the base?

                    Peter

                    I wouldn't think it matters since the slot and the back are parallel, but I can check and measure it.

                    #472559
                    Michael Gilligan
                    Participant
                      @michaelgilligan61133
                      Posted by John Baron on 17/05/2020 15:00:18:

                      […]

                      Anyway I believe I confirmed the results of the measurements from the dial gauge.

                      […]

                      I think these are horrible ! Nothing like I expected. […]

                      .

                      If they are as bad as they look in your photos : My suggestion of using Plastigauge to check the grip wouldn’t be much use !! … I was expecting you to find perhaps five thou’ variation along the gripping length of each jaw. surprise

                      MichaelG.

                      #472574
                      Hopper
                      Participant
                        @hopper
                        Posted by John Baron on 17/05/2020 20:12:01:

                        Posted by Oven Man on 17/05/2020 17:44:18:

                        Should the slots in the jaws be the measuring datum rather than the base?

                        Peter

                        I wouldn't think it matters since the slot and the back are parallel, but I can check and measure it.

                        Needs to be checked for sure. Or put a parallel in the slot and sit the square on the parralel.

                        #472606
                        John Baron
                        Participant
                          @johnbaron31275
                          Posted by Michael Gilligan on 17/05/2020 23:10:33:

                          Posted by John Baron on 17/05/2020 15:00:18:

                          […]

                          Anyway I believe I confirmed the results of the measurements from the dial gauge.

                          […]

                          I think these are horrible ! Nothing like I expected. […]

                          .

                          If they are as bad as they look in your photos : My suggestion of using Plastigauge to check the grip wouldn’t be much use !! … I was expecting you to find perhaps five thou’ variation along the gripping length of each jaw. surprise

                          MichaelG.

                          Hi Michael,

                          These look like what I would call "Friday night" work.

                          Even if the chuck was second hand, I find it hard to believe that each jaw would be that bad. Using a spring clamp to hold the square I can pass a 20 thou feeler gauge through at the back on the worst one but only a 5 thou through the best one. Also I noticed when taking them out of the chuck the two worst ones were the loosest in the slots.

                          Thanks for your suggestion. I do have some plastic strip that I was given that works like Plastigauge. But I've never used it.

                          #472611
                          John Baron
                          Participant
                            @johnbaron31275
                            Posted by Hopper on 18/05/2020 01:44:15:

                            Posted by John Baron on 17/05/2020 20:12:01:

                            Posted by Oven Man on 17/05/2020 17:44:18:

                            Should the slots in the jaws be the measuring datum rather than the base?

                            Peter

                            I wouldn't think it matters since the slot and the back are parallel, but I can check and measure it.

                            Needs to be checked for sure. Or put a parallel in the slot and sit the square on the parallel.

                            Hi Hopper, Thanks for your suggestions.

                            You and I seem to think alike smiley That is exactly what I've tried and yes the slots are parallel with the base. Though I did find a couple of thou difference in width between the sides on a couple. Again they were the worst pair and the loosest in the chuck body.

                            #472638
                            Nigel McBurney 1
                            Participant
                              @nigelmcburney1

                              I had a problem with Burnerd 3 jaw,same as the four jaw,bought new when I bought the Myford dividing head,this allowed me to hold work in the head and use the lathe 3 jaw to hold the cutters,.twenty years later the 3 jaw on the lathe was a little worn and the dividing head was not used as I had a universal dividing head for the mill.It was then that I found that the new chuck had a runout of around 1.5 thou, the one that I had used on the lathe initially had virtually zero runout. Too late to have a go at Burnerd so I mounted the new one on a back plate and got it dead true,and is still a good chuck. Manufacturers do make errors,quality is/was always a uk problem.Had a similar problem with a very expensive bore micrometer,this had two sets of jaws to cover the measuring range,this was a company purchase so it went to the standards room for calibration,one set of jaws gave a perfect reading,the second set had a serious error, and accordingly rejected. I dont know what happened as I moved on to another project.So if you buy precision tooling for your workshop ,check it over if you have the equipment to do it. Now there is a way to correct these jaws in the four jaw burnerd,find someone with a surface grinder find out the run out error on each jaw set up the jaw in the vice on the grinder with a dial gauge set the jaw with same amount of run out and grind the jaw true,do the jaws one at a time, I once trued up a 10 inch four jaw in this manner so that it could grip round material.I do not believe in using tool post grinders on a lathe,grinding dust and lathes do not mix no matter how careful you are, I once had to use a toolpost grinder at work to grind a long cylinder,and then found how grinding debris gets everywhere, being at work I used it as I was told to ,though it was never used again all the time I was there.

                              #472645
                              John Baron
                              Participant
                                @johnbaron31275

                                Hi Nigel, Guys,

                                Actually I've had a conversation with a friend of mine who is the works forman at a major engineering works discusing the issue with my chuck jaws. Normally he would have said "bring them in and I'll sort it" but because of the current problems few of the staff are in and he says that they are pulled out with work that is late and urgently wanted.

                                His advice is, because it is an independent jaw chuck, to use a toolpost grinder and true each jaw individually whilst in the chuck and to use a "G" clamp across a pair to stop any movement, also to lock the spindle with a block making sure that it was horizontal. He also told me that it didn't matter if each jaw was very slightly different from each other. He suggested that 20 thou gap on the inside was probably due to dirt or something underneath when it was ground.

                                Which if you think about it, it doesn't, because each jaw can be moved independently of the others.

                                #472730
                                Pete Rimmer
                                Participant
                                  @peterimmer30576

                                  John,

                                  Give me the jaw width, slot width and tooth pitch of your jaws. I'll check what I have.

                                  Also, a better check than using the square is to put two jaws on your surface plate with the gripping faces against each other, that way you aren't measuring any error in the square.

                                  Finally, if those two jaws really are touching at the tips whatever you clamp in them (lightly) should rock about in the chuck if you wrench the other end about with your hand. You should easily feel (or hear) this. Does it happen?

                                  #472749
                                  old mart
                                  Participant
                                    @oldmart

                                    The pictures of the chuck jaws and the square are totally meaningless. The rear of the jaws has probably been linished to remove burrs at the edge of the teeth. The squareness that matters is between the slots and the jaws and only then if they are in the chuck body and are stressed in the clamping direction.

                                    There was mention of soft jaws being bored to fit the test bar. Did that confirm an error in the lathe bed?

                                    #472768
                                    John Baron
                                    Participant
                                      @johnbaron31275
                                      Posted by Pete Rimmer on 18/05/2020 17:57:16:

                                      John,

                                      Give me the jaw width, slot width and tooth pitch of your jaws. I'll check what I have.

                                      Also, a better check than using the square is to put two jaws on your surface plate with the gripping faces against each other, that way you aren't measuring any error in the square.

                                      Finally, if those two jaws really are touching at the tips whatever you clamp in them (lightly) should rock about in the chuck if you wrench the other end about with your hand. You should easily feel (or hear) this. Does it happen?

                                      Hi Pete, I'll PM later. At the moment SWMBO has got me clearing, painting and decorating the small bedroom. Had to go out this morning and buy some architrave ! Tomorrow she wants some paint and wallpaper. I'm sure you know how long that can take.

                                      #472775
                                      John Baron
                                      Participant
                                        @johnbaron31275
                                        Posted by old mart on 18/05/2020 19:04:33:

                                        The pictures of the chuck jaws and the square are totally meaningless. The rear of the jaws has probably been linished to remove burrs at the edge of the teeth. The squareness that matters is between the slots and the jaws and only then if they are in the chuck body and are stressed in the clamping direction.

                                        There was mention of soft jaws being bored to fit the test bar. Did that confirm an error in the lathe bed?

                                        I can confirm that there is no twist in the lathe bed. The test bar in the soft jaws of the three jaw scroll chuck using the dial gauge showed just under a division 0.01 mm from one end to the other over 150 mm.

                                        I will before I start doing an work on the jaws check using parallels in the slots on the jaws. I do know that there is a few thou difference in the hight of the slot on one of the jaws which can be seen in one of the pictures. But I doubt that that will make any difference.

                                        I can tell you that the tailstock needs adjusting, its not quite point to point with a pair of centres. I would say a fraction high and slightly to the right. If I push the tailstock away from me it is just about spot on.

                                        This is using the steel rule method. But the tailstock doesn't concern me at the moment, but at some point I will run a between centres check and adjust it.

                                        #472789
                                        old mart
                                        Participant
                                          @oldmart

                                          Looking at the pictures of the jaws from the lightweight four jaw chuck, and having recently sold a set of new ones, I recon yours are in pristine condition, there are almost no signs of wear. The threads are ACME form, there is a variation with square threads. I have a set of worn jaws, they look very different both in the thread wear and the contact edges.

                                          There is a method of grinding these independent chuck jaws, one at a time, in the chuck. That would ensure they are accurate when used.

                                          #472790
                                          old mart
                                          Participant
                                            @oldmart

                                            Doubled up post yet again sarcastic 2

                                            Edited By old mart on 18/05/2020 20:55:45

                                            #472921
                                            John Baron
                                            Participant
                                              @johnbaron31275
                                              Posted by old mart on 18/05/2020 20:54:24:

                                              Looking at the pictures of the jaws from the lightweight four jaw chuck, and having recently sold a set of new ones, I recon yours are in pristine condition, there are almost no signs of wear. The threads are ACME form, there is a variation with square threads. I have a set of worn jaws, they look very different both in the thread wear and the contact edges.

                                              There is a method of grinding these independent chuck jaws, one at a time, in the chuck. That would ensure they are accurate when used.

                                              Yes I agree they should look pristine smiley The chuck has not been used more than once !

                                              But I do agree that they can be easily trued up insitu. I did try them turned around and with the 20 mm test bar they are virtually spot on. I discussed this with a friend, and how they could be trued up. I mentioned it in an earlier post.

                                              #472933
                                              Hopper
                                              Participant
                                                @hopper

                                                If you grind them in situ you will neef to make a clover leaf plate or at least packing sttrips between adjoining jaws to push the jaws outwards while grinding.

                                                #473005
                                                John Baron
                                                Participant
                                                  @johnbaron31275
                                                  Posted by Hopper on 19/05/2020 12:54:17:

                                                  If you grind them in situ you will need to make a clover leaf plate or at least packing strips between adjoining jaws to push the jaws outwards while grinding.

                                                  Hi Hopper,

                                                  Yes I agree with you for a three jaw chuck ! With a four jaw you can grind each jaw independently. The technique that has been described to me is to lock the chuck so that the jaws are horizontal and then grind the face of the jaw so that it is square. To prevent the jaw moving whilst grinding, use a clamp across opposite jaws.

                                                  As long as each jaw has a true face then any work placed in them and trued up should be true at both ends.

                                                  #476492
                                                  John Baron
                                                  Participant
                                                    @johnbaron31275

                                                    Hi Guys,

                                                    To close this thread.

                                                    In my case all four of the jaws all had different amounts of taper to the back. I've simply reground mine parallel.

                                                    However I've also recently discovered that PB deliberately grind the jaws with a 2 to 3 thou backwards taper. Apparently to allow for grinding tolerances in the guides.

                                                    Anyway having reground them I can now set the test bar true at the chuck and it is still true within two tenths of a mm 150 mm away. So I'm very happy with that.

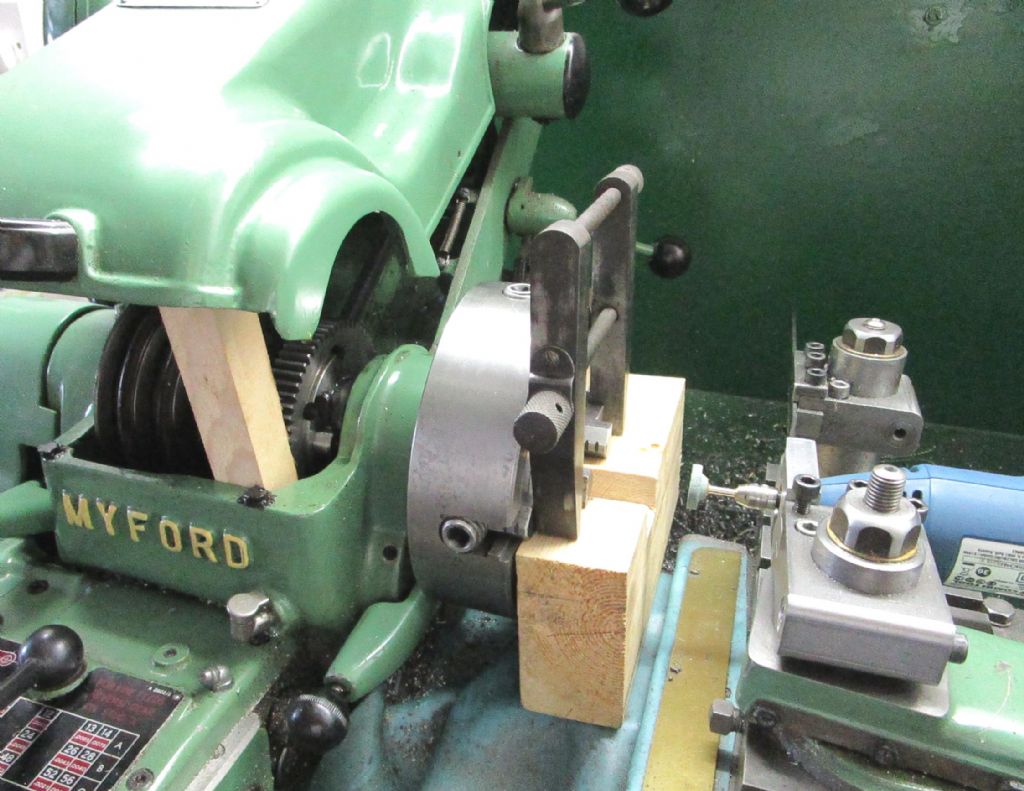
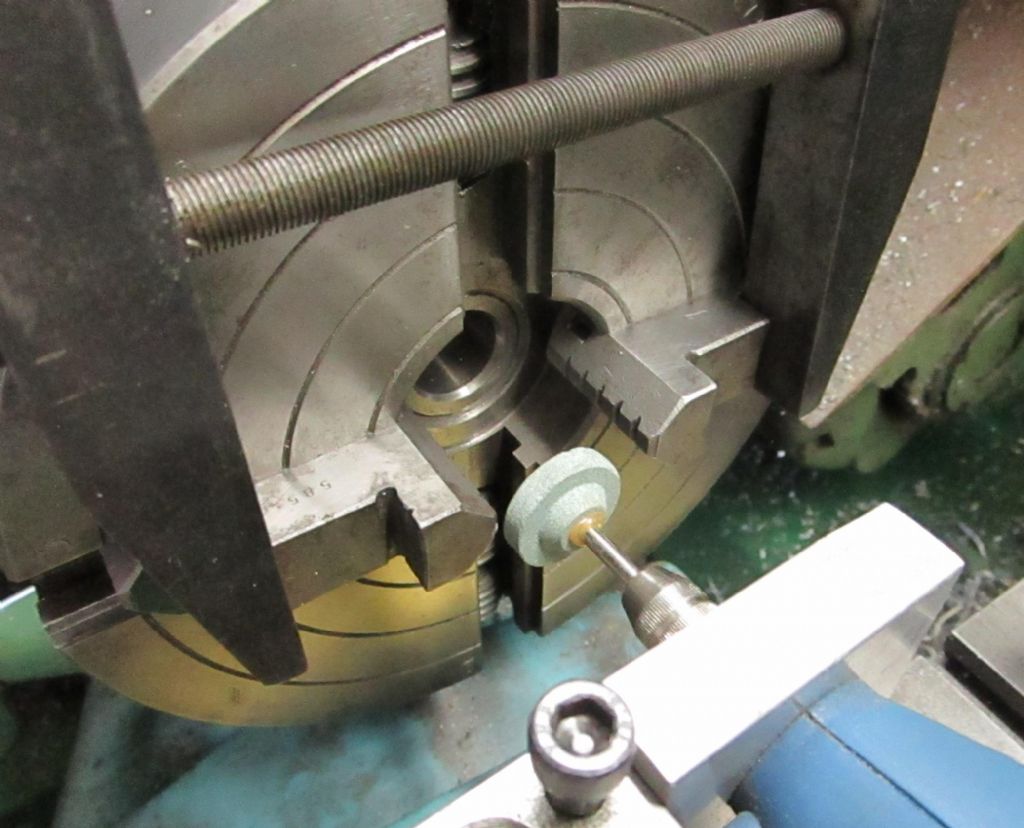
                                                    If I need to grind the compensation for guide wear back in all I have to do is reverse the jaw, clamp it against the inside so that it can't move and regrind the jaw face with the chuck locked so that the jaws are parallel to the bed and lock the chuck so it cannot move.

                                                    26-05-2020-001.jpg

                                                    The general setup.

                                                    26-05-2020-006.jpg

                                                    Ready to start grinding.

                                                  Viewing 24 posts - 26 through 49 (of 49 total)
                                                  • Please log in to reply to this topic. Registering is free and easy using the links on the menu at the top of this page.

                                                  Advert

                                                  Latest Replies

                                                  Home Forums General Questions Topics

                                                  Viewing 25 topics - 1 through 25 (of 25 total)
                                                  Viewing 25 topics - 1 through 25 (of 25 total)

                                                  View full reply list.

                                                  Advert

                                                  Newsletter Sign-up