How can I change colours in a jpeg?

Advert

How can I change colours in a jpeg?

Home Forums General Questions How can I change colours in a jpeg?

Viewing 14 posts - 1 through 14 (of 14 total)
  • Author
    Posts
  • #405924
    Georgineer
    Participant
      @georgineer

      I have scanned a black-and-white woodcut from an old engineering journal and want to colour parts of it to make it easier to understand.

      I have Paint version 6.1, which enables me to select the target colour and replace it with my chosen colour by selecting the eraser and right-clicking it. However, the eraser is very small and I haven't found a way of changing its size independently of the picture, so it will take forever to re-colour the bits I want.

      I'm sure that software must exist which will enable me to do this more quickly and easily. Has anybody any suggestions? I don't want to spend money if I can avoid it, as this is likely to be a once-only requirement.

      George

      Edited By Georgineer on 21/04/2019 18:14:01

      Advert
      #26566
      Georgineer
      Participant
        @georgineer

        Seeking a quick way to re-colour parts of an image

        #405925
        Journeyman
        Participant
          @journeyman

          You could do worse than install the GIMP free and available for all platforms. As powerful as Photoshop but a steepish learning curve.

          John

          #405926
          Frances IoM
          Participant
            @francesiom58905

            steep is almost vertical!
            I keep an old version of Corel Draw bought 20+yrs ago for win98 machine – works perfectly under Wine on all linux machines – one tool in the photo editing section is a ‘magic mask’ which selects the smallest enclosing area bounding a selected point where the boundary is defines as a adjustable colour difference – this area can then be filled with another colour

            #405930
            SillyOldDuffer
            Moderator
              @sillyoldduffer

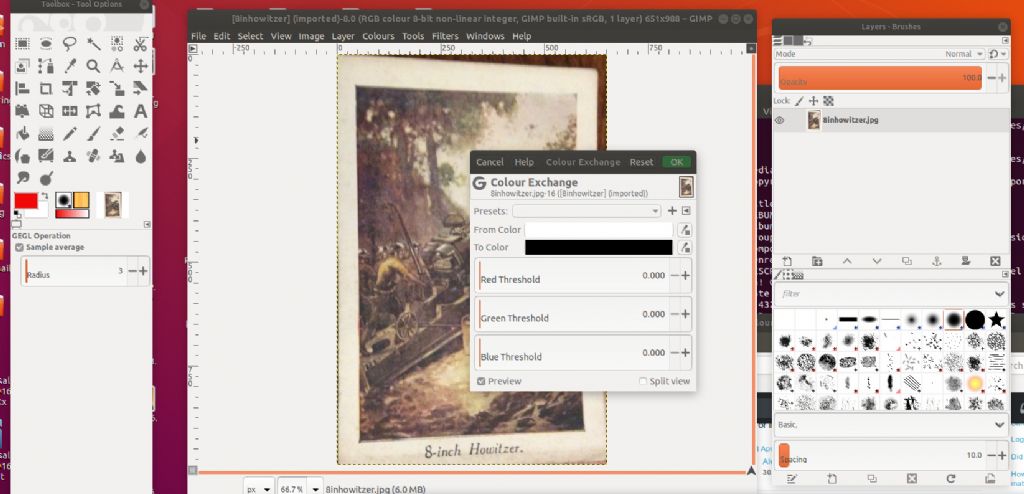
              GIMP has a tool for doing this. From the menu bar click, Colours->Map->ColourExchange. It gives a dialogue like this:

              colourmap.jpg

              The colour exchange dialogue lets you select a colour from the image (with the eye-dropper button) and then change it to another colour. The new colour can also be selected from the image, or it can be set manually to anything. The RGB threshold sliders control how close you have to be to the selected colour for the change to be made: this is necessary because many images are built of similar but different shades.

              By default colour changes are applied to the whole picture but you can select a specific area to work on. Works fastest and best on images with a simple colour scheme – can be hard work on images packed with subtle shades.

              Another possibility is to convert the image to greyscale and then 'Colourify' it. (Like tinting an old black and white photo)

              Francis makes a good point about GIMP's steep learning curve. It's easy enough when you 'get it', but it's NOT like Photoshop or other picture editors. For example, the screenshot above shows GIMP uses 3 separate windows to do its stuff: this alone is enough to blow the mind of many a newcomer! It's done that way so power users can edit with more than one screen: typically a big screen is used to display the image and all the controls are out of the way on a smaller one. Great feature but it tends to stall the average Joe out for his first test drive.

              Well worth persevering with if you want a high-end image editor and don't like Photoshop's license system.

              Dave

              #405932
              Journeyman
              Participant
                @journeyman

                There is an option to combine all the windows into just one, I find it makes things a bit easier.

                John

                #405933
                Peter G. Shaw
                Participant
                  @peterg-shaw75338

                  I too use GIMP, having migrated to it slowly from Paint Shop Pro v.7 when I migrated from Windows to Linux. I agree that the learning curve is steep, and it's not exactly intuitive, especially after PSP. But, some of the things I have found made it well worth learning about, eg converting all my slides to digital (built a light box, photographed the slide, then used GIMP to get rid of bad colours (an auto function I found was very good), and a lens distortion function which allowed me to get rid of pin-cushion & barrel distortion).

                  I also use it now to increase readability after scanning a document (save the scanned documant as a png, read it into GIMP and use Brightness/Contrast functions followed by export as jpg).

                  The three separate windows is somewhat mind blowing, but as I have two vdu's, it does eventually make sense.

                  In respect of changing colours, other than enhancing them, I have not had to do that so can't help, but I'm sure the facility will be there.

                  And best of all, it is free.

                  Peter G. Shaw


                  Edited By Peter G. Shaw on 21/04/2019 19:25:35

                  #405951
                  Georgineer
                  Participant
                    @georgineer

                    Thanks for all the suggestions. I've just downloaded GIMP and will have a play with it. Fortunately my mind is completely unsullied with any knowledge of picture editing so I shall have nothing to unlearn.

                    George

                    #405955
                    Neil Wyatt
                    Moderator
                      @neilwyatt
                      Posted by Georgineer on 21/04/2019 22:02:44:

                      Thanks for all the suggestions. I've just downloaded GIMP and will have a play with it. Fortunately my mind is completely unsullied with any knowledge of picture editing so I shall have nothing to unlearn.

                      George

                      Alternatively in Paint select the eraser, then click 'size' under the stripes, and select the thickest stripe.

                      This will give you a bigger eraser.

                      Neil

                      #405957
                      Georgineer
                      Participant
                        @georgineer
                        Posted by Neil Wyatt on 21/04/2019 22:59:29:

                        Posted by Georgineer on 21/04/2019 22:02:44:

                        Thanks for all the suggestions. I've just downloaded GIMP and will have a play with it. Fortunately my mind is completely unsullied with any knowledge of picture editing so I shall have nothing to unlearn.

                        George

                        Alternatively in Paint select the eraser, then click 'size' under the stripes, and select the thickest stripe.

                        This will give you a bigger eraser.

                        Neil

                        Thanks Neil, that certainly speeds things up a bit. It never occurred to me that the line thickness selector would act on the eraser. They disguised it well!

                        I've opened GIMP, but every time I try to access 'help' the plug-in crashes. Heigh-ho.

                        George

                        Edited By Georgineer on 21/04/2019 23:19:40

                        #405982
                        Peter G. Shaw
                        Participant
                          @peterg-shaw75338

                          I've just tried mine, and it says that the help file isn't loaded – correct – and gives me the option of looking at it online, which works ok.

                          FWIW I'm on Linux Mint 18.1 and my GIMP is 2.18.16

                          Peter G. Shaw

                          #406011
                          SillyOldDuffer
                          Moderator
                            @sillyoldduffer
                            Posted by Georgineer on 21/04/2019 23:19:14:

                            Posted by Neil Wyatt on 21/04/2019 22:59:29:

                            Posted by Georgineer on 21/04/2019 22:02:44:.


                            I've opened GIMP, but every time I try to access 'help' the plug-in crashes. Heigh-ho.

                            George


                            Another beginner mistake is trying to learn how to use complex software by reading the built-in help! The 'Help' provided with software varies considerably in quality, but it's quite common for the 'Help' to be Reference material rather than a User Guide. It's for checking points of detail and not for explaining fundamentals.

                            The effect is like trying to learn English with only a dictionary; very difficult! Wanting to ask the way to the Zoo, you start by reading that 'A' is the first letter of the alphabet, and is the 'low-back' vowel, formed with the widest opening of jaws, pharynx and lips. About 2000 words later (there are 12 definitions of 'A' ), you reach the first real word in English. In my dictionary, it's 'Aal', "a species of Morinda, whose roots yield a red-dye". Not only are you nowhere near 'zoo', by now you are thoroughly confused by a host of new words and abbreviations, like 'proclyptic' and OE.

                            Sometimes software 'Help' includes a comprehensive set of Tutorials, but – until the jargon is learned – it can be hard to find the particular tutorial you need.

                            If you have a particular task with GIMP or any other high software, the internet is your friend. If you search for 'gimp change colour tutorial', you should get several tutorials showing various ways in which the job could be done. There is more than one method, which is best for you depends on the nature of your image.

                            Usually a good idea for newcomers to follow tutorials exactly at first. If you try and adapt one to do your job without understanding it, you're liable to come unstuck. There is a lot to image processing.

                            My GIMP help works fine and it looks to cover beginner basics fairly well. Unfortunately I'm using version 2.99, which is the development release, and the help may be different to that provided with 2.10

                            Dave


                            Edited By SillyOldDuffer on 22/04/2019 12:20:41

                            #406064
                            An Other
                            Participant
                              @another21905

                              Go to Windows Menu and tick ''Single Window Mode' to get one window instead of multiples. The Gimp Download site has documentation which can be downloaded and accessible from the Gimp Help menu. (**LINK**

                              You will see from the menu for the manual that it is very detailed, and is not too difficult to follow, unlike other expensive commercial offerings which often have no manual.

                              #406193
                              Georgineer
                              Participant
                                @georgineer

                                Success! I looked at some tutorials and the manual (which has very clear and logical section names) and ended up doing this:

                                1. Posterise the original scan with: Colours. Posterise> Posterise Levels [10]. I chose a fairly high number to reduce the number of intermediate shades of grey. Puzzlingly, these were present even though I scanned on a black-and-white setting.

                                2. Tools>Selection Tools>Free Select. Zoom in using <Ctrl+Mouse Wheel> and draw an accurate outline of the desired area.

                                3. Colours>Map>Colour exchange>From colour [black] to colour [red, for example]> OK.

                                4. File>Save as>[suitable name]

                                5. File>Export as>Select file type (by extension)> JPEG image> Export [and follow any further instructions on screen.]

                                I think that's all there was too it. I know there are short cuts available and I used some of them. It wasn't scary at all because I was trying to do a very closely defined task.

                                Thanks again to everyone who made suggestions – I couldn't have done it so easily without you!

                                George

                              Viewing 14 posts - 1 through 14 (of 14 total)
                              • Please log in to reply to this topic. Registering is free and easy using the links on the menu at the top of this page.

                              Advert

                              Latest Replies

                              Home Forums General Questions Topics

                              Viewing 25 topics - 1 through 25 (of 25 total)
                              Viewing 25 topics - 1 through 25 (of 25 total)

                              View full reply list.

                              Advert

                              Newsletter Sign-up