Hardened Silver Steel Shattered – How to Avoid?

Advert

Hardened Silver Steel Shattered – How to Avoid?

Home Forums Beginners questions Hardened Silver Steel Shattered – How to Avoid?

Viewing 13 posts - 26 through 38 (of 38 total)
  • Author
    Posts
  • #400331
    SillyOldDuffer
    Moderator
      @sillyoldduffer

      Thanks chaps.

      I would NEVER have thought of Nigel's point about airlocks during quenching – that's likely. I'm going to try again in water with air-lock counter-measures, and then try Hoppers' colour running tempering method.

      I like the idea of quenching in oil too. Brine is recommended for a very hard finish, cold water for hard, but both risk cracking. Oil is gentler, less hard but tougher, and – of course – my steel tool doesn't have to be very hard to cut brass.

      Cheers,

      Dave

      Advert
      #400335
      Hopper
      Participant
        @hopper

        I've always used oil for quenching. Never had a problem with it. Always hard enough to cut steel when making counter bore tools, D-bits etc. And no fractures that I remember. As your tool is very thin on the wall (1.6mm) I would aim for toughness over hardness — as you say its for cutting brass.

        As far as the plunging goes, yes hold the job vertically and plunge it into the oil/water in a large container such as a bucket then rapidly move the job up and down under the surface as you simultaneously run it around in a circle when viewed from above. This gets the job away from the air/vapor pockets that form.

        Edited By Hopper on 14/03/2019 11:55:33

        #400344
        Mike Poole
        Participant
          @mikepoole82104

          I remember a mate got a bollocking at tech college when quenching a fairly large bar of steel in oil, plunging the bar in the oil produced a cloud of oil vapour which could be ignited by pulling the still glowing bar out of the oil, while demonstrating this to us the instructor walked round the corner, even though the hint of a smile and the shake of his head in disbelief we were in no doubt that the game was over.

          Mike

          #400361
          Phil Whitley
          Participant
            @philwhitley94135

            Duncan Webster is right about Tubal cain's book, it is excellent, and I think the MO is to heat till it loses its magnetism, and then hold at that heat for twenty minutes per inch of thickness before quenching. I too would quench in oil, you do not need glass hardness for brass, or anything much except perhaps files, and we know what happens when you drop a file dont we! It shatters!

            #400362
            SillyOldDuffer
            Moderator
              @sillyoldduffer

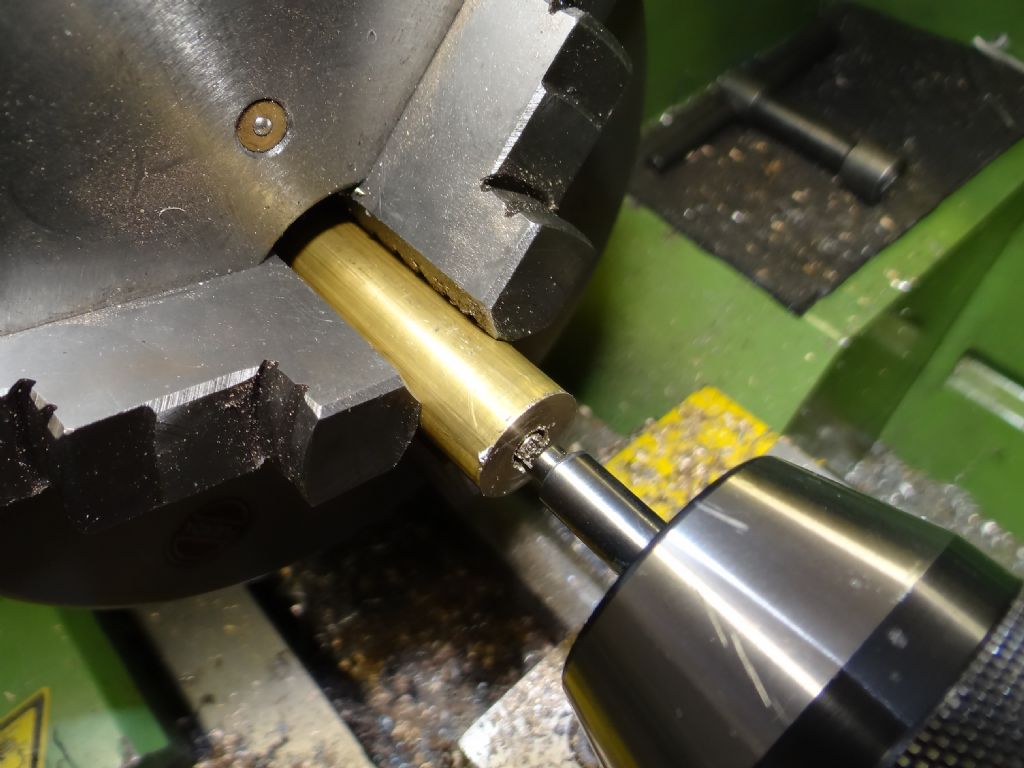
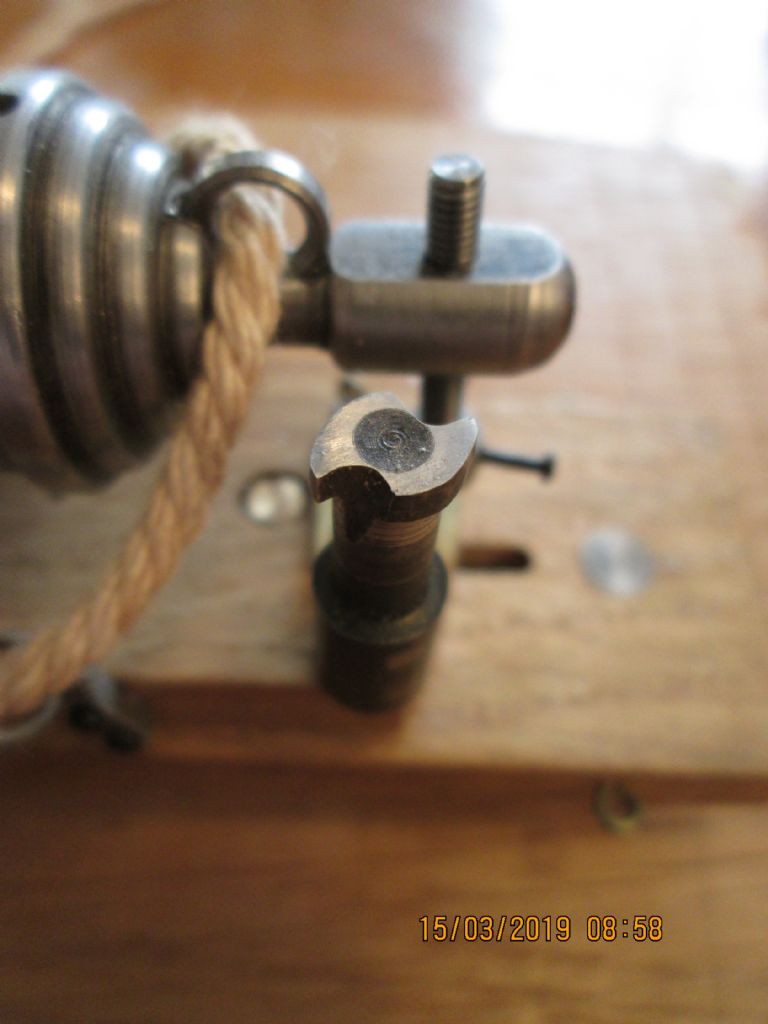
              Success!

              dsc05954.jpg

              Can't be seen in the photo but the cutting diameter is chamfered into the main body as suggested by Nigel. Heated to bright red-heat in a dim room, then plunged vertically hole end-up to reduce chance of an airlock. Polished whilst still warm and blunt end heated on an insulating fire-brick until the yellow line reached the cutting tip as suggested by Hopper. Camera isn't capturing the colours accurately – the silver steel is rather bluer at the drill-chuck end than it appears.

              I have to make another one to prove it's not a fluke!

              Thanks all,

              Dave

              #400382
              jaCK Hobson
              Participant
                @jackhobson50760

                The grain in the out of focus failure doesn't look that bad for silver steel but difficult to tell. If it is bad, then overheating would be the most likely cause. Use a magnet. For small silver steel like this, you don't need to soak for very long at all.

                You need to cool to room temp before temper. Some steels, stainless in particular, need super cooling to get full hardness (liquid nitrogen). For silver steel, it doesn't really make much difference if you delay between quench and temper. (You should do super-cooling as soon as possible after quench).

                If using a domestic oven then I would have thought that a single temper for one hour at 220C should do. However, the fail shows that the temper wasn't good enough. You could increase the temp a bit – especially if just cutting brass. So maybe 240. Some steels do need multiple tempers to get the best, but not silver steel.

                Do you know if you did anything different for the successful version – maybe tempered for longer?

                You can keep increasing temper temp without re-hardening but if you over temper then you will have to re-harden. You can repeat the cycle a lot – the risks are stress cracking or carbon depletion.


                Edited By jaCK Hobson on 14/03/2019 18:11:55

                #400385
                Neil Lickfold
                Participant
                  @neillickfold44316

                  There is W1 and O1 in the silver steel range. The W1 is water quench. With the W1 , I was always taught that the water should be heated to at least 40C if using water quenching, then leave in ice water after the initial quench.

                  Polish, keep oil free, then temper 1st time at 150c and then slowly increase temper temp to the desired hardness. After the 1st temper at 150C for minimum of 1 hour per 1/2 inch of section, quench in boiling water, then retemper to the desired range. IE a ball race needs to be retempered at 150c , but cutters in the 180 to 210 c range.

                  The way the quenching is done is also important, it does require agitated oil or water to be effective.

                  Sometimes shell cutters fail due to no internal clearance , or outside clearance.

                  Neil

                  #400402
                  SillyOldDuffer
                  Moderator
                    @sillyoldduffer
                    Posted by jaCK Hobson on 14/03/2019 18:07:51:

                    The grain in the out of focus failure doesn't look that bad for silver steel but difficult to tell. If it is bad, then overheating would be the most likely cause. Use a magnet. For small silver steel like this, you don't need to soak for very long at all.

                    You need to cool to room temp before temper. Some steels, stainless in particular, need super cooling to get full hardness (liquid nitrogen). For silver steel, it doesn't really make much difference if you delay between quench and temper. (You should do super-cooling as soon as possible after quench).

                    If using a domestic oven then I would have thought that a single temper for one hour at 220C should do. However, the fail shows that the temper wasn't good enough. You could increase the temp a bit – especially if just cutting brass. So maybe 240. Some steels do need multiple tempers to get the best, but not silver steel.

                    Do you know if you did anything different for the successful version – maybe tempered for longer?

                    You can keep increasing temper temp without re-hardening but if you over temper then you will have to re-harden. You can repeat the cycle a lot – the risks are stress cracking or carbon depletion.

                    Edited By jaCK Hobson on 14/03/2019 18:11:55

                    Thanks Jack,

                    Truth is I don't know what made the difference. Obvious differences: I added a chamfer, plunged and agitated to avoid a bubble, and then tempered with a blow-lamp instead of the oven.

                    However I think overheating in the earlier attempts is possible – I don't quite know what I'm doing in terms of required redness and time held at temperature! Also, in the flame, the thin part of the cutter tends to heat up faster than the body, and the outer rim nudged yellow briefly.

                    Might be smart for me to have an extended session heat treating silver-steel in various ways. The core drill seems an excellent way of exposing any weakness in the metal. My earlier attempts hardening home-made drills seemed OK, perhaps they were imperfect too, and I was lucky they lasted long enough.

                    Cheers,

                    Dave

                    #400452
                    Neil Lickfold
                    Participant
                      @neillickfold44316

                      For hardening a part like your cutter, I would be heating the solid shank, and allow the heat to transfer to the thinner part. It would need a hold time of about 5 minutes. With a gas torch that seems an eternity . Don,t over heat and get it all scaley, and I always use a carburising flame for heat treatment.

                      Practice is a good idea. Real daylight or no light is best to get the idea of the heat when getting the steel hot. There are colour charts on the net, but getting them nicely printed I have found is best from a photo centre.

                      Neil

                      #400464
                      jaCK Hobson
                      Participant
                        @jackhobson50760
                        Posted by Neil Lickfold on 14/03/2019 18:40:01:

                        There is W1 and O1 in the silver steel range.

                        I would agree that 'silver steel' may cover a broad range of alloys but the composition of modern silver steel should be better understood and should not include W1 or O1.

                        W1 is good for small edged tools, Not that easy to get hold of in UK in small quantities. Easy to heat treat and anneal. Very fine grained. Old files are often similar alloy.

                        O1 easy to heat treat, not so easy to anneal. Can get it hard for larger sections than W1. Fine grain. Ground flat stock is often O1. 'Shim steel' may also be ground flat stock and can often be something with less carbon and won't get as hard.

                        Bright round bar in small diameters is often silver steel. I think 'pivot steel' is similar, if not silver steel. I wonder if., as silver steel is usually round bar, it is expected it might be turned in a lathe, and therefore has the composition been designed to give larger grain in order to make it easier to machine on a lathe.? That question obviously exceeds my knowledge of metallurgy but would be easy to answer for someone who knows.

                        Edited By jaCK Hobson on 15/03/2019 08:19:30

                        #400467
                        jaCK Hobson
                        Participant
                          @jackhobson50760

                          Posted by SillyOldDuffer on 14/03/2019 20:42:14:

                          tempered with a blow-lamp instead of the oven.

                          Dave

                          My guess would be that the blow lamp got it hotter than the oven. Oxidising colours are a poor judge of absolute temp. They can be reliable for indicating relative temps if all conditions are the same – same material, same heat source, same atmosphere, same surface preparation. I think you have done a perfect demonstration of this – it looks like both success and fail are 'dark straw' but seem to behave differently.

                          #400474
                          Mick B1
                          Participant
                            @mickb1

                            I made this little cutter to slice out the radiused groove for the cascabel ring on my carronade. It was turned, then offhand ground. I used a butane blowlamp to heat the tooth tips bright red and quenched in the grinder's diptank. On the second attempt when I held the red heat for half-a-minute or so, it worked – the teeth resisted filing. Then I polished the end face and played the blowlamp on it carefully with pauses between quick heating passes until I saw the light straw oxide, then quenched again and finished the tooth surfaces with an India oilstone.

                            OK, so it only had <10 mm3 of EN1A to remove, but the teeth are still hard and the shank fileable. It's about 11mm. diameter, plain silver steel.

                            cascabelring2.jpg

                            Edited By Mick B1 on 15/03/2019 09:25:20

                            #400842
                            SillyOldDuffer
                            Moderator
                              @sillyoldduffer

                              Just to finish this one off, I've made progress! I can now make tools that are too soft, too hard, or just right to order!

                              I think my main problem was the mix of thin and thick metal involved in making a core drill, plus the construction is likely to trap steam inside and spoil the quench. Judging the temperature and holding it for a suitable amount of time is a little tricky: I was working on soak time calculated on the thin part of the metal (ie not very long), and have found that the time needed for the full thickness gives better results. Better control of the light in the workshop helps judge temperatures; full brilliance needed tp see the straw oxide layer during tempering, and rather dim for seeing cherry red before quenching.

                              Heating the silver-steel whilst it's laid on a fire-brick rather than holding it in a pair of pliers produces more consistent results. It's easier to avoid overheating the thin end while the main body is still warming up. Laying on a brick also makes it easier to accurately chase the straw-colour up to the sharp end during tempering.

                              Thanks again,

                              Dave

                              PS I like Mick's cannon!

                            Viewing 13 posts - 26 through 38 (of 38 total)
                            • Please log in to reply to this topic. Registering is free and easy using the links on the menu at the top of this page.

                            Advert

                            Latest Replies

                            Home Forums Beginners questions Topics

                            Viewing 25 topics - 1 through 25 (of 25 total)
                            Viewing 25 topics - 1 through 25 (of 25 total)

                            View full reply list.

                            Advert

                            Newsletter Sign-up