Have recently completed a refurbishment of my V10 Lathe, after aligning the lathe axis and surfaces using an accurate spindle morse taper test bar, I then tested the EMCO 3 jaw chuck for alignment and runout performance.
Since the chuck is now about 25 years old, I did not expect good results and found that the jaws were slightly bell mouthed and the chuck showed 0.11mm runout on a 20mm test bar, and 0.13mm on a 35mm test bar.
I decide to grind the jaws to see if I could improve this. First I stripped and cleaned the chuck, and then on the lathe tested for runout again. 0.11mm on a 20 mm test bar, with the low point midway between jaws 1 and 3, using the key in the socket between jaws 1@3 – this gave best runout.
I then set up for grinding:
I made a flanged insert, with an M8 thread through. This was inserted into the rear of the jaws, with the flange square up against the jaw rear face. The jaws were then tightened up firmly on the 2mm wide part of the flange, which was 22mm diameter. The threaded bolt was used as an aid the fitting the flange in the rear of the chuck. The bolt was the unthreaded and removed.

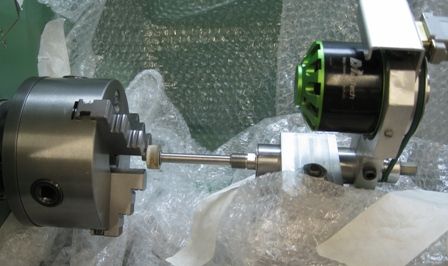
The grinder with a 20mm diameter wheel was then used to grind the jaws, with the chuck rotating at around 50RPM.

At first only jaws 1 and 3 made contact and slowly as depth was achieved, jaw 2 came into play. The process continued until all three jaws barely sparked, and the job was done.
The chuck was then stripped and cleaned, and reassembled on the spindle again.
The jaws after grinding:

The 20mm test bar was then used to check runout again. Runout was found to be 0.08mm using the key socket between jaws 1 @ 3 ( a in the first test). This was not a huge improvement.. I then tested ( as before) using the other two key sockets( as before) , and the socket between 1@2 gave 0.015 runout, directly in line with jaw 1! I then loosened the chuck to backplate mounting cap screws slightly and gave the chuck a firm tap with a rubber mallet at jaw 1 position, tightened up and measured again – 0.008mm!!
The sweet chuck position moved because cleaning the chuck required that it be removed from the backplate, and that registration probably is to within 0.005 mm, maybe slightly worse.
The using the 35mm test bar I measured 0.006mm.
I have a nice ( Chinese) dial indicator that reads microns…
I think that was a worthwhile effort!
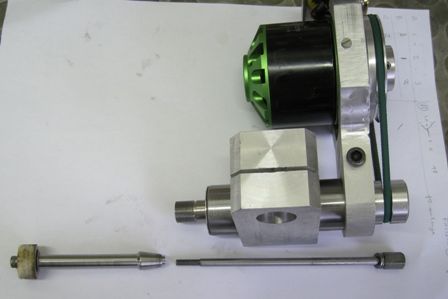
The grinder – using an RC brushless motor, a home made ER11 spindle and matching ER11 grindstone spindle, with drawbar. Spins @ 15,000 RPM

Joe
 Michael Gilligan.


