Tapping Cast Iron

Advert

Tapping Cast Iron

Home Forums Beginners questions Tapping Cast Iron

Viewing 9 posts - 26 through 34 (of 34 total)
  • Author
    Posts
  • #222627
    JA
    Participant
      @ja

      Buy taps when you need them. But always try to buy taps that are boxed, not loose. If any dealer is seller loose cutters just move on. I extend this practice to milling cutters.

      JA

      Advert
      #222643
      Marcus Bowman
      Participant
        @marcusbowman28936

        Yes; ground thread HSS Dormer E500 series taps get my vote, but be prepared for severe financial pain in the larger sizes.

        On a rainy day, if you are not using them, you can pull them out at tea time and just wonder at their beauty.

        Above M10, I would suggest "progressive" "geometric" taps like the Dormer E105 series, but they are even more expensive. They make tapping large diameter threads a very low torque process.

        I have quite a few Presto taps, bought locally many years ago. Again, they are ground thread HSS.

        For less frequently used imperial, ME and MME sizes I have found Tracy Tools taps pretty good.

        Sadly; despite what we all would wish, quality costs. But it can be a good investment.

        One other thing: in general, I would recommend Trefolex tapping compound. In fact I don't think I have tapped a hole without it in over 50 years. Eases the process, lowers the effort, and protects the tap too.

        It's wet here this morning; and its nearly tea break time; so I'm off to polish the contents of the tap drawer with a soft cloth. I think of it as cherishing my investments…

        Marcus

        #222663
        Chris Gunn
        Participant
          @chrisgunn36534

          Ian, if you visit any of the shows or car boots keep your eye out for sharp branded taps and dies, Dormer, Presto, and others mentioned above, marked HSS GT, check they do not look abused, ie with worn squares or shanks, these can often be bought as a job lot or cheaply. This will take time though. I would avoid non branded tooling for regular use. If you only have 1 hole to do then buy a cheap one, some are better than others, use one of "our" suppliers is best, you have some comeback. I can help with M6 taps but have no surplus dies. PM me if you are not sorted out

          Chris Gunn

          #222743
          Iain Downs
          Participant
            @iaindowns78295

            I've ordered a volkel 6M HSS set from amazon.

            It turns out I don't have any 6mm bar, but I do have a lot of 6mm threaded rod.

            I shall use that for my first attempt. If the thread cutting fails I will resort to glue.

            Thanks for the help.

            Iain

            #222758
            JasonB
            Moderator
              @jasonb

              The only downside of using threaded rod is that the thread is often cut to a very loose tollerance so you won't get so much thread engagement in the casting but more of an issue is that you will get a lot of play in the adjusting nut. Better to tap the nut and then you can use a split die to adjust the "fit" of the male thread.

              J

              #222822
              mark costello 1
              Participant
                @markcostello1

                Cheap taps cost too much time and money. +More aggravation for only one hole.

                #222842
                Michael Gilligan
                Participant
                  @michaelgilligan61133

                  For the little that my opinion is worth … Here's how I would 'Production Engineer' the adjustment detail:

                  1. Obtain a good quality [Unbrako, or similar] M6 CapHead screw, long enough to have at least 15mm of plain shank.
                  2. Cut off the head; face the end, and add small chamfer.
                  3. When making the adjuster Nut; use only the Taper Tap, and check frequently [using the screw as a gauge], until the 'fit' feels good.
                  4. Drill the casting, to a sliding fit [6mm nominal] for the screw shank, and deep enough to leave [say] 2mm of plain shank exposed when the shank is inserted.
                  5. Remove the black oxide coating from the shank, using emery, or a fine flle.
                  6. Coat the shank with Loctite Retainer [601 or 638], and wipe a smear of the same inside the hole.
                  7. … Insert, with a gentle 'push and twist', and wipe away any spillage.

                  The result should be strong & secure, and adjust smoothly.

                  It is also very simple to do

                  MichaelG.

                  .

                  I've laboured this a little, in the hope of prompting 'challenge'

                  … So let's see what better ways are offered.

                  #222857
                  Steve Withnell
                  Participant
                    @stevewithnell34426

                    At the risk of being laughed off the shop:

                    https://www.aldi.co.uk/p/92750/0

                    I bought one of these a couple of years back and the quality is pretty good. There is a 6mm die nut in my set, which following a tip from John Stevenson, I converted to a split die with a Dremel…

                    Double check the quality of course as they might have 'gone off' since I bought mine.

                    Steve

                    #225324
                    Iain Downs
                    Participant
                      @iaindowns78295

                      Lordy, Lord. These model engineering projects don't half take some time!

                      Mind you the current cold weather is not encouraging me to get out to the shed, in the dark after work!

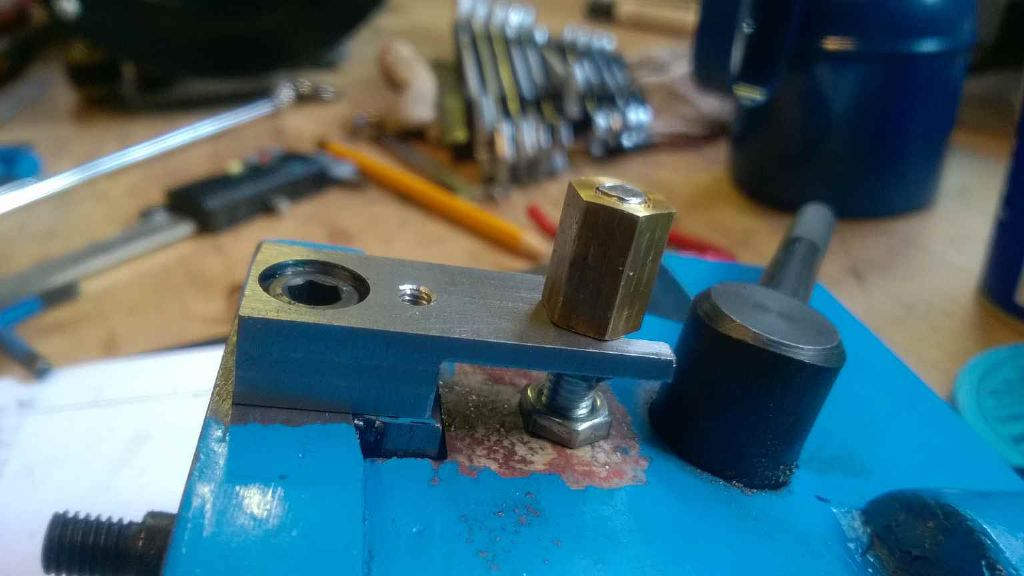
                      I've finally finished my tailstock adjuster – photo below.

                      I've gratefully used a number of the tips from this thread. New Volker taps and no lubricant, brass nut partially tapped and then finished with the actually bolt to be used.. It seems to be tight with little or no backlash, but I confess that I have not yet adjusted the tailstock with it, having run out of my allotted 'me' time.

                      tailstock adjuster

                      The design referenced in my original post wouldn't have worked since it was clearly for a different shape of tailstock so I built this as a vertically oriented mechanism and not a horizontal one.

                      EVENTUALLY, I'll get to an actual project!

                      Iain

                    Viewing 9 posts - 26 through 34 (of 34 total)
                    • Please log in to reply to this topic. Registering is free and easy using the links on the menu at the top of this page.

                    Advert

                    Latest Replies

                    Home Forums Beginners questions Topics

                    Viewing 25 topics - 1 through 25 (of 25 total)
                    Viewing 25 topics - 1 through 25 (of 25 total)

                    View full reply list.

                    Advert

                    Newsletter Sign-up