Centec 2B – New arrival and Q&A

Advert

Centec 2B – New arrival and Q&A

Home Forums Manual machine tools Centec 2B – New arrival and Q&A

Viewing 25 posts - 26 through 50 (of 126 total)
  • Author
    Posts
  • #556528
    William Ayerst
    Participant
      @williamayerst55662

      Thanks Gary! Mystery solved!

      I've found a fair few things loose on the mill in addition to the siezed knurling ring, the handwheel bosses, almost all of the gib screws, etc. but tightening them up has certainly helped.

      I was wondering why the half-nut kept disengaging on the X-axis, and it was a combination of the handwheel boss being very loose and allowing the rod to jiggle around enough to disengage, but also that the half-nut locking mechanism has been modified.

      The original arrangement was a nut that clamps the half-nut engaged or disengaged, it's movement actuated by a short hand lever as shown below:

      One of the previous owners of this mill has modified this, with a long arm that reaches underneath the table toward the operator, with a rest bolted onto the hole marked '15' in the above diagram. If the arm is in the rest, then the half nut is pulled upward and engaged. If the arm is moved off the rest and let fall slack, then the half-nut is disengaged.

      Maybe this solution worked when the mill was new(er), but as it stands the half-nut kept flopping open. I hope that tightening up the bosses on the end of the table has helped, if not I might need to find a way to reverse engineer it!

      Edited By William Ayerst on 31/07/2021 11:37:48

      Advert
      #556549
      Gary Wooding
      Participant
        @garywooding25363

        The half-nut may be worn so that small side pressure pops it open. I notice that you still have the rapid return spider, so you probably want to use the half-nut properly. I removed mine and keep the half-nut permanently closed.

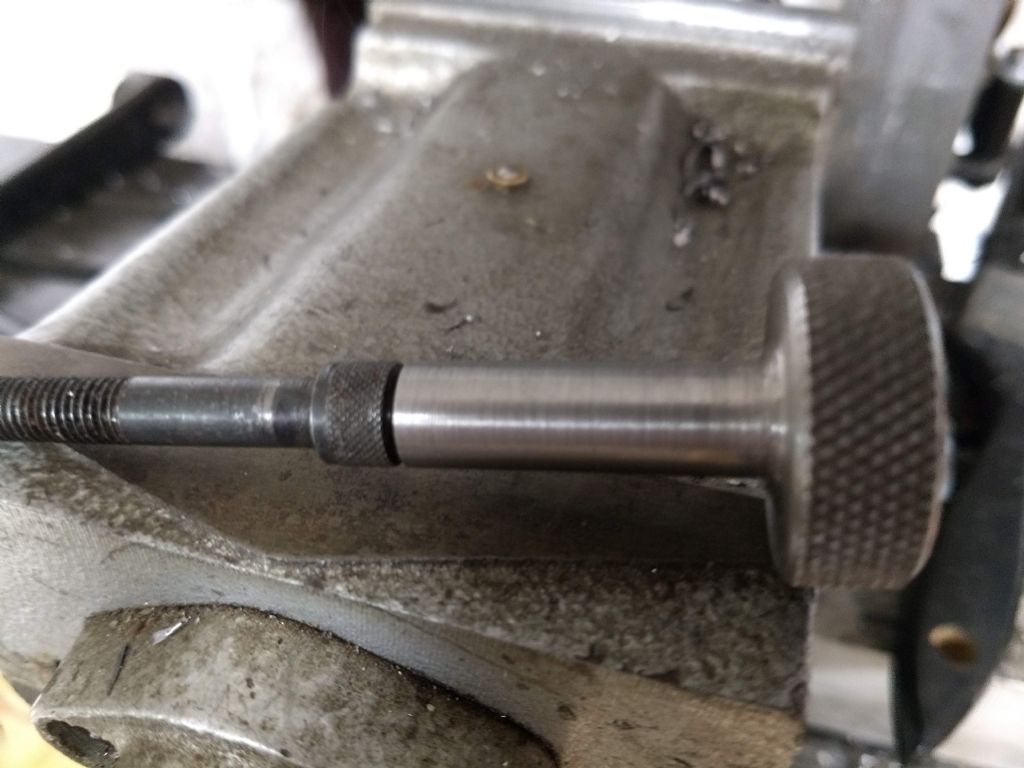
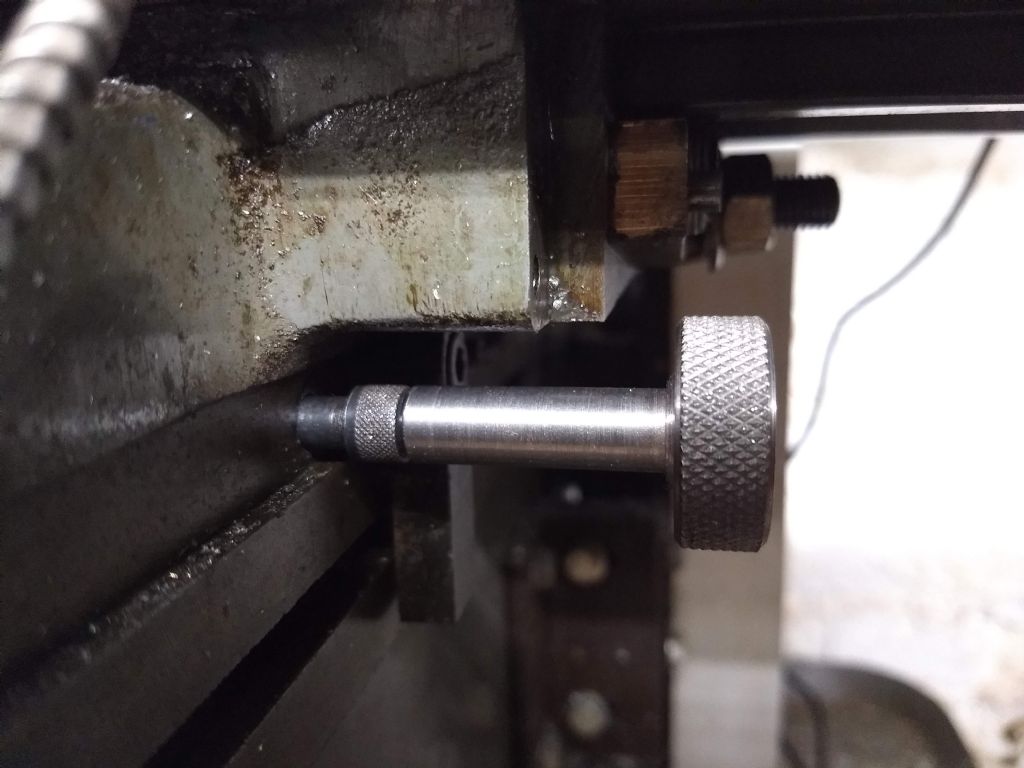
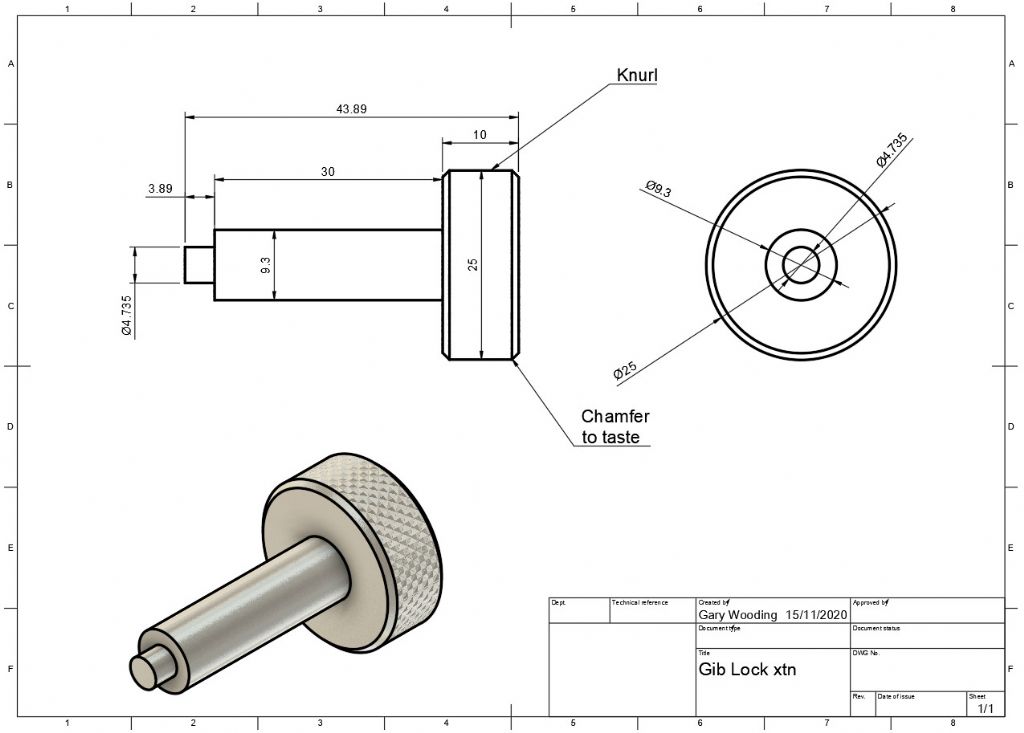
        A slight mod I made to my Centec was to the Y-axis gib-locking screw. It's a long Imperial threaded socket head screw which I found tedious to use. The Allen key kept falling out and I didn't have the wherewith all to make a custom version, so I made an extension from a piece of aluminium that's a press-fit into the socket head.

        It works for me and encourages me to lock the Y-axis more often.

        giblock xtn1.jpg

        giblock xtn2.jpg

        giblock dwg.jpg

        #556565
        not done it yet
        Participant
          @notdoneityet
          Posted by Gary Wooding on 31/07/2021 16:39:33:

          The half-nut may be worn so that small side pressure pops it open. I notice that you still have the rapid return spider, so you probably want to use the half-nut properly. I removed mine and keep the half-nut permanently closed.

          A slight mod I made to my Centec was to the Y-axis gib-locking screw. It's a long Imperial threaded socket head screw which I found tedious to use. The Allen key kept falling out and I didn't have the wherewith all to make a custom version, so I made an extension from a piece of aluminium that's a press-fit into the socket head.

          It works for me and encourages me to lock the Y-axis more often.

          My machine doesn't have half nuts. It’s been converted to a solid feed nut. The y axis locking screw is a longish flanged-head hex bolt, on which a combination ring spanner hangs (almost permanently). The long travel is limited by when the power feed motor contacts that bolt. If I wanted a bit more x travel I could replace it with a shorter bolt and use a long-form socket on the head (but I await the need to do that).🙂

          The x and z locking screws are of a similar arrangement. They, too, each have a small combination ring spanner hanging on them.

          #556580
          William Ayerst
          Participant
            @williamayerst55662

            I'm not sure I have a need for the rapid return capstan handle, certainly not for the scale of model engineering work I'm currently doing!

            This is a picture of the assembly showing the original handle and pivot, a pinned steel plate (I gather the two pins are the centres of the elongated slot that would take the nut) and the brass handle:

            After tightening up the bosses on both sides it seems more reliable and hasn't popped out since, so for now I'll leave be – but I think all things considered I'd prefer a more long winded process to disengage the nut but which is more secure when it's engaged.

            Any ideas on how I might reverse engineer it, should this be required?

            Thanks for the tips on the locking nut handles – not a bad idea at all. Do you know what thread the halfnut locking bolt will be, or what the gib locking screws are?

            All the best and thank you again, both!

            Edited By William Ayerst on 31/07/2021 21:22:53

            #556587
            duncan webster 1
            Participant
              @duncanwebster1

              The half nut thing on mine is a bronze casting. On the left (using orientation of your photo) is a curved slot with a bolt to clamp it in place. It looks as tho' yours has been modified, but can I see it peeping out underneath?

              I took the quick traverse mechanism off mine, it got in the way, and having adjusted the half nut right dropping it in and out didn't seem all that good an idea. It's not like a lathe, no in/out stops.

              Edited By duncan webster on 31/07/2021 22:28:21

              #556588
              William Ayerst
              Participant
                @williamayerst55662

                Yeah, I think those pins visible through the black steel are the extremities of the slot.

                Is removing the quick traverse a reversible operation? I'm not using it right now but I'd not want to make any permanent changes just yet!

                #556590
                Steviegtr
                Participant
                  @steviegtr

                  So come on William on a scale of 1-10 how chuffed are you with you new stallion..

                  Steve.

                  #556595
                  duncan webster 1
                  Participant
                    @duncanwebster1

                    Very reversible, you need a long box spanner to get at one of the nuts, cant remember what size, Whitworth and not that big

                    #556597
                    William Ayerst
                    Participant
                      @williamayerst55662

                      Dear Steve, I'm over the moon – I put together a video about it:

                      Regarding the half-nut situation, I'll see if I can get the plate off the bronze casting and those pins out without risking damage tomorrow and see what's going on.

                      #556602
                      Steviegtr
                      Participant
                        @steviegtr

                        Did you remember to snug up the damper ring on the Clarkson to the underside of the quill.

                        Steve.

                        #556627
                        William Ayerst
                        Participant
                          @williamayerst55662

                          Hi Steve, the Damper ring is on there pretty tightly. Is there a certain spanner I need to get it unstuck? I understand it's a left handed thread but it's on there tight in either direction!

                          #556644
                          Gary Wooding
                          Participant
                            @garywooding25363

                            Posted by William Ayerst on 31/07/2021 21:13:55:

                            Do you know what thread the halfnut locking bolt will be, or what the gib locking screws are?

                            Edited By William Ayerst on 31/07/2021 21:22:53

                            The gib locking screws are 1/4 BSF

                            #556660
                            peak4
                            Participant
                              @peak4

                              Yes the eject/snugging ring is on a left hand thread, so a short length of bar in one of the holes, and a sharp tap with a hammer, should release it OK; mine was jammed when I got it too. (tie a bit of string to the bar before how hit it. so you can find it again)

                              Next purchase is a bottle of port; when consumed, use the cork to block the end of the horizontal taper to keep the swarf out; they are a pain to clean, since they have the captive drawbar.

                              Bill

                              #556668
                              Dave Halford
                              Participant
                                @davehalford22513

                                This is the 2A half nut, the 2B is different I know as is the travel stop bar (I think mines been moved)

                                dsc02683.jpg

                                Your stop bar looks non original

                                #556676
                                William Ayerst
                                Participant
                                  @williamayerst55662

                                  I managed to get the modified half-nut handle off and luckily, no permanent modification – the screws and pins just pop out. I need to figure out what thread the locking nut is, though – I have a piece of 3/8" BSW and it seemed to fit but locked up after a turn or so, so I'm going to assume it's 3/8" BSF?

                                  Dave, I don't suppose you'd be able to check for me by any chance?

                                  I've been switching between horizontal and vertical milling and having alot of fun – I must admit though, I almost s**t my pants when the horizontal arbor locking nut caught on the support and started unscrewing, cranking the whole horizontal arm out at the same time! 

                                  Edited By William Ayerst on 01/08/2021 16:22:13

                                  #556693
                                  Richard Millington
                                  Participant
                                    @richardmillington63972

                                    "What is the purpose of the nut on the front of the vertical head? It seems to just spin in place on my one."

                                    It limits the vertical movement of the quill, otherwise it would hit the oil level dipstick which does.

                                    2BA grub screws for the gib adjustment on the 2A, as above 1/4 BSF thread for the locks. All the threads on my 2A are either BA or BSF, I assume they would not change for the 2B.

                                    #556695
                                    Richard Millington
                                    Participant
                                      @richardmillington63972
                                      #556697
                                      William Ayerst
                                      Participant
                                        @williamayerst55662

                                        Thanks all – I guess that big locking nut for the half-nut / rack feed handle must be 3/8" BSF then?

                                        Did my first horizontal milling in anger today and it went quite well. Not getting a super smooth finish on vertical milling yet (3/8" 4-flute endmill on brass rod) but lots of things to tweak. I'm starting from the beginning all over again.

                                        One thing that is definitely jumping out at me is planning the order of operations – switching from drill to mill and back to drill again is quite a time sink!

                                        #556698
                                        William Ayerst
                                        Participant
                                          @williamayerst55662

                                          Also, after trying to eyeball the centre of a piece of square bar with scribe marks and a needle-point wiggler and failing three times in a row to find the actual centre, I may be starting to understand the push towards a DRO …

                                          #556700
                                          Richard Millington
                                          Participant
                                            @richardmillington63972

                                            I assume so, it is on my 2A, can't remember a W/W thread being used apart from the drawbars. Measure it to find out for sure:

                                            https://www.ring-plug-thread-gages.com/PDChart/BSF-thread-data.html

                                            Brass, TBH can't remember milling any. When cutting brass on the lathe the tool doesn't have back rake, it may be grabbing and needs to be sharp.

                                            #556705
                                            peak4
                                            Participant
                                              @peak4
                                              Posted by William Ayerst on 01/08/2021 20:54:11:

                                              Also, after trying to eyeball the centre of a piece of square bar with scribe marks and a needle-point wiggler and failing three times in a row to find the actual centre, I may be starting to understand the push towards a DRO …

                                              You could try one of these to be going on with.
                                              Dearer options such as Starrett etc. are available too, if you have money burning a hole in your pocket.
                                              https://www.arceurotrade.co.uk/catalogue/results.aspx?search=centre+finder

                                              Bill
                                              #556714
                                              Gary Wooding
                                              Participant
                                                @garywooding25363
                                                Posted by Richard Millington on 01/08/2021 20:19:40:

                                                "What is the purpose of the nut on the front of the vertical head? It seems to just spin in place on my one."

                                                It limits the vertical movement of the quill, otherwise it would hit the oil level dipstick which does.

                                                2BA grub screws for the gib adjustment on the 2A, as above 1/4 BSF thread for the locks. All the threads on my 2A are either BA or BSF, I assume they would not change for the 2B.

                                                For the Mk3 VH there is a small grub screw, just behind the quill lock handle, that pokes into a slot that limits the quill vertical movement. The nut on the front of the VH does nothing on my VH.

                                                #556722
                                                William Ayerst
                                                Participant
                                                  @williamayerst55662

                                                  Peak4/Bill, I'm using the wiggler with a 1/4" ball head. Are these cylindrical finders better? In the meantime, should I be paying attention to it stop oscillating as my zero, or when it deflects?

                                                  Realistically I think I may have just fallen foul of expecting 1/4" square rod to actually be 0.250" .

                                                  I managed to nip up the bolt on the front of the vert head, it just seemed to be leaking oil through the loose bolt hole without it. Any ideas on what oil should go in it?

                                                  All the best!

                                                  #556730
                                                  SillyOldDuffer
                                                  Moderator
                                                    @sillyoldduffer
                                                    Posted by William Ayerst on 01/08/2021 20:54:11:

                                                    Also, after trying to eyeball the centre of a piece of square bar with scribe marks and a needle-point wiggler and failing three times in a row to find the actual centre, I may be starting to understand the push towards a DRO …

                                                    I'm a bit jealous of the fun William is having learning with his new toys! You can't say the process isn't interesting, but like magic tricks, finding out how it's done is an anti-climax, and then the task is just business as usual. Don't worry, next stage is making things accurately from someone else's plan, and beyond that is developing your own designs. There's always more to learn, and 3D CAD fills hours when the workshop is too hot or too cold.

                                                    Putting a DRO on a milling machine is a no-brainer, at least on the table. DRO transforms the machine, for example by eliminating the need to carry backlash correction and to carry 'how many turns' in your head. If a DRO is affordable, get one straight away.

                                                    With a DRO I rarely use anything other than a cylindrical edge finder and a needle wiggler on my mill. Cylindrical edge finders are easier to use than other types. I use it to locate a reference from two edges, and then work from that with the DRO. (Checking it often against other references.)

                                                    More often than not my needle wiggler is a dressmakers pin (a large pin with a plastic ball on the blunt end) and a blob of plasticine rather than the manufactured item. It's mostly used with a loupe to locate crossed lines or a centre-pop when no edge reference is available.

                                                    The accuracy of metal stock varies. Black Mild-steel is crudely untrustworthy. Bright mild-steel is much better, but varies between different strips, so check it. Not unusual for round rod to be a Reuleaux polygon (like a 50p coin) rather than truly circular. And I have some ¼" square rod that's actually a parallelogram. Ground stock is best for off the shelf accuracy, but expensive. Though Bright MIld Steel is usually 'good enough', a common first operation when milling is to start by cutting a reference surface rather than trust stock straight out of the box: if it doesn't have a reliable surface, cut one!

                                                    Dave

                                                    #556733
                                                    Gary Wooding
                                                    Participant
                                                      @garywooding25363

                                                      I fitted a 3-axis DRO to my 2B and then added a DRO scale for the quill, which is surprisingly useful. As per SOD, I use an edge finder and work from an edge or a centre point (easy to find with a DRO). All my drawings are dimensioned accordingly – I never have use scribe lines or a centre-punch.

                                                    Viewing 25 posts - 26 through 50 (of 126 total)
                                                    • Please log in to reply to this topic. Registering is free and easy using the links on the menu at the top of this page.

                                                    Advert

                                                    Latest Replies

                                                    Home Forums Manual machine tools Topics

                                                    Viewing 25 topics - 1 through 25 (of 25 total)
                                                    Viewing 25 topics - 1 through 25 (of 25 total)

                                                    View full reply list.

                                                    Advert

                                                    Newsletter Sign-up