Adaptation of the Proxxon Milling machine

Advert

Adaptation of the Proxxon Milling machine

Home Forums Manual machine tools Adaptation of the Proxxon Milling machine

Viewing 13 posts - 51 through 63 (of 63 total)
  • Author
    Posts
  • #662144
    Joseph Noci 1
    Participant
      @josephnoci1

      Graham, you are a true Craftsman – Absolutely stunning work.

      Joe

      Advert
      #662152
      Bountyboy
      Participant
        @bountyboy

        Plus one for Joe's comment, top quality workmanship.

        #662157
        Pete
        Participant
          @pete41194

          Highly accurate machined parts with excellent surface finishes like those are tough enough. Designing your own specialized parts starting with a blank piece of paper or computer screen and making them good looking, functional as well as in proper proportion is something else. Very few in my opinion have that combined set of skills Gray. My best compliment I could use for anyone's work would be to say there as good as anything George Thomas did. I think you've set a new bench mark for what my best compliment would be now.

          Have you given any thought about producing a volume II of your Projects For Your Workshop book?

          #662188
          Graham Meek
          Participant
            @grahammeek88282

            Thank you all for your kind endorsements of my work. This project has been a test for man and machines. While the machines handled the work with no trouble. I have found this project has taken me a long time to achieve.

            I was fortunate enough to call GHT my friend and visited him many times at Milton Grange. I owe a lot of my skills to his writings and his meticulous approach to planning his projects. He was a fount of knowledge when it came to engineering, and his woodworking skills with mortice and tenon joints would put many a toolmaker to shame.

            As regards a volume II I regret to say that this is out of my control. Chris Deith was the instigator of the first volume, which came totally out of the blue when he rang me one day at work with the suggestion of a book. That was well over 13 years ago now and approximately 50 articles ago. I suspect with his passing that will be the end of any future volumes.

            Regards

            Gray,


            Edited By Graham Meek on 30/09/2023 16:39:17

            #715123
            Graham Meek
            Participant
              @grahammeek88282

              It has been a while since I last posted anything on this thread. I have just completed a couple of items. The first is an adjustable lever that fits inside the belt cover and thus saves me looking for an Allen key. Having to search for an Allen key is one of my pet hates when it comes to using my machines.

              Lever Operated Belt Tension

              The Lever above is shown in the locked position and is so designed that the guard will only close in this position.

              Lever in OPEN position

              This image shows the lever released. One thing that no longer happens is the Pulley tilting over as it did when using a capscrew to lock the assembly. That is because an M6 stud now replaces that capscrew and thus keeps everything vertical.

              Changing speeds is no longer a hassle of trying to get a belt over a constantly moving pulley.

              The next item is something that came about after a suggestion and a PDF from John Slater. The PDF was a set of drawings by Stefan Gotteswinter for a Low Level Clocking attachment. I am beginning to think John is clairvoyant as this is something I had been thinking about for sometime for the Proxxon.

              Exploded view

              Whilst Stefan’s design was for a simpler sliding mechanism. A rabbit hole was introduced with regards to “it would be a good idea if the attachment had a fine adjustment”. While I disappeared down one rabbit hole John came up with a different design.

              However I wanted something specific to the Proxxon, and as such had a restricted swing before the attachment hit the Column of the machine. John having the larger Sieg mill needed a greater swing and had the luxury of more room under the spindle.

              Not fancying having to screw the clock from one end to the other. There is a spring loaded quick acting nut fitted. Which allows rapid adjustments without the need for the fine adjustment. In Stefan’s original design he incorporated an eccentric arbor to mount the unit on. This allows the stylus of the clock to be set on the machine centreline. His design needed the clock to moved out of the way for each adjustment. My design has a split clamp to allow adjustment and a shoulder which stops the whole unit dropping off the end of the arbor during adjustment. As such the clock is much easier to set-up on centreline.

              Low Level Clocking attachment 2

              This shows the unit in the machine.

              Low Level Clocking attachment 3

              As can be seen from the proximity of the clock dial to the slide bar this is a very compact design.

              Low Level Clocking attachment

              This last view shows the quick acting nut button. Pressing this disengages the feedscrew and allows rapid adjustments. The clock fitted is one of the shortest on the market that I could find, without spending a fortune. As this clock will remain fitted to this unit.

              If the Moderators think this last item warrants a new thread then I am good with that.

              Regards

              Gray,


              #715163
              Michael Gilligan
              Participant
                @michaelgilligan61133

                Elegant work, as ever, Gray

                Thanks in anticipation of another MasterClass.

                MichaelG.

                #732890
                Colin Creed
                Participant
                  @colincreed93792
                  On Graham Meek Said:

                  bronze key.jpg

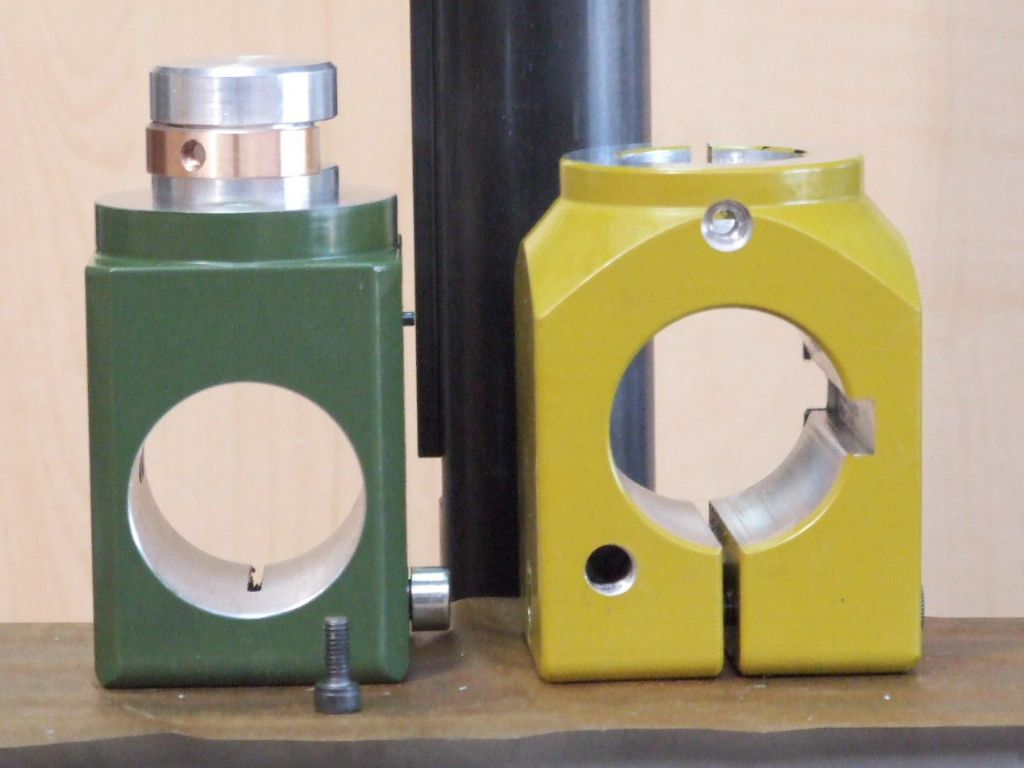
                  One thing I had noticed when “Tramming” the milling head was that there was a tendency for the Quill housing to work it’s way out of the Slider.

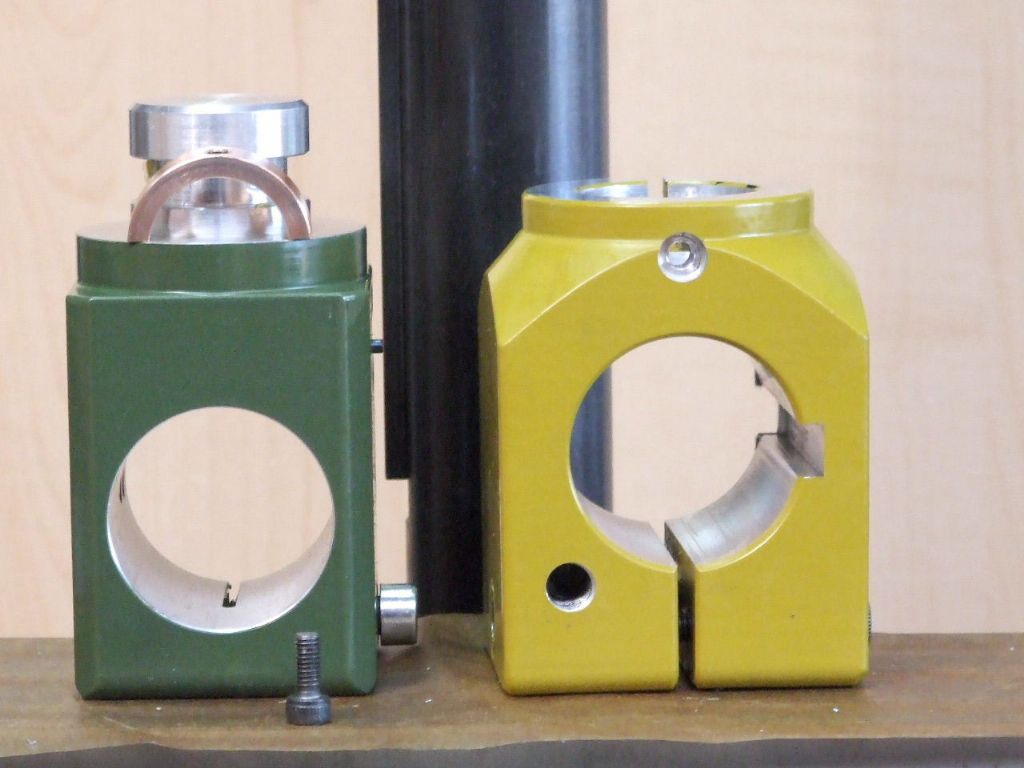
                  To solve this I have made a semicircular Bronze Key which fits in the groove machined to provide clearance for the M6 Cap screw which clamps everything up when the Milling head is dead true.

                  The key is held in place with a single M4 Cap screw. The counterbore for this can be seen in the top face of the Slider.

                  shape of key.jpg

                  The Bronze ring provided two Keys which was handy as I have a spare milling head.

                  One other thing I need to make is a Tailstock support for the Emco Dividing attachment which I have adapted to fit this machine. This will then give me the machine that I want.

                  Regards

                  Gray,

                  Hi Graham,


                  I’ve got a similar “nod” problem with my Proxxon Mill & was wondering if you happen to remember the approximate size of the bronze ring you made?

                  Otherwise do you happen to remember roughly what the “Slider” OD was?

                  I need to order some bronze but didn’t want to have to strip down the Mill to figure out the diameters needed.

                  Just need some rough numbers so I know what to chase.


                  regards Colin

                  #747483
                  Graham Meek
                  Participant
                    @grahammeek88282

                    Hi Colin,

                    Thanks for your email as I had totally missed this post.

                    I will try and post an updated drawing of this mod on the Forum as it is unlikely ever to appear in print.

                    Regards

                    Gray,

                    #747597
                    Colin Creed
                    Participant
                      @colincreed93792
                      On Graham Meek Said:

                      Hi Colin,

                      Thanks for your email as I had totally missed this post.

                      I will try and post an updated drawing of this mod on the Forum as it is unlikely ever to appear in print.

                      Regards

                      Gray,

                      Hi Graham,

                      No prob’s at all.

                      I look forward to seeing the updated drawing.

                      regards Colin

                      #747877
                      Graham Meek
                      Participant
                        @grahammeek88282

                        For those like Colin who wish to carry out his modification. Below is attached a work in progress drawing. I thought I had better add this now as I shall probably forget.

                        Proxxon Vertical


                        Regards

                        Gray,

                        #747885
                        Colin Creed
                        Participant
                          @colincreed93792

                          Thanks for that Graham.

                          Those details will help greatly.

                          regards Colin

                          #797035
                          Graham Meek
                          Participant
                            @grahammeek88282

                            Following on with my improvements for the Proxxon I have finally added something I wanted to add to my Emco FB2 mills. This item was thought about in the 1980’s long before more conventional electronic Digital Readouts were so easily available, and did not require a small mortgage to purchase. While I could have added electronic readouts today. These were deemed to be too big for the machine and were not guaranteed to keep any debris or coolant out.

                            Y Axis

                            I have finally finished some Digital position readouts. It feels as though it has been a long hard slog taking me about 4 months from design to manufacture. I am however pleased with the results. There is about 0.01mm backlash in the gear train which is far less than I had expected.

                            X Axis
                            The small aluminium knob engages the drive to the unit when they are required. To stop the locking action from disturbing the setting the small brass washer has a John Slater style D shaped hole, engaging a flat on the shaft.  Although I do tend to leave the Y-Axis permanently engaged.

                            Because the vice on the older mill has its fixed jaw nearer the operator and this is my Zero. This readout unit increments with an anti-clockwise movement. All the other units work conventionally.

                            X Axis on New Feed unit

                            The Black Delrin knob is used to Zero the unit. In use I tend to return to Zero before dis-engaging the drive via the aluminium knob. This saves a lot of twiddling with the black knob.

                            The Works

                            The increased length between the ball bearing races has given the mills a much silkier action on the feedscrews. The feedscrews are a composite construction with the threaded portion coming from the original feedscrew. The parted off portion is shown in the photograph of the parts. The screw cut split brass bush made the machining of the threaded portion a breeze. Keeping everything nicely concentric. The bearing part of the feedscrew extension and the location for the threaded portion were ground using the Compact 5 Tool post Grinder that I recently finished.

                            By machining a dovetail in the top of the Main Body I was able to make use of the original Window. Which has a Zero line moulded in and a Lens to enhance reading.

                            Why did I not just use the standard Position Indicator as supplied? Well there are a couple of reasons. One is the unit as supplied has no Zero function other that releasing an Allen grubscrew. The plastic body of the unit would have protruded well above the milling table surface and thus obstructed any long work on the table.

                            Regards

                            Gray,

                            #797110
                            Colin Creed
                            Participant
                              @colincreed93792

                              Terrific work Graham, Congrats!!

                            Viewing 13 posts - 51 through 63 (of 63 total)
                            • Please log in to reply to this topic. Registering is free and easy using the links on the menu at the top of this page.

                            Advert

                            Latest Replies

                            Home Forums Manual machine tools Topics

                            Viewing 25 topics - 1 through 25 (of 25 total)
                            Viewing 25 topics - 1 through 25 (of 25 total)

                            View full reply list.

                            Advert

                            Newsletter Sign-up