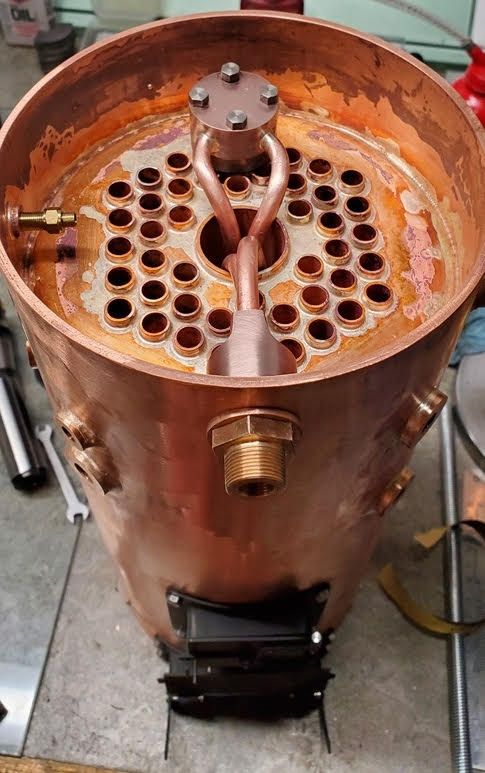
6″ vertical boiler cladding and testing

Advert

6″ vertical boiler cladding and testing

Home Forums General Questions 6″ vertical boiler cladding and testing

Viewing 11 posts - 1 through 11 (of 11 total)
  • Author
    Posts
  • #28290
    Matt Stevens 1
    Participant
      @mattstevens1
      Advert
      #557017
      Matt Stevens 1
      Participant
        @mattstevens1

        Hi All,

        I am finally getting my boiler soldered up and nearing a point of usability! Of course i have some questions….

        – I will pressure test the boiler to twice working pressure and then immediately go into adding the fittings and am sure i will want to steam as soon as possible! I have seen a couple of discussions about setting the safety valves by use of hydraulic pressure testing…. any tips here? Anything else i need to do before first steam?

        – What is the best / traditional wood strip to use for cladding? I see Mahogany is common – any reason why?

        – Brass banding. What is the best practice to secure the bands…i assume to solder a small block on each end, and tap one, clearance drill the other and then use a screw. However this might work but not sure how nice it looks. Is there a better method?

        – How many brass bands….is there a rule of thumb like one every x inches?

        – Shoe Polish – I have seen the use of black shoe polish on a toothbrush to blacken between the wood strips and bring out the grain a little. This was done after oiling/varnishing(?) the wood. Any thoughts on this practice?

        – Glue. I have seen the use of a liberal amount of glue when applying the boards, yet we know the boards should come loose after some expansion and contraction of the boiler. Would a dab on a few places make more sense or do you actually want the boards to glue to each other?

        – Do you need to remove the boards for annual pressure testing or any other purpose?

        – Any other hints any tips regarding cladding? Thickness of boards? Anything under the cladding? etc

        Images for interest….

        20210730_200951.jpg

        boiler superheater.jpg

        #557027
        Former Member
        Participant
          @formermember12892

          [This posting has been removed]

          #557030
          Matt Stevens 1
          Participant
            @mattstevens1
            Posted by br on 04/08/2021 16:46:56:

            Well impressed with the neatness of the soldering. Fine job.

            bill

            I made solder rings for most things, that way it works very nicely when heated….

            #557032
            Nigel Graham 2
            Participant
              @nigelgraham2

              Fine work!

              Mahogany has a very attractive dark reddish-brown colour but its main advantage is being strong and close-grained.

              I'd think there is any hard and fast rule about spacing the lagging bands, but start with one round the top and the bottom of the wood (the lower being the foundation-ring level unless you intend taking it full-depth for better appearance).

              Then I'd have one each at the thrids points but that might be very easy here due to all the fittings, fire-hole etc. I'd be inclined to experiment to see what is most pleasing as well as mechanically sound. You might find a single central band would both look and work well.

              The method you describe for joining the ends of the bands is as common and as good as any. A solid but neat block on each end is certainly better than simply folding the strip up, which the screw would try to straighten out so look poor.

              Under the wood? You won't have much room but a thin insulating layer will certainly do no harm. The total thickness of blanket and wood is largely dictated by the fittings and their bushes, allowing you to remove a fitting if necessary without having to disturb the woodwork.

              It may well be better not to glue the boards together. I'd be tempted to machine a very shallow rebate, fractionally under the band thickness, on each end of each board to engage the rings, to stop the boards moving vertically.

              ''''

              On boiler testing, as this is copper it should be inspected first un-clad, but not need the cladding removing in future. I'm not sure but I don't think setting the safety-valves hydraulically works all that well. I think you'd still need re-adjust them during the steam-test, so they match the red line on the gauge.

              #557050
              Rod Renshaw
              Participant
                @rodrenshaw28584

                I am no expert on this but I think I read somewhere about gluing the boards side by side to a piece of fabric which can then be wrapped around the boiler,fabric layer inside, rather than trying to fit each board individually. Need to ensure the boards are only glued to the fabric, and not to each other! If the boards are fitted tightly together when the fabric is flat they will separate slightly when the fabric is wrapped around the boiler and should give a slightly and neatly spaced appearance.

                I think one would need to make a pattern from card etc first, to mark out all the holes for the fittings, and than transfer the postion of the holes to the fabric/ wood assembly.

                Rod

                Edited By Rod Renshaw on 04/08/2021 19:16:31

                #557074
                Nigel Graham 2
                Participant
                  @nigelgraham2

                  Neat way of doing it, Rod!

                  I find card cut from cereal packets quite good for templates and test developments, though the box seams can make folding awkward.

                  #557076
                  Nigel Graham 2
                  Participant
                    @nigelgraham2

                    Matt –

                    Have a look at Luker's post on here introducing his Ballaarat construction series.

                    He includes photos of the preserved original and of his replica, showing that has wooden cladding with just three fairly broad brass retaining bands: one each end, the other in the middle.

                    #561412
                    James Hall 3
                    Participant
                      @jameshall3

                      Interested to know what boiler that is please – from kit/plans or your own design.

                      #561417
                      Matt Stevens 1
                      Participant
                        @mattstevens1
                        Posted by James Hall 3 on 05/09/2021 17:51:14:

                        Interested to know what boiler that is please – from kit/plans or your own design.

                        This is the Reeves 6" diameter vertical boiler. You can buy the plans and cast top from Reeves directly.

                        #561434
                        James Hall 3
                        Participant
                          @jameshall3

                          " This is the Reeves 6" diameter vertical boiler. You can buy the plans and cast top from Reeves directly."

                          Thanks Matt. Looks like some heavy duty saving up would be required – and as a pretty much newcomer to boiler making – I suspect that it might strain my skills such as they are, possibly resulting in a very expensive b*lls up.

                        Viewing 11 posts - 1 through 11 (of 11 total)
                        • Please log in to reply to this topic. Registering is free and easy using the links on the menu at the top of this page.

                        Advert

                        Latest Replies

                        Home Forums General Questions Topics

                        Viewing 25 topics - 1 through 25 (of 25 total)
                        Viewing 25 topics - 1 through 25 (of 25 total)

                        View full reply list.

                        Advert

                        Newsletter Sign-up