Yuriy’s Toys DIY DRO

Advert

Yuriy’s Toys DIY DRO

Home Forums Electronics in the Workshop Yuriy’s Toys DIY DRO

Viewing 17 posts - 1 through 17 (of 17 total)
  • Author
    Posts
  • #467146
    Iain.S
    Participant
      @iain-s

      Has anyone had first hand experience of building one of these for IGauging scales (magnetic type as sold by ARC)? I'm in the process of ordering one and whilst waiting, I need to buy some USB headers & I have a question about them.

      Many thanks

      Iain

      Advert
      #32085
      Iain.S
      Participant
        @iain-s
        #467287
        Colin Heseltine
        Participant
          @colinheseltine48622

          I have built a couple of these but I am using them with the magnetic scales from Machine-DRO. My connection to the scales is via 9 pin 'D' connectors (computer serial ports).

          Colin

          #467294
          Ian P
          Participant
            @ianp

            Iain, as far as I know Arc do not have IGaging scales, also IGaging are not magnetic types so I am curious which scales are you referring to?

            What are USB headers?

            Ian P

            #467299
            Stuart Smith 5
            Participant
              @stuartsmith5

              I have built one recently for my Warco milling machine.

              I used these from ARC :

              **LINK**

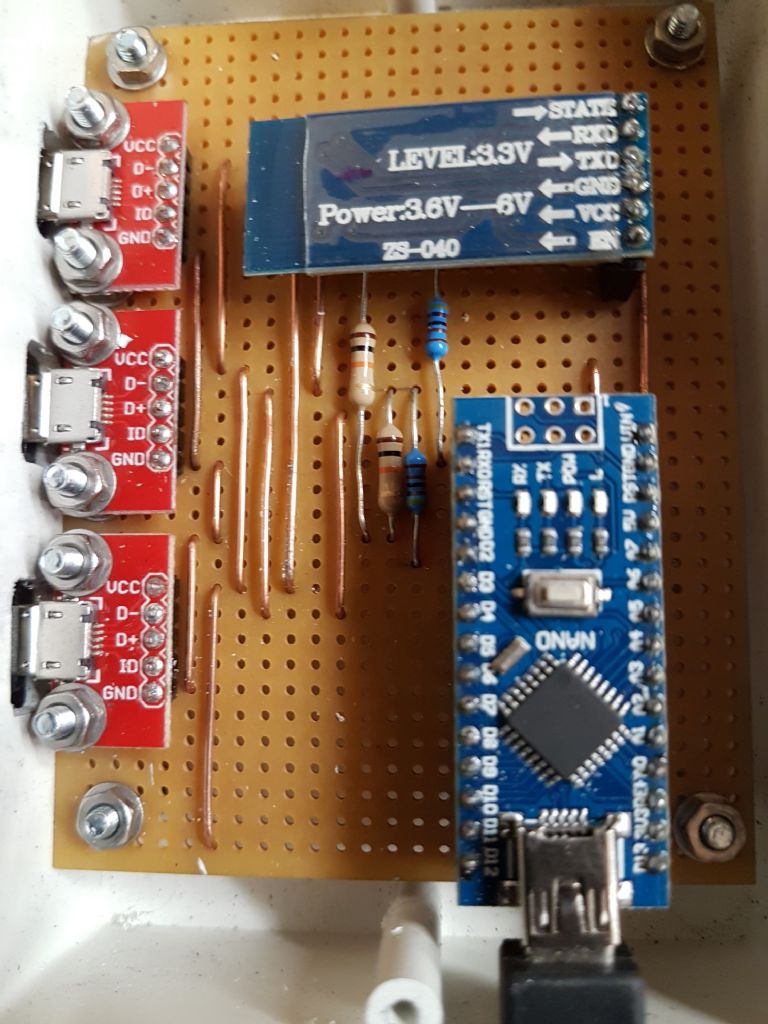
              I made the circuit on veroboard using an Arduino nano , an HC05 Bluetooth module and 3 micro usb breakout boards.

              Stuart

              #467300
              Stuart Smith 5
              Participant
                @stuartsmith5

                These are the breakout boards I used:

                **LINK**

                this is the Bluetooth module:

                **LINK**

                and this is the Arduino nano:

                **LINK**

                Stuart

                #467306
                Mark Davison 1
                Participant
                  @markdavison1

                  I'm using the app with a Teensy 3.2 micro controller reading chinese 5um optical scales (3 off on my mill, cost about £40 each before china shut down) directly (encoder library handles them with no additional hardware). I then broadcast the data over bluetooth to my android phone.


                  Teensy 3.2

                  There is now a much faster Teensy 4.

                  Edited By Mark Davison 1 on 26/04/2020 22:18:34

                  #467368
                  Iain.S
                  Participant
                    @iain-s
                    Posted by Ian P on 26/04/2020 20:45:48:

                    Iain, as far as I know Arc do not have IGaging scales, also IGaging are not magnetic types so I am curious which scales are you referring to?

                    What are USB headers?

                    Ian P

                    Apologies all. I got it slightly wrong. The scales I have are the digital readout bars from Arc which are of course, capacitive not magnetic blush. According to Yuriy's site, they are just debadged IGaging scales.

                    USB headers are the female sockets that solder onto a circuit board to accept a male USB plug. Normally called breakout boards. I need Micro-B sockets to suit the plugs on the scales.

                    My question is, the DIY board from Yuriy only has 4 holes to solder on the breakout boards for each of the X,Y,Z axis USB connectors, yet the breakout boards I can find for sale in the UK have 5 connections as shown by the ones used by Stuart S 5 in his link above.

                    So how do I connect the two together? Whilst I'll openly admit to not being an electronic expert, even a spanner monkey like me can see the difference laugh

                    Iain

                    Edit – forgot to add that this is all for installing a TouchDRO system

                    Edited By Iain.S on 27/04/2020 10:43:48

                    #467372
                    Dennis D
                    Participant
                      @dennisd

                      I built one the same as Stuart if you go to Yuriys site he has detailed instructions for wiring dro-build-instructions just scroll down to see the breakout board wiring and he has a YouTube video of final set up calibration

                      #467376
                      Zebethyal
                      Participant
                        @zebethyal

                        I built mine using perfboard and an ATtiny85 (an 8 pin microcontroller) as seen here, which also shows a much reduced schematic.

                        I used Igaging scales from Taylor Toolworks, a US ebay supplier, that even after shipping, taxes, etc was still cheaper than any UK supplier, and the cheapest Android tablet I could find.

                        The scales, while they use USB cables are not USB compatible, they use a +ve, -ve, clock and data for pins 1-4, the first 3 can be joined together across all axes to common pins, then you just need the data pin from each axis to go to a separate pin on your microcontroller.

                        A real USB connection uses +ve, D+, D-, -ve for pins 1-4, the 5th connection is for the ID which is floating in the case of a B device, or tied to ground for an A device. As mentioned above, the scales do not use true USB and even mess with where +ve and -ve are connected.

                        It is also worth changing the cables for shielded ones as the original ones can cause resets if they see EMI spikes from motors or similar – I had this happen quite often while I was still using the original readouts.

                        Be aware that the scales may also need to be calibrated, and while you can use a feedback calculation based on a reading and distance measures, the correct cpi value for Igaging scales is 2560 – found on the Schumatec OpenDRO website (the default cpi value in TouchDRO is 10,000 which is way too high).

                        #467379
                        Iain.S
                        Participant
                          @iain-s

                          Many thanks Dennis. Did'nt think to look further than the actual item I was ordering. That'll prove useful but it it will still involve connecting the USB breakout boards with what is, to all intents & purposes, flyleads.

                          What I'm looking for is a UK source of breakout boards with just four connections to match Yuriy's board and end up with a neat installation.

                          Iain

                          #467387
                          Stuart Smith 5
                          Participant
                            @stuartsmith5

                            Iain

                            The boards I used do have 5 connections. The one labelled ID is not used. Although the scales use a micron usb connector the pins are not used as the usb spec.

                            VCC : power supply to scales (3 volts for mine)

                            D- : Clock signal from micro to scales

                            D+ : Data signal from scales to micro

                            Gnd : Ground connection to micro / power supply

                            If you want to buy a complete board, the touch dro website has them:

                            **LINK**

                            But at $86 + $30 postage they cost too much for me!

                            I think I mine cost me less than £25. Not quite as professional looking but it works ok.

                            810c920f-4359-4f62-93ca-7b0ce7ae70da.jpeg

                            #467389
                            Frances IoM
                            Participant
                              @francesiom58905

                              the 5th wire is connected to 0V to act like a normal 4wire USB but is left high to act as a host – this is the OTG extension – there is a description in Linux Magazine May 2020 (issue 234 – should still be in shops) but our local Google-Fu zen master might be able to find a better explanation – the Mag article was about its use in the very cheap Raspberry Pi Zero

                              Edited By Frances IoM on 27/04/2020 12:01:33

                              #467393
                              Zebethyal
                              Participant
                                @zebethyal

                                Mine cost under £5.00 half of which was for the bluetooth module, and could have cost £0.87 less if I had used a 5V supply or a couple of extra resistors for a voltage divider from my free 7V wallwart supply instead of a buck converter.

                                Edited By Zebethyal on 27/04/2020 12:22:28

                                #467404
                                Iain.S
                                Participant
                                  @iain-s

                                  Many thanks again for your input Chaps and whilst you may not regard them as such, they're neat looking boards. Certainly better than I could produce.

                                  I've seen the TouchDRO complete board and like you, found the price a bit rich which is why I've gone for the DIY kit. At nearly half the price, it's still a more expensive option than your efforts but I don't have the benefit of enough electronic knowledge to attempt my own version. Basic soldering I can achieve but any detailed descriptive knowledge might as well be in Klingon to me.

                                  Not wistanding that, the info you've provided is helping me understand.

                                  Thank you.

                                  Iain

                                  #467411
                                  Colin Heseltine
                                  Participant
                                    @colinheseltine48622

                                    p1010038resize.jpg

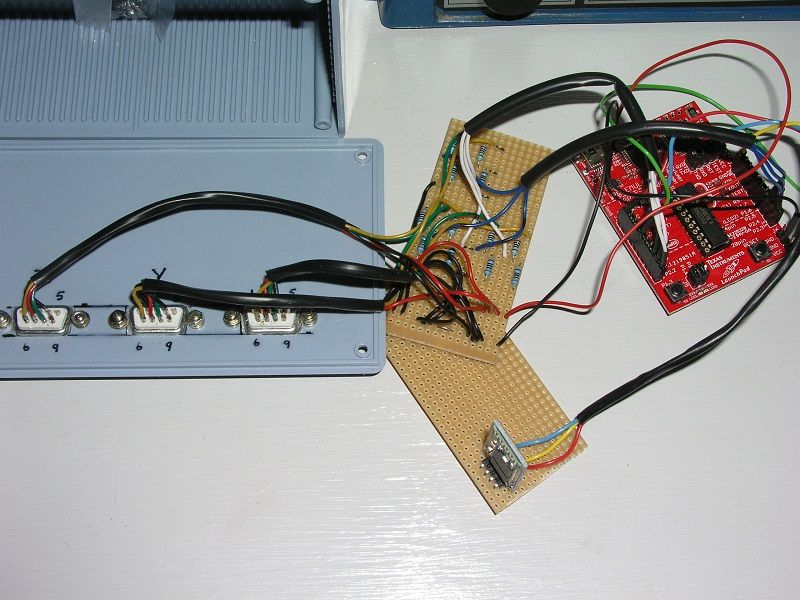
                                    I used the Texas Instruments circuit boards and used a piece of Veroboard to make up t. he voltage divider part of the circuit. I had not touched electronics for over 40 years, but amazingly it all worked. I think the whole box of electronics came out at well under £20. I had some bits like the serial connectors in my IT stock. I drew out the resister layout on paper first, then drew it out on a veroboard layout before attempting to solder to veroboard.

                                    Colin

                                    #467413
                                    Zebethyal
                                    Participant
                                      @zebethyal

                                      One piece of software I find very useful for vero, perf, strip board type layouts is DIY Layout Creator it is a free piece of software, available for PC and MAC, aimed at people with minimal electronics knowledge. I regularly use it for laying out this type of circuit .

                                      Here is the layout I created for the above board using this software:

                                      I then use this to create the circuit on the perfboard (view from back of board):

                                      The wire traces shown are stripped solid cores from an old piece of ethernet cable.

                                      I am also too cheap to buy sets of jumper wires to use on bread boards so also use various lengths of ethernet solid core wire for this (just the ends stripped).

                                      Edited By Zebethyal on 27/04/2020 14:02:56

                                    Viewing 17 posts - 1 through 17 (of 17 total)
                                    • Please log in to reply to this topic. Registering is free and easy using the links on the menu at the top of this page.

                                    Advert

                                    Latest Replies

                                    Viewing 25 topics - 1 through 25 (of 25 total)
                                    Viewing 25 topics - 1 through 25 (of 25 total)

                                    View full reply list.

                                    Advert

                                    Newsletter Sign-up