What Did You Do Today 2019

Advert

What Did You Do Today 2019

Home Forums The Tea Room What Did You Do Today 2019

Viewing 25 posts - 926 through 950 (of 1,046 total)
  • Author
    Posts
  • #438374
    Cornish Jack
    Participant
      @cornishjack

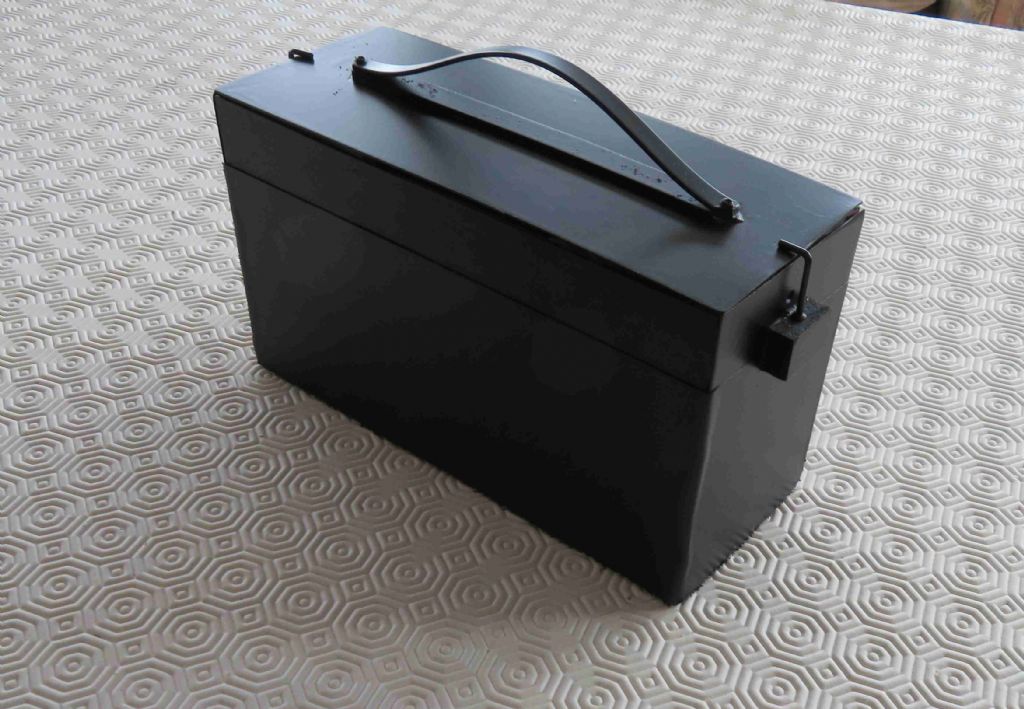
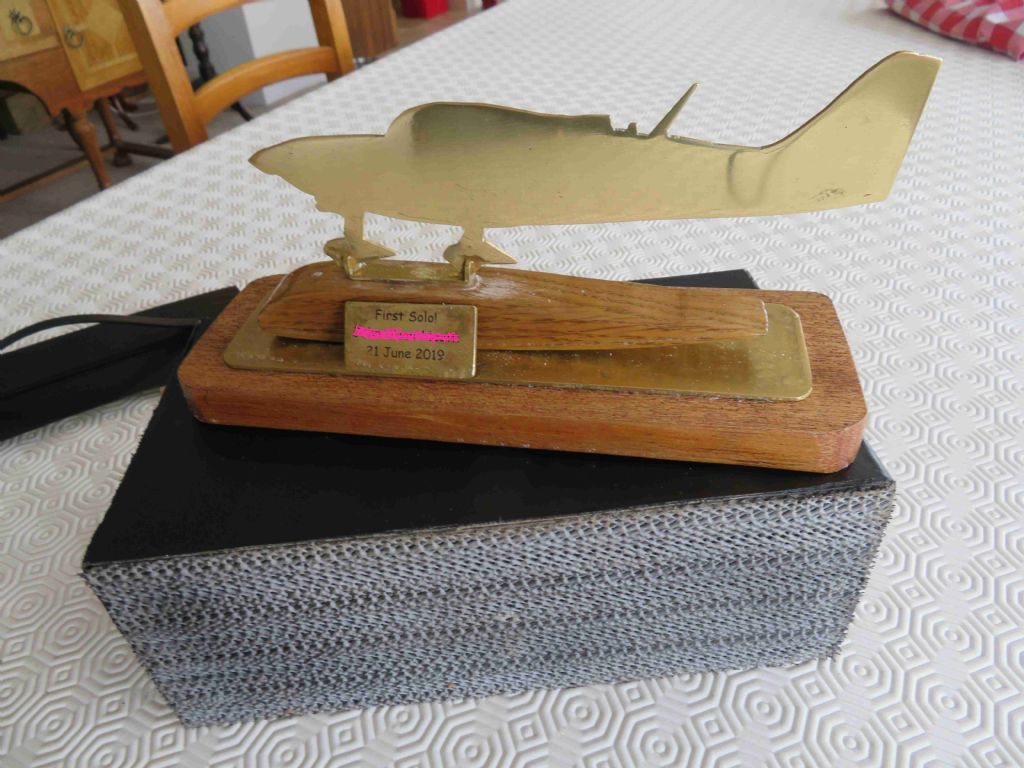
      Not today but yesterday – JUST in time for intended recipient's arrival! Intended as a memento of a 'mature' first solo and the aircraft plus the Naca 43012 aerofoil which supported him! He was very surprised and seemed pleased. Yes, that is intended to be a 'Black Box'! The whole thing just developed from a quite different original idea and generated more problems than almost anything I've done previously!

      All construction materials from offcuts/ scraps/Os&Ssetc. No skill or ability for engraving, so made a waterslide transfer for the plaque.

      img_0412a.jpg

      img_0414b.jpg

      Definitely not one to repeat!

      rgds

      Bill

      Advert
      #438414
      Ian Parkin
      Participant
        @ianparkin39383

        I was in the audience for the question time special broadcast on Friday night live and I was the first questioner very nerve wracking …

        #438438
        geoff walker 1
        Participant
          @geoffwalker1

          Hi Ian,

          I heard your question and I was not surprised by Corbyns answer.

          I mean, come on how would he know how to cut an unlisted thread on Colchester student lathe?

          That was you, was it?

          #438442
          Ian Parkin
          Participant
            @ianparkin39383

            Yes Geoff it was I

            only knew 5 mins before who the questioners would be

            #438451
            Anonymous
              Posted by geoff walker 1 on 23/11/2019 14:39:14:

              I mean, come on how would he know how to cut an unlisted thread on Colchester student lathe?

              Should have specified a LH thread. smile

              Andrew

              #438455
              John Hinkley
              Participant
                @johnhinkley26699

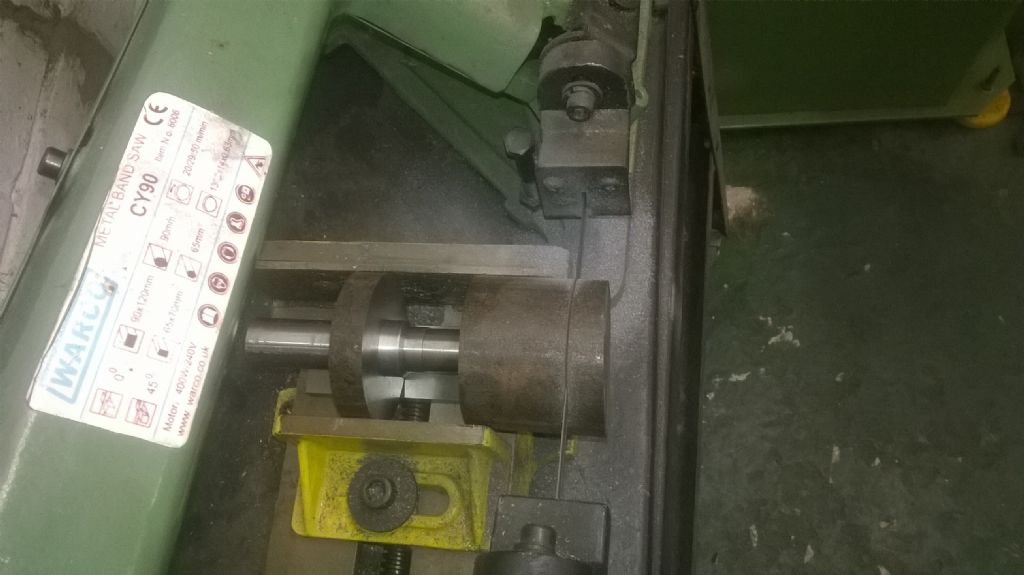
                Getting to the end of the manufacture of the gear dogs for my gearbox and realised I'd misread a drawing and needed to cut off another slice of 65mm bar. Unfortunately I'd only got a short length left. Mounted it in the bandsaw and started to cut it. Halfway through, it cocked over and ruined the cut. I should have known better! A little head scratching over lunch and I came up with the solution pictured below:

                cut-off bodge

                Luckily, I already had a blank of the same diameter partially machined and mounted on an arbor, ready for the next stage. I drilled and tapped the "bad" end 10mm and screwed the arbor into this, mounted it in the bandsaw vice on a parallel as shown and, hey-ho, stable as you like. Set the bandsaw going and before long, I had my new blank. Quite satisfying. I might even be able to get another out of it by placing plates along each vice jaw to extend their reach. Hopefully I won't be making any more mistakes and the scrag end can go back into the scrap box.

                John

                #438462
                not done it yet
                Participant
                  @notdoneityet

                  JH,

                  Is your vise jaw set fully across to the right side? It looks like there was quite a lot of adjustment available, looking at the space between the washer and the left end of the jaw. It looks like there is another 20-25mm of jaw adjustment?

                  Edited By not done it yet on 23/11/2019 17:12:13

                  #438464
                  Robert Butler
                  Participant
                    @robertbutler92161

                    Its as far across to the right as it will go! Robert Butler

                    #438465
                    Robert Butler
                    Participant
                      @robertbutler92161

                      Its as far across to the right as it will go! Robert Butler

                      #438469
                      John Hinkley
                      Participant
                        @johnhinkley26699

                        Ndiy,

                        Robert was right. Twice!

                        John

                        #438475
                        Journeyman
                        Participant
                          @journeyman

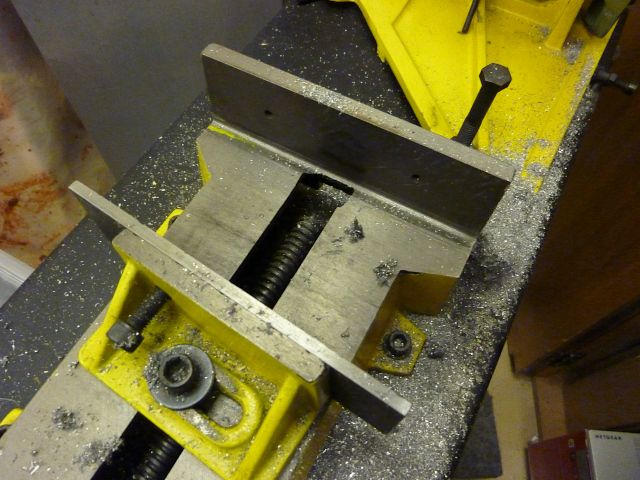
                          I found it helped on the CY90 saw vice to remove the jaw face from the fixed jaw and fix it to the smaller swivel jaw making them both the same length.

                          sawvice.jpg

                          It also helps to add a jack screw to the left side of the swivel jaw so that you can hold short ends without packing, just adjust the screw.

                          John

                          #438481
                          Neil Wyatt
                          Moderator
                            @neilwyatt
                            Posted by Journeyman on 23/11/2019 18:42:44:

                            I found it helped on the CY90 saw vice to remove the jaw face from the fixed jaw and fix it to the smaller swivel jaw making them both the same length.

                            sawvice.jpg

                            It also helps to add a jack screw to the left side of the swivel jaw so that you can hold short ends without packing, just adjust the screw.

                            John

                            Wonder where you got that idea from

                            Neil

                            #438483
                            Journeyman
                            Participant
                              @journeyman

                              Can't remember but definitely not original thinking.

                              John

                              #439322
                              Nicholas Farr
                              Participant
                                @nicholasfarr14254

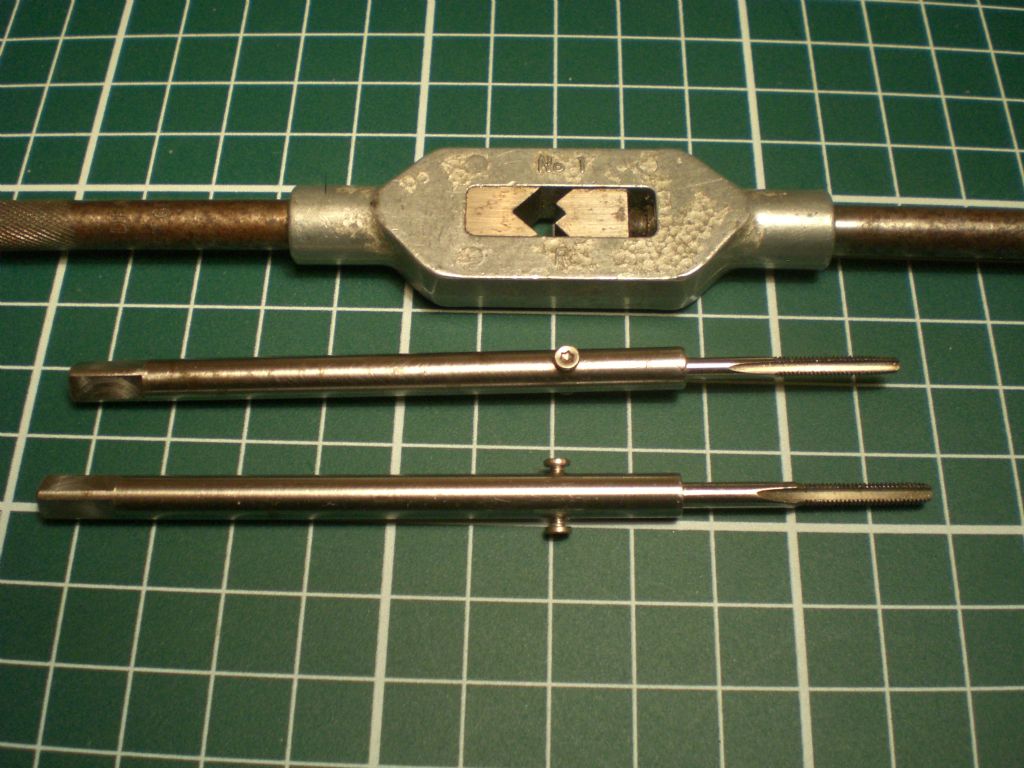
                                Hi, today I finish off making a couple of tap extensions, these are not a typical design as I've made them to fit the tap shank snugly and two screws bear onto two opposite flats.

                                cimg2759.jpg

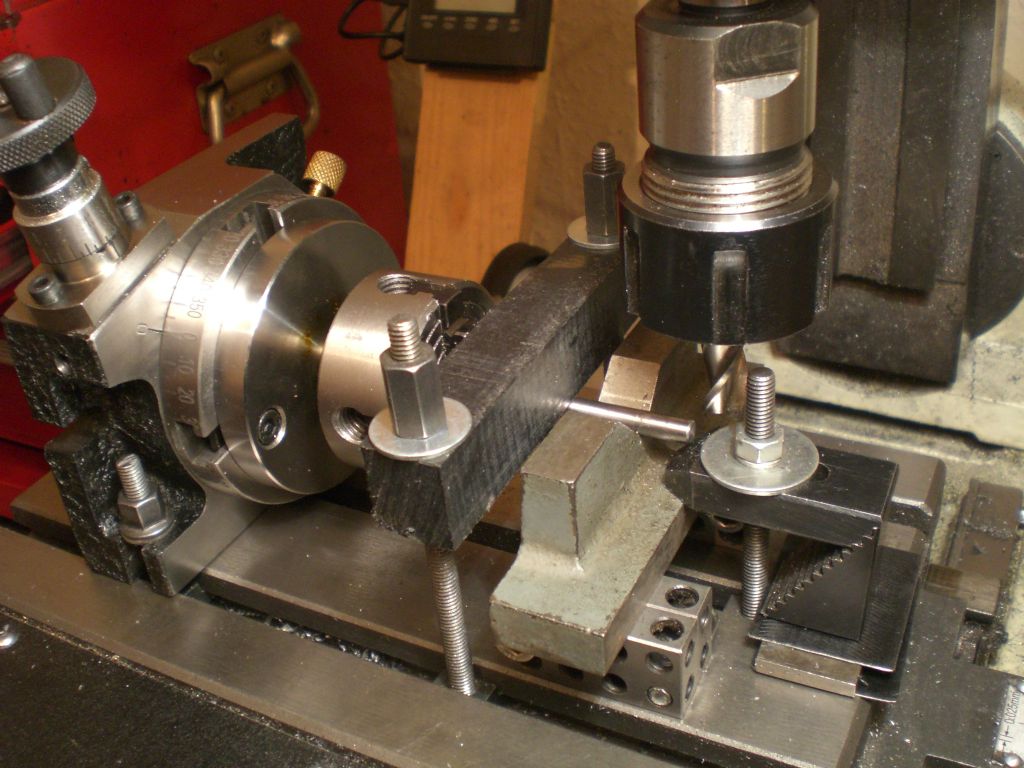
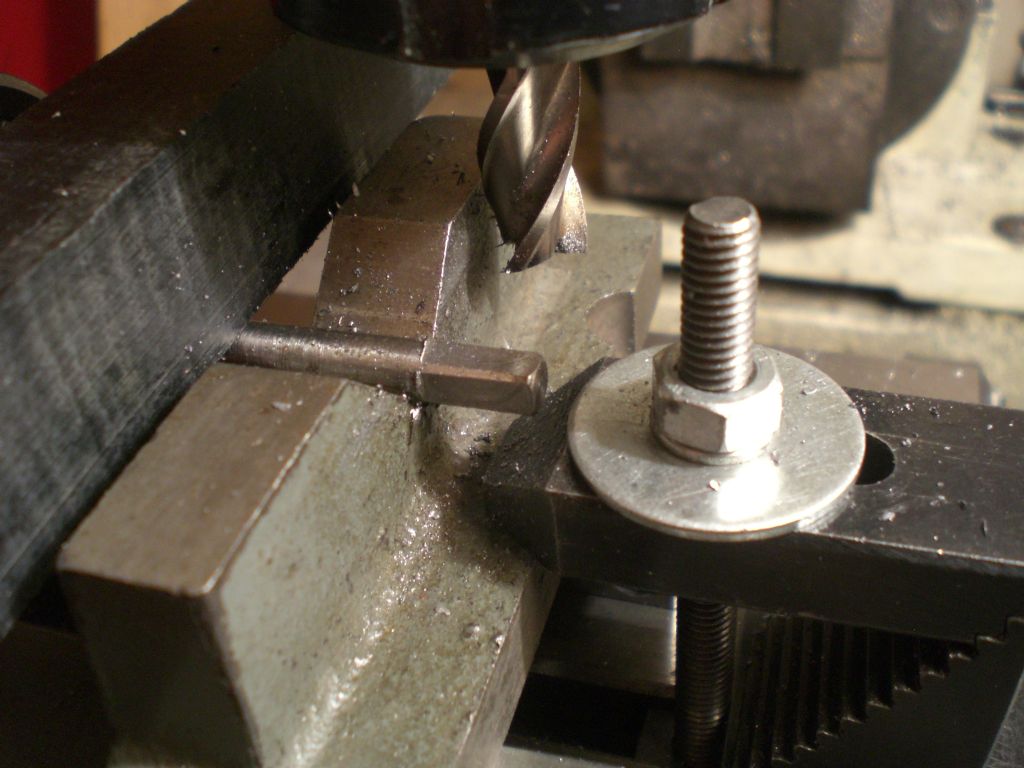
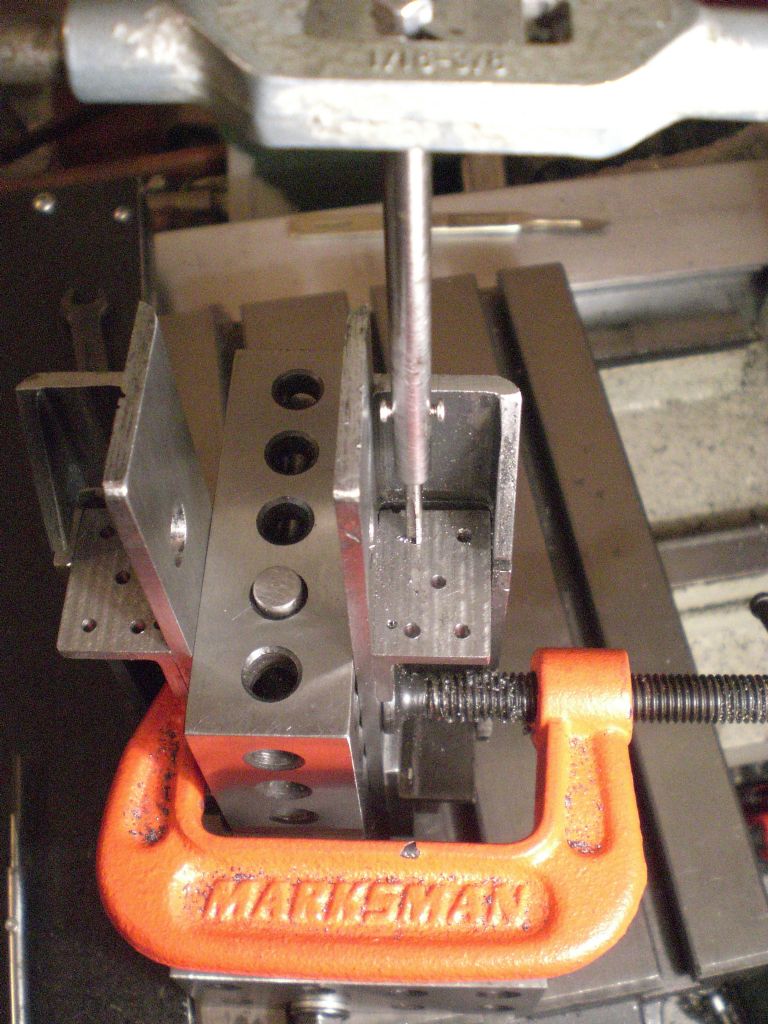
                                A hole was drilled into one end of a piece 7/32" silver steel rod, about 22mm deep, which is a close fit to the tap shanks and then a hole was drilled crosswise about midway to where the flats on the taps are and were treaded 2mm. Two very short 2mm screws were then fitted into these threaded holes, the screws being salvaged from an old computer hard drive. The pieces of steel rod were then held in a four jaw fitted to a rotary table on my mini milling machine with the opposite end to the drilled hole outwards and resting in a "V" block about 12mm from the end of the rod, a bar, crossways to the rod and just behind the "V" block to prevent it from lifting out. Then using the rotary table, four flats were milled onto the rod end, for use in a conventional tap wrench.

                                cimg2754.jpg

                                cimg2755.jpg

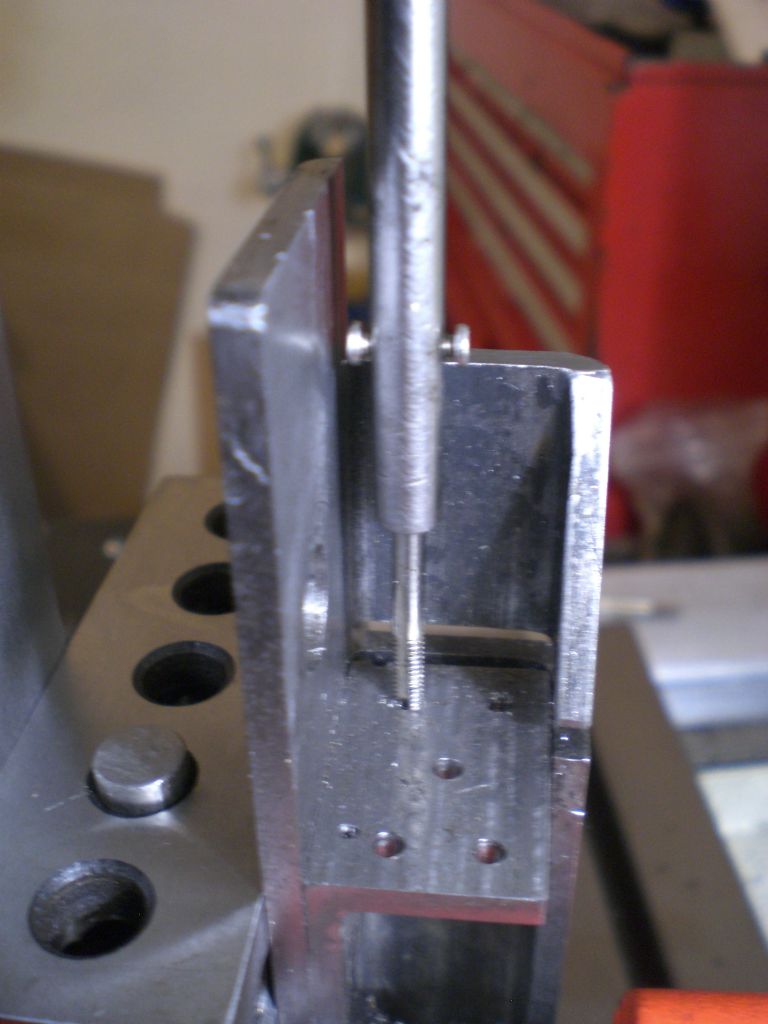
                                The reason for making these can be seen in the photo below.

                                cimg2758.jpg

                                cimg2756.jpg

                                Regards Nick.

                                Edited By Nicholas Farr on 28/11/2019 22:45:12

                                #439374
                                John Hinkley
                                Participant
                                  @johnhinkley26699

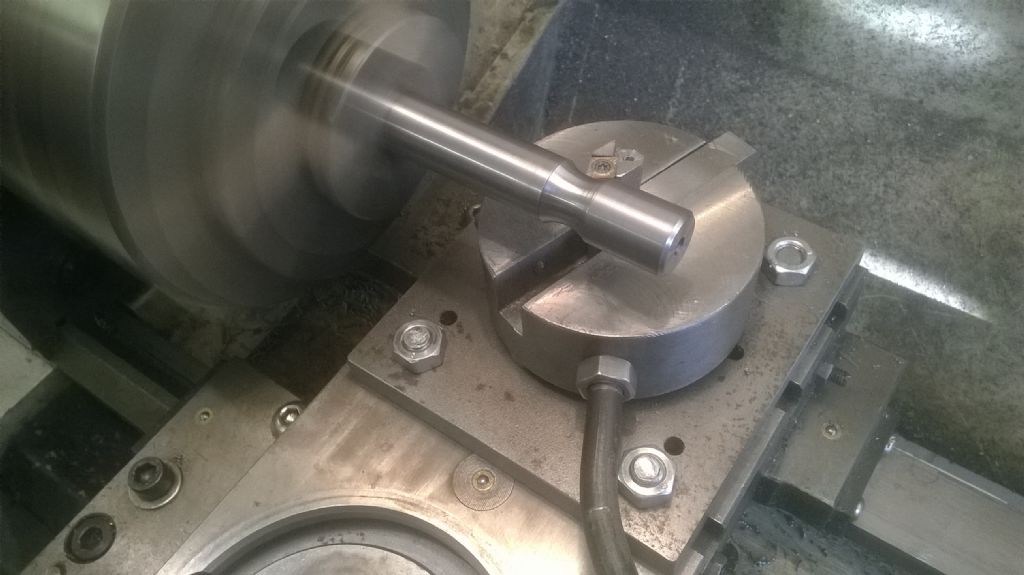
                                  As a break from the seemingly endless production of gear blanks and gear engagement dogs, I decided to add a little embellishment to the end of the input shaft of the gearbox. Having messed up the splines once when the cutter broke (my fault!), I turned up a sleeve and Locted it to the shaft. Partially to disguise the join, I've added a concave radius like this:

                                  Adding a bit bling

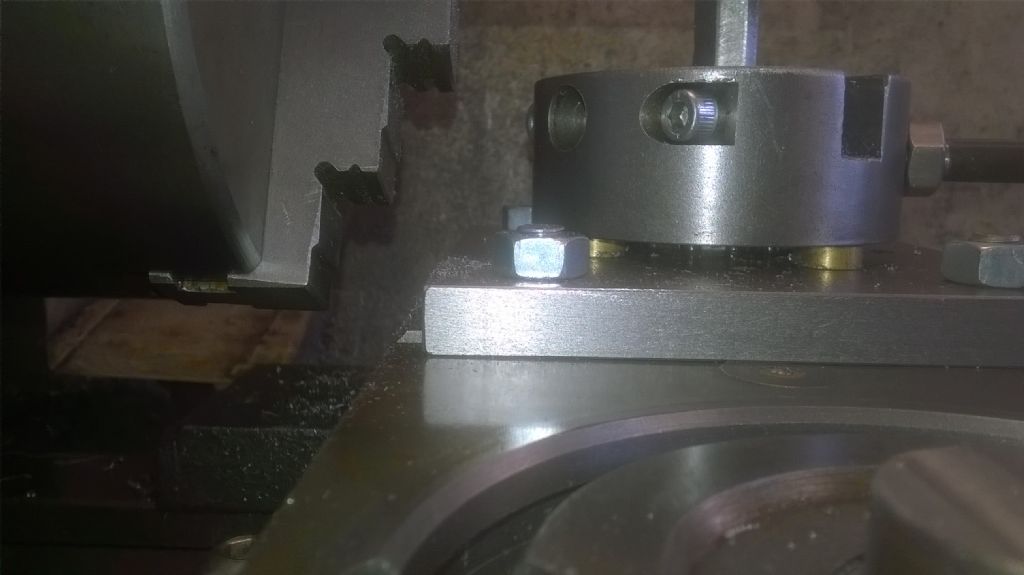
                                  As an aside, you will notice that the cutter is slightly modified from that described on Steve Bedair's site on which it is based. That is to say, I didn't like the way the body was mounted directly onto the base, so I introduced a "thrust bearing" of sorts – actaually a caged ring of ball bearings from a bicycle steering column – and to prevent any rocking motion it also rests on four brass pads. I've tried to take a photograph to illustrate this, not very successfully. The end resuly is a smooth angular motion that gives a good finish. The lathe has to be run in reverse for the cut shown in the first photograph, so not suitable for some chuck attachment methods without extreme caution and VERY light cuts.

                                  You can just about see the ball cage and brass pads in the photo below:

                                  radius cutter detail

                                  I've also made the insert holder double sided, which extends the range of radii availble for cutting.

                                  John

                                  #439414
                                  mechman48
                                  Participant
                                    @mechman48

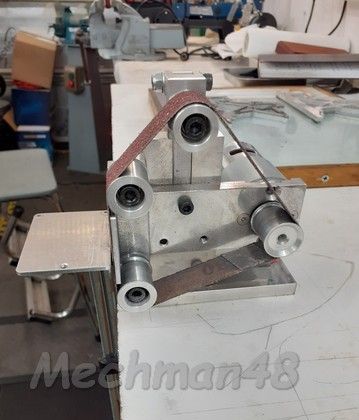
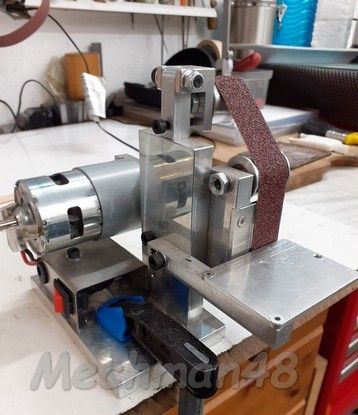
                                    Yesterday actually; Had a play with my new toy, a mini belt sander sold on Banggood ( usual disclaimer ) at a very reasonable price, early Xmas gift to oneself … devil … used it to sand away some excess from my beam engine frames, does a nice job so far.

                                    mini sander (1).jpg

                                    mini sander (2).jpg

                                    George.

                                    #439448
                                    Nigel Graham 2
                                    Participant
                                      @nigelgraham2

                                      Completed a special 2-roller fairlead for a cave-"digging" project I was involved in a for a couple of years or so.

                                      "Digging" in this context means removing umpteen thousands of years' worth of naturally-accumulated sediments and rock falls ( small boulders in this case) choking the passage, to find what lays beyond.

                                      The difficulty was that manually hauling buckets or rocks up a shaft ate pulleys for breakfast. After I'd made yet another simple sheave running on the shank of a "through-bolt" masonry-anchor, I realised the problem was firstly the relative positions of everything meant the rope is pulled at a low angle to the line of the bolt; and secondly, the crew would do nowt about it a sticking sheave until the muddy rope had lapped a bloomin' great groove in it and the bearing bush!

                                      So, a 2-roller fairlead, which I will deliver tomorrow with advice on how I intend it being installed, and a bag of assorted spare washers, spacers and building shims so it can be screwed to the irregular rock wall by the original and a second, through-bolts.

                                      The rollers are of Nylon with a wearing surface cut from a piece of scaffold-tube. The horizontal one runs on the shank of an M10 bolt also helping hold the vertical roller's column to the assembly together, the vertical roller is on a spigot on that column, retained by a threaded thrust-washer and Nyloc nut: the rope has to be hooked over this twice per raising/lowering operation.

                                      The frame is a confection of bits cut from structural-steel sections, and accuracy is not of the essence so don't look too closely.

                                      Making the stainless-steel thrust-washer was an experience. My generic Taiwanese band-saw spent literally hours cutting a slice from some 2.5" dia. bar. Luckily the unknown grade proved nice to machine, on the Myford 7, but parting-off was a matter of low speed and lots of lubricant for the insert-tool in the rear tool-post.

                                      Still, modifying another stainless disc for a spacer for mounting the fairlead, I ran the lathe fast with an insert-type boring-bar, and a brush of lubricant, perfectly well.

                                      (Incidentally, I have found it misleading that carbide inserts "have " to be worked at high speed. They can be: they are made for such duty industrially, but I find they give as good or indifference finishes as HSS, on the same material, at modest speeds. I suspect the operator, well, this one, first!)

                                      ++++

                                      Tried to use the two rollers at right-angles as an exercise in trying after a long lay-off in despair, to tackle the problem of 3D modelling in TurboCAD. I had drawn them orthogonally, for future spares reference; but isometric CAD is a black art indeed. Luckily TurboCAD does not need it as a preliminary to the 2D workshop drawings, as Fusion and Alibre appear to need.

                                      Failed, but did start to determine how the different classes of "solid" react to simple moves like changing their sizes. Sometimes trying to increase the height of a figure, moves it instead, so I endeavoured to find the (or any) pattern in such behaviour.

                                      ++++

                                      For the geologists among you…

                                      The cave, called Spider Hole, lies in the upper reaches of Cheddar Gorge, and has formed in the almost-vertical plane of a strike-slip fault in one of the anticlines forming the Mendip Hills. It contains so far known, two sizeable chambers resulting partly from fault-brecciation, partly from dissolution by percolation water. An area of the lower chamber has been marked with plastic tape to protect the pristine breccia floor and some unusual concretions, from being trampled.

                                      A small inlet in the lower of chambers, on an end wall displaying the brecciated fault-plane, has deposited calcite. Another small inlet appears in the shaft where the fairlead will be installed. The water feeds the Gough's Cave River, not visible in the show-cave but emerging in the artificial lake opposite the cave entrance

                                      The shattered rock has dropped down the fissure as dissolution creates voids to permit this; hence the digging being a slow process of manually moving possibly some hundreds of tons of shattered limestone and stacking it further up the cave, which is predominantly vertical. Where necessary the rocks are stabilised with mortar to give climbable sections but with minimum impact on the cave's natural appearance.

                                      Some units of the Carboniferous Limestone are highly fossiliferous, with a lovely mass of coral at the foot of the shaft.

                                      #439476
                                      John Haine
                                      Participant
                                        @johnhaine32865
                                        Posted by mechman48 on 29/11/2019 17:49:25:

                                        Yesterday actually; Had a play with my new toy, a mini belt sander sold on Banggood ( usual disclaimer ) at a very reasonable price, early Xmas gift to oneself … devil … used it to sand away some excess from my beam engine frames, does a nice job so far.

                                        George.

                                        George, that looks a nice little unit. I found it cheaper on eBay than Banggod, at the price I couldn't buy the materials, so have ordered one.

                                        #439479
                                        Danny M2Z
                                        Participant
                                          @dannym2z

                                          Today I had a play with my new toy Digital Torque Wrench which although purposed for fine tuning my target shooting rifles I noticed that it might be useful for the head bolts on my model aircraft engines.It was!

                                          * Danny M *

                                          #439502
                                          Neil Wyatt
                                          Moderator
                                            @neilwyatt
                                            Posted by Nigel Graham 2 on 29/11/2019 22:34:26:.

                                            The cave, called Spider Hole,

                                            Cripes, two phobias for the price of one!

                                            crook

                                            Neil

                                            #439580
                                            Ian P
                                            Participant
                                              @ianp
                                              Posted by Danny M2Z on 30/11/2019 11:50:40:

                                              Today I had a play with my new toy Digital Torque Wrench which although purposed for fine tuning my target shooting rifles I noticed that it might be useful for the head bolts on my model aircraft engines.It was!

                                              * Danny M *

                                              Is the torque wrench in your link the correct one?

                                              There is no mention of digital or electronics on the webpage, in fact there is little mention of anything that has any real meaning. If I were a potential customer for a small torque wrench the lack of a proper description or specification would eliminate that one in a flash.

                                              Ian P

                                              #439593
                                              Nigel Graham 2
                                              Participant
                                                @nigelgraham2

                                                Neil:

                                                "two phobias for the price of one!"

                                                What, spiders and caves?

                                                The spiders are only in the entrance area, and they are rather handsome little animals, in a fetching, gloss brown and grey livery. I think they are of the breed called the Cave Spider, glorying in the species name Meta Menardii, which favours caves, cellars and tunnels.

                                                One of my phobias is of heights, which is not very helpful in that particular place! It is not tight, but is very determinedly vertical. Well, it does have to drop a few hundred feet in altitude to reach outlet level maybe only about a mile away in a straight line – though we won't know the actual passage distance until it's found.

                                                I am now engaged in a similar project not far from there, for which I built a simple winch for handling tools and spoil in the vertical entrance shaft.

                                                It's just a large rope-reel on a scaffolding tripod standing over the shaft. Fabricated-PVC drum: a left-over from something at work. Bearings: plastic bushes, revolving between steel collars on a length of aluminium scaffold-tube. Sides: PVC sheet drum-cheeks, inside two hexagonal side-frames giving a 4:1 mechanical advantage by diameter, welded from flat bar.

                                                Source of bar: worn-out miniature-railway track!

                                                To set out the 120º inside angles for the 3 bar-pairs eventually united in each hexagon (an attempt to distribute errors), I had to resort to geometrical construction on a sheet of plywood; by rule, pencil and a rather lovely beam-compass that looks as if an apprentice-piece by Anon, many years ago. The bars were clamped to angle-plates along the pencil-lines, with the corner clear of the board edge for the first weld.

                                                #439601
                                                Danny M2Z
                                                Participant
                                                  @dannym2z
                                                  Posted by Ian P on 30/11/2019 21:33:34:

                                                  Is the torque wrench in your link the correct one?

                                                  Sorry, my linky was a bit lacking in detail. Here is a better one with more info FAT Wrench Reviews

                                                  I purchased the digital version as it is more accurate and easier to use than the analogue one.

                                                  * Danny M *

                                                  #439750
                                                  Nigel Graham 2
                                                  Participant
                                                    @nigelgraham2

                                                    A leisurely sunny afternoon in the local Christmas street " fayre " – not that the traders were all local!

                                                    Then a couple of hours or so this evening, detailing the cylinders for my steam-wagon, cut from a rectangular block of cast-iron.

                                                    I'd managed to miss thinking far enough ahead about actually getting steam in and out of the right bits, so I've a fair bit of head-scratching and wangling to work out where to drill passages big enough for the steam, but which won't run into stud holes or the port-to-cylinder passages.

                                                    The HP side is easy – ish as I can use a flange fitting on the valve-chest flank, but the rest might entail some tricky angled drilling and external plumbing.

                                                    I'd drawing it in TurboCAD, orthogonally only; with the part-machined block and a rule next to the computer. Apart from my not using 3D anyway, 2D directly relates the design to machine-tool travels, so helps avoid the trap of 3D-models that look pretty on screen, but prove very difficult or impossible to make.

                                                    I did try Alibre, from the MEW series, and had previously flirted briefly with Fusion, but realised that was a mistake because apart from their long-way-round approach, I'd already bought and made some progress with TurboCAD, with its default 2D/3D choice. TC used to be advertised in "our " magazines but seems to have disappeared. Anyone know why?

                                                    Meanwhile my drawing-board still forlornly dominates the dining-room, draped in caving-kit hung up to air.

                                                    #439851
                                                    Anonymous

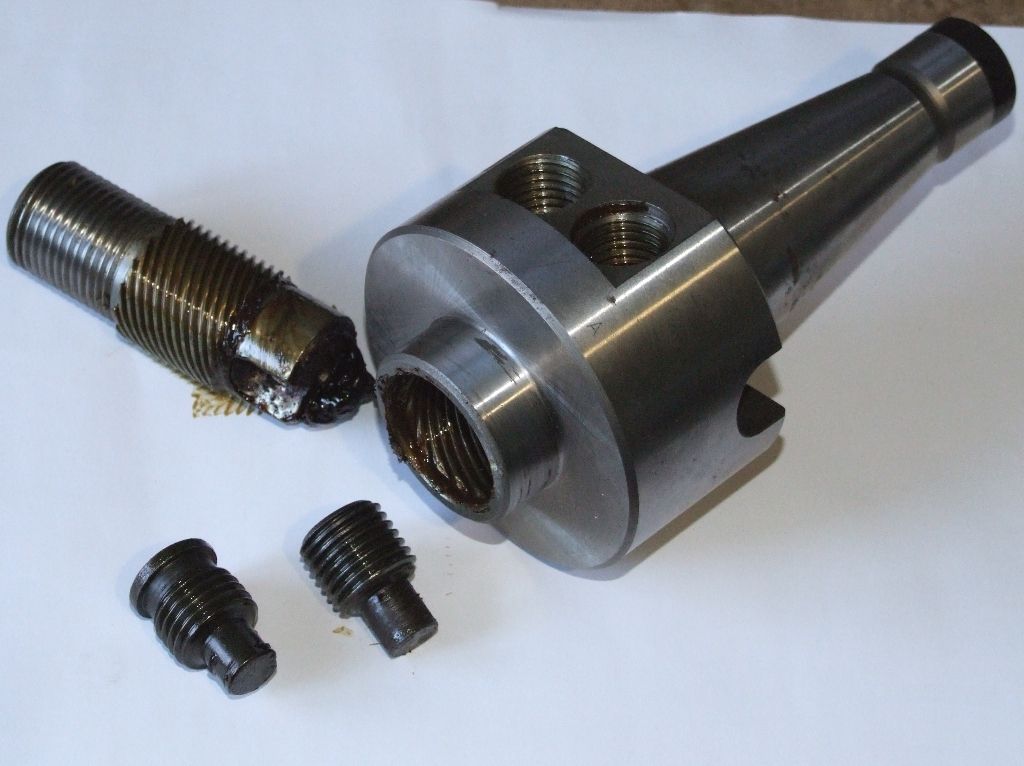
                                                      Now that I'm a member of the unwashed, aka unemployed, I've finally got time to look properly at items I bought years ago on Ebay. First, a Clarkson Dedlock chuck, shown here disassembled:

                                                      dedlock_chuck.jpg

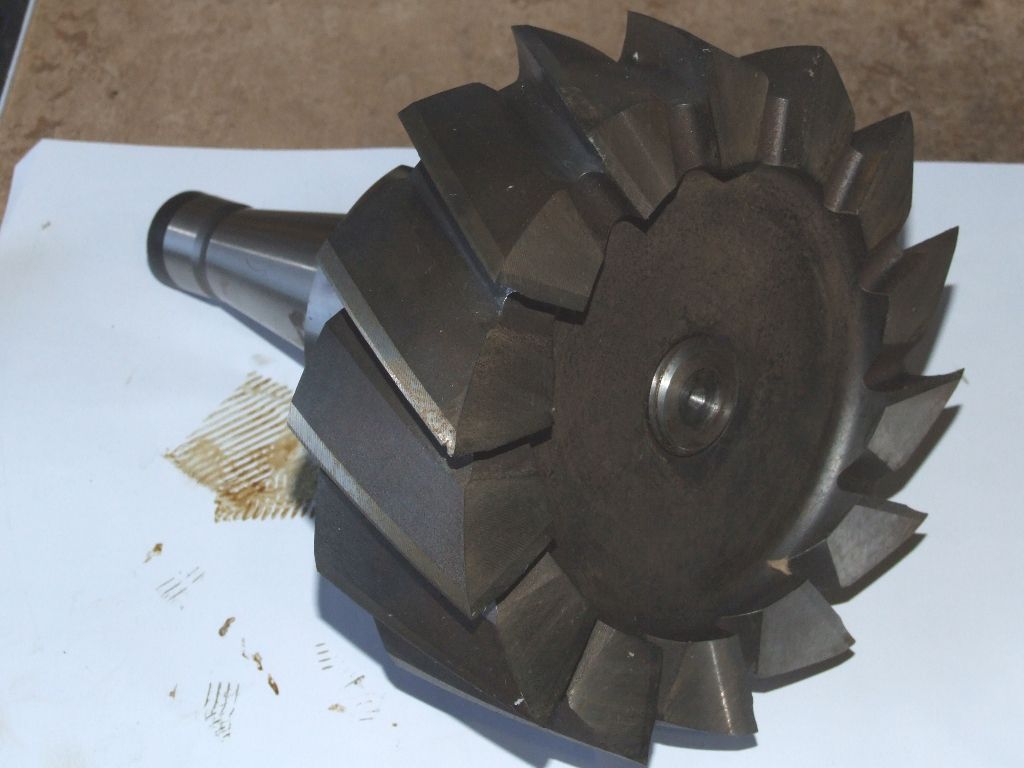
                                                      The shaft top left is interesting; a double start ground thread and it's a moot point if the next bit down is a multistart thread, a helical spline or a helical gear. It's one thing grinding the external "thread", but the internal "thread" would be more of a challenge. And here's the chuck reassembled with a cutter in place:

                                                      dedlock_cutter.jpg

                                                      It works in a similar way to the Clarkson chucks for threaded cutters. If the cutter rotates slightly, due to cutting forces, the cutter is forced harder onto the shoulder of the chuck. Can't wait to give it a go and make the horizontal mill work for its supper. The question is; can I clamp the work down hard enough to resist the cutting forces?

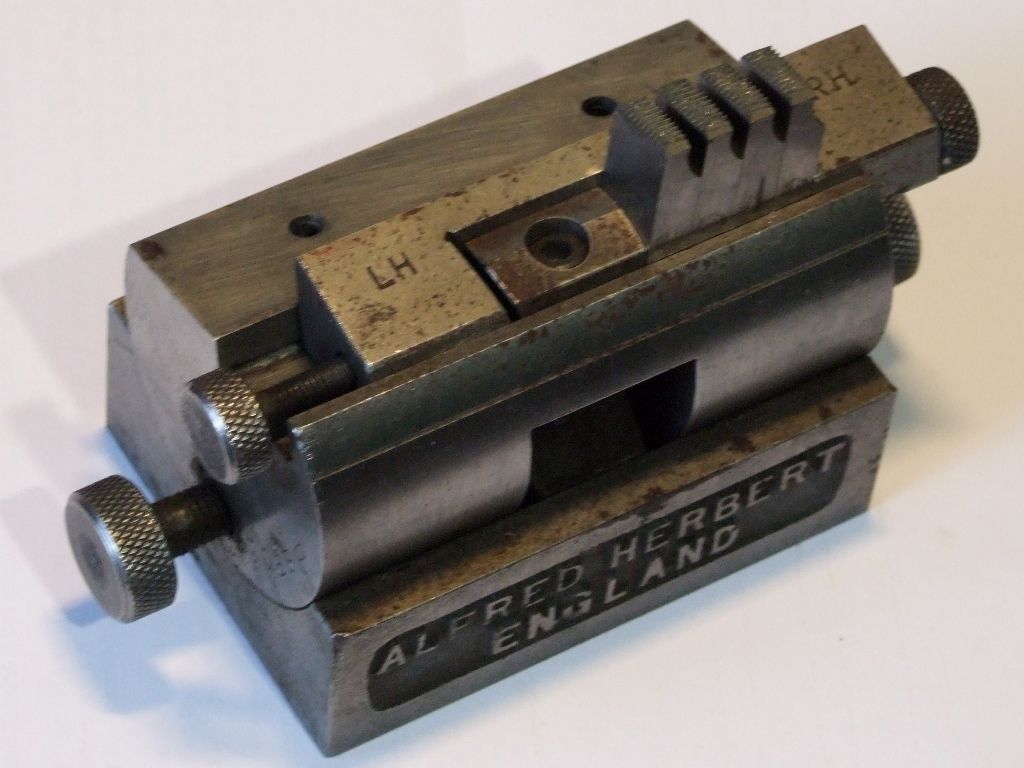
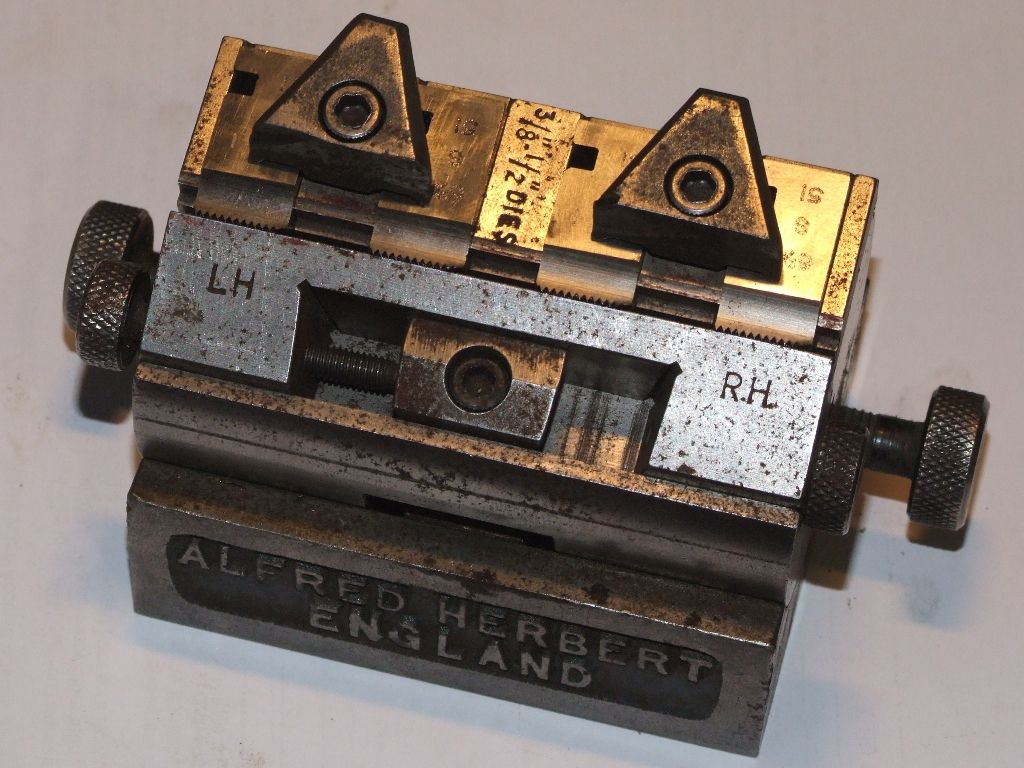
                                                      I've also had a good look at the No.1 and No.2 Coventry die grinding fixtures. I see how they work now. There is the odd bit missing, but they can be made if required. Here's the No.1 fixture set up to grind the throat (cutting edge):

                                                      coventry_grinding_1.jpg

                                                      And to grind the rake:

                                                      coventry_grinding_2.jpg

                                                      That's enough excitement for one day. This evening I'll make a start on assembling the last of the four rear wheels for my traction engines.

                                                      Andrew

                                                    Viewing 25 posts - 926 through 950 (of 1,046 total)
                                                    • Please log in to reply to this topic. Registering is free and easy using the links on the menu at the top of this page.

                                                    Advert

                                                    Latest Replies

                                                    Home Forums The Tea Room Topics

                                                    Viewing 25 topics - 1 through 25 (of 25 total)
                                                    Viewing 25 topics - 1 through 25 (of 25 total)

                                                    View full reply list.

                                                    Advert

                                                    Newsletter Sign-up