Warco BH600G

Advert

Warco BH600G

Home Forums Manual machine tools Warco BH600G

Viewing 25 posts - 1 through 25 (of 25 total)
  • Author
    Posts
  • #303466
    Rik Shaw
    Participant
      @rikshaw

      I would like to download a user manual for a Warco BH600G lathe but I have been unsuccessful. Even knowing the overall length would be helpful.

      Rik

      Advert
      #12994
      Rik Shaw
      Participant
        @rikshaw
        #303469
        JasonB
        Moderator
          @jasonb

          I think Grizzley in the US do the same machine under a different badge, better manuals too and all downloadable.

          #303472
          not done it yet
          Participant
            @notdoneityet

            Does the instructions really matter if the bed length is 6'', 10" or 12"? There are more important features than simply bed length?

            #303473
            not done it yet
            Participant
              @notdoneityet

              Does the instructions really matter if the bed length is 6'', 10" or 12"? There are more important features than simply bed length?

              #303477
              Rik Shaw
              Participant
                @rikshaw

                "Does the instructions really matter if the bed length is 6'', 10" or 12"? There are more important features than simply bed length?"

                The manual would likely detail the overall length of the lathe. Nothing is more important to me as knowing the overall length as it will have to fit in a gap exactly four foot wide – simple innit?

                Rik

                #303497
                Bazyle
                Participant
                  @bazyle

                  The BH600 drip tray is 52 inches long. The lathe might overlap a bit and you want space for the handles and doors to open. Build a bigger shed?

                  The Grizzley 9249 is the equivalent one and the manual is probably 90% the same but there could be differences in details of wiring. But it is "12×37" and you can't tell if they are measuring the same thing for length as Warco so is it a BH600 (no) or a BH900 or a 12×36 ?

                  #303606
                  Howard Lewis
                  Participant
                    @howardlewis46836

                    Have you tried Warco, for a manual?

                    If unavailable, Chester still sell the machine as the Chester Craftsman.

                    Whereabouts are you?

                    I have an Engineers Tool Room BL12 – 24 which is like the above machines but with different paint and dual dials.

                    If the worst came to the worst, if you are in East Anglia, perhaps we could get together and photo copy the relevant bits, (I think that I remember where it is!)

                    Anyone on here who has had one, and sold it, but still has the Operators Manual?

                    Howard

                    #303623
                    JasonB
                    Moderator
                      @jasonb

                      Chester Craftsman manual

                      Howards post reminded me that Chester have their manuals on their forum.

                      Edited By JasonB on 22/06/2017 08:08:24

                      #303658
                      Bazyle
                      Participant
                        @bazyle

                        Useful link. I stand corrected length of tray is 51.5748 inches, roughly.sad
                        Interesting to see the different approaches to manuals. The Chester one has nothing useful on the electrics, the Grizzley one has several pages of circuits plus lots on gear cutting etc but is rather poor on dimensions
                        One vital piece of information is found on page 10 "The lathe on which you will work is used to cut metal". secret So if you forked out £3k thinking it would ice cakes you are in for a disappointment.

                        But it is a nice lathe so you do need a bigger shed so you can fit it in, go on you know you want a bigger shed.

                        #303660
                        JasonB
                        Moderator
                          @jasonb

                          Baz, maybe warco give it a thicker coat of paint!

                          Also don't forget to allow room to remove the cover from the end of the headstock !

                          #303666
                          Rik Shaw
                          Participant
                            @rikshaw

                            Thanks for the comments. Much appreciated.>>

                            The person I am buying the machine from has now found the handbook and I now know that I will have to destroy some valuable bench space to fit it in. A small price to pay I consider as my new acquisition has been housed indoors since new and been used by the elderly owner for ten hours at most. (4x small loco wheels).>>

                            It looks like it has just come out of the showroom with most of the WARCO supplied extras still in wrappers. It seems the poor chap became ill and remained so for many years after buying the lathe. He passed on only recently. I hope I can do his lovely machine justice.>>

                            The build quality appears to be far superior to the present WARCO offerings that I have seen. I have been told by a friend that this is because this model was made in Taiwan in the days before WARCO changed to suppliers in China but my friend might be wrong of course.>>

                            Does anyone know when WARCO stopped supplying this model?>>

                            Rik>>

                            #303677
                            Ketan Swali
                            Participant
                              @ketanswali79440
                              Posted by Rik Shaw on 22/06/2017 15:11:46:

                              Does anyone know when WARCO stopped supplying this model?>>

                              Rik>>

                              Hi Rik,

                              Phone and ask them. I am sure that they will be happy to tell you.

                              Ketan.

                              #303696
                              Bazyle
                              Participant
                                @bazyle

                                I'm sure you are aware of the modifications published by Anthony Mount in ME in 2003/4 which also resulted in some production improvements. G.Howe has some notes on his website.

                                They considered re-introducing it about 4 years ago and had one at the Ally pally show. I asked if it would become a standard part of their range and they affirmed so I walked away reassured that it would be available when I got a bigger shed. However a few months later at the Bristol show they told me it had been dropped owing to lack of interest at the previous show. The reduced cost of gearheads has all but wiped out this model

                                #303705
                                Rik Shaw
                                Participant
                                  @rikshaw

                                  "I'm sure you are aware of the modifications published by Anthony Mount in ME in 2003/4"

                                  Bazyle – I was unaware. I do not read ME on a regular basis. Will have to track down the mods by AM, could make for interesting reading. Thank you for your input.

                                  Rik

                                  #303712
                                  Howard Lewis
                                  Participant
                                    @howardlewis46836

                                    My lathe is actually an Engineers Tool Room BL12 – 24. (But in a different paint scheme, and with metric leadscrews and dual dials.

                                    FWIW, in the hope that this may help you: my experiences:

                                    1) In standard trim there is a ball oiler for the Sliding / Facing self feed contyrol; located under the Cross Slide Handwheel, and so inaccessible. With fear and trembling, I took this off, blanked the hole on the top with a bit of 6mm dia brass, and drilled another 6mm hole on the Tailstock side of the housing where it would be accessible for oiling, and fitted new ball oiler. (obtainable from WARCO or Arc Euro Trade).

                                    2) My thread cutting dial was on the Headstock side of the Saddle, using a bit of card as a template, transferred the position of the tapped hole to the Tailstock side. While at it, marked out the housing and milled it to clear the Tailstock end block acting as bearings for the Leadscrew, Power Shaft and Forward/Reverse shaft. Made sure that everything was clean before reassembly, and hey presto, a little more travel at both ends, for the Saddle.

                                    3) BUT pride comes before a fall, and eventually managed to run the Saddle into the Headstock under power.

                                    This bent the feed pinion and its integral shaft, to some order! Warco quoted £38.60 + carriage + VAT for a replacement; well onto £70! With the invaluable advice of Geoff Halstead, removed the Apron and stripped it.

                                    Bought a length of Silver Steel, (16mm from memory) and a 1.5 Mod (again from memory) gear cutter, (£28.60 in total) Made a new shaft and turned up a blank for the gear. The problems with the HV6 Rotary Table chart are related elsewhere on this Forum, but finally (Right first time eventually) produced a 13T gear and Loctited it into the new shaft and fitted a brass spacer between gear and housing (to replace the shoulder on the original shaft. While at it, turned up a nylon bung for the hole where the large gear passes into the Apron, so as to raise the oil level, to ensure plenty of lubrication for the gears and dog clutches. Replaced everything, but the capscrews for the worm housing were slack so tightened them. WRONG! Could not refit the power shaft, so remove Apron and slacken, before refitting to the Saddle, before tightening the capscrews. Short end of 5mm Allen key is too long to fit between Apron and Bed. Shorten key, good: but now fingers tilt the key so that it still does not engage the capscrews, Drive an extension onto the key to place fingers below the lathe bed. Spent 2 hours, working by feel, to tighten the four capscrews. Hurrah!

                                    While the Apron was off, removed the Rack and ground off the first two teeth (unused) and the next two which had been damaged. Pinion now disengages from rack just before Saddle hits Headstock, but is a little difficult, at times to re engage the pinion with the Rack. Funny but the traverse along the bed feels better than original, or am I kidding myself?

                                    4) Thought that I had primary belt slip;

                                    Horrors!, lathe CLOSE upto wall, no easy access. Actually it was the secondary belt inside the Headstock that was slippng. Eventually found that the short lever on the inside of the Headstock was slightly slack on shaft. Disconnect the linkage and strip out the shaft and short lever. Dimple in shaft is too shallow, hence problem. Deepen dimple and reassemble. Only problem is restarting the pivot bolt into the lever. Lack of space for fingers, but using a screwdriver to provide some end load eventually succeeded. Belt is now tensioned, and off to work we go!

                                    Hopefully you won't have these problems; all solvable; so that you have a good useable machine that will last for many years. Mine is now 14 years old, still accurate, very useable, and apleasure to use.

                                    Howard

                                    #303717
                                    Rik Shaw
                                    Participant
                                      @rikshaw

                                      Many thanks Howard – your info goes into my BH600G file. Valuable? I should say so!

                                      Rik

                                      #303737
                                      Howard Lewis
                                      Participant
                                        @howardlewis46836

                                        Glad to be some help, Rik.

                                        One other comment; found when levelling the lathe, to take out any twist in the bed, that the fixings having, by far, the greatest effect were the two below the spindle nose, rather than at the Tailstock end.

                                        One other memory.

                                        The clamp on the fixed steady is a REAL bind. The bolt keeps dropping out of the slot in the foot. Somewhere in MEW, Neil published my "Fixing a Fixed Steady". Mill slot to take the bolt head. Tap small hole at one end of slot. Put in bolt, and secure a small piece of sheet steel to prevent bolt falling out. Clamping Steady in position is no longer a job for a three handed contortionist; now a straightforward task.

                                        Howard

                                        #303740
                                        Rik Shaw
                                        Participant
                                          @rikshaw

                                          Howard – Invaluable info – thank you!

                                          Rik

                                          #306498
                                          Rik Shaw
                                          Participant
                                            @rikshaw

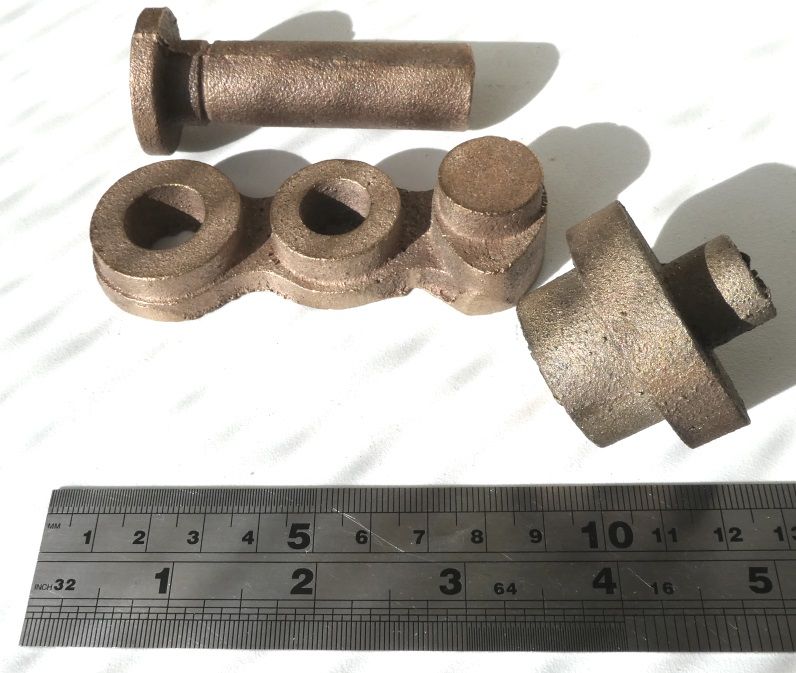
                                            A box of unmachined GM castings came with the lathe and I have identified most of them as being for a loco.

                                            However, three of the castings appear quite unrelated and I was wondering whether they might be a part of a kit for modding the lathe. I have read that the lowest feed rate on the lathe is a mite to fast for comfort and wonder whether these castings together with an extra gear/gears could be configured/machined to provide a solution.

                                            Are the castings lathe related or are they spare parts for grannies mangle?

                                            Rik

                                            3xcastings.jpg

                                            #306642
                                            Bazyle
                                            Participant
                                              @bazyle

                                              To lower the feed rate the most likely solution would be another stud on the banjo if there is room but you wouldn't use castings for that. The top one looks like it could be machined to take the two cored collars from the second. But the rhs of the middle one looks to have an oval flange perhaps combined with the bottom one to form a stuffing box on a piston rod.

                                              #306664
                                              Howard Lewis
                                              Participant
                                                @howardlewis46836

                                                The castings do not look like anything related to the lathe. Possibly they were jobs on the "Round Tuit".

                                                The lowest feedrate quoted for the BH600 is 0.0047"/rev.

                                                I don't think that you can remove the 40T primary gear, and substitute either of the 32T or 36T gears. These seem to be intended to replace the standard 40T gear on the Input Shaft of the Norton Box, to allow certain Metric threads to be cut.

                                                You can reduce the feed rate slightly by running 40:127/120:40, but the decrease is pretty small, (0.00444"/rev).

                                                My method was to make a 80T gear for the Norton Box Input. This interferes with the Gear Cover retaining stud. So having removed the stud, a new tapping needs to be made in the casting, in a more convenient place. Removing the retaining "nut", in my case entailed destroying the plastic knob, to enable the "nut" and its housing to be removed and resited.

                                                If you do not have suitable replacement to hand, it might be advisable to make replacement from Aluminium, (flute or knurl according to your tastes, equipment and abilities) before starting demolition!

                                                With the new 80T in situ, the minimum feed rate of about 0.00225"/rev is achievable with 40:127/120:80.

                                                DO remember that the Norton Box settings will then be those for double what you require; i.e. to cut a 1.5mm pitch thread, set up for a 3mm pitch, (C-1), and so on.

                                                All the above figures rely upon my increasingly fallible memory, and I am too idle to check!

                                                Howard  (typo corrected)

                                                Edited By Howard Lewis on 11/07/2017 13:53:43

                                                #306699
                                                Rik Shaw
                                                Participant
                                                  @rikshaw

                                                  Thanks Bazyle – grannies mangle it is then. Thanks Howard and your 80T gear sounds like the solution. I'll have to see if I can track one down as I MUST crack on with the model I am working on otherwise it will never get completed. As they say, time waits for no man. I think I should have chosen horology instead of steam – at least I could have turned back the clock. vamp

                                                  Rik

                                                  #308287
                                                  Rik Shaw
                                                  Participant
                                                    @rikshaw

                                                    After reading about people having problems swapping pulley positions of the motor drive belt I have removed the motor pulley guard. Changing the belt over is now much easier. If you do yours there are three screws securing it. The ones at either end are OK to get at but the middle one is up inside and a pig.

                                                    Gathered the electrical wiring together and cinched with plastic cable ties. This helps in keeping the loom at a safe distance from the pulleys.

                                                    For the time being I have removed the belt adjuster bolt and nuts and I am allowing the weight of the motor to tension the drive belt. It seems to be OK cutting air but it remains to be seen whether it will be OK under load – I'll see then?

                                                    I must say though, she is a noisy little madam – but then I'm used to that devil.

                                                    In the interests of safety, If you want to carry out this "improvement" and you are under the age of 65 please ask your guardian for permission.

                                                    Rik

                                                    #308296
                                                    Bazyle
                                                    Participant
                                                      @bazyle

                                                      Forgot to mention before but there is a yahoo group called "12×24 import lathes" which is much more wide ranging than the title covering all the far eastern lathes of about this size give or take a few inches including the direct equivalents of the BH600. I think there was something in there about making a motor lift lever coming through to the front for easier operation when changing the belt.

                                                    Viewing 25 posts - 1 through 25 (of 25 total)
                                                    • Please log in to reply to this topic. Registering is free and easy using the links on the menu at the top of this page.

                                                    Advert

                                                    Latest Replies

                                                    Home Forums Manual machine tools Topics

                                                    Viewing 25 topics - 1 through 25 (of 25 total)
                                                    Viewing 25 topics - 1 through 25 (of 25 total)

                                                    View full reply list.

                                                    Advert

                                                    Newsletter Sign-up