Tailstock too high on Harrison M250, how to lower?

Advert

Tailstock too high on Harrison M250, how to lower?

Home Forums General Questions Tailstock too high on Harrison M250, how to lower?

Viewing 25 posts - 1 through 25 (of 43 total)
  • Author
    Posts
  • #202690
    Ian P
    Participant
      @ianp
      I was trying to centre and drill some small holes and discovered that the tailstock was out of alignment.
      I removed the tailstock from the bed, dismantled it and checked for burrs, trapped swarf etc before cleaning and assembling. I was able to precisely (within 0.005mm) align the back to front axis but there is no adjustment for height and the barrel is about 0.15mm high.
       
      I suppose the only option is to remove metal from the base of the tailstock but it does not feel right so I wondered whether anyone else had experienced the same problem or had any other suggestions to improve the alignment?
       
      Ian P
      Advert
      #24076
      Ian P
      Participant
        @ianp
        #202696
        Nick_G
        Participant
          @nick_g

          .

          Are you taking that measurement when both the tailstock and it's quill are tightened.?

          Nick

          #202699
          Nigel McBurney 1
          Participant
            @nigelmcburney1

            Usual tailstock problem wear causing tailstock to be low is common,never had a high tailstock, I assume the lathe was used when you acquired it,if it had been supplied to a training establishment there could be the possibility of tailstocks getting swapped, though I would have thought that centre height between similar lathes would have been very accurate ,I once replaced the tailstock on a round head Colchester with a tailstock from a later square head lathe which aligned very accurately with the headstock, you state that the barrel is .15 mm high, did you measure the error on the o/dia of the barrel or on the the bore of the morse taper, just wondering if the error was in the tailstock bore or if the morse taper was not central to the barrel,worth checking. Yes I too would be wary about taking metal off the base of the tailstock,once off not easily rectified. So I would get a knowledgeable friend or colleague to do an independent check,using his equipment ,just to make sure there is an error and does he get the same error, then come the decisions about rectification ,a very goof surface grinder would be required.

            #202703
            Ian P
            Participant
              @ianp

              I bought the lathe secondhand but the dealer had acquired it off a model engineer and I can only assume its the original tailstock.

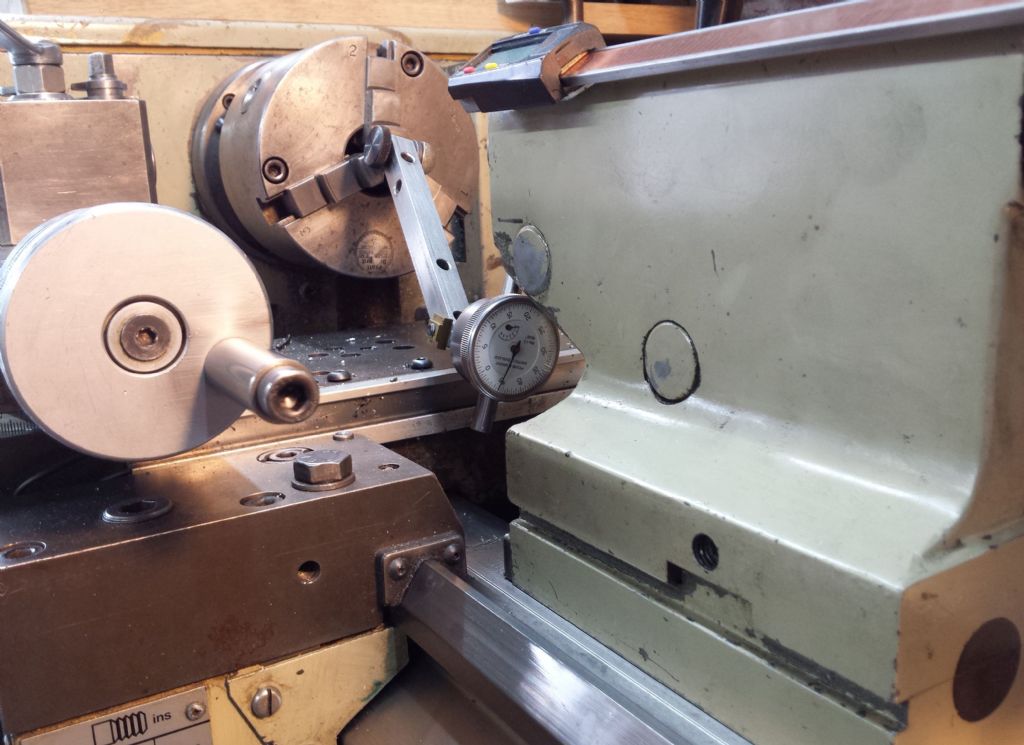
              I measured the error with a DTI mounted in the chuck and read off the error on the OD of the barrel, with and without the tailstock (and the barrel) locked. Interestingly when the tailstock is clamped to the bed the DTI takes a second or so to stabilise as the oil is squeezed out of the bed mating surfaces (the effect is not present when I did the same test 'dry&#39

              I also saw the same 0.015 error when I had the DTI checking the Morse taper bore so at least I know its concentric.

              The barrel is locked by a cam pushing the key upwards so increases the problem, however when using a centre drill, the quill is free so would not matter.

              Ian P

              #202704
              Ian P
              Participant
                @ianp

                Thanks to Graham who has suggested to me (in a PM) that I shim up the headstock rather than remove metal from the tailstock.

                On reflection though I think shimming the headstock might be a lot of work on an M250. Apart from the difficulty of getting shim two thicknesses that work out correct (on the 'V' and the flat of the bed) actually stripping down and installing them would be a major task.

                The tailstock has a separate soleplate so seems a good candidate for surface grinding (not that I have one) although there is a raised (crossways) tenon which separates what would a plain flat surface.

                Ian P

                #202709
                millinghead
                Participant
                  @millinghead

                  When clocking from headstock to tailstock error will be half clock reading,

                  So your tailstock barrel is 0.003" or0.0003"high depending whether clock TIR is 0.15 mm or0.015mm.

                  Also this check does not account. Which way the tailstock is pointing !

                  #202711
                  frank brown
                  Participant
                    @frankbrown22225

                    Could the problem be that the tailstock is actually pointing upwards? Its pivoting on the crossways tenon and needs some shims at its back end?

                    Frank

                    #202716
                    Jon
                    Participant
                      @jon

                      Not forgetting the runout of the DTI being held!

                      Since its a quality machine and unless abused Harrison wouldn't send out with that error, perfectly fine for imports. Steel far superior to Asian imports and wont wear either but the ram will in the casting.

                      There may be adjustment front and back on the bottom, two grub screws. Bigger Harrisons can tilt the tailstock via this a small amount.

                      #202718
                      Phil P
                      Participant
                        @philp

                        Are you sure the tailstock and or barrel has not been strained or bent by somebody using it to lift the machine ?

                        Maybe you could remove the barrel and do your DTI test in the bore of the tailstock casting.

                        Phil

                        #202719
                        Ian P
                        Participant
                          @ianp

                          The difference in reading between the top and bottom of the barrel is 0.015mm so surely I need to lower the tailstock by that amount to correct the error (rather than only half that amount).

                          I did check the barrel at another position after I extended it and did not see much difference. However tomorrow I will check more carefully as a tilted barrel is a possibility.

                          I need to make some Hooke joint shaft couplings to fit a non standard (and non changeable) shaft which is 3.270 diameter (measured with two different high resolution micrometers). I don't want to have reamer made but was hoping to make a D bit or modify a twist drill by trial and error so that I can get a very close fit otherwise the joint will be notchy if not exactly on centre. If when drilling, the drill is not on centre it will bend and I will end up with a bell mouthed hole. One temporary solution might be to mount the drill chuck on a boring head in the tailstock so that I can offset it and correct the error.

                          Ian P

                          #202743
                          Chris Denton
                          Participant
                            @chrisdenton53037

                            Has the headstock been shimmed?

                            #202746
                            Hopper
                            Participant
                              @hopper

                              Many lathes are made with the tailstock slightly higher than the mandrel so that when the tailstock wears it is still within reasonable limits. Even the Schlesinger limits are -0 +.0008" or so for this measurement. And note, this measurement is actual alignment, which is half of Total Indicated Runout. So if you have .003" TIR, that is only .0015" actual shaft offset and probably is just how the manufacturer intended it to be.

                              I would not be too hasty to remove metal from the tailstock or to tinker with the headstock alignment. If you can put a piece of 1" bar about 6" long between centres and turn it parallel within .001" you really have nothing much to worry about. And if it does turn a taper greater than .001", you can adjust that out by offsetting the tailstock sideways without touching the vertical alignment.

                              Those concerned that if we want to drill a .010" diameter hole and the TIR is .003" the drill will be .003" off target and snap etc, should remember that it is only .0015" off centre and no hobbyist tailstock chuck is going to hold a drill to any greater accuracy than that anyhow.

                              Leave well enough alone, I reckon.

                              Edit: PS, just read your correction post. If TIR is .015mm (aka .0006" your misalignment is .0003".

                              And if you are worried about this affecting a 3" diameter drilled hole, just stop it and get turning.

                              If you want those sorts of accuracies you will need a toolroom cylindrical grinder, not a lathe.

                              But in the real world, I would drill undersize and bore to the final diameter. This is the usual way of machining couplings and uni joints of this size. You should be able to bore to .001" to .0005" accuracy if you take small final cuts and allow for spring in the boring bar by taking several cuts at the same setting to get final size.

                              Edited By Hopper on 01/09/2015 06:09:23

                              Edited By Hopper on 01/09/2015 06:11:34

                              Edited By Hopper on 01/09/2015 06:16:25

                              #202749
                              Hopper
                              Participant
                                @hopper

                                PPS, just reread your last post again. If that coupling shaft diameter is 3.27mm, not inches, disregard my misguided waffle about boring etc. D bit makes much more sense at that tiny size! Doh. Getting our inches and MM confused here.

                                But even so, .015mm TIR between mandrel and tailstock is well within the Schlesinger limits and you are not going to get closer than that on a lathe. That is .0075mm misalignment. I'll bet that if you run your lathe for 30 minutes at high speed, heat in the headstock will lift the mandrel by that much. Likewise, I'll bet that your dial indicator set up has more sag than that amount, no matter how rigid you think it may be.

                                #202757
                                Ian P
                                Participant
                                  @ianp
                                  Posted by Chris Denton on 01/09/2015 03:10:50:

                                  Has the headstock been shimmed?

                                  If it has I want some of that negative shim material for the tailstock!

                                  Ian P

                                  #202759
                                  Ian P
                                  Participant
                                    @ianp

                                    Hopper

                                    Boring a 3.27mm hole is a distinct possibility and might be my best option as its not to a great depth. Watchmakers regularly bore diameters below 1.5mm, although it usually only in thin brass plate rather than SS bar.

                                    I'm slightly confused now about TIR numbers in respect of tailstock alignment. If the barrel is 0.015mm high, to me that would be a total error of 0.03mm in terms of the diameter of the rotating workpiece, so a 1mm drill would make a hole 1.03mm diameter (neglecting drill flexure).

                                    Ian P

                                    #202763
                                    David Colwill
                                    Participant
                                      @davidcolwill19261

                                      If you put a 3 morse blank in the tailstock, drill it out and finish with a 2 morse taper reamer you would have an adapter that you could use for fine work. You would need a witness mark on it as it would only be true in one position. Not the best solution maybe but cheap and easy.

                                      Regards.

                                      David

                                      #202777
                                      Chris Denton
                                      Participant
                                        @chrisdenton53037

                                        Was it my imagination or on the Harrison group didn't you say it was 0.15mm out?

                                        #202782
                                        Ian P
                                        Participant
                                          @ianp

                                          Chris, not your imagination. I carelessly used confusing and contradictory readings in some posts.

                                          I have just done some more careful checking, this time I used a plunger type DTI which has half thou resolution (0.0005&quot. The results are very consistent and and I have tested with barrel locked and free and with the tailstock locked to the bed each time.

                                          With the plunger reading the OD of the barrel I get 0.000" at the East and West positions. North reads 0.005" positive and South reads minus 0.005".

                                          Out of interest, with the barrel unlocked firm finger pressure gives 0.001" lateral movement whereas the clamp pushes it 0.002". The action of clamping the tailstock to the bed seems to lowers the tailstock by 0.003" very consistently.

                                          Good news is that I get exactly the same N, S, E & W readings with the barrel fully extended, only difference is my finger pressure gives more deflection as the barrel moves further out of the tailstock bore.

                                          For expediency I will solve the current problem by mounting a chuck on a small boring head so I can offset it the right amount.

                                          Ian P

                                          #202787
                                          Hopper
                                          Participant
                                            @hopper
                                            Posted by Ian Phillips on 01/09/2015 09:00:49:

                                            Hopper

                                            Boring a 3.27mm hole is a distinct possibility and might be my best option as its not to a great depth. Watchmakers regularly bore diameters below 1.5mm, although it usually only in thin brass plate rather than SS bar.

                                            I'm slightly confused now about TIR numbers in respect of tailstock alignment. If the barrel is 0.015mm high, to me that would be a total error of 0.03mm in terms of the diameter of the rotating workpiece, so a 1mm drill would make a hole 1.03mm diameter (neglecting drill flexure).

                                            Ian P

                                            I think maybe we are talking at cross purposes on TIR vs misalignment. Kind of hard to explain clearly in words so here is a diagram that maybe will clarify it some.

                                            So if you have a Total Indicated Runout on your dial gauge of .015MM it consists of the .007MM at the top plus the .007MM at the bottom. So if you move the solid blue circle (tailstock) downwards by .007MM the tops of the two circles will line up. The bottoms of the two circles will line up. Shafts aligned.

                                            It's like when you set something true in the four jaw chuck. You measure the TIR – the total movement of the needle on the dial gauge in a 360 degree sweep – then rotate the job to the high spot and move the job in by HALF the TIR and the TIR will then be zero. You can try this yourself at home.

                                            Either way, even if the tailstock is .03MM higher than the headstock spindle (aka .001" ) That would be exactly how Harrison made the lathe, in order to allow for wear as is normal practice wiith quality lathes. I would not be messing with it. Your drill chuck is not going to be any more accurate than .03MM concentric.

                                            But at .015MM TIR, aka .007MM misalignment, count yourself fortunate, very fortunate, to have a lathe with such good alignment. In old money that is "two tenths of a thou" or exactly three fifths of five eighths of a gnat's left 'un.

                                            And you could always try drilling a 2.7MM hole in a piece of scrap with your current set up and measure what size it comes out. If you round the sharp outer corners of the cutting edges with a rub or two on the oilstone, you will be surprised how close to size a drill bit will drill.

                                            Or you could make a "toolmaker's reamer' by cutting a piece of silver steel bar of the correct diameter at an oblique angle and hardening and tempering it.


                                            Edited By Hopper on 01/09/2015 11:41:20

                                            #202790
                                            Anonymous

                                              How do we know that the 'error' isn't due to an eccentricity of the chuck used to hold the DTI?

                                              Andrew

                                              #202797
                                              Ian P
                                              Participant
                                                @ianp

                                                Andrew

                                                The DTI is mounted a long way off from the centreline of the chuck axis, it has to be in order to orbit the tailstock.

                                                Ian P

                                                #202798
                                                Ian P
                                                Participant
                                                  @ianp

                                                  Hopper

                                                  Sorry I gave some misleading measurement terms but I have redone some tests which you can see a couple of posts previous to this.

                                                  Picture shows the setup

                                                  Ian P

                                                  dti on tailstock barrel.jpg

                                                  #202801
                                                  Keith Long
                                                  Participant
                                                    @keithlong89920

                                                    Ian – if the 3 jaw chuck is not perfect then you need to factor the eccenticity from that in to your calculation of tailstock height error. The DTI being a long way off the chuck centre line is irrelevant – the eccentricity of the axis about which the DTI revolves is VERY important in this measurement, as is any flexing in the DTi mounting – rigidity is everything in measurement like this.

                                                    #202802
                                                    Hopper
                                                    Participant
                                                      @hopper

                                                      ??? so the Total Indicated Runout has gone from .015MM to .15MM to now .010 INCHES, which is 0.25MM? That puts a bit of a different light on things.

                                                      Your idea of using a boring head to adjust for the .005" misalignment is probably the best way to go in the short term.

                                                    Viewing 25 posts - 1 through 25 (of 43 total)
                                                    • Please log in to reply to this topic. Registering is free and easy using the links on the menu at the top of this page.

                                                    Advert

                                                    Latest Replies

                                                    Home Forums General Questions Topics

                                                    Viewing 25 topics - 1 through 25 (of 25 total)
                                                    Viewing 25 topics - 1 through 25 (of 25 total)

                                                    View full reply list.

                                                    Advert

                                                    Newsletter Sign-up