Inlaying silver in brass.

Advert

Inlaying silver in brass.

Home Forums Beginners questions Inlaying silver in brass.

Viewing 15 posts - 1 through 15 (of 15 total)
  • Author
    Posts
  • #10143
    Robin Graham
    Participant
      @robingraham42208
      Advert
      #461177
      Robin Graham
      Participant
        @robingraham42208

        I've had a (sort of) plan to try inlaying silver into brass for a while. Things being a bit slack at the mo, this project has been promoted from the back burner…

        What I want to do is inlay a circle, 1-2mm wide in the face of a 1.5" diameter brass disk. The diameter of the inlaid circle would be perhaps 3/4".

        Plan was to face-groove the brass, undercut the slot with a hand graver and bash some silver wire in. I'd read that silver is soft enough to cold weld at the join.

        Knowing nothing, I bought a length of 2mm square sterling (92.5%) silver wire from Cookson gold. Although this is supplied fully annealed, it is much stiffer than I expected and I can't see it working – especially as it will work harden as I bash it.

        So to my questions…

        1. If I buy fine (99.9%) rather sterling, is my plan feasible?
        2. Cookson supply silver solder at about 75% silver. This has a melting point of about 730C, so should be OK to run into the groove – it's CZ121 brass, apparently 875C melting point. But I don't know how much contrast this alloy will provide. I've tried doing this with Silverflo 55, and there is hardly any contrast with the brass.

        Anyone have any experience with this sort of thing? Any advice would be most welcome. My wife is currently self-unemployed, so funds for unsuccessful experimentation are limited at the mo.

        Take care all, Robin.

        #461179
        Bill Phinn
        Participant
          @billphinn90025

          Personally I wouldn't attempt to inlay the ring of silver by bashing it into an undercut groove; I'd use solder. Make up the ring as near as possible to the exact size of the groove and solder shut using hard solder. Pickle it. Round it on a mandrel and if necessary enlarge or reduce it slightly for a snug fit in the groove. Don't push it all the way down into the groove when test fitting or you will struggle to get it out.

          Next, sweat solder the bottom of the groove using medium or easy solder. Pickle the brass. Flux the groove and the sides of the ring. Lightly tap the silver ring all the way into the groove. Heat the workpiece from below until the solder flows all round; the solder should stay mostly below the surface of the brass unless you used an excess when sweat soldering. A buff with 1200-grit wet and dry should remove any small amounts of solder that may have flowed on to the surface.

          #461204
          Keith Hale
          Participant
            @keithhale68713

            Hi Robin,

            Can't help but wonder what your supplier suggested?

            Your item is not going to be hallmarked so why use a hallmarking grade of silver solder?

            Why not use a more readily available alloy with 55% silver as opposed to the 67% and with a lower melting point and cheaper?

            When I worked as a Technical Sales Rep for Johnson Matthey Metals we made bi-metal sheet and strip by hot rolling fine silver 99.95% into a groove cut into the brass. The resultant slab was then rolled to the finished required thickness.

            So your hot working technique could work.

            Fine silver will work harden, but it will anneal at relatively low temperature. Keep it on a domestic radiator long enough will anneal it!

            Do Cookson sell fine silver wire?

            Got any silver fuse wire?

            Know any electroplaters that might cut you a sliver from an anode?

            Will your local MANUFACTURING jewellery company or bullion dealer provide you with a lead? Forget the high street.

            You could always ask Johnson Matthey!

            If you opt to go down the brazing route consider using a paste containing flux and filler metal in the bottom of the groove. Lay the circle on the top. Heat as suggested by Bill, from underneath.

            Declaration of interest – like the information you can get the paste from CuP Alloys!

            #461338
            Neil Wyatt
            Moderator
              @neilwyatt

              Just fill the depression with silver solder, no-one will ever know the difference.

              Tubal Cain's soldering and brazing book pictures a 'T.C.' done in just this way, using ordinary punches.

              Neil

              #461343
              Plasma
              Participant
                @plasma

                Hi,

                I have used Neil's suggestion on projects before.

                I have stamped text into steel, then run silver solder over it and filed back till the letters are revealed.

                Works well on key fobs, tags etc

                Mick

                #461398
                Robin Graham
                Participant
                  @robingraham42208

                  Thanks for replies.

                  Bill – sounds like you've done this sort of stuff. Thanks for the detailed info – I shall follow up on that, though I think I will have to develop some new skills to do do as you have suggested. But that's part of the thing for me!

                  Keith –

                  "Your item is not going to be hallmarked so why use a hallmarking grade of silver solder?

                  Why not use a more readily available alloy with 55% silver as opposed to the 67% and with a lower melting point and cheaper?"

                  Pig ignorance on my part I'm afraid Keith. I've never worked with silver before, so just did a bit of a search for silver, Cookson popped up, and I bought the 925 thinking 'that's silver, so should be alright'. Obviously there's a lot more to it – I learn from my mistakes.

                  Neil/Mick – I'm confused. I tried using standard 55% silver solder because the rods look silvery enough, but after the solder re- solidified it was brass coloured. When I silver solder steel the fillets are brassy rather than silvery. That's why I was thinking a solder with a higher silver content may be better, to get more contrast.

                  Robin.

                  #461415
                  Bill Phinn
                  Participant
                    @billphinn90025
                    Posted by Robin Graham on 31/03/2020 23:25:55:

                    I've never worked with silver before, so just did a bit of a search for silver, Cookson popped up, and I bought the 925 thinking 'that's silver, so should be alright'. Obviously there's a lot more to it – I learn from my mistakes.

                    Robin.w

                    Keith is talking about the choice of silver solder there though, Robin, not the metal itself [925 or fine].

                    On the choice of solder, I'm not sure where Keith is looking [I'm looking on the CUP Alloys Low Temp Silver Solder page] when he suggests 55% solder [e.g. the 455] is cheaper than 67% solder [e.g. Cookson's Easy silver solder]. Whether you opt to buy Cookson's Easy as a 9g strip or the slightly more convenient 30g, 16.25 metre reel of 0.5mm wire, it appears to work out considerably cheaper per gram than the 455.

                    Counterintuitively, Cookson's own 55% solder [Silverflo 55] is also marginally dearer per gram than their higher silver-content Easy. Perhaps higher manufacturing costs are a factor.

                    #461434
                    Paul M
                    Participant
                      @paulm98238

                      The technical term for what you want to do is damascening. In my days of making jewellery etc, I inlayed steel, brass and silver. The general rule of thumb was to make sure the inlay was a softer metal than the base. When you say bash I assume you will use a hammer which is probably not the best way. Make steel punches with a splayed end a rounded one, without any sharp corners. Having undercut your grooves again with a shop made tool or in your case an engraving tool you should be able to inlay the silver working around with a punch to work the metal into the groove. You need to make sure the gauge of the wire is a little over the width of the slot. If it is too large you will have issues with the metal work hardening and obviously if it is too small in diameter, it will never work into the undercut of the groove. I think the essential thing is to have punches to do the inlay as a hammer will not give you the control.

                      I am sure you will find a demo on youTube.

                      #461436
                      Keith Hale
                      Participant
                        @keithhale68713

                        Hi Robin,

                        See personal message.

                        Keith

                        #461460
                        Kiwi Bloke
                        Participant
                          @kiwibloke62605

                          My understanding (and it's book knowledge only, without personal experience) is that in a/the standard technique, the edges of the undercut groove are raised a little, when the undercut is formed, then worked down again, as the inlay is applied, further securing the inlay. Fine silver seems to be standard, because of its ductility, whereas sterling silver is less ductile. I haven't come across mention of cold hammer-welding of silver, although gold does, of course.

                          Having said that, would a standard engineering approach not work? Can you roll the wire into a square-section ring? A ring 19mm dia, of nearly 2mm square section, is quite substantial. If you can make the ring truly circular, with a well-butted join, or soldered, couldn't you make it an interference fit, where the OD of the ring is a gnat's whatsit greater than the OD of the receiving groove? It wouldn't be terrifically 'strong', but you haven't indicated what this is for. If it's just for looking at, strength is a minor consideration.

                          #461490
                          Tim Stevens
                          Participant
                            @timstevens64731

                            Inlaying has 'always' been done by cutting a groove and hammering in a wire. Cut the groove so that the edges form a burr, and hammer the burr down onto the edges of a half-round wire. It is not 'engineering' in a modern sense, but it is certainly silvermithing. Gold inlay into silver is done just the same, as was silver into steel for posh armour.

                            Cheers, Tim
                            (the last apprentice of the Guild of Handicraft)

                            #461571
                            Tim Stevens
                            Participant
                              @timstevens64731

                              PS It is useful, when hammering the wire into place, to do it on a firm solid surface, so the energy goes into the job and doesn't buckle the background. Secondly, don't use a hammer alone – use a punch with a smooth and slightly convex surface – rounded at the edges. A useful punch can be made from a coach bolt with a 'flat' filed in the middle of the dome, and then polished using emery, wet-&-dry, and finally chrome polish. If you can see your face in the surface that is shiny enough. You might need an assistant to hold the work against the support while you tap, tap, tap. Using a punch should avoid making half-moon marks around the surface.

                              And do a practice run first – copper wire will do for this.

                              Cheers, Tim

                              #461575
                              Bill Phinn
                              Participant
                                @billphinn90025

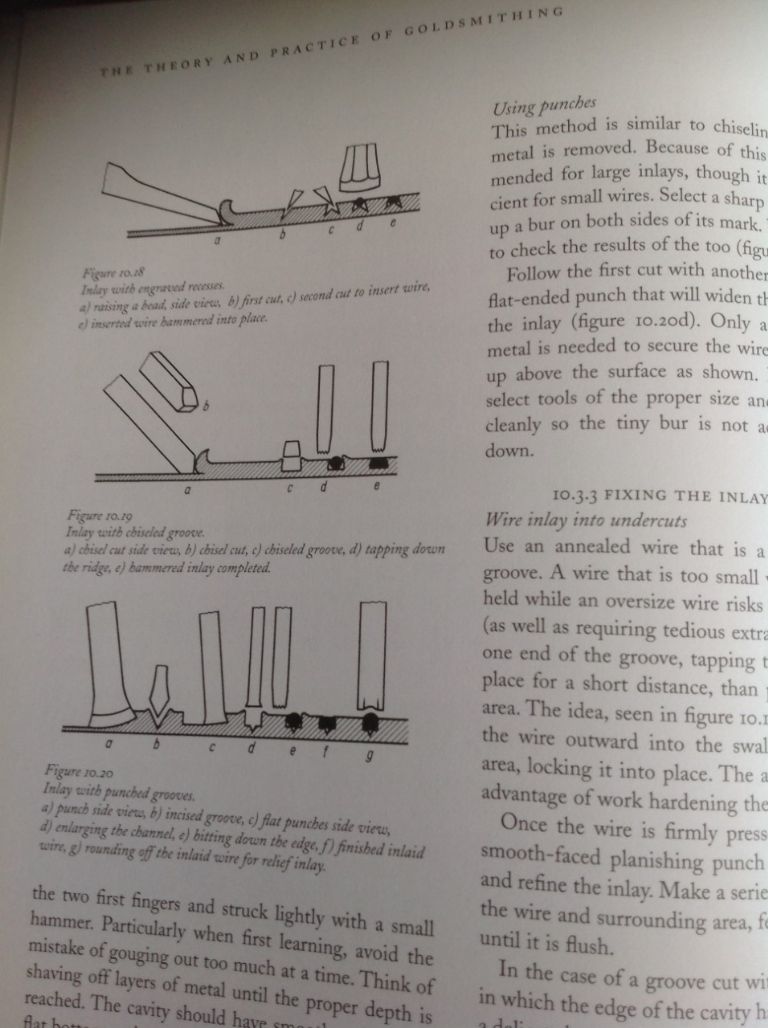
                                Robin, if you do decide to inlay by mechanical means rather than using solder [you'll still need to solder the ring shut and size it accurately first], below is a diagram of the choices open to you.

                                inlaying.jpg

                                #462204
                                Robin Graham
                                Participant
                                  @robingraham42208

                                  Thanks for further replies. I am obviously well out my depth when it comes to mechanical inlaying of silver, but that's OK – it interests me, so I'll learn.

                                  Keith@CuP suggested that as I don't need to worry about the mechanical properties of the inlay – I just want to make a decorative feature – it would be worth considering a tin based soft solder, specifically 96/4 tin/silver. I hadn't thought of that. CuP supply this alloy, but I found a reel of the selfsame stuff (sorry Keith/CuP!) in a drawer. I had a go with it and it will probably give the visual effect I want.

                                  To give some context, I have a commission from a friend to make to make a chaotic (double) pendulum in brass. She's seen the MKIII device, but I thought it would be nice to tart up the MKIV with a bit of silver as it's going to be screwed to her sitting room wall, so should look nice as well as being an entertaining bit of physics. She'd probably value the thing more if I could say that it was silver inlay rather than 'I ran a bit of tin into it, nobody will be able to tell the difference'. It might function and look the same but wouldn't be the same!

                                  Thanks for the scan of the page from The Theory and Practice of Goldsmithing Bill. That's useful, and chimes in with replies from Tim and Kiwi Bloke -for which thanks. I'll get a copy of the book I said to myself, but 70 quid, not going to happen.

                                  Robin.

                                  PS is the 4% Ag in the tin solder there only to inhibit the beta/alpha tin transition (tin pest) or does it have other functions?

                                Viewing 15 posts - 1 through 15 (of 15 total)
                                • Please log in to reply to this topic. Registering is free and easy using the links on the menu at the top of this page.

                                Advert

                                Latest Replies

                                Home Forums Beginners questions Topics

                                Viewing 25 topics - 1 through 25 (of 25 total)
                                Viewing 25 topics - 1 through 25 (of 25 total)

                                View full reply list.

                                Advert

                                Newsletter Sign-up