Improvements to a Linley Mill

Advert

Improvements to a Linley Mill

Home Forums Manual machine tools Improvements to a Linley Mill

Viewing 6 posts - 1 through 6 (of 6 total)
  • Author
    Posts
  • #64391
    Ramon Wilson
    Participant
      @ramonwilson3
      As mentioned elsewhere I have just updated my mill to variable speed control. This is the latest in a series of gradual improvements to this machine over some 35 years.
       
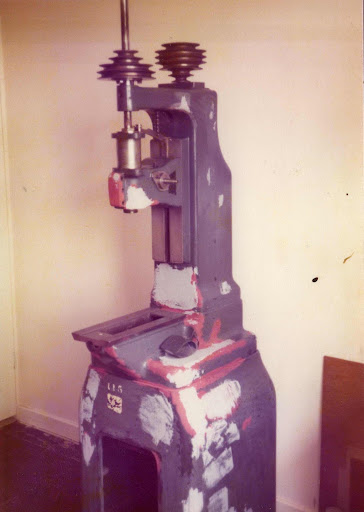
      I bought this small machine in 1977 for the sum of £114 plus a Rodney milling attachment in part exchange. It had no motor and no collets but despite it’s tatty paintwork and the score down one side of the tee slot the bedways were sound without a scrap of wear movement. The seller – GW Machine tools in Norfolk told me it was originally sold as a jig borer but at the time I put this down to sales talk but apparently this is true. When I initially stripped it down I was surpised to find that the leadscrews were ground – perhaps he was right. Last year when considering another machine I was told by someone at Warco -consulting from a book on milling machines that this was indeed so. – he also confirmed after all this time that the collets required were Schaublin.
       
      This is the only pic I have of it as purchased but stripped ready to clean up – it’s sitting in my third bedroom which was my workshop for many years – yes a bungalow in case you’re wondering.

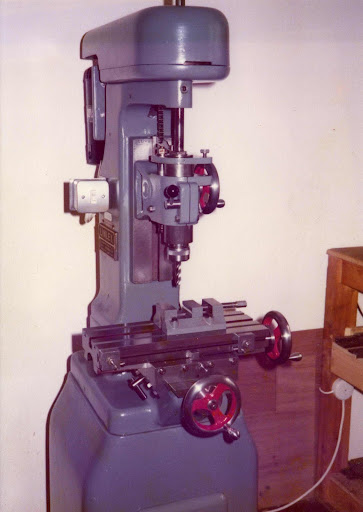
      This shows it after that initial strip and repaint. You will notice it has a very small table -just 16″ long with only 9″ of travel but a good 6″ travel in the Y axis. Its a very substantial piece of kitvery heavy and quite rigid. The early attempt to make a collet and nose piece was not that successful and it was not long before the first modification began.

      The collet shape can best be described as having the appearance of a half size R8. Another attempt at making collets to fit 1/4, 3/8 and 1/2 cutters was made this time utilising the original nose piece. Made from Silver steel and left unhardened they are still in use today though beginning to look a little worn – thing is they still work and are accurate. It would be over twentyfive years before two metric collets were finally made.
       
      The motor was given to me by a work colleague – problem was he lived in Liverpool and I live on the oppposite side of the country and we both worked at that time in Tunisia So he brought it out to the rig as baggage and I brought it back the same way – I can still see it now wrapped in sacking rolling down the carousel at Heathrow – Cor Bet you’d get away with that now eh!
       
      Three years after purchase saw a career change and with it introduction to the ‘real world’ of engineering. Exposure to lots of machines soon led to realising most of the Linleys shortcomings and the first mod took place. The one piece drive shaft and spindle was cut in two, the drive shaft drilled through from both ends and the spindle drilled too. Reassembled with a connecting ring this enabled a draw bar to be used. A range of tooling was then gradually made over the years all the shanks made from tool steel
       
      Clockwise from left – two MT#1 holders, two fly cutters (the shank is interchangeble with the boring head. Small drill chuck (a limitation of the machine) Shell end mill – very rarely used and two FC3 cutter holders with a 10mm weldon shank holder made only recently. The collets are in the middle with the original nose piece (tightened with two ‘C’ spanners)
      A better vise than the Rodney one seen was purchased but apart from that very little was done until the late nineties. However in 1986 my company purchased a brand new Bridgeport and this would make a big difference
      This is getting long so more a bit later.
      Hope this is of interest to someone.
      Regards – Ramon
       
      Advert
      #11750
      Ramon Wilson
      Participant
        @ramonwilson3
        #64561
        Ramon Wilson
        Participant
          @ramonwilson3
          The increase in versatility that the draw bar gave was soon realised but the mill had one big short coming in that it was too short! That cast iron base it sat on was very substantial but far too low. The cross slide handle was at mid thigh level and I’m not tall!
           
          At some stage a decision was made to move it to a welded steel bench previously made and incorporate a drip tray too. At the same time I decided to strip it again and replace the bearings in the headstock. This time the paint was stripped off to the bare metal and repainted with some twenty coats of primer – one in the morn, one at night – house had the faint whiff of cellulose for a few days! Two coats of polyurethane grey top coat gave a finish that, the odd chip aside lasts to this day.
           
          When that new Bridgeport arrived in 1986 I had to ask, well you would wouldn’t you?. So a pattern was made and a new table and handwheel bracket cast at the local founders – now gone and sadly missed. After taking the skin off it sat outside for well over six months before a succession of Friday afternoons saw it milled. A leadscrew was cut too and a new nut made but it would be well into the late nineties before it was finally fitted.
          I found this photo today – it shows the small table still in use and the part is off the
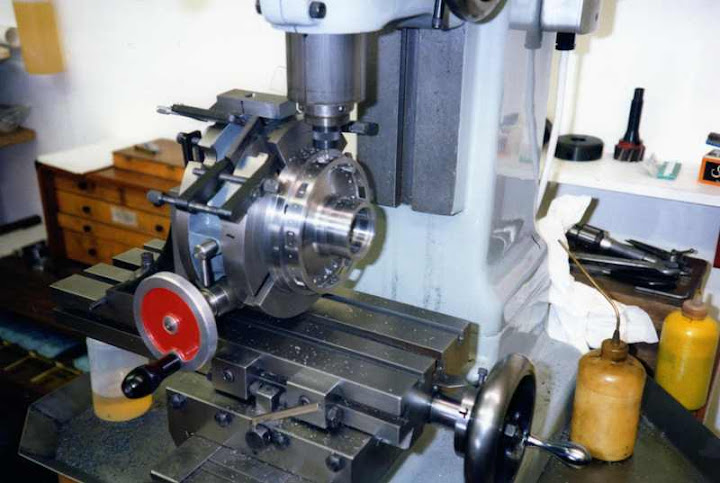
          BR2 which was worked on from ’92 -’96 – I think the table was finally changed around 98-99. It’s also now in the outside workshop. As you can see that table really is quite small. Also note this is pre modification to the R/T. Completely jury rigged stops using clamps but it worked.
          The new table was made in proportion to the saddle roughly the same as the Bridgeport
          and gave a 24″ table with 16″ of travel. The original leadscrew is still on the saddle and has 6 thou of backlash which is not bad for something well over half a century old.
          An Ortec DRO was fitted about 2002 and this latest improvement in fitting a VSD brings it nearly but not quite to staisfaction – A DRO is required for the quill and I reallymust replace that old bolt with a neat handle on the down feed stop bar.
          Here are some pics of what it’s current state is


          As said elsewhere the new motor is of Italian manufacture. Very quiet, very smooth and extremely well priced.
           
          So after some thirty odd years  I’m nearly there with this mill and that really is why I decided to post this. Over those years it has served me well and it’s limitations have been stretched to some pretty alarming distances.
           
          For the newcomer to the hobby there is far more available to you now than ever there was when I set out and particularly on the milling side. Putting aside the question of quality there is a vast amount of kit to tempt you but unless you have limitless resources then  a steady plod will get you there – if not quite as slow as this one.
           
          Regards – Ramon


          Edited By Ramon Wilson on 23/02/2011 21:36:37

          #64574
          Steve Garnett
          Participant
            @stevegarnett62550
            Ramon, that’s truly inspiring work you’ve done. I have a depressing feeling that it’s going to take me about as long to recondition the pile of machinery I’ve got…
             
            Posted by Ramon Wilson on 23/02/2011 21:25:16:

             
            This time the paint was stripped off to the bare metal and repainted with some twenty coats of primer – one in the morn, one at night – house had the faint whiff of cellulose for a few days! Two coats of polyurethane grey top coat gave a finish that, the odd chip aside lasts to this day.
             

            I’m very interested in your painting scheme – did you do all the coats by hand, or were the top coats sprayed? From the photos it looks like an excellent finish.

            #64607
            Ramon Wilson
            Participant
              @ramonwilson3
              Hi Steve,
               
              Yes all the coats were applied by hand but with a very soft brush about 30mm wide. I think even my long suffering but extremely tolerant wife would have protested at spraying cellulose indoors
              The trick after the second coat is to keep the paint thin and get it on without brushing it out as each coat with cellulose disolves a little into the previous one. I gave a quick rub down with wet and dry – I would guess about 320 grit – after each five coats or so.
              As I recall I did not set out to achieve a particularly good finish merely a smooth oneas the previous finish was marred by filled areas that were not level.
              Many who visit still remark on the finish but it came from what’s underneath the gloss not by layers of the gloss itself.
               
              The gloss was International Paints ‘yacht paint’ and is one of the smoothest paints I think I’ve ever brush painted. I still have some left and have used it on at least two models. Regretably other colours tried since don’t have the same characteristic.
               
              Hope that helps – Ramon
              #64613
              Steve Garnett
              Participant
                @stevegarnett62550

                Thank you Ramon – that is indeed helpful!

              Viewing 6 posts - 1 through 6 (of 6 total)
              • Please log in to reply to this topic. Registering is free and easy using the links on the menu at the top of this page.

              Advert

              Latest Replies

              Home Forums Manual machine tools Topics

              Viewing 25 topics - 1 through 25 (of 25 total)
              Viewing 25 topics - 1 through 25 (of 25 total)

              View full reply list.

              Advert

              Newsletter Sign-up