Another rotary table question

Advert

Another rotary table question

Home Forums Workshop Tools and Tooling Another rotary table question

Viewing 25 posts - 1 through 25 (of 45 total)
  • Author
    Posts
  • #232296
    mark smith 20
    Participant
      @marksmith20

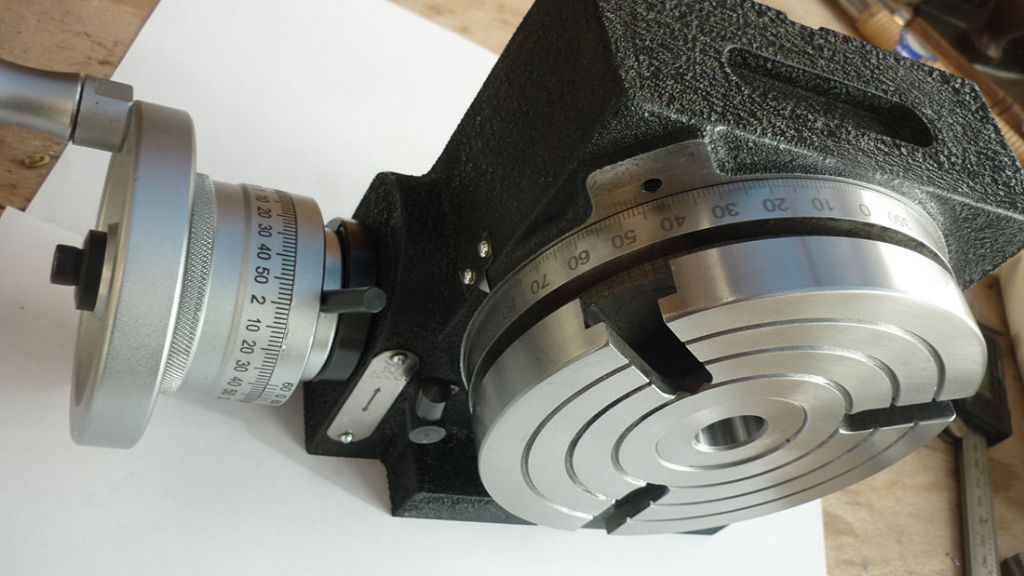
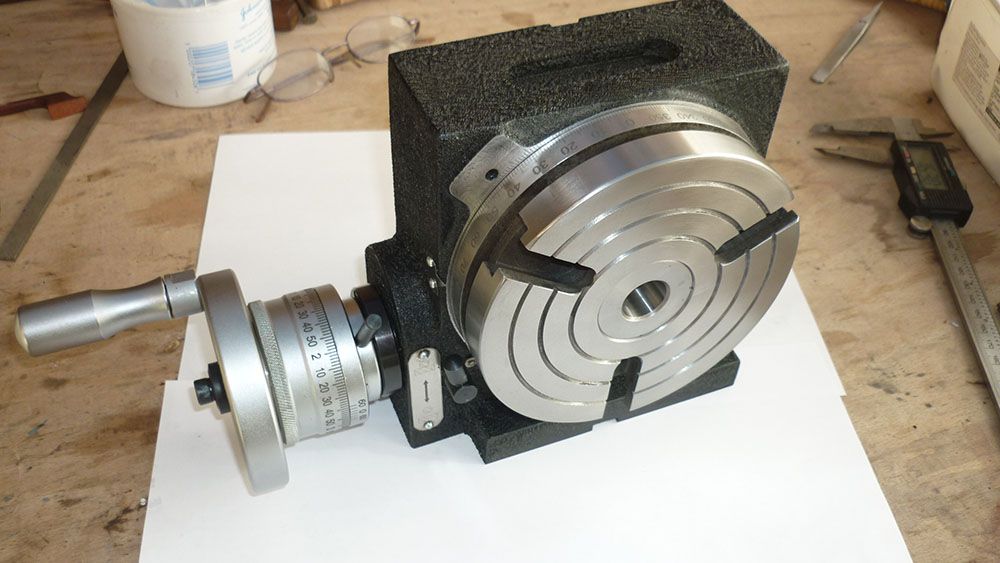
      p1280364.jpgp1280363.jpgHi, Ive never used and as yet dont know how to use a rotary table.

      I just bought a 5" table from warco and im trying to dismantle it to clean it up as i dont like all the razor sharp edges and dirt /swarf inside it.

      Ive got the table removed but im stuck as how to remove the rest of the handle and worm gear ???

      The screw in the side of the casting just seems to turn and nothing has become free. Do you need to press it out or what???

      Thanks

      Edited By mark smith 20 on 29/03/2016 16:52:32

      Advert
      #18040
      mark smith 20
      Participant
        @marksmith20
        #232307
        An Other
        Participant
          @another21905

          Hi, Mark,

          Your table looks very similar to the one I have. Looking at your top photograph, there is a hole in the base just above the axis of the handle. On my table there is an allen-head screw in the hole, which retains the handle and worm drive. If I take it out completely, then the complete handle/wormdrive assembly pulls out of the block.

          #232329
          mark smith 20
          Participant
            @marksmith20

            Hi An other, thanks .

            Thats the hole ive tried ,the screw just seems to spin and do nothing it wont tighten and wont come out of the hole . The whole worm assembly is stuck tight . 


            Edited By mark smith 20 on 29/03/2016 18:48:37

            #232330
            Michael Gilligan
            Participant
              @michaelgilligan61133
              Posted by mark smith 20 on 29/03/2016 18:47:52:

              Thats the hole ive tried ,the screw just seems to spin and do nothing it wont tighten and wont come out of the hole . The whole worm assembly is stuck tight .

              .

              I'm not 'knocking' manufacturer or supplier, BUT

              There is significant risk that the hexagon has been rounded, and that your key is spinning in it.

              My 'first next step' would be to visually inspect whatever you can see down the hole [a small LED on a wire is a great help]

              MichaelG.

              #232331
              An Other
              Participant
                @another21905

                Michael beat me to it – maybe I should have said – i think these things are Chinese, and I've had problems with both the size of the hexagons (too loose for the correct key), or soft metal. Maybe I shouldn't admit it here; but I ended up finding an old key that was too big, grinding it to 'a close fit', then hammering it (gently!) into the screw.

                That said, do as Michael suggests first. If the key isn't slipping in the hexagon, then it looks like a stripped thread. I'll take a look at mine in the morning and see if there is any other solution. (sorry – its very late evening here).

                #232341
                mark smith 20
                Participant
                  @marksmith20

                  Hi,

                  Hexagon Allen key hole is fine looks like the head has sheared from the screw . Probably when manufacturer tightened too much.

                  I cant even get the loose head out ,i wish  i`d noticed this before id took it apart as i would have sent it back.

                  Whats the screw go into ,some sort of groove in the worm shaft?

                  I may have to drill it out.

                  Edited By mark smith 20 on 29/03/2016 19:54:32

                  #232354
                  An Other
                  Participant
                    @another21905

                    Hi, Mark,

                    If your table is the same as mine, the handle and worm assembly is mounted in an eccentrically drilled cylinder. If the screw we are talking about is loose, then the cylinder can be turned to adjust the engagement of the worm and table gear. The hole the cylinder fits into is split, and allows the hex screw to slightly close the block and clamp the cylinder.

                    That raises the point that if the screw head has broken off, there should be no clamping, so the handle/worm/cylinder assembly should pull out. Mine was quite stiff, and took quite a pull to get it out.

                    If this is your case, you may then be able to get the bolt shank out of the hole without drilling it, if the cylinder is out of the way.

                    Sorry – need to sleep now, but I'll look at mine in the morning, and see if I can take a picture with it dismantled. I have to admit that I'm giving you advice from memory, so I will check to be sure.

                    #232380
                    Simon Williams 3
                    Participant
                      @simonwilliams3

                      Hi

                      I can see the logic that says "you took it to bits – so the warranty is now void" – (and anyway you can't put it back together if it's broken) – but you didn't break it, or if you did it's because of a manufacturing fault in the first place.

                      You only took it to bits to save the supplier the trouble of replacing it with one that wasn't full of c##p. That doesn't relieve the supplier of his duties under the sale of goods legislation.

                      I'd be inclined to have an open and honest conversation with the supplier at this point. You have the right to expect a serviceable item for your money, even if it does have some sharp edges you'd rather round off. I don't see you've invalidated the guarantee by trying to repair/improve a poorly made item, and discovering it's faulty in the process.

                      As the original "I can fix this if I could only work out how" delusionist I understand the incentive to make a silk purse out of a sow's ear, fix it yourself and not invoke the Sale of Goods Act, but now you've found a fault and it might not be easily surmountable, you still have the option (I believe) to ask for a replacement.

                      Good luck with it

                      Simon

                      #232383
                      Mike Poole
                      Participant
                        @mikepoole82104

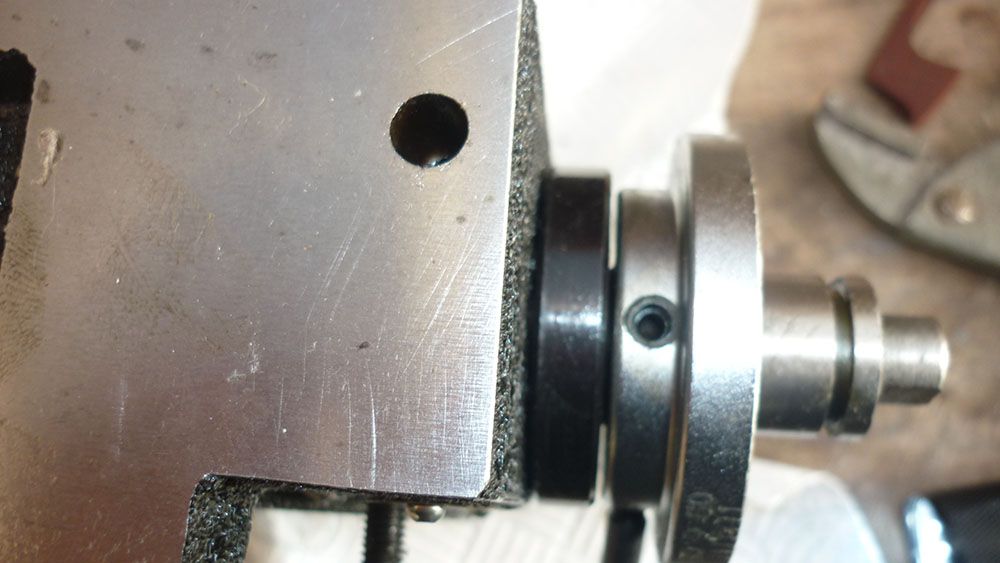
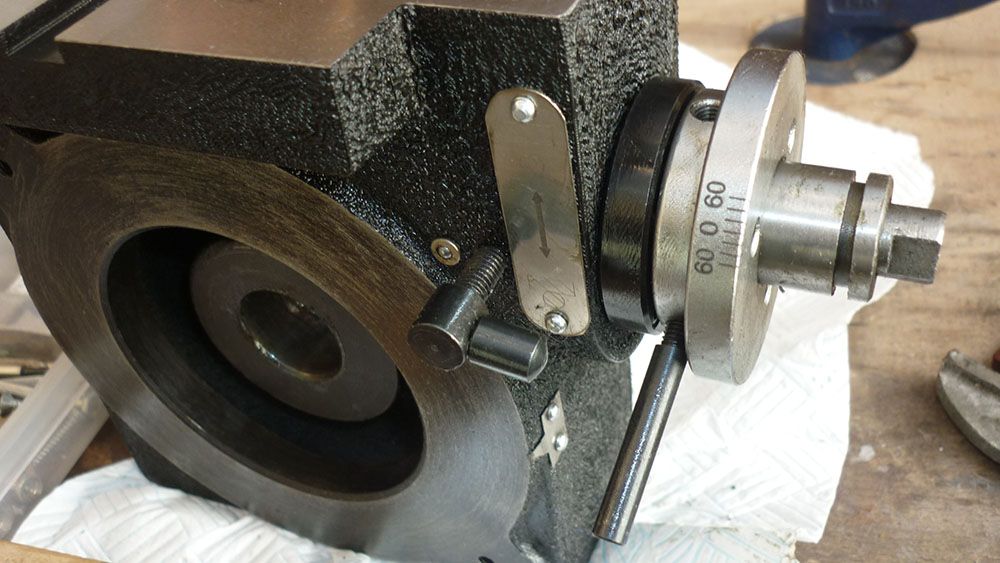
                        If you remove the collar with the 60-0-60 graduations you should be able to remove the black ring behind it, loosen the black locking screw and see if it will slide out, there are usually two screws that limit the rotation of the cartridge to disengage it from the table to allow quick positioning.

                        Mike

                        #232428
                        An Other
                        Participant
                          @another21905

                          Hi, Mark,

                          First, I have to apologise – after looking at my table, it looks as though it may be the same manufacturer, but slightly different design. The handle assembly and seating for the table seem to be identical, but the block looks slightly different.

                          In the side of the block, where the handle/worm is mounted (I think that is the side facing away from the camera in your bottom picture) is an M4 grub screw. This locates in a groove turned in the cylinder carrying the handle/worm.

                          The hole the cylinder fits into has a split on each side for about 2 cms, and an allen head screw fits to one side of the hole through the split. When it is tightened it clamps the cylinder in the block. I have to loosen the allen screw to slacken the clamping off, then remove the grub screw completely to be able to withdraw the cylinder/handle/worm. Just slackening the clamping screw allows the cylinder to be turned, and to set the worm/table gear engagement.

                          I'm sorry if I've misled you, but I guess that if it is the same manufacturer, then same or similar clamping arrangements will apply. In that case, is there a grub screw anywhere around the block close to the handle. One word of warning – my 'grubscrew' was more like a piece of soft metal with grooves in it, and it was difficult to tell it had a hexagon in its end. I replaced it with a better quality one – at least the thread in the hole was OK.

                          #232454
                          mark smith 20
                          Participant
                            @marksmith20

                            Hi Another and Michael,

                            I followed Michael`s advice and removed the collar with 60-0-60 degree graduation on. I was at first unsure how to do this ,as i initially thought that the holes around the parimeter were just for the bar handle lever. I couldnt see the hexagon grub screws in the bottom, once these were slackened the collar came off no problem.

                            Another your table is proably somewhat similar from what i can find our ,they are either made by an Indian company called Saral tools or in China by a company called DC machinery. Going by the shape of the main wheel handle mine looks like the Chinese one . A supplied manual or parts list would have helped,i got nothing.

                            The problem was when i looked into the hole in the casting all i could see was a hexagonal hole that looked like a hex head machine screw ,so i was trying to remove it to no avail. I drilled out the hole about a mm larger to get a better view and cleaned all the dirt and gunge out and then only discovered another hex head grub screw about M4 and around 20mm long. I had to remove this almost whole the way until the main shaft/worm came out easily .

                            Turns out the grub screw was located in an oversized depression which seems to allow about a 10degree movement left or right .

                            I`ll post some more photos.

                            Ive cleaned up the worm and some nasty burrs etc which are obviously stopping smooth movement..

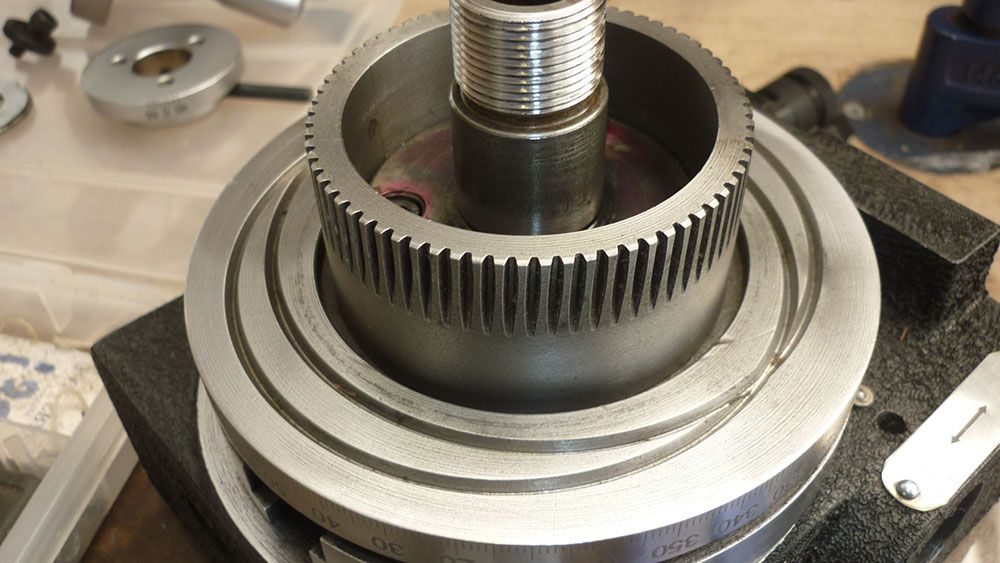
                            I`m still unsure which are the mating surfaces between the main table and the centre of the casting,everything is roughly finished . Obviously the centre of the worm gear slides in the centre of the casting but does the underneath of the big worm wheel also slide on the casting ?

                            Hard to explain without photos.


                            Edited By mark smith 20 on 30/03/2016 12:33:15

                            #232477
                            mark smith 20
                            Participant
                              @marksmith20

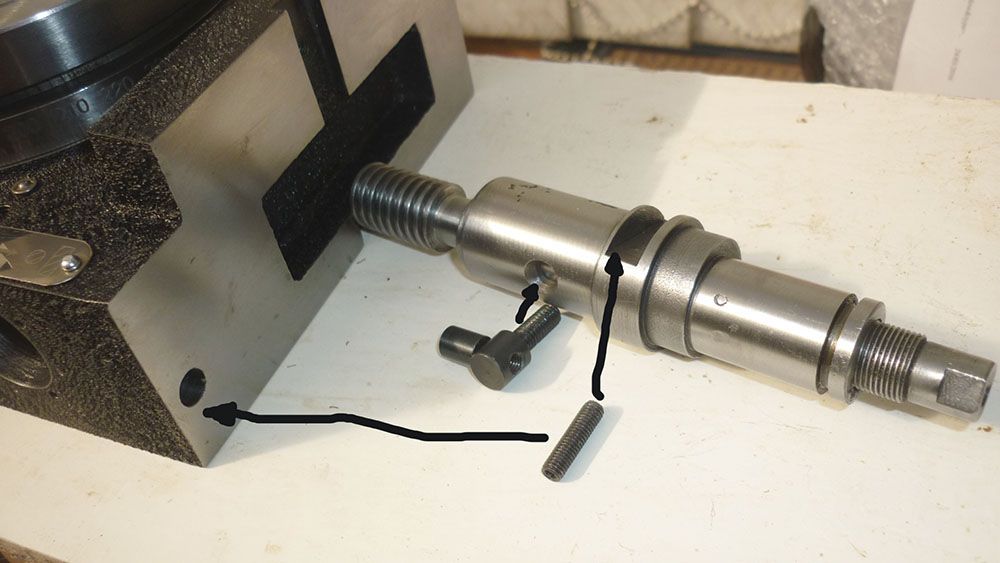
                              p1280381.jpgHeres a couple of photos , the second  shows where the set screw mates with the shaft ,seems a large cut out of the shaft for such a small m4 screw.

                              The first shows the worm reattached to the underneath of the table after removing heaps of dirt/swarf and grease.The red areas i was checking to make sure that this area wasnt contact the centre of the table as there seemed very little clearance about 1mm and the three holes had massive burrs round them.

                              Whats the best lubricant for these tables, grease on the worm and something like slideway oil (such as nutto 68) for the table mating surface?? And 32 on the shaft?

                              p1280389.jpg

                              Edited By mark smith 20 on 30/03/2016 14:06:01

                              Edited By mark smith 20 on 30/03/2016 14:08:43

                              Edited By mark smith 20 on 30/03/2016 14:09:16

                              Edited By mark smith 20 on 30/03/2016 14:15:10

                              #232522
                              mark smith 20
                              Participant
                                @marksmith20

                                Put it alltogther now i cant get to work properly , i have no experience of rotary tables ????

                                Even the table clamps are catching on the little oil bearing port on the side of the table.

                                maybe they only work full of filth and chips.blush

                                #232544
                                An Other
                                Participant
                                  @another21905

                                  Hi, Mark – apart from the shape of the block, the bits of my table look exactly like yours. I don't have the big cutout in the eccentric cylinder for the handle/worm grubscrew location – mine is just a shallow groove all the way round the cylinder.

                                  I also got no instructions. (Suspect Chinglish would have been hard to follow anyway). When I reassembled mine, I gently turned the entire eccentric handle mounting cylinder (Don't know what else to call it), until I could feel that the worm was engaged with the table gear (turn the handle a bit), then adjusted it until I could fell no backlash in the handle or by trying to turn the table. I don't know if this is correct, but lack of instructions…. After I had used it for a while, I repeated this process, as it seemed to have 'bedded' in or settled down a bit.

                                  I assume yours used to work before you dismantled it, so the handle should fit back in approximately the correct position because of the slot for the grubscrew, so you should only have to turn it a short way to get the correct position. Since I set it up like this, it has worked fine – no perceptible backlash.

                                  I suspect the big slot is to allow some In/out adjustment as well as rotary adjustment, so a slot would be cheap and easy to machine. I can't adjust mine in the In/out direction: it must fit fully home so I can get the grubscrew to locate in its groove. Check the grubscrew is OK – threads and hexagon – be a shame to get it back together only to find later that the grubscrew is knackered.

                                  If you find things are touching that shouldn't, try putting it together 'one piece at a time'. Fit the table without the handle, and ensure that it rotates freely. If that is OK, then push the handle into place, and ensure it all turns freely and smoothly before tightening the grubscrews and locking screws. I don't know if it correct, but I used some grease on the worm/table thread (didn't like the idea of it turning 'dry', and thin oil on other bearing surfaces. Maybe someone else some advice on this.

                                  Sorry about the 'technical' terms – I can make it work, but I don't know what the bits are called, so I hope you can follow my description.


                                  Edited By An Other on 30/03/2016 19:45:58

                                  #232550
                                  mark smith 20
                                  Participant
                                    @marksmith20

                                    img155.jpgHi An other, thanks. I have removed bits and reassembled several times since earlier. It works pretty smoothly `without` the table clamps I dont know what the problem has suddenly become with them the shafts are right up (around 1/2mm gap)against the table edge and hitting the oil port. cheeky

                                    One thing thats bothering me is i can turn the table by about a full half a degree either way when i stop turning . Which is going to make it difficult to use accurately . (i bought it to cut a pinion for a lathe ) and havent dividing plates.)

                                    I cant figure out how to adjust this out . I noticed when i had it apart that the worm shaft only seemed to engage fully with the worm gear under the table when it is exactly in the middle of the `wormed area` of the worm gear . So maybe its the vertical height of the table central part that is slightly out during manufacture . As in diagram above if the height is different either way in the direction of the arrow then it doesnt engage fully????

                                    I cant see anyway of correcting this or figure out what the adjustment set screw in the casting body is meant to do??

                                    Edited By mark smith 20 on 30/03/2016 20:05:08

                                    Edited By mark smith 20 on 30/03/2016 20:06:49

                                    #232600
                                    Roger Head
                                    Participant
                                      @rogerhead16992

                                      Mark, have a look at the Grizzly site for their RT manuals. You may not find the (essentially) same one as yours, but the general principles are much the same. I would expect that you will find an adjustment that controls the limit of the 'engage' movement of the worm engage/disengage lever. That final engaged position controls the amount of backlash between the worm and wheel.

                                      Roger

                                      #232601
                                      Peter Krogh
                                      Participant
                                        @peterkrogh76576

                                        Mark, that long setscrew that engages the slot in the worm shaft eccentric is used to adjust the 'throw' of the eccentric.

                                        The adjustment is sensitive but done carefully should allow the worm engagement to be just right. On mine I had to make the slot a bit longer on the 'disengage' end to allow full dis-engagement.

                                        I use grease on the worm and machine oil on the table and other oilers.

                                        Pete

                                        #232690
                                        mark smith 20
                                        Participant
                                          @marksmith20

                                          Roger and Peter thanks,

                                          I had forgot to put the thrust bearing in under the table ,I did this and tried again without the table clamps ,it worked great for a couple of minutes and that loose table movement of a full degree i could do by hand had gone.

                                          Then suddenly it all locked up and everything has gone down hill since,no matter how much i fiddle. I am having a problem setting the locking collar? (with the lever on ) in the correct position .Unsure even what the correct position is.

                                          The set screw that engages the shaft cut out from the side of the casting is driving me crazy ,no idea how much or where the correct adjustment should be . I wish i had left the thing as it was with all the dirt and sharp edges.

                                          Im ready to throw the table over the hedge .angry

                                          #232705
                                          mark smith 20
                                          Participant
                                            @marksmith20

                                            p1280394.jpgWell after all the effort and trying allsorts of adjustment s ive finally done it i thinksmiley

                                            The side screw is very sensitive and there is now almost zero back lash .

                                            I wont be dismantling it again in any hurry.

                                            Thanks to all suggestions. Just need to sort out them stupid table clamps!

                                            Another couple of photos.p1280390.jpg

                                            Edited By mark smith 20 on 31/03/2016 17:36:33

                                            #232741
                                            Paul Lousick
                                            Participant
                                              @paullousick59116

                                              WARNING.

                                              Ensure that the worm screw is adjusted so that it is fully engaged with the worm gear when you are the rotary table.

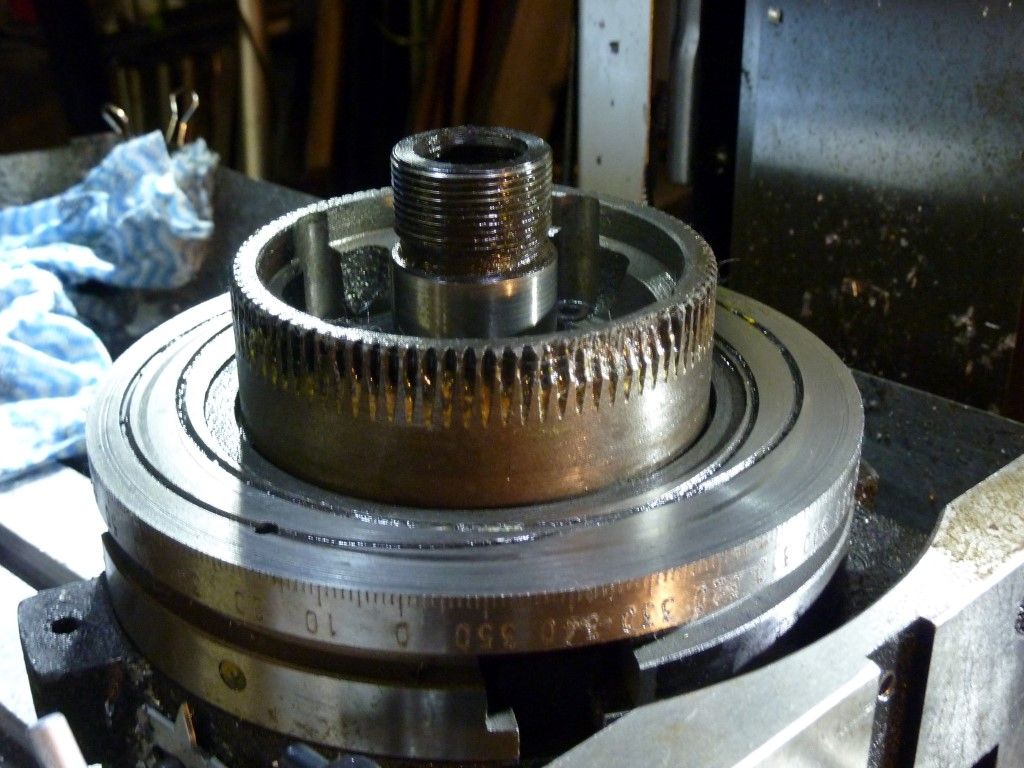
                                              The engaging ring (the one with the small lever) has a tendency to undo when taking heavy cuts. The vibration caused by the flutes on the milling cutter will undo the ring and the worm will only be engaged with the tips of the teeth on the worm gear. The gear is only made from cheap steel and the teeth can break (see photo). The clamp screw (screw with small tee handle) which is supposed to lock the engaging ring does not always work.

                                              Paulrotary table gear.jpg

                                              #232755
                                              Roger Head
                                              Participant
                                                @rogerhead16992

                                                [Quote]

                                                WARNING.

                                                Ensure that the worm screw is adjusted so that it is fully engaged with the worm gear when you are the rotary table.

                                                The engaging ring (the one with the small lever) has a tendency to undo when taking heavy cuts. The vibration caused by the flutes on the milling cutter will undo the ring and the worm will only be engaged with the tips of the teeth on the worm gear. The gear is only made from cheap steel and the teeth can break (see photo). The clamp screw (screw with small tee handle) which is supposed to lock the engaging ring does not always work.

                                                [/Quote]

                                                +1 Never a truer word written.

                                                That gradual backing-off of the engagement lever increases the effective backlash of the system. If you are climb milling taking light cuts you may not notice it, but if your cut terminates at a feature which presents a slightly greater area to the periphery of the cutter, you can get a fairly violent 'dig in' . With a big cutter this can cause significant loads that can shift your workpiece even if it is clamped really well.

                                                He's also correct about that little thumbscrew clamp.

                                                Roger

                                                #232760
                                                Paul Lousick
                                                Participant
                                                  @paullousick59116

                                                  Roger,

                                                  Backing off of the engagement lever not only increases the backlash but increases the stress on the teeth because the load is only taken on the tip of the tooth.

                                                  I was conventional milling with the rotary table to try and eliminate backlash and was actually applying pressure by hand to keep the worm gear in mesh when the breakage happened. I did not notice that the worm engagement was coming loose.

                                                  Problem was that I was using a 6" rotary table to machine a 250mm dia x 16mm thick piece of boiler plate (460 MPa) which is not easy to machine. The Rotary table was not one of the cheap Asian clones but a good one, made in Japan. To replace it I bought one of the cheap clones but was not as good as the original. Since then I have replaced the worm gear ($150) on the original.

                                                  Paul.

                                                  #232761
                                                  Paul Lousick
                                                  Participant
                                                    @paullousick59116

                                                    Roger,

                                                    Backing off of the engagement lever not only increases the backlash but increases the stress on the teeth because the load is only taken on the tip of the tooth.

                                                    I was conventional milling with the rotary table to try and eliminate backlash and was actually applying pressure by hand to keep the worm gear in mesh when the breakage happened. I did not notice that the worm engagement was coming loose.

                                                    Problem was that I was using a 6" rotary table to machine a 250mm dia x 16mm thick piece of boiler plate (460 MPa) which is not easy to machine. The Rotary table was not one of the cheap Asian clones but a good one, made in Japan. To replace it I bought one of the cheap clones but was not as good as the original. Since then I have replaced the worm gear ($150) on the original.

                                                    Paul.

                                                    #232780
                                                    mark smith 20
                                                    Participant
                                                      @marksmith20

                                                      Hi Paul, i did notice the metal looks to have the consistancy of hard cheese, and its good to see an illustration of how damage can occur.

                                                      What it be better to fit some sort of locking pin into where the clamp screw goes , as this would prevent the shaft moving even if the locking collar vibrates loose????

                                                    Viewing 25 posts - 1 through 25 (of 45 total)
                                                    • Please log in to reply to this topic. Registering is free and easy using the links on the menu at the top of this page.

                                                    Advert

                                                    Latest Replies

                                                    Viewing 25 topics - 1 through 25 (of 25 total)
                                                    Viewing 25 topics - 1 through 25 (of 25 total)

                                                    View full reply list.

                                                    Advert

                                                    Newsletter Sign-up