Acute (a cute?) tool sharpening system

Advert

Acute (a cute?) tool sharpening system

Home Forums Workshop Tools and Tooling Acute (a cute?) tool sharpening system

Viewing 25 posts - 26 through 50 (of 62 total)
  • Author
    Posts
  • #214457
    Danny M2Z
    Participant
      @dannym2z
      Posted by Bill Wood 2 on 14/11/2015 10:38:51:

      Posted by Danny M2Z on 09/11/2015 06:47:00:

      My last set of soft jaws (to hold a Cox engine backpate) went like this.

      I don't understand this description – any pictures / web pages / previous threads that might help me please ?

      Bill

      Bill, I only just spotted your query so replied in another thread – Small Soft Jaws.

      * Danny M *

      Advert
      #214461
      John Haine
      Participant
        @johnhaine32865

        IDP, I find Gary responsive through the contact form on his website, and I think he also keeps an eye on this forum.

        #214474
        Eccentric Engineer
        Participant
          @eccentricengineer

          Hi All

          IDP, sorry you haven't heard back from us yet, was it me you tried contacting about the book or my sister Tania ?

          If you tried Tania sometime in the last few days she may not have got the message or call yet as she has a stand at the Stitches and Craft exhibition in Harrogate this weekend.
          She makes and sells Textile artworks and engineering tooling, it's an obvious link reallysmiley

          I'll email Tania to make sure she received your enquiry and I'm sure she'll send you a reply as soon as she gets back.

          On another note.
          I've finally decided to launch the Acute Sharpener parts kits on the website shop but without the DVD at the moment as the filming is taking so long. At least customers such as John that are confident enough to build it from the drawings can get started now.
          My workload over the last six months just hasn't allowed me to find all the additional hours required for the filming and editing of the DVD which I had no idea would take so long, so I apologise to all the customers that have been waiting all this time for the kits.
          Tania should be receiving another shipment of kits from me later this week by the way.

          Well done on the excellent build thread John, it looks like you're almost finished now.

          Cheers

          Gary

          #215621
          John Haine
          Participant
            @johnhaine32865

            Well, things have been happening though I haven't posted for a week or so. The unit is basically complete and I have made one end mill holder for 1/2" shanks from one of the blanks supplied. Not yet tried in anger. One or two small errors caused by my trying to "improve" on the design which led me a little astray but nothing irrecoverable.

            I have three things still to do. One is to set up a grinder with a CBN wheel, on its own base board that the Acute can mount on. I'll need to make some raising blocks for my 6" Elu grinder to give enough height. I also want to make it so the Acute can mount at each end.

            One of my main jobs for the system will be to sharpen mills for my Novamill which has ER16 collets. As I have a set of these I want to make an ER16 holder, and I'm going to try to make a 12-sided dividing collar 25mm a/f which will fit just behind the chuck so I can use the same thing for 2, 3 and 4 flute cutters.

            I also want to make a dedicated tool block for square tool bits, as I don't have facilities to broach out the blanks supplied.

            I'll get some more photos up of the story so far at the weekend, and of these additional jobs as I go.

            #216215
            John Haine
            Participant
              @johnhaine32865

              Some more progress.

              img_0853.jpg

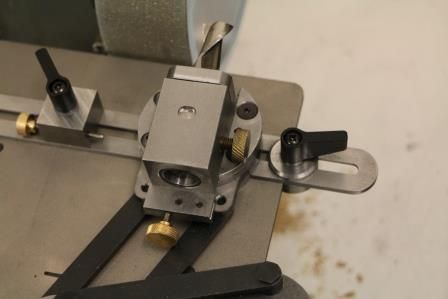
              Here is the unit set up temporarily on my grinding bench. I've bought a CBN wheel and fitted it to my ELU grinder (much easier than I expected, though I need to extend the guard to cover the wider wheel). Note that I have replaced the lever screw that clamps the cutter holder with a brass thumb screw – this is easier to use as the lever I found didn't give enough rotation to clamp the holder without fouling the tool block, so you had to take the tool block out of its slide. Also I found that the square end on the holder, which indexes the cutter, fouled on the bottom of the slot in the tool block and prevented the latter sitting snugly in the slot. The tool block is made 25mm square but the square flange on the holder was 25.4mm, 1", as shown in the drawing. This doesn't seem right to me so I milled a shade off each face of the square down to 25mm and it now fits much better.

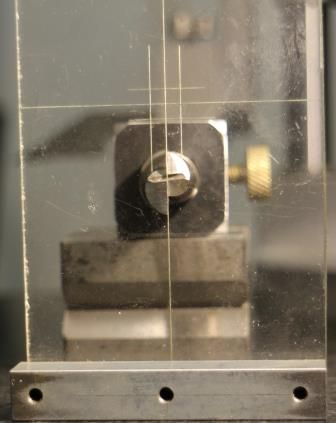
              In order to align the cutter to the sides of the square holder I used a simple optical aid I made years ago.

              img_0860.jpg

              This is a scrap of perspex screwed onto a bit of square bar sitting on my surface plate. The tool block perches on a Vee-block (just for height). There's a vertical line scribed on the perspex and you just align the cutter edges to this as in the photo. I'll get around to making a dedicated version for the Acute later (when a get a "tuit" I expect).

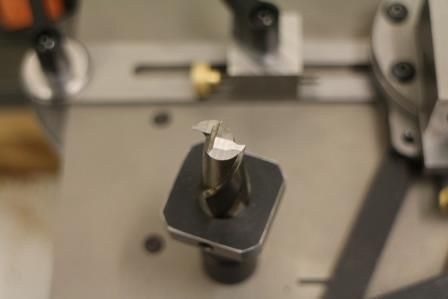
              I've had a go at 2 cutters so far. The first was a 1/2" end mill, which I now realise had been sharpened quite a lot before I got it (very surplus). This tirned out to really need re-gashing so the sharpening didn't go well – back into the "too sharpen" box with it! So then I tried a 1/2" slot drill, shown mounted in the photo. This went fine, here is the result.

              img_0855.jpg

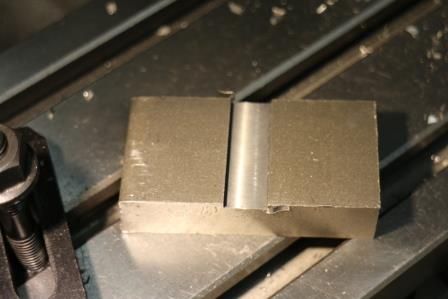
              Mounted this on the mill and took a trial cut on a block of mild steel, feeding the cutter straight down as shown in Gary's example video, about 2.5mm, then elongated the hole into a slot. The mill cut very nicely, making a nice "chuffing" sound and freely generating chips. Obviously it sharpened well – here is the end result –

              img_0861.jpg

              Things to do still…make a 12mm holder…make the ER16 holder with a 12-sided dividing flange (drawn up but needs making)…make a slotted tool block for grinding lathe tools (especially for my "Diamond" tool holder)…tidy up the grinder by making a wider guard and mounting the whole caboodle on its own base…and get a lot of practice!


              Edited By John Haine on 13/12/2015 17:13:26

              #216351
              Vic
              Participant
                @vic

                That clearly worked well. Good job!

                #217228
                John Haine
                Participant
                  @johnhaine32865

                  Thanks Vic – all credit to Gary's design really.

                  Very slow progress over the last week. One thing I have clarified with Gary is that I shouldn't have milled down the "dividing square" on the tool holder to 25mm – the idea is that the holder and block sit on the front end of the holder and back edge of the block to ensure the holder is in its exact position – Gary points out that if the 25mm square is not quite concentric with the holder shank there could be a small error in one or two positions. I see what he means – I took great care to ensure the square was concentric, but I'll think twice before modifying another one.

                  I've made a start on the ER16 collet holder, so far just making sure I can screw cut the M19x1mm thread for the mini clamp nut – previously I haven't had much success CNC threading on my converted S7. Worked on a scrap of 3/4 FCMS bar, with a bit of fiddling and editing the g-code generated by the Mach 3 Simple Threading wizard to stop the tool crashing into the chuck (!) I managed to form a nice well-fitting thread second try. Then drilled the bar out 11 mm and tried making the taper – this was a bit more fiddly as I need to find a satisfactory way to reference a boring tool, but eventually able to make a well fitting ER16 socket as well. So much for the practice – now to put it into action "in anger". I'll take some photos as I'm making the "proper" component – hopefully this coming week.

                  Edited By John Haine on 20/12/2015 18:27:04

                  #217248
                  Simon Collier
                  Participant
                    @simoncollier74340

                    I bought myself this kit for Christmas. It is under the Christmas tree, unopened. Your posts fill me with trepidation, just from the amount of work. I am thinking I should have bought the finished article.

                    #217276
                    Neil Wyatt
                    Moderator
                      @neilwyatt

                      Well done John.

                      Simon, I'm sure you will be OK if you take it a step at a time.

                      Neil

                      #217280
                      ega
                      Participant
                        @ega

                        John Haine:

                        If you are in the UK would you let us have some details about the CBN wheel, please?

                        Thanks for the excellent coverage of your build.

                        #217358
                        Martin Connelly
                        Participant
                          @martinconnelly55370

                          I have one from Peter Child woodworking tools on my double ended 6" grinder. It is an electroplated metal wheel so you can use the flat side as well as the curved rim.

                          Martin

                          #217375
                          John Haine
                          Participant
                            @johnhaine32865

                            Hi Simon, actually there isn't that much work, compared with say a Quorn! It has probably taken me less than 10 days solid work spread out over a few weeks so far, don't despair! If you meet any problems Gary is very helpful by email and I'll be glad to try to help.

                            img_0121.jpg

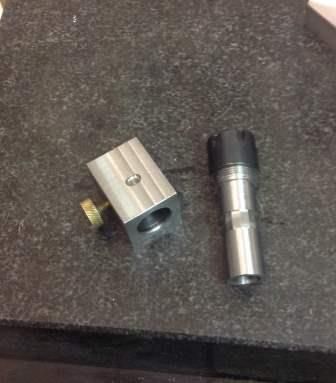
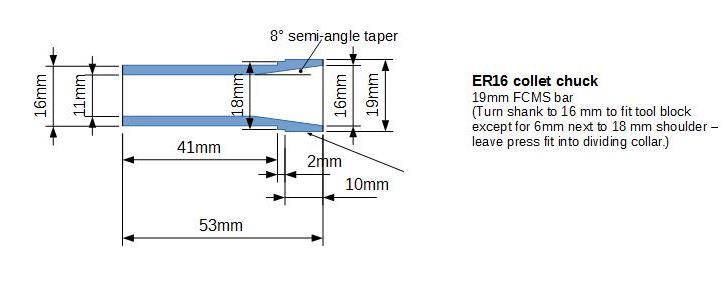
                            OK, so this is the ER16 holder alongside the tool block (my own design). It is turned from (I think) EN1a or something similar, 3/4" diameter. I spent quite a while working out and testing the g-code for my CNC S7 to cut the taper for the collet, and the thread – time well spent as these were a doddle.  Here's a drawing of the item.

                            er16_holder.jpg

                            Originally I was going to make a collar around the shank with 12 sides and fixed by a set screw, but then I realised that it could be done more neatly by making 12 flats around the shank that the locking screw can bear on.

                            img_0119.jpg

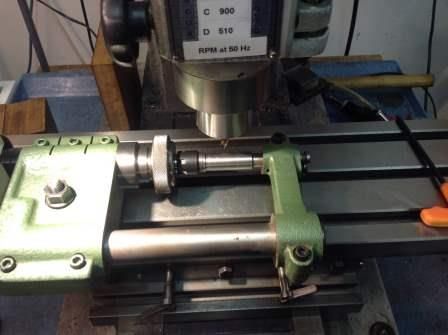
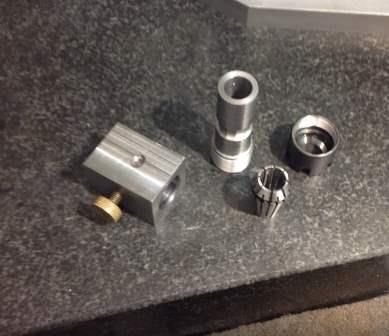
                            This is the holder set up on the dividing head.  I clamped a 10 mm bar in an ER16 collet in the holder, with the other end of the bar in a Myford collet in the DH, and supporting the tail of the holder using the DH tailstock.  I intended to make the faces 14mm a/f but had a bit of a wobble so they ended up ~13.5 mm a/f.  They double as a dividing gadget and also to take a wrench to tighten the collet.  Note that the collet nut has to be a "mini" type to clear the tool slide, not the standard ER16 type.

                            img_0125.jpg

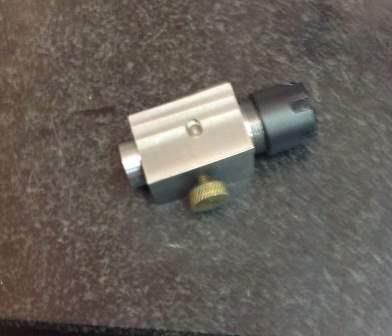
                            Holder in tool block.

                            img_0129.jpg

                            All the parts and a 10mm collet.


                            Edited By John Haine on 21/12/2015 21:56:20

                            Edited By John Haine on 21/12/2015 22:13:54

                            #217376
                            John Haine
                            Participant
                              @johnhaine32865

                              Unfortunately Peter Child no longer stocks CBN wheels. A shame because his location is quite close. His supplier apparently stopped making them I gather. Axminster Tools stock them (but only coated on the rim), I got mine from "The Toolpost", it's 6" x 40mm x 180 grit.

                              Now I need to spend some time "fettling", also finishing off the grinder itself and a mounting base. I'll try to take some more photos of the unit in action. But I feel another project coming on, so I'd better finish it soon!

                              #217407
                              ega
                              Participant
                                @ega

                                John Haine and Peter Connelly:

                                Thank you. I believe I may have bought the last of Peter Child's stock which was, of course, intended for grinding woodturning tools. I will follow up the Axminster and Toolpost references.

                                #217433
                                John Haine
                                Participant
                                  @johnhaine32865

                                  EGA – The wheels are intended for HSS, I don't think they mind whether the tool is for wood or metal! Peter Helmsley at The Toolpost said thay are also fine for tungsten carbide. I meant to add, the wheel I got is coated on the rim and a band on the outside of one face. It also has a deep recess machined in the other face so it fits happily on a grinder designed for 20mm wheels (though not the guards).

                                  #217449
                                  ega
                                  Participant
                                    @ega

                                    John Haine:

                                    "also fine for tungsten carbide" – Roy Child made the same point when I bought my wheel.

                                    As someone said elsewhere on the forum HSS is a general label that covers a multitude of different formulations; I believe that the same is true for TC. These distinctions may not much concern the amateur, of course, and given the high price of CBN I imagine most will settle for one wheel that will work across the range.

                                    Edited By ega on 22/12/2015 14:45:30

                                    #217502
                                    Enough!
                                    Participant
                                      @enough

                                      'ppreciate this build thread, John: I just had the kit delivered about a week ago and your notes are proving very useful.

                                      I don't know what your feelings are but I think that the spotting of the holes is perhaps more of a hindrance than a help in some cases – particularly if you have access to a mill with (or without) a DRO.

                                      For instance, the clamp block that goes on the edge of the table that you described on the first page of this thread. If the centre hole alone were spotted (or none at all), it could be drilled/tapped then turned/faced on the mandrel as you described. It could then be clamped to the milling table (orientation unimportant) and the centre hole located. The shoulder screw holes and step could then be machined at one setting with no need for "trickiness" with the combination square.

                                      (Of course you could ignore the existing hole spots and do this anyway but it would leave the redundant spots in the finished part).

                                      In several of these instances I've felt it easier to remake the part from scratch …. doing most of the turning work more easily on the end of a bar of material then parting off.

                                      Not to detract from the quality of the kit though – I realise Gary has set this up to minimise the equipment needed to make it.


                                      Edited By Bandersnatch on 22/12/2015 22:01:03

                                      #217532
                                      John Haine
                                      Participant
                                        @johnhaine32865

                                        Yes, in a couple of cases, the clamp washers that go on top of the fence and also IIRC the ones on the base, I found it easier to turn them and part off from bar stock. In the case of the clamp block, in retrospect I'd have used Gary's method of drilling thru the screw holes and using some pins to locate the block vertically in the machine vice to mill the step. But it's nice to have a kit with all the material you need.

                                        Glad you're finding the thread useful.

                                        #217541
                                        Baz
                                        Participant
                                          @baz89810

                                          I bought the book of drawings from Eccentric Engineering at the Harrogate show earlier this year and am slowly working my way through it. As I got drawings only I am using what material is surplus in the workshop and having to adjust sizes accordingly. The table is cut from a piece of 3/16 thick GFS so the clamps have to be adjusted accordingly and the metric stock sizes are rounded up or down to the nearest imperial sizes I have available. A lot of work in making it but very enjoyable, no drawing errors so far, the only problem is finding the small adjustable handles(dont know their proper name) at the moment I have some M6 ones from Axminster at a push they will do but would like a couple of M4 ones, anybody know of any stockists?

                                          #217551
                                          Bob Rodgerson
                                          Participant
                                            @bobrodgerson97362

                                            Baz,

                                            If you live near Manchester a tool supplier called BrianPope has them in stock. They are in Stockport, a really gpod source of all engineering tools. I even get my lathe oils and coolants from them

                                            Regards,

                                            Bob

                                            #217555
                                            Baz
                                            Participant
                                              @baz89810

                                              Hi Bob,

                                              I am a couple of hundred miles south down in Hampshire. Have you got a phone number or website address for them. Thanks for the info.

                                              #217557
                                              Muzzer
                                              Participant
                                                @muzzer

                                                Presumably **LINK**

                                                Not the most comprehensive or compelling website I've ever encountered! Sounds like a place you need to turn up in the flesh.

                                                Edited By Muzzer on 23/12/2015 12:09:08

                                                #217562
                                                Muzzer
                                                Participant
                                                  @muzzer

                                                  Dunno if you boys have seen this but there are some Youtube videos from a Brit living in the US who is making one of these tools. Judging by the apparel, he appears to have gone native…

                                                  #219263
                                                  Simon Collier
                                                  Participant
                                                    @simoncollier74340

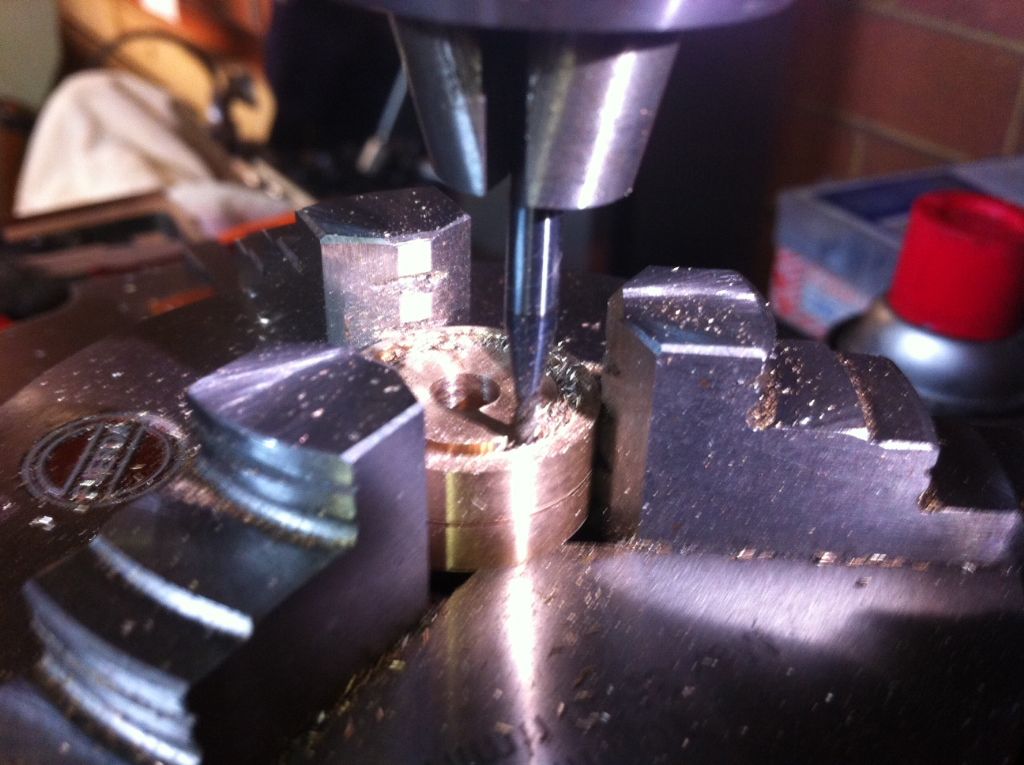
                                                    I have started my kit and am up to the first image of John's thread. I find turning radial grooves difficult so I used a 2 mm carbide end mill and set up drilled and parted discs of LG2 on the rotary table on the mill. I first attempted this with the laser cut discs provided but they raised huge burrs which made it difficult to see, and impossible to test fit the o-ring. My long M6 screws are too long but about 3 mm so I will either cut them down or use spacers. It would be much better if all the laser cut steel discs in the kit were CNC machined instead, but I suppose Garry does what is most economical to keep prices down.mill ring.jpg

                                                    #219334
                                                    John Haine
                                                    Participant
                                                      @johnhaine32865

                                                      Yes, the burring is a problem with the steel plate used, whatever the machining method. Like you I parted my discs off a bit of bar, but turned the grooves – can't remember what tool I used though!

                                                    Viewing 25 posts - 26 through 50 (of 62 total)
                                                    • Please log in to reply to this topic. Registering is free and easy using the links on the menu at the top of this page.

                                                    Advert

                                                    Latest Replies

                                                    Viewing 25 topics - 1 through 25 (of 25 total)
                                                    Viewing 25 topics - 1 through 25 (of 25 total)

                                                    View full reply list.

                                                    Advert

                                                    Newsletter Sign-up