Warco lathe feedscrew shear pin

Advert

Warco lathe feedscrew shear pin

Home Forums General Questions Warco lathe feedscrew shear pin

Viewing 20 posts - 1 through 20 (of 20 total)
  • Author
    Posts
  • #27095
    petro1head
    Participant
      @petro1head
      Advert
      #448416
      petro1head
      Participant
        @petro1head

        I have the wm290, any idea what i need to buy to replace the shear pin ie dia and material

        #448423
        Mick B1
        Participant
          @mickb1

          On my 250V, it's 1/8" or 3mm standard brass. Think that's all I've ever seen on any normal lathe.

          #448428
          SillyOldDuffer
          Moderator
            @sillyoldduffer

            I can't remember the diameter of the pin on my WM280, but it was about 3mm, not tapered. Whatever it was, the hard part was getting the broken pin out. With the feed-screw fitted to the lathe, I couldn't see the broken pin well enough to drive it out – high risk I was uselessly hammering the screw rather than hitting the pin. With the screw off the lathe and everything in plain view it took about 10 seconds to tap the pin out and measure it.

            No problem turning 4mm brass rod down to size by hand with the lathe in bits. Then it was straightforward to tap the pin in when the feed-screw was re-fitted.

            Assuming your 290 is like my 280, the awkward bit will be removing the bearing block at the tail end to get the feed-screw off. (If you have to; with luck you can see the old pin and remove it in-situ.) Mine is held in place by two bolts (easy) plus two dowels (tricky). The plain dowels take an Allen Key but they're sort of shimmied out rather than unscrewed. I may have done it wrong by turning with a pulling action with the Allen key tilted to get a bit of grip. Bad language didn't help other than making me feel better. Reassembly is easy – they just slide in.

            Dave

            #448464
            petro1head
            Participant
              @petro1head
              Posted by Mick B1 on 23/01/2020 13:51:44:

              On my 250V, it's 1/8" or 3mm standard brass. Think that's all I've ever seen on any normal lathe.

              I have bought some of both, thanks

              #448477
              Mick B1
              Participant
                @mickb1
                Posted by petro1head on 23/01/2020 17:41:20:

                Posted by Mick B1 on 23/01/2020 13:51:44:

                On my 250V, it's 1/8" or 3mm standard brass. Think that's all I've ever seen on any normal lathe.

                I have bought some of both, thanks

                Ah. I'm not sure it actually matters which… blush

                #448506
                old mart
                Participant
                  @oldmart

                  The lathe I use has a drawing for the shear pin in the manual, I have made a small quantity as they are waisted. When I was cutting a coarse ACME thread on the lathe which meant overdriving the gearing and big cuts, I bit the bullet and fitted a solid pin. the forces were great enough to cause a serious risk of the pin shearing during use from the forces and causing more damage that way. It was replaced with a standard pin as soon as possible.

                  #448518
                  Howard Lewis
                  Participant
                    @howardlewis46836

                    On my BL12-24 (Warco BH 600 or Chester Craftsman) I replaced the original rollpins !!!!!!!!!!!!!!

                    by 5 mm brass, drilled through 2.5 mm.

                    better to have the pin shear than damage the gear train! Even more important if you lathe has plastic gears, or maybe they ARE the weakest link, by design?

                    Howard

                    #448658
                    Bruno Taylor
                    Participant
                      @brunotaylor21701

                      Hi,

                      I have a WM250V. The sheer pin is brass 3mm dia. Problem is in my case that it does not shear. Through carelessness the other day l locked up the carriage against the stop. The pin did not shear and the result was the carriage pinion shaft bending. This has happened twice now.

                      Okay it's a quick fix (the second time!!) Remove the carriage gear box and hit pinnion shaft with a hammer. After the first time l decided to fit a plastic shear pin. Will definitely actually do it this time.

                      Anyone else had this happen?

                      #448689
                      Mick B1
                      Participant
                        @mickb1
                        Posted by Bruno Taylor on 24/01/2020 16:53:46:

                        Hi,

                        I have a WM250V. The sheer pin is brass 3mm dia. Problem is in my case that it does not shear. Through carelessness the other day l locked up the carriage against the stop. The pin did not shear and the result was the carriage pinion shaft bending. This has happened twice now.

                        Okay it's a quick fix (the second time!!) Remove the carriage gear box and hit pinnion shaft with a hammer. After the first time l decided to fit a plastic shear pin. Will definitely actually do it this time.

                        Anyone else had this happen?

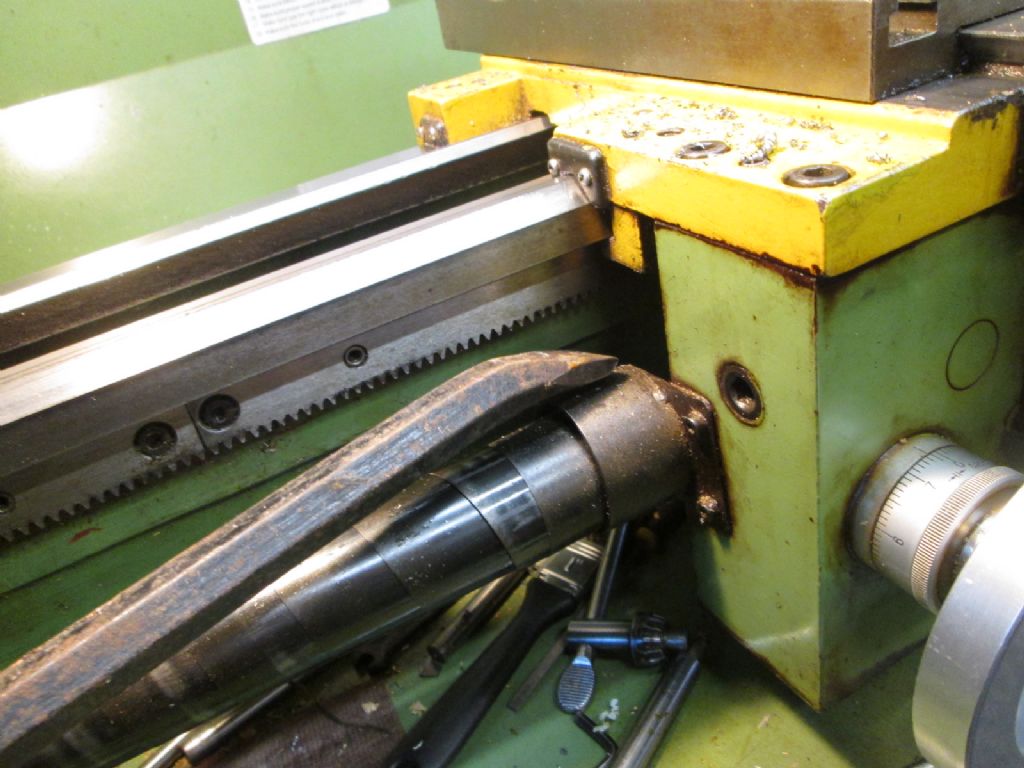
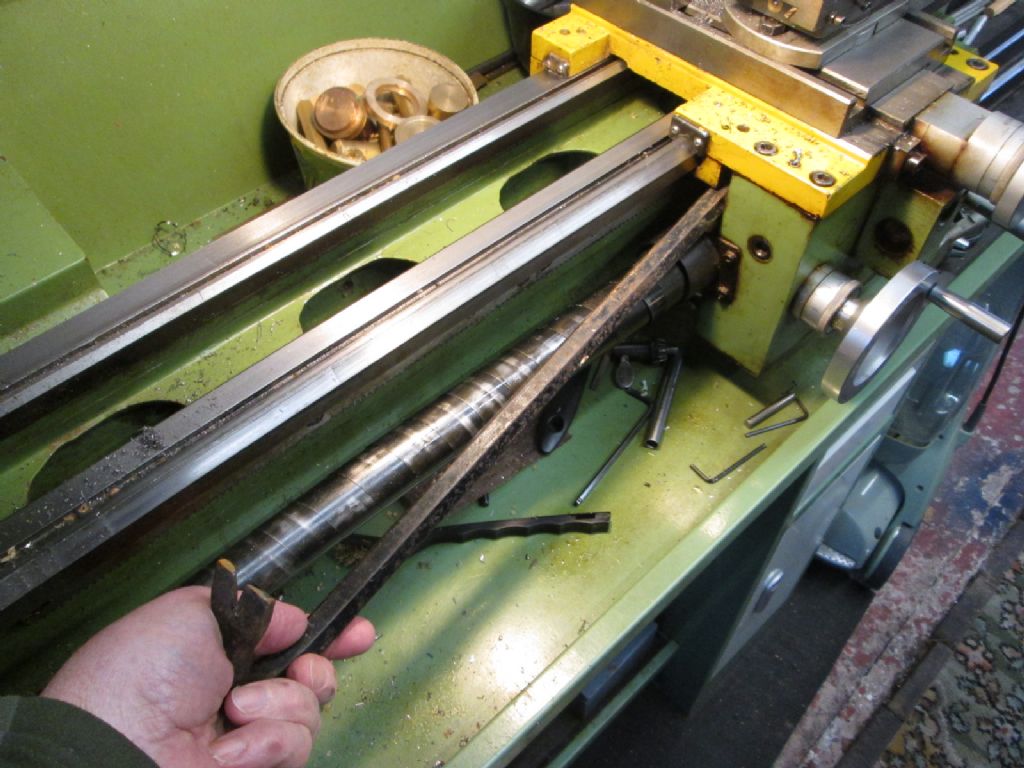
                        You don't need to take off the gearbox if you've got a standard crowbar with a shallow-bent toe end. You run the saddle to the tailstock end and find the tight spot – that's where the bend in the pinion shank's forcing it hard against the bed rack. Set the tiptoe of the crowbar against the top of the pinion shank with the top of the shallow bend against the corner-pad under the LH near side end of the saddle, then lever up. That bends the pinion shank downwards, away from the bed rack – solving the problem.

                        My shearpin didn't shear because it was silver steel or something like it. What did shear was one of the keyed bushes in the headstock geartrain, between two paired gears. The shearpin's now brass, but now that you've told me it's still too strong to save the carriage pinion, I think I'll weaken it further at some convenient time…

                        smiley

                        #448763
                        petro1head
                        Participant
                          @petro1head

                          Having read about brass shear pins not breaking maybe I sould make an alluminium one

                          #448821
                          Howard Lewis
                          Participant
                            @howardlewis46836

                            When I jammed my Saddle against the Headstock, the rollpin ensured that the pinion and its shaft bent.

                            Obviously a regular happening since Warco could supply from stock, at a total cost approaching £70. I cut my own 13T gear, eventually, having found that the chart for the HV6 had errors, including, of course, the one for 13 divisions!

                            16mm Silver Steel from Cromwell Tools, (£12 ), a 1.5 Mod cutter from RDG (£22 ) and we were back in business, after a few days. Then made the 5 mm OD, 2.5 mm ID, shear pins. Not needed since, Thank Goodness!

                            Howard

                            #448833
                            Clive Foster
                            Participant
                              @clivefoster55965

                              It is often advocated that a shear pin be necked with two Vee grooves of centre spacing equal to the diameter of the inner shaft. Especially if steel pins are used.

                              It is said that the neck provides a stress raiser ensuring that the pin shears cleanly and the tapers prevent the broken end smearing between the inner and outer shafts. Smearing can can create considerable friction between the two parts making it a right pain to align them so the pin can be driven out.

                              Indeed I have seen one such where the pin had clearly been broken for some time but the smeared and jammed up ends continued to provide approaching adequate, albeit not completely continuous, drive between the two parts. Leaving a right mess when the parts were eventually separated by longitudinal movement.

                              Clive

                              #448846
                              Mick B1
                              Participant
                                @mickb1
                                Posted by Howard Lewis on 25/01/2020 14:43:38:

                                When I jammed my Saddle against the Headstock, the rollpin ensured that the pinion and its shaft bent.

                                Obviously a regular happening since Warco could supply from stock, at a total cost approaching £70. I cut my own 13T gear, eventually, having found that the chart for the HV6 had errors, including, of course, the one for 13 divisions!

                                16mm Silver Steel from Cromwell Tools, (£12 ), a 1.5 Mod cutter from RDG (£22 ) and we were back in business, after a few days. Then made the 5 mm OD, 2.5 mm ID, shear pins. Not needed since, Thank Goodness!

                                Howard

                                Here's the crowbar fix to the bent pinion. Pic 1 shows the end of the crowbar to use, pic 2 shows it in place with the chisel toe on top of the pinion shank and the fulcrum up under the saddle corner pad:-

                                crowbar fix 1.jpg

                                crowbar fix 2.jpg

                                You have to be able to get the saddle far enough from the headstock to get room for the crowbar, and get the highspot on the pinion at the top, ie. where it binds tightest against the rack, so a *very* severe bend might not be fixable this way. But if it's possible, it costs nothing but a minute or two's time – though to be fair, we got the crowbar for free because the previous house-owners left it in a cupboard…

                                Edited By Mick B1 on 25/01/2020 17:03:06

                                #448854
                                Howard Lewis
                                Participant
                                  @howardlewis46836

                                  My pinion shaft was too badly bent to be tweaked back into position. The original material seemed to have more in common with plasticine than steel, having bent inside and outside the Apron. The lathe now runs with a mild steel pinion, Loctited and pinned, on a Silver Steel shaft, located by a brass sleeve. Seems to travel a bit more sweetly, so possibly reduced the backlash during the repair. It won't happen again, I hope, The pinion now disengage from the shortened rack just before Saddle / Headstock contact. So with hollow brass shear pins, and disengagement, there should be no more damaging collisions, unless I omit to open the half nuts at some future time!

                                  Howard

                                  #448989
                                  Ian S C
                                  Participant
                                    @iansc

                                    Early in it's life I brokethe shear pins on the lead screw of my Tywanese lathe (there are two in tandem). I replaced them with bits of 1/8" brazing rod, about 25 years ago.

                                    Ian S C

                                    #449180
                                    petro1head
                                    Participant
                                      @petro1head

                                      I have made an alloy shear pin instead of the brass one

                                      #449200
                                      Clive Foster
                                      Participant
                                        @clivefoster55965

                                        petro1head

                                        I hope you put grooves in it to define the shear point and prevent smearing if it breaks. Alloy tends to be rather ductile so it will bend and stretch before shearing. Most likely dragging some material into the gap. If you are unlucky it will make thinks a total pain to remove if it fails.

                                        Shear pins need to be fairly, but not too, brittle so they break cleanly under reasonably predictable loads. The half hard brass alloys can be very good for this especially as being weak enough to allow a handleable size pin to be used.

                                        The steel pins often found on industrial lathes can be surprisingly small. My Smart & Brown 1024, a hefty 10" swing toolroom machine, uses a 3/32" (2.5 mm) pin in single shear to protect the complete drive train from headstock down. A spare pin was provided in the standard equipment so clearly its assumed to be weak enough that it will break under only moderate overload.

                                        Obviously it handles less torque, being further up the drive train, than one in the screw itself but its food for thought.

                                        Clive

                                        #449229
                                        Circlip
                                        Participant
                                          @circlip

                                          Since most of the "Modelling" lathes from Taiwan/China are copies of the Emco range, the one they copied must have had the original Aluminium shear pin replaced with a bit of brass. 3mm Aluminium welding rod is the often recommended replacement.

                                          Regards Ian.

                                          #449295
                                          peter smith 5
                                          Participant
                                            @petersmith5

                                            We used 1/8th csk iron rivets on all our Bantams in school, and also Boxfords. If your machine is English and more than 25 years old it will be imperial not metric. The technician changed them every year when we serviced them after the exams.

                                            pete

                                          Viewing 20 posts - 1 through 20 (of 20 total)
                                          • Please log in to reply to this topic. Registering is free and easy using the links on the menu at the top of this page.

                                          Advert

                                          Latest Replies

                                          Home Forums General Questions Topics

                                          Viewing 25 topics - 1 through 25 (of 25 total)
                                          Viewing 25 topics - 1 through 25 (of 25 total)

                                          View full reply list.

                                          Advert

                                          Newsletter Sign-up