Tom Senior Motor

Advert

Tom Senior Motor

Home Forums Manual machine tools Tom Senior Motor

Viewing 25 posts - 1 through 25 (of 32 total)
  • Author
    Posts
  • #211864
    Hevanscc
    Participant
      @hevanscc

      I have just become the proud owner of a Tom Senior M1 (#195) milling machine. It has the original (I think) 3 -phase 415 V motor but I need to run the mill from a domestic 1-phase 240 V supply. I have trawled the forums and related posts here and elsewhere and understand that my options are:

      1. Use an inverter to convert to 220 V 3-phase which can be used if the motor is dual voltage wired delta

      2. Use a converter to convert to 415 V 3-phase

      3. Use a static or rotary converter to do the same job as 2.

      4. Change to a 1-phase motor

      I would prefer to use the existing motor with an inverter (option 1) but understand that the motor must be a dual voltage 220/415 V motor wired delta to do this.

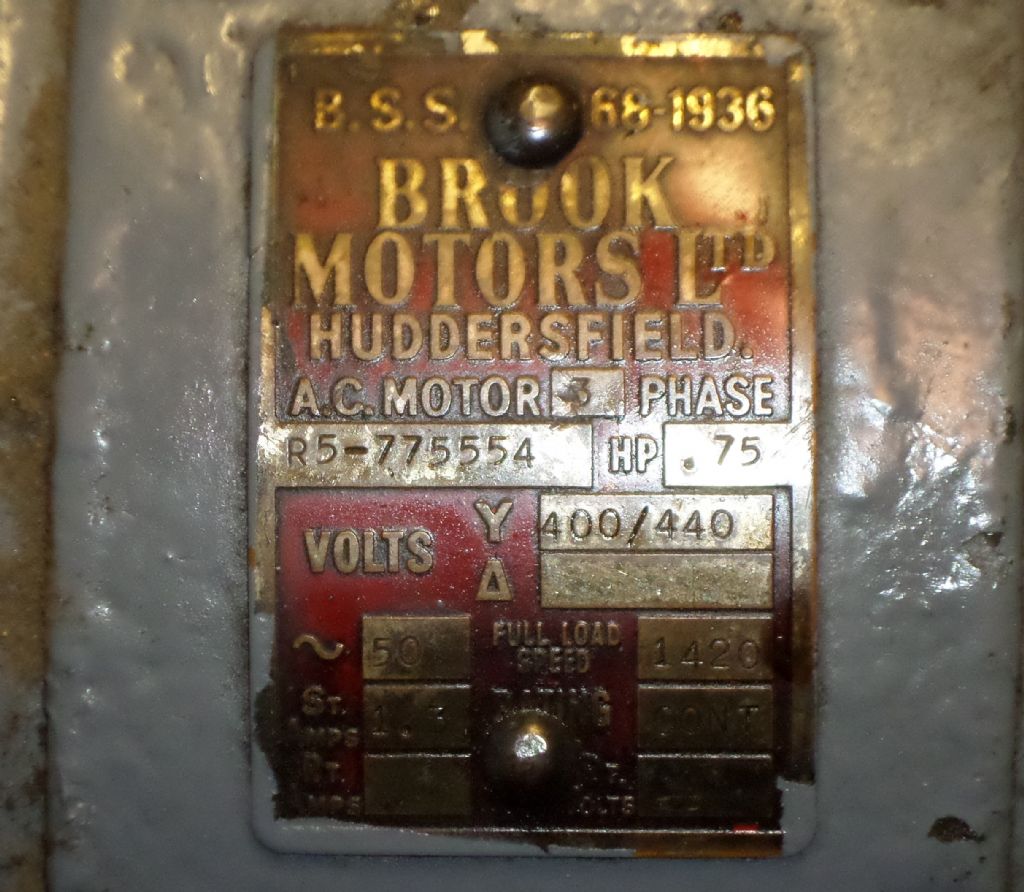
      Now the motor is very old (1940 s I think) and the faceplate says it is 400/440 wired star (see picture) not a dual voltage motor apparently.

      So my first question is would it be possible to open up and re-wire delta as shown in this forum and elsewhere to accept 220 V 3-phase from an inverter, or is this the type of motor that can inly run off 415 V?

      Hywel

      sam_2595.jpg

      Edited By Hywel Evans on 13/11/2015 08:34:46

      Advert
      #12581
      Hevanscc
      Participant
        @hevanscc
        #211871
        John Rudd
        Participant
          @johnrudd16576

          To answer the question, you would need to open up the motor and locate the Star point, separate the winding ends and rewire in Delta, you can then use a 240 in 240 out inverter.

          #211872
          john fletcher 1
          Participant
            @johnfletcher1

            I'm not absolutely certain but pretty sure your motor can be altered to 240 volt Delta. Can you send a picture of the terminal box, if you have 6 terminals with a wire or brass links across three of them then it an easy job. There was an excellent article on this site a few weeks ago on just that topic. The person carrying out the reconnection, posted a lot of very good informative pictures together with a step by step explanation. Have a look on more last posts or view all topic, if you still can't find contact Neil he will know. John

            #211874
            John Rudd
            Participant
              @johnrudd16576
              #211877
              Clive Foster
              Participant
                @clivefoster55965

                As there is no voltage marked on the delta section of the motor nameplate its most likely to be wired in Y. At that date 6 terminal connection blocks permitting easy change from Y to delta were unusual. Allegedly Y and delta motors were often of slightly different electrical design despite being built on the same case and frame.

                Easy, effective, but not cheapest way is to get one of the inverter units converted to give 440 volts output from 240 volts input from folk such as Drives Direct at Nottingham. Simple wire in and it works. For that sort of power rating probably cheaper than a rotary converter. Which is also plug in and it works. But bigger box and can be noisy if ill situated.

                Having opened up similar motors, found the star point and rewired to run off the normal single phase mains supply using the static converter "capacitor trick" I'd now advise against that approach. Its an old fashioned way of doing things and not worth the work and risk with better alternatives now available at similar cost. Capacitors come expensive these days. Worked well for me on pillar drills and similar where run time is relatively short so any heating effects due to imperfect tuning wouldn't have time to build up enough to hurt the motor. Not sure that I'd care to do the same on a milling machine which runs for fairly long periods under varying loads. I know of one Bridgeport fitted with an apparently well tuned static converter, I checked it, which eventually killed its motor. Took about 3 years and probably something in the region of 2,000 hours use tho'.

                One important point against opening up the windings is the state of the insulation proper and wire coating. By your estimates that motor is around 70 years old so things will be getting pretty friable and brittle in there. Fine if not disturbed but I'd not care to dig around. The ones I worked on were 1950;s vintage so more like 30 to 35 years old at the time and things were already getting old then. Various oddies and bits also needed that you are unlikely to have to hand unless you do, or know one who does, electrical work.

                Clive.

                Edited By Clive Foster on 13/11/2015 09:55:01

                #211907
                Hevanscc
                Participant
                  @hevanscc
                  Posted by john fletcher 1 on 13/11/2015 09:06:43:

                  I'm not absolutely certain but pretty sure your motor can be altered to 240 volt Delta. Can you send a picture of the terminal box, if you have 6 terminals with a wire or brass links across three of them then it an easy job. There was an excellent article on this site a few weeks ago on just that topic. The person carrying out the reconnection, posted a lot of very good informative pictures together with a step by step explanation. Have a look on more last posts or view all topic, if you still can't find contact Neil he will know. John

                  Alas there are only 3 wires at the terminal box so I would have to dig around for the star point

                  #211909
                  Hevanscc
                  Participant
                    @hevanscc

                    I've looked at the link posted by John and it seems pretty clear that I would have to open the motor up and find the star point to re-wire to delta. I'm comfortable with doing that except mindful of the last post by Clive in which he says that the age of the motor might mean it is all but impossible to do properly without damage.

                    So, I will take the end off and have a look to see if it is remotely achievable. If not then I am left with two preferred options:

                    1. Buy a 1P 220 V to 3 P 415 V converter

                    2. Buy a 220 V 1P to 3P inverter and 3P motor package

                    Both are similar in cost but I am thinking that option 2 would be better because then I would have a new motor rather than a 70 year old one which, regardless of its longevity, must have a finite number of years left in it.

                    Hywel

                    Edited By Hywel Evans on 13/11/2015 12:04:00

                    #211931
                    Steve Pavey
                    Participant
                      @stevepavey65865

                      Given that you're leaning towards option 2 (a vfd and new motor) you have nothing to lose by having a look inside your existing motor and seeing if the star point is accessible. If, like me, this is your first one then I can confidently predict that a photo posted here of the insides of the motor will get you all the help you need.

                      Having been through this once it really is much simpler than I had imagined – I'd have no hesitation in doing another one.

                      Steve

                      #211949
                      Clive Foster
                      Participant
                        @clivefoster55965

                        I'd just get an inverter and keep the existing motor for now whilst keeping an eye out for a good quality replacement at an attractive price. Those small inverters are compact enough to be easily mounted on the machine for control via their front panel buttons which makes life easier. A major point in favour of the packaged inverter & motor offerings is that the remote control box comes fully sorted and wired in the price. Rolling your own remote box is more hassle than it looks at first sight for a non electrical / electronics person and the cost of the switches and bits do add up. The motor supplied with a package tends to be towards the serviceable end of the quality spectrum, of necessity given that the price of the package has to be in line with the purchasers pocket which is rarely as deep as one would like. Given time a better, albeit lightly used, motor will turn up.

                        Although re-connecting the star point is pretty easy if its lying on top of the windings opening up a decently old motor is still on the chancy side. On the ones I did I recall the insulation on the flexi leads out to the terminal block being very hard and brittle. They really didn't care for being bent when the motor end cover was pulled off. Many cracks but nothing fell off so sleeving with heat-shrink tube made a good repair. My star points were nestled into the windings rather than directly on top so had to be teased out and the wires re-varnished in that area just in case insulation was damaged. The lacing had to be completely re-done. On one the tufnol (?) plate holding the terminal block fractured and had to be re-made. As ever age related deterioration is very variable. I imagine its temperature related so a cool running motor sat out in clear air and not worked too hard will probably age a lot more slowly than one buried in a machine running hot and hard. You just don't know what you are going to find. I've opened up 10 or 15 year old motors to retrieve screws and washers dropped in by others. Everything is so much nicer and clearly no trouble to operate on.

                        Clive.

                        #212233
                        Hevanscc
                        Participant
                          @hevanscc

                          Right, I took the cover off the motor eventually and it looks like the star point is sitting on top of the winding at seven o'clock in the photo. Thought I'd post here before going in to get opinions How best to attach the new leads? Silver solder would require a lot of heat but ordinary solder might be too low temp. I have read that some people just use crimps? Any ideas on which is best? Then cover with PTFE tape and heatshrink on top of that.

                          Brook motor winding

                          #212250
                          John Rudd
                          Participant
                            @johnrudd16576

                            Personally I'd go for soft soldering new tails whose wire gauge is an approx match to the existing ones, the joints covered with heatshrink……Secured against the windings of course..

                            #212256
                            Alan Waddington 2
                            Participant
                              @alanwaddington2

                              I did exactly what you are doing on my tom senior and used normal soft solder as described by John, I over sleeved the heat shrunk joints with heatproof sleeving from some old down lights I had knocking about. it worked perfectly and gave no trouble whatsoever.

                              Alan.

                              #212262
                              Clive Foster
                              Participant
                                @clivefoster55965

                                Soft solder worked fine for me too. I used a "rubber" insulating sleeve as well under the heat shrink which I always feel to be a bit thin for mains voltage. Looks very good inside. Either that motor has been repaired some time in the last 20 – 30 odd years or its much younger than you thought. The ones I dealt with looked much older and the insulation on the flexi leads was worryingly fragile.

                                If you want a bit of mechanically strong over sleeve grab some of the (usually) white high temperature stuff found in most halogen security lights,irons and similar.

                                Clive.

                                #212266
                                john fletcher 1
                                Participant
                                  @johnfletcher1

                                  Whilst you have access to the motor terminal its a good idea to mark each separate winding 1 end and 2 end so that its easy to reconnect the motor into delta for 240 volt running. Do ensure you connect a winding 1 end to a winding 2 end other wise you get strange results. If you are unsure about delta connection ask here, some one else will tell you how to do it. John

                                  #212274
                                  John Rudd
                                  Participant
                                    @johnrudd16576

                                    If you mark the wire ends corresponding to the already terminated ends,


                                    Then W1-W2 as your first winding and correspondingly with U and V, so the new ends should be W2,U2 and V2

                                    To connect Delta, connect W2 to U1, U2 to V1 and V2 to W1.

                                    The three phase supply wires ( Red/Yellow/Blue or Brown/Grey/Black) then go the the junctions W2-U1, U2-V1 and V2-W1

                                    If the motor runs the wrong way, swap over any two of the incoming phases….

                                    Edited By John Rudd on 14/11/2015 17:22:23

                                    #212718
                                    Tony Simons
                                    Participant
                                      @tonysimons69671

                                      I did exactly the same with my Tom Senior serial no. 178. Worked fine for last 5 years, just started stripping the machine down for a clean and paint. I also need to make a new worm wheel for the power feed as its missing some teeth. I'll take pics of progress.

                                      #212721
                                      Hevanscc
                                      Participant
                                        @hevanscc
                                        Posted by Tony Simons on 17/11/2015 07:47:28:

                                        I did exactly the same with my Tom Senior serial no. 178. Worked fine for last 5 years, just started stripping the machine down for a clean and paint. I also need to make a new worm wheel for the power feed as its missing some teeth. I'll take pics of progress.

                                        Hi Tony,

                                        If you look in my photo album you can see what my TS looks like at the moment. I had to take it apart for transport so while,it is in bits I might as well repaint it to get rid of that lovely green enamel. I was goimg to have a go with a polystrip disc and wire wheel on the angle grinder on the base and chip tray. I am not going to do a full strip so will have to cover over the drive train and vertical screw before attacking the column and knee. How were you going to do it? From what I've seen the castings are quite rough so will need to be filled and sanded back to get a smooth finish. I was going to use the TS paint from Stationary Engine Parts because this seems to have a good press.

                                        #212756
                                        Tony Simons
                                        Participant
                                          @tonysimons69671

                                          I am using craft master paint as I prefer it to stationary engines paint

                                          I have painted the cabinet and stripped the tray. There is a lot of filler in the column. I have pulled the machine apart 3 times now for various moves. This time it's getting a full overhaul before it goes back together. It has hard a hard life in a school and looks as though it been painted with a yard brush with battleship gray paint.

                                          #212784
                                          Senior Yates
                                          Participant
                                            @senioryates

                                            Hi Hywell,

                                            I too got into Tom Senior milling machines having refurbished two of them. All I would say if you are going for the vfd and new motor buy from a listed supplier, I purchased mine from a auction site from a guy selling reconditioned units with the nice speed controller etc, my motor looks newish in good condition offering both Star and Delta options. The inverter was a Mitsubishi one good make I was told, I wired it all in nicely tucking the vfd behind the machine under the coolant tray with the control box mounted where the old on/off switch was. But since doing all this my machine has no torque at all it struggles to cut plastic let alone anything else, I went back to the guy sent the item back he tested it and said its fine, so I'm stuck with a vfd which I'm not sure works ok or if my motor is dud and I'm too skint to get them tested outside. (If anyone has any ideas please let me know)

                                            My point is pay the professional and get the right equipment.

                                            Good luck you will love this machine.

                                            #212805
                                            john fletcher 1
                                            Participant
                                              @johnfletcher1

                                              Regarding the inverter or motor which has little or no torque can you not locate a model engineer some where close by you who can help you out. I just wonder if the motor is still connected in Star. Have you a multi meter which you can safely use to measure the out put voltage or have you another motor to which you can carry out a test. John

                                              #212895
                                              Tony Simons
                                              Participant
                                                @tonysimons69671

                                                It sounds to me as though one of the winding in the motor i connected the wrong way round. The end of one winding must be connected to the start of the next and so on.

                                                #212909
                                                Hevanscc
                                                Participant
                                                  @hevanscc

                                                  I think that I've got eveything wired up now. I used the cable from an old iron because the insulation is silicone and heat resistant, that's why the new end tails are red, blue and green/yellow. Soft soldered them on, wrapped in PTFE tape and covered with heatshrink. There is continuity between the start and end of each of the tails with equal resistances of 12 Ohm. I tried several different ways of tying the wires to the windings: got some fibreglass twine but this kept breaking; then linen twine but wasn't happy with that; in the end I used the PTFE tape which is actually very strong when twisted and seems fine.

                                                  Now for the bit I am unsure of. My understanding is that the end of one winding must be connected to the start of another, so:

                                                  Ends are Yellow Y1, Y2 and Y3

                                                  Starts are Red R1, R2 and R3

                                                  There is continuity between the Y1-R1, Y2-R2 and Y3-R3 pairs respectively.

                                                  On the teminal block they must be wired so that different starts and ends are wired together, so I have wired them Y1-R3, Y2-R1 and Y3-R2

                                                  Now to buy a 1hp inverter – a TECO from Drives Direct or a WEG from Inverter Drives Supermarket https://www.inverterdrive.com/group/AC-Inverter-Drives-230V/WEG-CFW10-0040-S-2024-EOFAZ-230V-750W/

                                                  image.jpg


                                                  Edited By Hywel Evans on 17/11/2015 22:12:18

                                                  #212911
                                                  John Rudd
                                                  Participant
                                                    @johnrudd16576

                                                    Your termination wiring scheme sounds good to me……


                                                    My advice,when you get your inverter, wired to the motor, use a 3 amp fuse in the plug….on initial start up…..

                                                    Drives Direct gets my vote…

                                                    Edited By John Rudd on 17/11/2015 22:24:37

                                                    #212919
                                                    Hevanscc
                                                    Participant
                                                      @hevanscc
                                                      Posted by John Rudd on 17/11/2015 22:23:39:

                                                      My advice,when you get your inverter, wired to the motor, use a 3 amp fuse in the plug….on initial start up…..

                                                      Yes, point taken – stand well back and wear thick rubber boots . . .

                                                    Viewing 25 posts - 1 through 25 (of 32 total)
                                                    • Please log in to reply to this topic. Registering is free and easy using the links on the menu at the top of this page.

                                                    Advert

                                                    Latest Replies

                                                    Home Forums Manual machine tools Topics

                                                    Viewing 25 topics - 1 through 25 (of 25 total)
                                                    Viewing 25 topics - 1 through 25 (of 25 total)

                                                    View full reply list.

                                                    Advert

                                                    Newsletter Sign-up