Rotary table set up

Advert

Rotary table set up

Home Forums Help and Assistance! (Offered or Wanted) Rotary table set up

Viewing 8 posts - 1 through 8 (of 8 total)
  • Author
    Posts
  • #359692
    BOB BLACKSHAW 1
    Participant
      @bobblackshaw1

      I am thinking of making some type of jig to set up a rotary table on a mill. I thought of using a plunge DTI on a lump of aluminum bolted to the rotary table so that it rests on the mill spindle.

      How do you set up a rotary table, as in the past its taken me ages to get a reasonable set up.

      If this has been discussed in past threads, apologies to all.

      Bob.

      Advert
      #33228
      BOB BLACKSHAW 1
      Participant
        @bobblackshaw1
        #359695
        Mike Clarke
        Participant
          @mikeclarke87958

          Hi Bob,

          I use a large ball bearing (approx 30mm) – lower the quill and trap the ball bearing between the centre of the rotary table (presuming you have a hole there!) and your milling chuck, for example.

          Works for me.

          Cheers,

          Mike

          #359698
          Maurice Cox 1
          Participant
            @mauricecox1

            I assume that you wish to set the centre of the rotary table in line with the axis of the mill spindle. I use a morse tapered mandrel with an accurate 1/4” reamed hole in it, and a length of 1/4” sliding in it with a circling to stop it falling right out. A piece of steel is fitted in the centre of the rotary table, also with a 1/4” hole reamed in it. Having clamped the rotary table approximately under the spindle, then move the mill table until the rod drops freely into the hole. If in any doubt, check it after with a DTI.

            Maurice

            #359708
            mark costello 1
            Participant
              @markcostello1

              Excellent,Mike.

              #359712
              Anonymous

                Step 1: Set, and lock, the rotary table on zero.

                Step 2: Lightly bolt down the rotary table, indicate on one of the four slots while moving the appropriate table axis. Tap the rotary table to reduce indicator movement, when the indicator doesn't move tighten the bolts.

                Step 3: Use one of these:

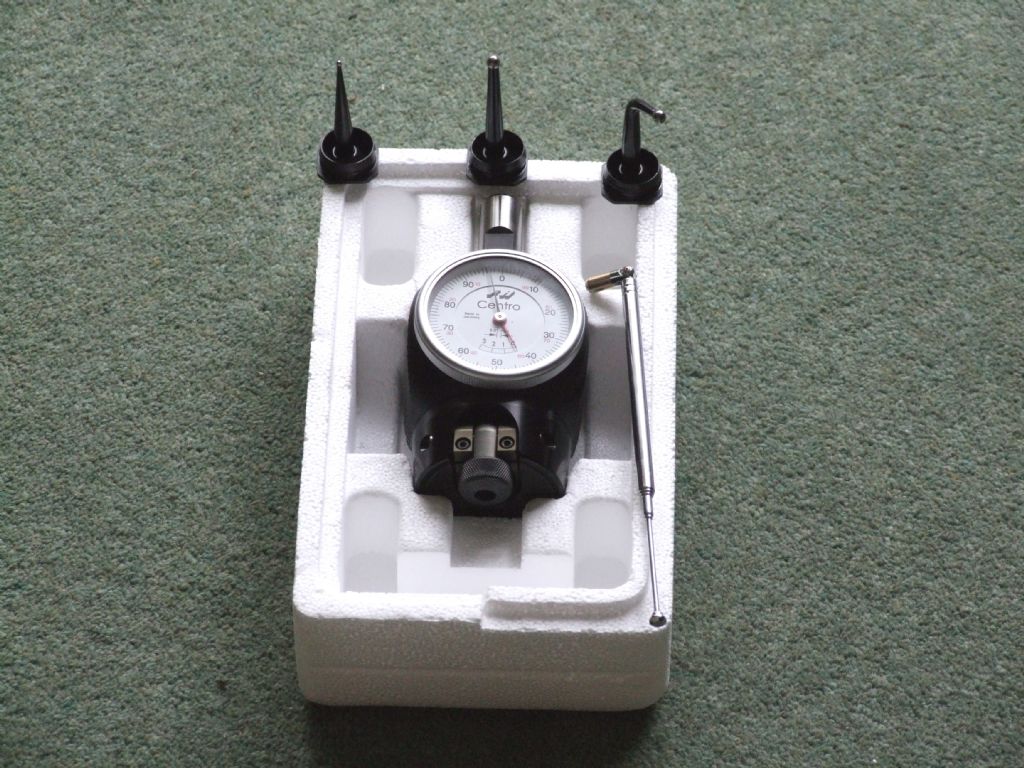
                centro.jpg

                in conjunction with the parallel hole in the centre of the rotary table to set the DRO on 0,0. For those who don't recognise the unit it's a Haimer Centro.

                Having completed all steps the rotary table will have its cardinal points aligned with the X and Y movements of the mill, and the DRO indicates the centre of the rotary table. Doesn't take long, probably a few minutes.

                Andrew

                Edited By Andrew Johnston on 27/06/2018 22:28:16

                #359717
                DMB
                Participant
                  @dmb

                  Alright for those able to boast about such large balls.

                  Sorry, couldn't resist that.

                  Where's me coat?

                  #359721
                  Jim Nic
                  Participant
                    @jimnic

                    I use a 2MT mandrel in the centre of the rotary table as per Maurice, albeit with a 10mm rod.

                    I loosely position the rotary table on the mill table with the rod inserted in the mandrel then tighten it down.

                    Jim

                  Viewing 8 posts - 1 through 8 (of 8 total)
                  • Please log in to reply to this topic. Registering is free and easy using the links on the menu at the top of this page.

                  Advert

                  Latest Replies

                  Viewing 25 topics - 1 through 25 (of 25 total)
                  Viewing 25 topics - 1 through 25 (of 25 total)

                  View full reply list.

                  Advert

                  Newsletter Sign-up