Real Bull CJ18, metal spindle drive gear (Pulley)

Advert

Real Bull CJ18, metal spindle drive gear (Pulley)

Home Forums Manual machine tools Real Bull CJ18, metal spindle drive gear (Pulley)

Viewing 25 posts - 1 through 25 (of 34 total)
  • Author
    Posts
  • #14132
    Gazz
    Participant
      @gazz
      Advert
      #518454
      Gazz
      Participant
        @gazz

        Having just replaced the headstock bearings and the hi – lo gears in there with metal ones, i guess this was bound to happen,

        The toothed drive gear that the motor drives exploded on me when i accidentily dug in whilst parting.

        Exploded gear

        Now i was thinking of changing that gear anyway for a slightly larger one, so i can get a little more torque at the low end.

        I'm thinking if i go for a metal one, the weak link will then be the belt or the motor drive gear, so would i be best going with a plastic gear here and having this is the 'fusable link'

        can someone who has replaced this gear (similar on the seig C3 lathes i believe) with a slightly larger one tell me what gear they used please?

        #518604
        Iain Downs
        Participant
          @iaindowns78295

          Amadeal have a good selection of spares for the CJ18(A).

          If this is the gear on the motor (it doesn't look like how I recall it), I've burst 2 or 3 with interrupted cuts and replaced them OK.

          If you replace the gear with one with more cogs on then you will increase the speed and reduce the low end torque. Reducing the low end torque on my CJ18A is about the last thing I want to do…

          Iain

          #518613
          Gazz
          Participant
            @gazz

            this is the gear on the headstock input spindle.

            So thinking go up a few teeth on this will reduce top speed and give a little more torque at low speeds, same as going down a size on the motor gear.

            i've ordered a new plastic gear from amadeal just to get me up and running again,

            #518641
            Howard Lewis
            Participant
              @howardlewis46836

              If you try to install a gear with more teeth it will be larger and not fit in. You would need to change both the driving and the driven gears. Just adding teeth to a gear means that the diameter will increase; unless you change the tooth configuratiion of the gear (In this case the Module ) and then it will no longer mesh correctly with the driving gear.

              You are unlikely to be able to change the centre distance between the shafts for the gears, easily, to accommodate a larger driven gear.

              If you don't believe me, read Ivan law's Book, "Gears and Gear Cutting, ( 17 in the Workshop Practice Series ) where you will find the formulae that relate to gears.

              So, putting it in simple terms;"You can't"

              WHAT did you do to split the gear? Something violent by the looks of it, and WAY beyond what the lathe was designed to do.

              The chances are, apart from cost, that the plastic gear was intended to fail, rather than some more costly or complicated component.

              Howard

              #518642
              Howard Lewis
              Participant
                @howardlewis46836

                Oh! I forgot to say that it is possible that the gears from a Real Bull machine will have a 4mm keyway, where Sieg machines use a 3 mm. So parts may not be directly interchangeable . You can open up a 3mm keyway, carefully, to 4 mm, but not the other way round.

                Howard

                #518643
                Ex contributor
                Participant
                  @mgnbuk

                  You can open up a 3mm keyway, carefully, to 4 mm, but not the other way round.

                  True – but you could make a stepped key.

                  Nigel B.

                  #518657
                  Ron Laden
                  Participant
                    @ronladen17547

                    I broke the plastic hi/low gears in the head of my CJ18 having stalled the spindle (twice) when parting steel and like you fitted a set of metal gears (the finer pitch set) as replacements. I didnt fancy having to strip the head end of the lathe should it happen again and you will know its not a five minute job.

                    Some believe that the plastic hi/low gears in the head are plastic to act as a sort of safety valve but that is not true they are plastic because they are far cheaper to produce than making them in steel, the same as with the plastic change wheel set that comes with the lathe.

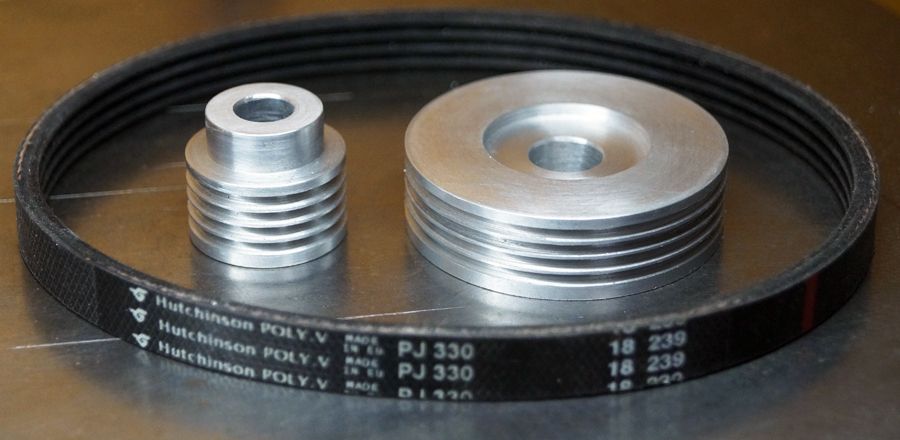
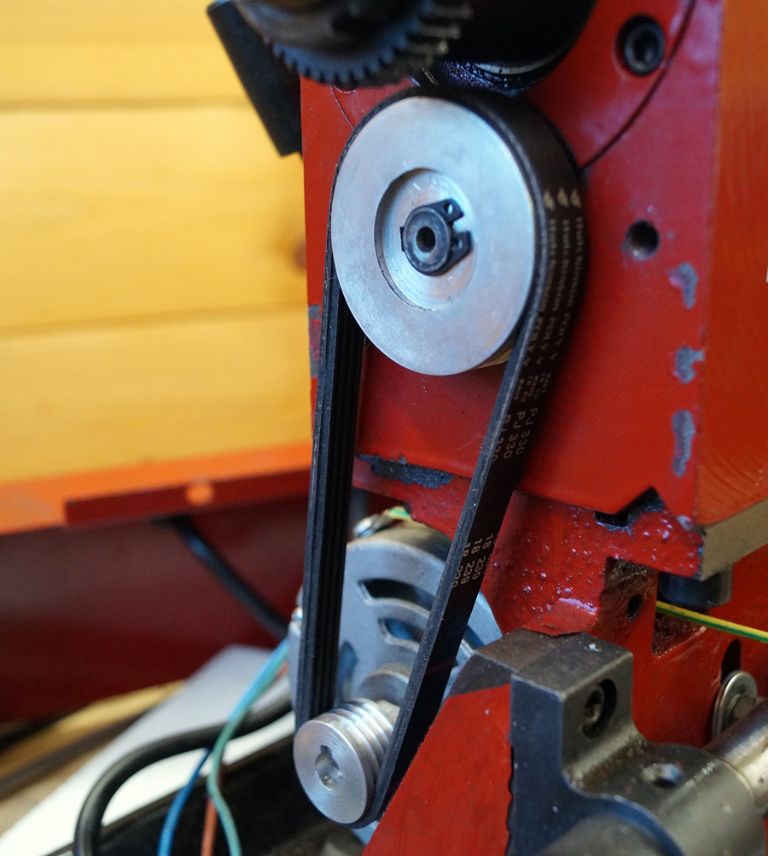
                    The problem with the metal head gears is if there is a stall or a crash they wont break but something further back in the drive will and it looks as if you have found the weak link i.e. the plastic spindle drive gear. Having fitted the metal head gears I was looking for a way of fitting some sort of safety feature that would protect the drive, the motor, gears etc. Jason came up with the idea of going for a poly V belt between the motor and spindle pulleys instead of the toothed timing belt as originally fitted. The poly v belt could be adjusted to give enough drive but with just enough slack to allow the belt to slip in a stall, it did mean having to make two poly V drive pulleys which I produced in aluminium but it all turned out well (picture of belt and pulleys below)

                    I never really had any lack of torque problems, actually not true, I did but soon learnt how to overcome them. I set myself limits on the depth of cut depending on the material type, also the same with feed rates and spindle speed. I let the machine tell me what it was happy with and when it wasnt I adjusted settings until it was. One thing I did find is that getting the lathe higher into its power band helped a lot especially with the slower cuts, so for example if a cut was recommended at say 300rpm I would go with 400 maybe even 450 depending on the type of cut and material.

                    As for parting off my CJ18 was pretty hopeless in general until I bit the bullet and made a new larger / heavier duty T slotted cross slide and a rear tool post. That transformed parting off into something that was enjoyable to do but making a new cross slide is a fairly major mod and I.m not suggesting you do it.

                    Ron

                    dsc06417.jpg

                    dsc06487.jpg


                    Edited By Ron Laden on 09/01/2021 14:48:56

                    #518668
                    JasonB
                    Moderator
                      @jasonb

                      Before anyone else gives wrong info the OP's photo shows a Pulley not a gear and they have teeth not cogs,

                      Ratio could be altered but belt would need changing as the motors position cannot be altered very much.

                      Ron's solution is good as if you do get a jam up the belt is likely to slip. Putting a bigger toothed pully on will just decrease engagement of teh smaller one on the motor and you will likely chew the teeth off the pully next time it comes to an unintended stop.

                      #518670
                      Gazz
                      Participant
                        @gazz

                        How i broke the gear, parting some steel, what kind i have no idea, but it seems to have hard spots in it… or more likely i don't know what i'm doing,

                        as it would machine nicely, then suddenly need a lot more pressure to do anything, i'd back the tool away, inspect the insert etc, no build up on the tool (thinking maybe a chip was caught and it was rubbing and not cutting)

                        So i'd try and machine it again and it'd need a fair bit of pressure, then suddenly it would bite and start machining again,

                        Only when doing this whilst parting, the last bit stalled the spindle quite violently,

                        i guess all the previous 'bites' had weakened the gear a bit maybe (it's the original to the lathe, which was made in about 2010) and the last one shattered the gear.

                        I'm just glad i have the metal gears in the headstock now, or it would have been those that went again,

                        That poly Vee belt drive looks a good idea, and that would be an easy way to change the gearing a little bit,

                        The speed controller has an overload setting (I've recently rebuilt the lathe and set the trim pots on the controller properly, according to the speed controller manual) but the overload protection which reduces motor current can't do much when a tool digs in and suddenly the chuck spinning at 500 rpm is stalled, so a belt that can slip in that situation is a very good idea.

                        #518673
                        Bob Rodgerson
                        Participant
                          @bobrodgerson97362

                          Gazz, sounds like you were work hardening the metal. This is common with stainless. what happens is that air some point the tool is allowed to rub on the surface of the parting cut and this forms a hardened skin which takes pressure to break through, when you do so the spring in the system is released and the tool digs in. This is much more obvious on a small less rigid machine like yours. The more rrididity the better.

                          #518681
                          Gazz
                          Participant
                            @gazz

                            Ahh, the workhardening thing fits perfectly, i knew it was something i was doing,

                            AFAIK it's just mild steel, it has rust on it so not stainless (tho i know there's many grades of stainless, and not all of them resist rust.. i think)

                            All i'm doing is making a couple of slugs with threads on them that will go in each end of a tube,

                            The tubes are a barstool's 'leg' that i will sit on when using the lathe or tig welding, with the standard gas ram in it, when unloaded it was at just about the right height, but sit on it and it sunk by a good foot or so (yeah i know, the real solution is to lay off the pies

                            So i'm turning it onto a fixed height pole, with a screw connection so i can undoo the pole and store the 2 parts under the workbench.

                            The threads are already cut in the pieces of steel, so i was just turning down the outer diameter and parting it off at the size i need, and i managed to bugger that up

                            OH yeah, it is a pulley, not a gear, sorry for the confusion,

                            i have a longer belt i bought thinking i could buy a larger diameter driven pulley easily, but the mentions of doing this online refer to the seig machines, which at the least have different bores for the motor pulley (as i ordered one from arc eurotrade thinking it'd fit my machine,

                            But i think the vee belt and pulleys is the better way to go now, so will look at getting that set up.

                            #518684
                            Howard Lewis
                            Participant
                              @howardlewis46836

                              Parting needs a constant steady feed, for the tool to cut not rub..Repeated shocks from dig ins causing the machine to stall would be likely to cause failure of a plastic gear.

                              FWIW, I have an insert parting tool, but gave up using it after repeated dig ins in the front toolpost, so reverted to the HSS tool, mounted inverted in the back toolpost. The HSS blade has Zero tap rake and only front and side clearance.

                              It is taken as read that the tool was mounted on centre height, not above it.It may be that the steel that you were parting off work hardened, (likely if the tool was allowed to rub ).

                              A Vee or polyvee belt, as opposed to a toothed belt, drive from Motor provides some overload safety, in that the belt can slip in the event of a stall

                              But gears will provide the various ratios for screwcutting, or a range of feed rates. But on many lathes there is no power cross feed, so that is no help when parting off. The manual feed has to be at a reasonably steady rate to compromise between allowing the tool to rub and forcing the tool by over feeding.

                              As Ron has already said,replacing plastic gears with metal moves the weak point to somewhere else in the drive train, possibly with more expensive results in the vent of a stall. Motors and control boards can be expensive "shear pins". A belt that can slip may be the failsafe point in the event of a stall.

                              Howard

                              #518686
                              Iain Downs
                              Participant
                                @iaindowns78295

                                For what it's worth, I've had varied success with parting off with my CJ18A.

                                Currently (hoping nothing falls on my head), I'm having decent success. The main recent change for me was throwing away a parting tool which I'd fettled and replacing with an indexable carbide parting tool. this sits on a steel QTCP (250-000 type I think) available from china and ARC (the parting tool is from ARC).

                                This is working well with various steels and aluminium. I've also got a HSS parting blade from ARC which works for aluminium but is rather more erratic on steel (it's a delight on EN1A leaded).

                                I actually think the main improvement from when I got the lathe is increasing the saddle rigidity. I did that by replacing the mechanism which holds the saddle to the bed with something more substantial and tightening it up.

                                Which is not dissimilar to Ron's experience.

                                What I've struggled with are attempting to do threading, particularly of large diameters and also cutting large diameters (say 6 – 9 inches for flywheels and the like). Cutting at 100 RPM or less just doesn't really work (though that's around what it should be I think), so I cut a lot faster, which has it's own issues.

                                Iain

                                #518693
                                SillyOldDuffer
                                Moderator
                                  @sillyoldduffer
                                  Posted by Bob Rodgerson on 09/01/2021 15:37:34:

                                  Gazz, sounds like you were work hardening the metal. This is common with stainless. what happens is that air some point the tool is allowed to rub on the surface of the parting cut and this forms a hardened skin which takes pressure to break through, when you do so the spring in the system is released and the tool digs in. This is much more obvious on a small less rigid machine like yours. The more rrididity the better.

                                  As Gazz has explained since he was parting rusty mild-steel, I think work-hardening is unlikely in his case. But otherwise Bob's analysis is correct. A blunt tool, off-perfect tool height, or awkward material could all cause the initial resistance and mini-lathes being not particularly rigid are highly likely to dig in. Small lathes just aren't good at parting off! I avoided doing it on my mini-lathe: it's a job for real men with nerves of steel, not just a reinforced lathe.

                                  I also smashed and replaced my two speed gear. I'm not sure the gears are plastic simply for cheapness – they are also quieter than metal, which is a definite virtue. I was also concerned about what might break next! Dig-ins put a considerable shock load on the bearings, hi-lo gear, spindle drive, belt, motor and electronics. My crash pulled the motor out of alignment and tore half a dozen teeth the belt – the entire power train suffered.

                                  As the worst that can happen is a damaged motor and burnt out control board. I'd rather the break occurred as far away from the electronics as possible. However, I don't think there is a right answer because mini-lathes aren't identical. Though I replaced plastic with plastic the amount of work involved strongly tempted me to fit metal gears instead. It's also an opportunity to fit taper bearings.

                                  Dave

                                  #518743
                                  Gazz
                                  Participant
                                    @gazz

                                    The parting tool was brand new, i was going to get an indexable parting tool, but everything i read about them said that on little lathes like this there's a good chance of breaking the inserts, and at 5 quid a time that'd get expensive.

                                    So i went for a HSS parting blade, but one of those with a T shape to it, one of these in fact:

                                    https://www.chronos.ltd.uk/product/new-3-8-sq-shank-clamp-type-parting-tool-with-4-1-2-m-35-hss-chipbreaker-blade/

                                    I made sure it was as close to centre height as i could get it (i still need to get a QCTP for this lathe) but i had read that it's better to be a little under than over centre height,

                                    When i replaced the hi – lo gears in the headstock i fitted angular contact bearings at the same time, it is a bit noisier with the metal gears, but i quickly got used to that.

                                    #518786
                                    Ron Laden
                                    Participant
                                      @ronladen17547

                                      I can only speak for the CJ18 which is the mini lathe I had and the bottom line is it lacked rigidity, the amount the tool post kicked when I stalled mine was scary. Mini lathes are all very similar but some models may have more rigidity than others maybe some have less. They are what they are and have limitations but if you accept that and work around it and don't push it beyond what it's capable of then they can produce some nice work.

                                      For me I came to the conclusion that the biggest weakness rigidity wise was the small tool post sat on a small top slide which sits on a small cross slide. I often thought that if those 3 parts were increased by 25% in all dimensions it would improve things no end. It wouldn't make it perfect but I,m sure it would help and 25% wouldn't make them too big.

                                      I wouldn't knock the mini lathe, far from it I produced some good work on mine. Starting out as a beginner it probably taught me more about turning then a big rigid machine that does everything with ease.

                                      Just my two penneth.

                                      Ron


                                      Edited By Ron Laden on 10/01/2021 08:08:33

                                      #518788
                                      JasonB
                                      Moderator
                                        @jasonb

                                        I think the beginner should also be more willing to reach for the hacksaw than carry on with over expectations of what a light hobby machine can part off.

                                        #518789
                                        Ron Laden
                                        Participant
                                          @ronladen17547

                                          Probably true Jason but for me I always thought it a bit of a failure in doing that though it isn't of course that was just me. That's why I made the heavier cross slide to take a rear tool post but it wouldn't be for everyone.

                                          Edited By Ron Laden on 10/01/2021 08:23:27

                                          Edited By Ron Laden on 10/01/2021 08:48:26

                                          #518797
                                          SillyOldDuffer
                                          Moderator
                                            @sillyoldduffer
                                            Posted by JasonB on 10/01/2021 08:11:54:

                                            I think the beginner should also be more willing to reach for the hacksaw than carry on with over expectations of what a light hobby machine can part off.

                                            Hacksaw was my answer!

                                            An interesting experiment is to mount a DTI on the bed and measure how far tools and jobs move when pressed hard with a thumb. Push in various directions to see just how much bending, lifting and side movement there is. Setting up it pays to minimise all possible movement by minimising overhang, locking unused slides, supporting the job, and snugging everything up.

                                            Big lathes move less than small ones because they're bigger, but even they need all the help they can get when parting off. My WM280 parts off OK most of the time from the front-tool post, but the massive rear post is safer. A fairly recent discovery due to cowardice is that the WM280's power-traverse is better at parting off than I am. I think this is because the machine applies constant force whereas I wobble about and vary the cutting pressure. No such luxury as a power-traverse cross-slide on a mini-lathe so keeping the feed-rate on target depends entirely on the operator. It's a skill.

                                            One of the HSS parting-off tools I bought for my mini-lathe didn't work at all. Impossible, and I assumed it was cheap rubbish. Except the same tool cuts well on my WM280. Rigidity!

                                            Ages ago someone posted a film of a Canadian factory making shells during WW1. One of their lathes was set up for parting off and the tool-holder was massive. No messing about, their low-slung industrial parting-off attachment must have weighed at least 10kg and it replaced the tool-post and cross-slide entirely. Far more rigid than the rear tool-post I think is the bees knees on my lathe.

                                            Dave

                                            #518844
                                            Gazz
                                            Participant
                                              @gazz

                                              i've just bought a second hand cold cut saw, so i may never have to part in the lathe again… it's one of those that spins the blade at 85 rpm's and pumps coolant over the blade when it is turning, a nice upgrade to my abrasive wheel type cut off saw,
                                              And hopefully much cleaner than the evolution rage type i was thinking of getting, the ones that use a tct blade spinning at a few thousand rpm's (can't believe the little ones that cost about £100 spins the185mm blade at 4500 rpm!)

                                              Unfortunately if i were to use a hacksaw to cut the 2 inch piece of steel round bar, i'd not be able to do anything for a week whilst my joints recovered (arthritis) hence my reliance on power tools,

                                              But i still will part little things on the lathe… i just bought that nice new parting tool after all, just not steel, as i now know thats outside the capacity of this little toy lathe i have.

                                              I did notice the compound slide was going to be an issue, so before i started parting i locked the gibs tight, but of course i couldnt do that to the cross slide and carriage… but i have recently (as in a few weeks ago) stripped and re-fitted all the moving parts of the lathe, so i have the gibs and that crappy excuse of a carriage adjuster as tight as i can have them whilst still allow them to move.

                                              I do want to make tapered gibs for this lathe one day, but not having a milling machine or even a milling slide, i might struggle with manual tools to cut them, wish there were ready made tapered gibs i could buy and fit, but aparantly for the carriage one that needs some other mods, but anything's got to be better than the way it's held on atm.

                                              I think it really was the interupted pressure on the parting tool that was at fault, i had one hand turning the cross slide handle, the other hand with a small brush slathering cutting oil in the grove it was cutting… which at the same time the brush was positioned just over the blade to stop the shower of hot chips going on my hand that was turning the handle (well shower of filings was more what i was getting, only when it dug in did i get some nice chips from it..and we know how that ended 😀

                                              A power cross slide is something i often wish i had, i can remember years ago using a small battery drill with a hex key in the chuck and powering the compound with it when making a taper, but that was on delrin, which is what i'd mostly been playing with on this lathe, or alli bar, this was really the first bit or real metal i did anything with in it.

                                              I've owned the lathe since 2011, but hardly used it, 5 of those years it spent in storage when i lived in a crappy house with not even a shed, so i've really not learnt much in the almost 10 years i've had it

                                              #518853
                                              Andy_G
                                              Participant
                                                @andy_g
                                                Posted by Gazz on 10/01/2021 12:30:28:

                                                But i still will part little things on the lathe… i just bought that nice new parting tool after all, just not steel, as i now know thats outside the capacity of this little toy lathe i have.

                                                I did notice the compound slide was going to be an issue, so before i started parting i locked the gibs tight, but of course i couldnt do that to the cross slide and carriage… but i have recently (as in a few weeks ago) stripped and re-fitted all the moving parts of the lathe, so i have the gibs and that crappy excuse of a carriage adjuster as tight as i can have them whilst still allow them to move.


                                                On the belt pulley – if you are ordering a commercial pulley, check the profile required carefully. Some of the mini lathes use an obscure pitch (maybe not yours) – timing pulleys are available relatively cheaply, so it might make sense to replace both motor and driven pulleys with something more readily available.


                                                On the rigidity issue, I believe that a fundamental weakness of the generic "Mini Lathe" design is the torsional stiffness of the bed – even with the slideways working properly and the gib strips snugged up, the bed can twist in response to cutting forces, allowing the depth of cut to vary.

                                                Once can demonstrate this by putting a DTI between the bed and the work and applying force somewhere that doesn't involve the carriage, compound slide or toolpost .

                                                I have bolted my (similar design) lathe to a substantial beam which greatly reduces this. movement.

                                                Can't remember if I've posted this here before or not.

                                                (Tin hat on)

                                                Edited to add:

                                                This is 42mm dia. leaded mild steel with eccentric holes in it (in fast forward). I don't pretend that it's a masterclass, but it proves that it can be done. Two hands on the cross slide to try and keep an even feed.


                                                Edited By Andy_G on 10/01/2021 13:01:35

                                                #518905
                                                Howard Lewis
                                                Participant
                                                  @howardlewis46836

                                                  Don't be embarrassed to use a saw. No point in persisting with a dodgy method and ruining material which is irreplaceable, or expensive or both, possibly combined with damage to the tooling and/or lathe.

                                                  Recently had to part off two pieces of 4 inch diameter x 2 inch long Aluminium.

                                                  Went as far as felt comfortable with, and then finished off with a saw and then Often this is the safest, most parctical means.faced the parted / sawn surfaces.

                                                  Quite often use the bandsaw to produce a blank which is then faced back to finished length.

                                                  Having a small pot magnet with a screw in column, made up a tap and nozzle and with the aid of some monkey blocks, to make up a gravity feed of soluble oil for parting off. The bottle sits above the lathe and feeds through windscreen washer tubing to the tap/nozzle . The nozzle is positioned to drip soluble oil onto the parting blade.

                                                  Works so well that often parting off is now with power fine feed!

                                                  Howard

                                                  #518996
                                                  Gazz
                                                  Participant
                                                    @gazz
                                                    Posted by Ron Laden on 09/01/2021 14:47:05:

                                                    Jason came up with the idea of going for a poly V belt between the motor and spindle pulleys instead of the toothed timing belt as originally fitted. The poly v belt could be adjusted to give enough drive but with just enough slack to allow the belt to slip in a stall, it did mean having to make two poly V drive pulleys which I produced in aluminium but it all turned out well (picture of belt and pulleys below)

                                                    dsc06417.jpg

                                                    dsc06487.jpg

                                                    Edited By Ron Laden on 09/01/2021 14:48:56

                                                    Dang, i was hoping i could buy those pulleys, a serpentine belt and have a crash proof set up on my lathe.

                                                    I guess i have the tool to produce most of that tho once i get the lathe up and running again, i don't have a mill or own any keyway broaches, but i do have a little 1 ton arbour press, so i could be half way there for that part (depends how much a broach kit would be for the size i need)

                                                    I also recently finished building my 3D printer kit, and i could do a proof of concept thing on that for the pulleys, to see how big i can go on the spindle pulley and if it makes enough of a difference to bother with,

                                                    #519016
                                                    Ron Laden
                                                    Participant
                                                      @ronladen17547
                                                      Posted by Gazz on 10/01/2021 22:10:42:

                                                      Posted by Ron Laden on 09/01/2021 14:47:05:

                                                      Jason came up with the idea of going for a poly V belt between the motor and spindle pulleys instead of the toothed timing belt as originally fitted. The poly v belt could be adjusted to give enough drive but with just enough slack to allow the belt to slip in a stall, it did mean having to make two poly V drive pulleys which I produced in aluminium but it all turned out well (picture of belt and pulleys below)

                                                      dsc06417.jpg

                                                      dsc06487.jpg

                                                      Edited By Ron Laden on 09/01/2021 14:48:56

                                                      Dang, i was hoping i could buy those pulleys, a serpentine belt and have a crash proof set up on my lathe.

                                                      I guess i have the tool to produce most of that tho once i get the lathe up and running again, i don't have a mill or own any keyway broaches, but i do have a little 1 ton arbour press, so i could be half way there for that part (depends how much a broach kit would be for the size i need)

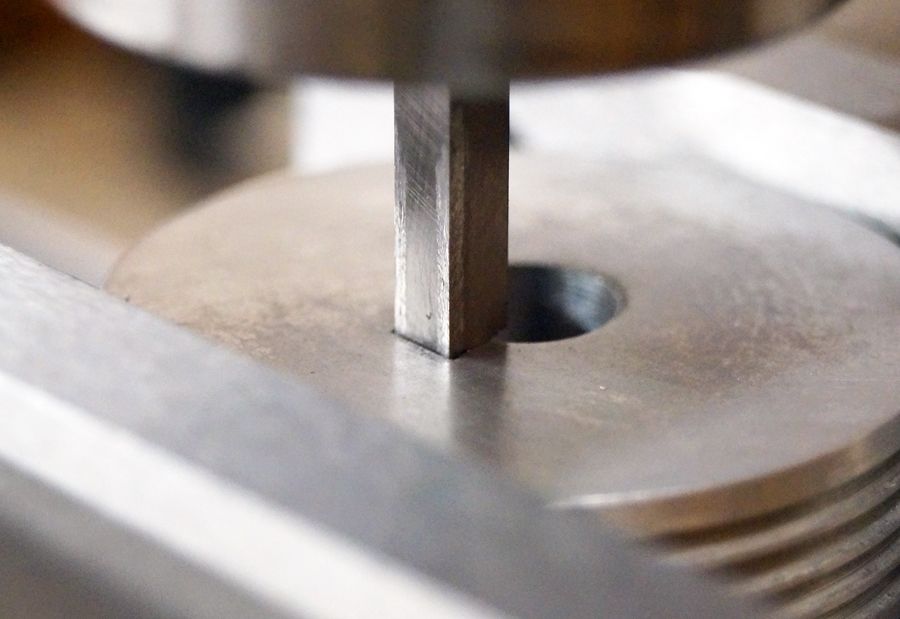
                                                      You don't need a broaching kit for the keyway, Jason put me onto using a piece of tool steel (picture below), I used the mill as a press I know you don't have a mill but you have your press. Jason also explained doing the same in the lathe with the pulley in the chuck, tool steel cutter in the tool post and use the carriage back and forth to make the cuts.

                                                      dsc06432.jpg

                                                    Viewing 25 posts - 1 through 25 (of 34 total)
                                                    • Please log in to reply to this topic. Registering is free and easy using the links on the menu at the top of this page.

                                                    Advert

                                                    Latest Replies

                                                    Home Forums Manual machine tools Topics

                                                    Viewing 25 topics - 1 through 25 (of 25 total)
                                                    Viewing 25 topics - 1 through 25 (of 25 total)

                                                    View full reply list.

                                                    Advert

                                                    Newsletter Sign-up