Progress No.1 Bench Drill

Advert

Progress No.1 Bench Drill

Home Forums Workshop Tools and Tooling Progress No.1 Bench Drill

Viewing 18 posts - 1 through 18 (of 18 total)
  • Author
    Posts
  • #362962
    Simon Orchard
    Participant
      @simonorchard42334

      Hi,

      I got the above type bench drill the other day and the tool tray is so tight on the column that the only way to get it off was to gently knock a cold chisel into the split on the casting to loosen it.

      Is this normal? I'm tempted to enlarge the hole on the mill regardless, moving the head up and down is going to be a nuisance if I have to get the chisel out every time I want to.

      Simon.

      Advert
      #19003
      Simon Orchard
      Participant
        @simonorchard42334
        #362964
        Vic
        Participant
          @vic

          I’ve never had that problem with mine. It was pretty tight coming off when I first got it but that was because of the accumulated crud on the column. Once it was clean it was fine.

          #362965
          Simon Orchard
          Participant
            @simonorchard42334

            The top of the column where the head sits is clean, further down it's a bit grotty but the tray won't drop back over the column despite wiping it and the hole in the casting.

            #362966
            Bazyle
            Participant
              @bazyle

              You are lucky you got the tool tray at all. frown Measure the gap when on, add a couple of thou and make a piece of plastic that fits the slot, but is soft enough to compress a tad when you tighten it. If necessary adjust by adding shims of mil bottle.

              #362968
              Clive Foster
              Participant
                @clivefoster55965

                Simon

                Odds are the clamp has been seriously overtightened for many years causing the cast iron to flow slightly distorting the hole. Simply opening the split doesn't work because the distortion causes another bit of the hole to grip. Super cleaning, careful inspection and a bit of abrasive work on the lobes will sort it. PIA job as the amount of effort involved in getting it right is out of all proportion.

                If you do put it on the mill I imagine that clamping up with a suitable washer in the slit and inspecting the bore with a dial gauge will identify any internal lobing so you could bore it back to true size and roundness. If I ever get conned into doing another job of that sort it will get re-engineered with a floating collet system instead of a simple clamp up slit. Much nicer to move and very little torque on the bolt to tighten. Use a stud with a Bristol handle.

                Clive.

                #362974
                Simon Orchard
                Participant
                  @simonorchard42334

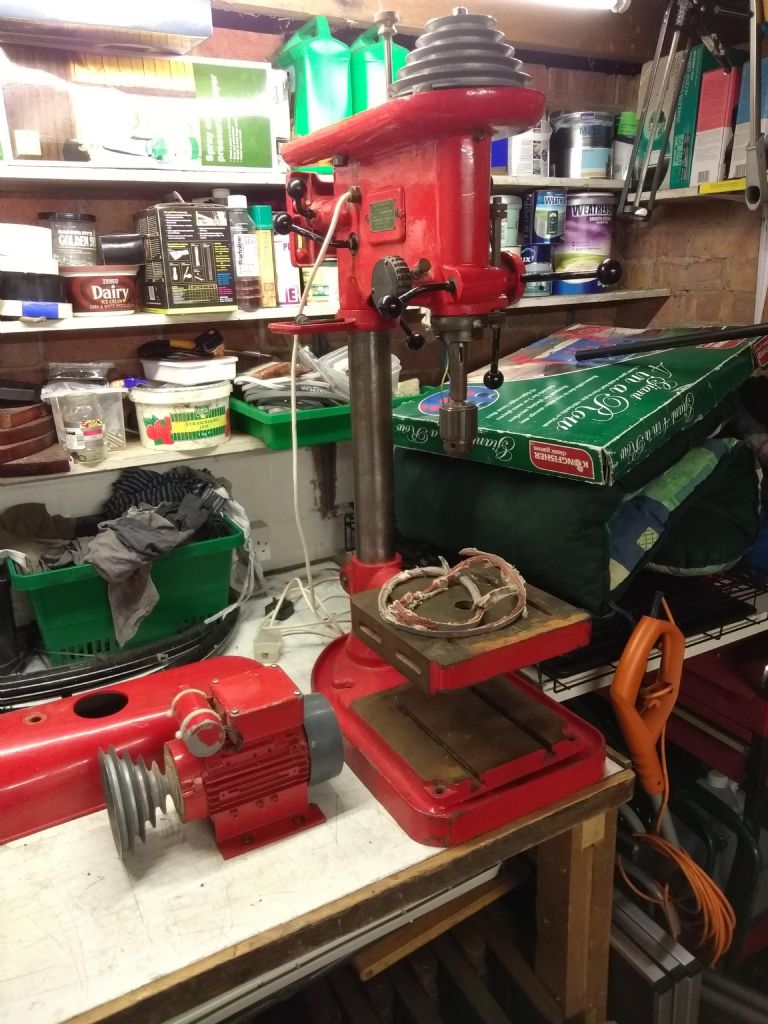
                  Here it is in all it's fire engine red glory. The new belt appeared this morning so hopefully I can get it set up after dinner (Dad is coming round to investigate, an extra machine tool in the family is cause for celebration!).

                  #362981
                  mechman48
                  Participant
                    @mechman48

                    No pic' ?

                    Geo.

                    #362984
                    Simon Orchard
                    Participant
                      @simonorchard42334

                      *shrug*, I can see a picture. Probably made a hash of the link. Hang on.

                      #362985
                      not done it yet
                      Participant
                        @notdoneityet

                        I’ve got a ‘no entry’ sign in shades of grey!

                        Easiest to make an album and post it from there.

                        #362986
                        Simon Orchard
                        Participant
                          @simonorchard42334

                          Yes?

                          drill.jpg

                          #362991
                          Jeff Dayman
                          Participant
                            @jeffdayman43397

                            Pic is visible to me. Re your overtight collar – is there room beside the clamp screw to drill and tap for a setscrew? If so the setscrew could be installed to "jack" the halves apart a bit to ease movement (after loosening the clamp screw of course). Not terribly convenient but not very involved to do either. Coarse threads largest dia possible would be a good plan I think, if this idea is possible.

                            Edited By Jeff Dayman on 19/07/2018 16:00:01

                            Edited By Jeff Dayman on 19/07/2018 16:00:28

                            #362994
                            Simon Orchard
                            Participant
                              @simonorchard42334

                              How about doing it the other way. Turn a sort of dimpled disc that goes into the slit to fit the plain hole in the clamp and use the other threaded hole to force the clamp open against it? Something like a stopcock wheel on a threaded rod.

                              It means relying on the fact that the clamp is too tight rather than positively closing it, but it's only a tool tray and if it relaxes over time then I can put it back to standard again.

                              Edited By Simon Orchard on 19/07/2018 16:16:09

                              #362997
                              Jeff Dayman
                              Participant
                                @jeffdayman43397

                                Hi Simon, if your clamp screw will fit from the other side your suggested method should work I think. A plain piece of sheetmetal or gauge plate slipped into the slot and maybe taped in place would be even simpler than the dimpled bit. As you say, this method is reversible later with no damage to machine if things relax in time.

                                Edited By Jeff Dayman on 19/07/2018 16:52:48

                                #363003
                                Brian Wood
                                Participant
                                  @brianwood45127

                                  Simon,

                                  If I may butt in and offer some safety advice. These are extremely top heavy pieces of kit and the more so with the motor mounted up in the air up top.

                                  Do please bolt it down in all three positions; when you start hauling on the star wheel and the drill grabs on break through the last thing you need is to have it fall on you. No it hasn't happened to me, my imagination works well though.

                                  Enjoy the new toy

                                  Brian

                                  #363073
                                  Simon Orchard
                                  Participant
                                    @simonorchard42334

                                    By all means, butt away. I hadn't considered fixing it down, but then I hadn't thought about how top heavy it could be. Bolt it through the bench top or screw it?

                                    Updates on the machine:

                                    The tool tray casting gets in the way of the clamp handle going in the wrong way unfortunately, on the mill it will go.

                                    The new belt was fitted last night and it runs with no discernible wobble in the spindle nor play with it at full extension. Parental approval says it's a good machine.

                                    Tony Griffiths says that the extension is part of the spindle, someone on another forum says that he has the same one at work and there's a ring with a tommy bar hole that can be wound down to force the extention off of a Jacobs taper at the end of the spindle. – Discuss

                                    #363078
                                    Brian Wood
                                    Participant
                                      @brianwood45127

                                      Hello Simon,

                                      Bolt it down for preference.

                                      I have the same model drill, but the # 34 Jacobs chuck fits directly onto a Jacobs taper [# 6 in my case] on the end of the spindle. There is a screwed collar with a tommy bar hole (not terribly effective, I use pipe grips now) behind the chuck to be able to push the chuck off the taper.

                                      You have a Morse taper end to your spindle which I think is a better fitting but the daylight clearance below will be reduced correspondingly. I am confused over your tool tray that you refer to, where is that situated as it's not obvious in your picture. Your table is a little different to mine in that you have side bolting slots below the table surface, mine just has a plain flat cast top.

                                      I've had excellent service from it since buying it, badly needing new spindle bearings, in 1962 for £25 . I have added an intermediate pulley cluster between motor and spindle to get the lower speeds down for drilling the larger holes, that facility is used less now that it has an old 3 speed washing machine induction motor fitted instead of the 1/2 HP single speed 1425 rpm version. I can just switch between the motor windings which is a lot more convenient

                                      My server makes it impossible now to post pictures here, I can't even put them in albums; some odd incompatibility problem which hides the appropriate upload button. I you want to see some PM me with your email address

                                      Regards

                                      Brian

                                      #363081
                                      Simon Orchard
                                      Participant
                                        @simonorchard42334
                                        Posted by Brian Wood on 20/07/2018 10:57:44:

                                        I am confused over your tool tray that you refer to, where is that situated as it's not obvious in your picture.

                                        Hi Brian,

                                        The thing I am referring to a tool tray is sticking out on a separate cast ring just under the drill head on the column. It's just below the second shelf up and has the chuck key sitting on it in the picture. It's a very useful stop to prevent the head from falling down the column when you unclamp it. I am aware that it isn't a substitute for the head clamp!

                                        I'll try unscrewing the ring, it would be nice to get the clearance between the table and the end of the chuck.

                                        Mine cost me £150 last week, there were others available cheaper, but they all seemed to have 3 phase motors which would have brought the cost up to about the same. It seems a reasonable price anyway.

                                      Viewing 18 posts - 1 through 18 (of 18 total)
                                      • Please log in to reply to this topic. Registering is free and easy using the links on the menu at the top of this page.

                                      Advert

                                      Latest Replies

                                      Viewing 25 topics - 1 through 25 (of 25 total)
                                      Viewing 25 topics - 1 through 25 (of 25 total)

                                      View full reply list.

                                      Advert

                                      Newsletter Sign-up