Lathe not turning parallel problerm

Advert

Lathe not turning parallel problerm

Home Forums Beginners questions Lathe not turning parallel problerm

Viewing 13 posts - 1 through 13 (of 13 total)
  • Author
    Posts
  • #249670
    ChrisH
    Participant
      @chrish

      I have found my lathe was not turning parallel when turning between centres. Checking why, I found that the tailstock centre was not true with the headstock centre both vertically and horizontally by a very small margin but it produced a taper to the tune of 0.004"/inch. This I have corrected, checking using the old 'feeler held between the centres' trick, feeler now held at 90 degree to longitudinal axis both vertically and horizontally. However, it still turn out of parallel by 0.001"/inch.

      I have not tried turning a, say, 4" length of 1" dia bar held just in the headstock chuck at the moment but the last time I did if I remember correctly it was pretty true, less than 0.001" over the 4 inches. Am I right in now assuming that the lathe is turning out of parallel between centres because the bed needs truing up again? I am going to check this hopefully tomorrow but it would be nice to know if I'm on the right track before I start or if there is anything else to check out first!

      Chris

      Edited By ChrisH on 06/08/2016 19:47:46

      Advert
      #8239
      ChrisH
      Participant
        @chrish
        #249671
        kevin beevers
        Participant
          @kevinbeevers61752

          have you looked at the chuck?if you have another chuck try it

          #249675
          Sam Longley 1
          Participant
            @samlongley1

            As a beginner might I ask if the method is to put a centre each end & then drive using a dog at the headstock end.

            Or is that not correct?

            #249678
            Neil Wyatt
            Moderator
              @neilwyatt

              Hello Chris,

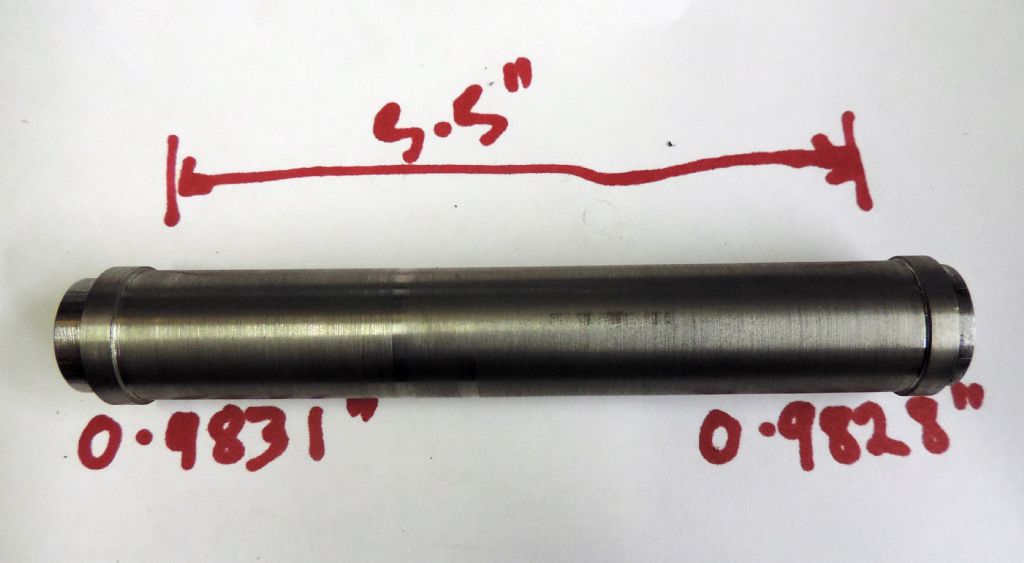
              Do you still have a mini lathe? On any lathe with a set-over tailstock any out-of parallel between centres can be corrected by adjustment.

              The best solution is to turn up a test bar with two collars the same diameter at each end. Do it between centres and reverse the bar so light finishing cuts are taken at the same setting and at the headstock end.

              This is my test bar:

              test bar.jpg

              To set the tailstock precisely, use a DTI or dial gauge in the toolpost and adjust so that when between centres both collars give the same reading.

              Neil

              #249682
              Ajohnw
              Participant
                @ajohnw51620

                You need to check with a test bar. If there is anything out on the bed moving the centres together wont give the same results as when they are far apart. Don't start lapping the base of the tailstock etc until you have checked it over this way.

                If it's a 0.001" per inch you can correct it by offsetting the tailstock. Personally I would get it as good as it can be via tailstock adjustment and then use a morse taper reamer to correct the socket. It will only need a tiny bit of truing up. It wouldn't be a bad idea to check the headstock end first. I better way of doing that is to form 2 rings on a bar say 6" apart and take very light cuts on the ring and then measure the difference. 1" bar is a bit thin really. 1 1/2 would be better. If the far end is bigger it can just be down to the bar bending a little or the bearings being a bit loose or oval. Running the same cut several times may help remove both problems. Some older lathe makers suggest flexing the bed to make them the same size if the difference is small but that correction will be much bigger at the tailstock end so has to be removed in part by adjusting that. I don't think it's a good idea.

                John

                Edited By Ajohnw on 06/08/2016 20:34:39

                #249689
                ChrisH
                Participant
                  @chrish

                  Hi,

                  Kevin – the chuck is a new 4 jaw with the centre clocked to run true in it,

                  Sam – correct, that is what I was using,

                  Neil and John – it is not a mini mill it is a Weiler, a German built lathe from the late 60's or so, with about 250mm swing by 600mm, or so, a reasonable size lathe, with 4 holding down bolts at the headstock and another 4 at the tailstock end. The headstock bearings are taper roller bearings back to back and I know they are good and correctly adjusted. The headstock nose was check clocked true when I made up a backplate for the new 4 jaw which was machined on the nose, and the chuck check clocked true as well. The manual says to do a turning test with 3-4 inches hanging out the chuck of 3/4 inch diameter bar and what holding down bolts to adjust to true it up, but I guess I will need to make some more shims up for under the feet. I have some 1 inch diameter bar in stock but no 1 1/2 inch bar and agree that would be better but will use what I have. The tailstock has the horizontal adjustment built in so correcting for horizontal error is easy, but vertically it was 15 thou out so I have shimmed that true so the centres match exactly. That is why I have come to the conclusion that there must be a wee bit of twist on the bed so, in the absence of any other idea I will turn a test bar as per the manual first, get as much twist that the test shows up out as far as I can by shimming where required, then check the centres still match and if not re-adjust, then turn a test between centres and see how I go. The problem I see with a 6 inch test bar is that you need the lathe true to turn the bar true – or am I missing something? Neil, not sure why you did your test bar with 0.0003" difference in diameters, or is that just how it turned out? Do you 2 guys think my proposed method of check and correction is the right one?

                  Chris


                  Edited By ChrisH on 06/08/2016 22:01:24

                  #249695
                  Ajohnw
                  Participant
                    @ajohnw51620

                    I don't like the idea of twisting the bed to true a lathe up. If you correct say 0.001" at 3" it's going to move the end of the bed by bed lenght / 3" x what ever the error is. That then is taken out with tailstock adjustment. What I generally do is make up some screw jacks sensibly or with just nuts and bolts and mount the bed strain free by adjusting with my fingers then tightening down onto the jacks.

                    It sounds like you could make a decent ordinary between centre test bar providing you have a good sensitive DTI. Might be a better way of seeing what is going on. Just use the 4 jaw, with a length of say 1" silver steel with little sticking out of the chuck. Aim to get that running true as good as you can. Ideal is no deflectuon on a 1/10,000 reading DTI. Face it and lightly centre drill it slowly. That will come out central as they cut on on side if the tailstock is out. Then do the same to the other end. You can make them like a posh one. Turn down the OD a bit for say 3/8", chamfer and turn a shallow recess in the end and then centre drill. This just protects the important bits from bumps. Or of course buy one. Not useful that often but if it has a morse taper on it can also be used to check the headstock. It's best to check that the headstock bearings are fully home.

                    To use that check the top first by running a dti over the top at several places with the cross slide. This gives you and idea of height problems. Then run the diti along the side. If your feeling manic it's possible to work out what any height difference will do to the readings on the side. The height tolerance on the tailstock is often – 0 to plus something. Often 0.05 / 0.002" I assume this is better when that is corrected by offsetting the tailstock rather than it being low. Not sure.

                    Anyway using the bar you can align the tail stock as well as it can be. You could also do turning tests and offset as per Neils suggestion.

                    Also or even instead when it's pretty accurate and if the height variation is even suggesting that the tailstock is a touch high and the bed is flat …………….

                    What I have done when needed is to re ream the morse socket in the tailstock to remove the last few thou of error. Not at all sure how to do this on a light weight lathe but you have a decent one. Fit a morse reamer in the 3 jaw. I'm assuming that runs pretty true, it helps to rotate work just as the jaws close on it. You should feel some resistance. Then extend the tailstock quill by a couple of inches and slide the tailstock down the bed onto the reamer. You will only be removing a few thou. The whole thing will find it's own centre, the weight of the tailstcok is enough to do that. Just like a centre drill a morse reamer will cut on one side if needed so tends to sweep out the correct angle and then true the lot up.

                    The biggest risk with this is that it's already been done like this several times and when you put something in the socket next to no morse taper sticks out. Done correctly that will hardly change.

                    1" bar will be fine for turning tests if there is a centre in the end, If it's just chucked 1 1/2 or even 2" is needed really and even 1 1/2" is likely to flex a bit. 6" is usually used because most lathe work is reckoned to be shorter than that – except when there is a centre in the end.

                    laughForgot to mention – if you do make a between centre bar and rotate it against a dti the deflection should be very low or something has gone wrong, bent bar or centre not true. They may be a touch out in an angular fashion due to the way it has been made but that should make very little difference. If you buy one they are usually spec'd to +/- 0.0002 or 0.0005. It is possible to make one to similar limits.

                    John

                    Edited By Ajohnw on 06/08/2016 23:06:01

                    Edited By Ajohnw on 06/08/2016 23:12:58

                    Edited By Ajohnw on 06/08/2016 23:13:43

                    All these edits – too quick as I want to go to bed.

                    Edited By Ajohnw on 06/08/2016 23:15:16

                    #249701
                    Hopper
                    Participant
                      @hopper

                      The between centres turning test should be the last of a series of tests and corrections you do on the lathe, following

                      1. Check bed is level along its full length, using a precision level. This ensures there is no twist in it.
                      2. Check headstock bearings are in good condition and are correctly adjusted. Do this at operating temperature after running the lathe for half an hour or so.
                      3. Make sure all the gibs and dovetails on the carriage and cross slide are in good condition and adjustment and working correctly. Clean out any swarf etc. Check for wear on the bed and slideways that could affect movement.
                      4. Turn a test piece held in the chuck. Something like 1" diameter or more by 6" long. Check it is turning parallel along the length. If not, your headstock or bearings are not set up true to the lathe axis, or you have a worn area on the bed ways. Adjusting the level of the bed can be used to correct errors on this test.
                      5. The last step is to make the between-centres turning test. After everything else is set up correctly. Any error in the between centres test is corrected by adjusting the alignment of the tailstock until you get a between-centres test piece that is turned parallel. If you are holding the headstock end centre in the chuck, it should be a soft centre and turned true in situ before making the test.. Adjusting the bed levelness to make the between centres test piece parallel will throw out the alignment when turning work held in the chuck, so is never the way to correct for between-centres test results.

                      If you are happy already with the way your lathe turns a workpiece or test piece held simply in the chuck (NO tailstock centre), and you have no chatter problems etc, you can skip the first four steps and go straight to the last step. But don't adjust bed level to try to correct it. Move the tailstock to whatever position it needs to turn parallel. This will not necessarlily be dead-on as measured by the shim between centres test or by dial indicator mounted on the chuck and bearing on the tail centre. You may well have to move the tailstock out of technically perfect aligment to get a perfect test bar result. It is the end result that counts.

                      Edited By Hopper on 07/08/2016 06:33:15

                      #249702
                      not done it yet
                      Participant
                        @notdoneityet

                        Do start by turning a rigid bar only held in the chuck. No amount of off-setting the tailstock will make any difference if the tool position is changing as it traverses the ways. Perhaps tell us what this bed length is and how the lathe is supported? Flimsy timber is a no-no, timber is not that good, but a sturdy steel stand on a solid base is good.

                        Don't assume anything. All that is likely to do is lead you up a dead end!

                        #249721
                        Ajohnw
                        Participant
                          @ajohnw51620

                          Don't know about Hopper but I feel that the use of a precision level is miss understood. There are 2 aspects to levelling a machine. The first one is so that coolant drains away cleanly. The 2nd is a precision level across the bed or saddle with readings along the bed to detect twist. It's not an easy thing to pick up any other way. The lathe bed doesn't need to be level to do this as the check is via bubble movement. By implication it needs to be pretty close though. I think Harold goes through it here. But as mentioned I don't agree with a couple of things he suggests.

                          **LINK**

                          There is a chance that a level might pick up bed wear as well. Lathes usually wear most up by the headstock so the slope may change as the saddle is moved along. Also dish shaped warp along the bed. All of these will also cause diameter changes when turning tests are carried out. They will also show up when checked with a test bar. There is no easy way of telling what is actually causing the problem unless bed and spindle can be checked independently.

                          A precision level needn't be that expensive. I have digital one that has a bubble level on top of it. It's very sensitive. The brand is Wixey, there are probably others. The bubble can be checked by turning through 180 degrees and looking for the same bubble movement. It's also used to zero the digital scale. It has a magnetic base so can be placed on a parallel strip etc. These things do tend to be rather short for some applications.

                          I'll repeat though – it's best to mount the bed strain free first and try that. Bed strain is only intended to remove reallyminuscule errors. Personally I also feel it belongs in the era when lathes came on massive cast iron stands. One problem is that to strain a bed to a fixed position that wont change over time the stand needs to be a lot stiffer than the bed.

                          John

                          #249740
                          ChrisH
                          Participant
                            @chrish

                            To answer "not done yet" – the overall length of the lathe is approx 1.5m with about 1.1m from headstock to the far tailstock end. It is sat on the manufacturers fabricated steel stand.

                            Thanks to all that have contributed such detailed replys, I do appreciated the time and effort taken to compose them. It has given me a lot to ponder on to formulate where I go from here. The point about a worn bed is valid in my case as I know it is a bit worn near the headstock but as the vast majority of my work is in that area I have been able to live with it so far. To have the bed reground would probably be worth it as the lathe is a quality lathe, but the work involved to get it done is rather daunting to say the least but will be considered as I ponder where to go next. On the other hand, Warco are currently offering their WM250V for £1475 inc VAT and delivery which is temping, if only I had £1475 lying around spare!!

                            For today, in the end I decided that as I had a job set up for turning between centres with more than enough material at over 1 inch diameter to play with I would see if I could get it to turn true and leave checking the bed and a test piece held just in the chuck for another day. After nearly 2 hours of taking very fine cuts, checking and adjusting I got it to turn to 0.0002" over a tad over 3 1/2 inches length which was good enough for me at this time. I can now crack on with making the part to the plan dimensions.

                            Chris

                            #249744
                            Ajohnw
                            Participant
                              @ajohnw51620

                              I don't know Chris. You don't say which model it is but as far as I know they are all pretty substantial, fairly well designed and can't really be compared with a WM250V.

                              Personally I would have set it up strain free and done some turning with it and started on the basis of how bad that is. Your lathe probably has separate guides for the tailstock. Unusual for those to wear much but it does happen. If not it's good to have a well aligned headstock and tailstock as it can give nice round holes. Just as important at times as any taper. I suspect you may have already found that if the bed is stressed much that the tail stock drifts out more as it's moved along.

                              One other thing that can cause taper is loose headstock bearings. It can usually be picked up by carefully watching for recuts when the same cut is run again. It can be just because the bar is bending. The bearings also have an effect on finish. Nice feed, nice finish and rings appearing periodically along the work with moderate cuts. Just deep enough to take out any play. Marginal wear causes that. They can't be too tight so those rings sometimes disappear when the lathe warms up. Heavier cuts tend to give a better finish when they are loose as well. The dam things are a nightmare but really good lathes have 2 opposed and close together at the front of the headstock. That helps a lot.

                              Emery cloth correction of taper is a pain but often when a really close tolerance is needed parts need polishing anyway. A file can remove stuff quicker.

                              John

                            Viewing 13 posts - 1 through 13 (of 13 total)
                            • Please log in to reply to this topic. Registering is free and easy using the links on the menu at the top of this page.

                            Advert

                            Latest Replies

                            Home Forums Beginners questions Topics

                            Viewing 25 topics - 1 through 25 (of 25 total)
                            Viewing 25 topics - 1 through 25 (of 25 total)

                            View full reply list.

                            Advert

                            Newsletter Sign-up