HSS Tool Geometry

Advert

HSS Tool Geometry

Home Forums Workshop Tools and Tooling HSS Tool Geometry

Viewing 18 posts - 1 through 18 (of 18 total)
  • Author
    Posts
  • #522795
    GingerLathe
    Participant
      @gingerlathe

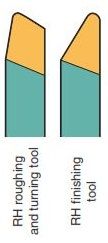
      These forums and a google will yield results on suggest tool geometry for HSS lathe tools. However I'm trying to determine the validity of a "Roughing" tool vs a "Finishing" tool. The names are self explanatory but can any one offer an opinion on the use of a finishing tool? Will such geometry make a big difference? Does anyone have angles for such geometry?

      I've attached an example diagram for reference.

      Roughing vs Finishing

      Advert
      #20125
      GingerLathe
      Participant
        @gingerlathe
        #522807
        Emgee
        Participant
          @emgee

          That RH finishing tool looks like what I thought was my LH finishing tool, depends on how it's ground I suppose.

          Emgee

          #522808
          GingerLathe
          Participant
            @gingerlathe
            Posted by Emgee on 26/01/2021 16:44:27:

            That RH finishing tool looks like what I thought was my LH finishing tool, depends on how it's ground I suppose.

            Emgee

            would you say the finishing tool provides a superior finish over the roughing tool geometry as the name suggests? Do you know the angles?

            #522825
            Mick B1
            Participant
              @mickb1

              I just use a plain knife tool – with a cutting edge square to the spindle centreline, a plan trail angle of *about* 20 degrees and a point radius of about 20 thou/ half a mm. Leftmost tool in the pic.

              If I'm roughing, I might angle the toolpost to give a plan approach angle of 10 degrees or so, but as an amateur machinist I'm not often in enough of a hurry to do that.

              If I'm finishing, I quite often cock the toolpost over so as to almost eliminate the plan trail angle, and use the trailing edge of the tool almost as a shaving face – small depth of cut, low speed, bit of lube, variable feed depending on results.

              There was a traditional design of finishing tool almost like an over-wide parting tool with radiused edges, used with very low speed, very light cuts and rapid feed. In some respects I guess I'm trying to emulate that in a multipurpose tool.

              I've never really understood the 'classic' profiles reproduced above, and I didn't use them much when I was turning for pay, either.

              img_3733.jpg

              Edited By Mick B1 on 26/01/2021 17:36:41

              #522831
              SillyOldDuffer
              Moderator
                @sillyoldduffer

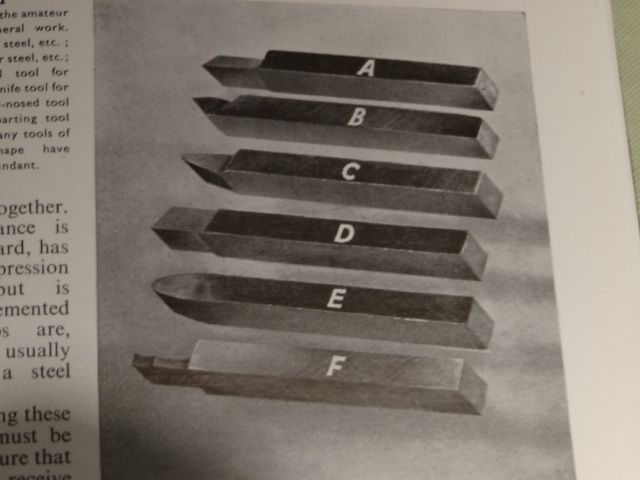
                May I suggest investing in a copy of Sparey's "The Amateur's Lathe"? It answers this and many other questions,

                Roughing tools are shaped to remove metal quickly without regard to finish. In the event they don't produce a decent finish, the geometry of a finishing tool should do a better job. Sparey suggests getting to within 20 thou with a roughing cutter before switching to a finishing tool for final accuracy and finish.

                Here;s what Sparey says about the GingerLathe's shapes: The orthodox round-nosed tool for steel, as usually recommended, is too broad for use on a small lathe, and "chatter" on the work takes place.

                The book gives angles for 8 different shapes covering steel, brass, and parting-off. But Sparey notes: Very rarely will the amateur be able to grind to exact angles without special grinding jigs, but experience shows that slight variations make little or no difference in general practice. Theoretically correct angles are, however, important when utmost cutting efficiency is required.

                I work mostly with inserts, switching to HSS when a form tool is needed or I have trouble getting a good finish, I almost always go for Sparey's Knife tool A, which is square section HSS, with 5° relief on the forward face and both sides, and about 55° ground off the top.

                dsc06391.jpg

                For roughing the tool is used at right angles to the work. For finishing, the tool is angled in towards the headstock so the full length of the top edge is close to the work.

                Dave

                #522846
                Neil Wyatt
                Moderator
                  @neilwyatt

                  I agree with SOD. In historic books there are usually far too many suggested shapes out there for HSS tools. Possibly this goes back to carbon steel tooling and foot powered lathes.

                  A selection of left hand and right knife tools with different end radiuses will meet most needs and can be angled in the toolholder for roughing.

                  (The reason for the angle is that it allows for a wider, thinner chip for a give depth of cut and rate of metal removal).

                  Other HSS shapes I regularly use are either form tools/threading tools or parting/grooving tools.

                  For general use I am a fan of inserted tooling.

                  Neil

                  #522859
                  Howard Lewis
                  Participant
                    @howardlewis46836

                    As the name suggests, a roughing tool is intended for removing larger amounts of metal. How much will, depend on the machine, its rigidity, power and the rigidity of the tool holding. You may take a 6 mm deep cut on a big lathe, but that would probably wreck a mini lathe. (The mini lathe Operator Manual says that for roughing do not exceed 0.010" (0.25 mm), although used with discretion, deeper cuts are used by many )

                    A rougher can be a plain knife tool.

                    The greater the length of the edge involved in cutting, in general, the more prone to chatter it can be.

                    Chatter can be induced by grinding the tool to the wrong clearance or rake angles for the material being machined.

                    Too large a top rake can induce dig ins or chatter because of the deflection of the tool caused by the cutting forces.. Parting tools can be particularly prone to digging in. (I use a parting tool with no top rake, in a back toolpost.. But this is not always possible with some lathes )

                    A finishing tool, will have a small radius on the cutting edge, which combined with a fine (low ) feed rate, and shallow depth of cut should produce a good surface finish. Lubricants can improve surface finish, even when the optimum speeds and feeds are being used. Ideally, the radius should be a little larger than the depth of cut and feed per revolution.

                    What was shown as a finishing tool is, in my view, a Left Hand tool, used in certain circumstances, to cut away from the Headstock.

                    The hand of a lathe tool is that when viewed on the cutting end, not the shank.

                    Unless the tool is set on the centre height of the lathe it will not cut properly.

                    It might be worth making a Centre Height Gauge, so that tools can be set to be at the correct height.

                    +1 for L H Sparey "The Amateurs Lathe" Majors on the Myford ML7, but the basic principles are still the same.

                    Also, Ian Bradley "The Amateurs Workshop"

                    The Workshop Practice Series includes two books by Harold Hall (A former MEW Editor ) which will be worth studying.

                    No.34 "Lathework" and No. 38 "Tool and Cutter Sharpening"

                    Two other MEW Editors have written books on the mini lathe, David Fenner, and the present Editor, Neil Wyatt.

                    All of these will give advice on grinding tools, setting up and using a lathe.

                    You will find a set of Zeus charts invaluable. I bought mine in 1958 and still use them regularly.

                    Another very useful reference book is Tubal Cain's "Model Engineers Handbook"

                    Money spent on books may well be repaid in the savings by avoiding scrap material or poor results.

                    Riding a hobby horse, quite a few on here are, like me, enthusiasts for the Tangential Turning Tool which is normally reserved for finishing in my shop, although deep cuts can be taken. For this you really need a Centre Height Gauge for setting the tool height, Grinding the tool is easy, with only one face to grind.

                    HTH

                    Howard

                    #522868
                    Simon Williams 3
                    Participant
                      @simonwilliams3

                      Assuming we're talking HSS here, there is no such thing as a roughing tool, and of the two shapes shown in the original post the right hand one is a left hand tool. As has been said by others.

                      "No such thing as a roughing tool" is a sweeping statement, but on a small power lathe it is impossible to get enough power to the cutting edge to take advantage of shaping the tool cutting edge to cut freely and easily so as to maximise the metal removal rate. The best you can do is to remove metal efficiently, which means shearing it off the workpiece cleanly and quietly, without tearing. That's done with a finishing tool. The only difference between a roughing stage and finishing is freshly sharpening the tool, giving it a lick with a fine carborundum stone to make sure the edge is good. Putting a radius in contact with the cutting zone is generally counter productive. However you do need to take care setting the angle of the tool face so it takes a shearing cut off the remnant work (we're talking turning a cylindrical surface). Too long a shearing interface gives rise to chatter, so anything wegge shaped or cutting a chamfer is counter-productive.

                      Achieving a fine finish is partly about having something other than point contact between the cutting tool and the work, which is where the misconception about putting a radius on the tool originates. A radius on the end of the tool is there to extend the life of the tool, not to give a fine finish. It will give a better finish than a point tool (zero radius) but that is a red herring. Fine finish on a small lathe is about having a shearing action going on at the work/tool interface, and above all not letting the freshly sheared metal pressure weld either to the tool or the work piece it just left. That's partly (largely) why HSS tools like cutting lubricants.

                      For best efficiency with limited power at the cutting edge, the tool cutting force reaction should be at right angles to the tool travel. That isn't the case with a radius as the cutting interface, but it is exactly how the traditional knife edge tool operates.. If so, this has the result of no lateral force on the reduced diameter after the chip has left the work.

                      Carbide tools use a completely different process to cut metal, and by and large if you want a better surface finish change to a fresh tip, then go faster, deeper quicker till you find the sweet spot. That's because the cutting action is a hot form action away from the tip of the tool – the tip itself isn't shearing metal like a HSS tool does, it's causing a pressure zone.

                      All of this is covered in the books recommended. though Sparey (love him to bits) spends time discussing carbon steel tools, which is of his time. The recommendations he makes for those tools translate well to HSS

                      #522870
                      GingerLathe
                      Participant
                        @gingerlathe

                        Everyone – many thanks for your feedback and help. Very much appreciated. Lots for me to go away and look at.

                        Thanks again.

                        #522887
                        Mick B1
                        Participant
                          @mickb1
                          Posted by SillyOldDuffer on 26/01/2021 17:53:45:

                          ….

                          For roughing the tool is used at right angles to the work. For finishing, the tool is angled in towards the headstock so the full length of the top edge is close to the work.

                          Dave

                          If I didn't make myself clear in my post, that's pretty much what I meant about the use of the multipurpose knife tool.

                          #522905
                          Howard Lewis
                          Participant
                            @howardlewis46836

                            I doubt if my late turning instructor at Rolls Royce, Sentinel Works, would totally agree with Simon Williams 3

                            Alf Neal was approaching retirement after a lifetime spent operating lathes of many shapes and sizes, often on piecework. With a six inch rule,he could measure to within 0.002" of what I found with a depth mic!

                            I just wish that I could hand grind drills as accurately as he could!

                            My notes from that time state:

                            "Object of nose radius

                            1 ) To clean up rough surface produced by the primary cutting action

                            2 ) To strengthen the cutting edge and improve tool life.

                            3 ) When a tool has a sharp edge or a small radius there is little capacity beneath the point to absorb heat and shocks. Result: Rapid failure of corner.

                            4 )When nose radius exceeds depth of cut, an increase in cutting speed can be effected, resulting in an improved cutting action.

                            Disadvantage of large nose radius.

                            1 ) Turning a slender job with a large nose radius will bend the component.

                            2 ) When turning upto a shoulder, then use of a large nose radius may mean then use of another tool to remove the radius from the workpiece.

                            Point To Note

                            In conclusion, while it may be assumed that nose radius can influence a tool's ability to remove metal at an increased rate, a nose radius is not necessarily the correct tool for a roughing operation."

                            Out of interest, Eccentric Tools put a radius on the edge of the toolbit in their Tangential Turning Tool.

                            HTH

                            Howard

                            #522964
                            GingerLathe
                            Participant
                              @gingerlathe

                              Howard – thanks for your comments. There is certainly no replacement for a life's time of experience. Thanks.

                              #522974
                              Bazyle
                              Participant
                                @bazyle

                                The shapes and their uses should not be taken too literally but there is much scope for pedantry and adhering to percieved but erroneous received wisdom without thinking.
                                The sloping left edge of the tool is there for a reason nothing to do with cutting. It enables contiuouos re-sharpening without altering the geometry whereas if it is parallel to the body sharpening requires it to move to to the right leaving a step that ultimately requires a total reshaping of the tool. You often see knife tools that have got to this stage and been left inthe bottom of the tool box to appear on ebay after twenty years.
                                Since 90% of cutting can be roughing the tool will need frequent resharpening so the tool design allows that.

                                #522977
                                John Haine
                                Participant
                                  @johnhaine32865
                                  Posted by Howard Lewis on 26/01/2021 20:40:10:

                                  ……

                                  Out of interest, Eccentric Tools put a radius on the edge of the toolbit in their Tangential Turning Tool.

                                  HTH

                                  Howard

                                  Actually I think they recommend the user does that. Whether using the Diamond or a home made version you need to round the corner slightly or the edge quickly breaks down, and you then have to grind quite a lot off the end of the tool to restore it. After my experience with tangential tools I reckon that unless you have a special requirement you don't need anything else for most of the time. And the geometry is trivial to produce.

                                  #522979
                                  David George 1
                                  Participant
                                    @davidgeorge1

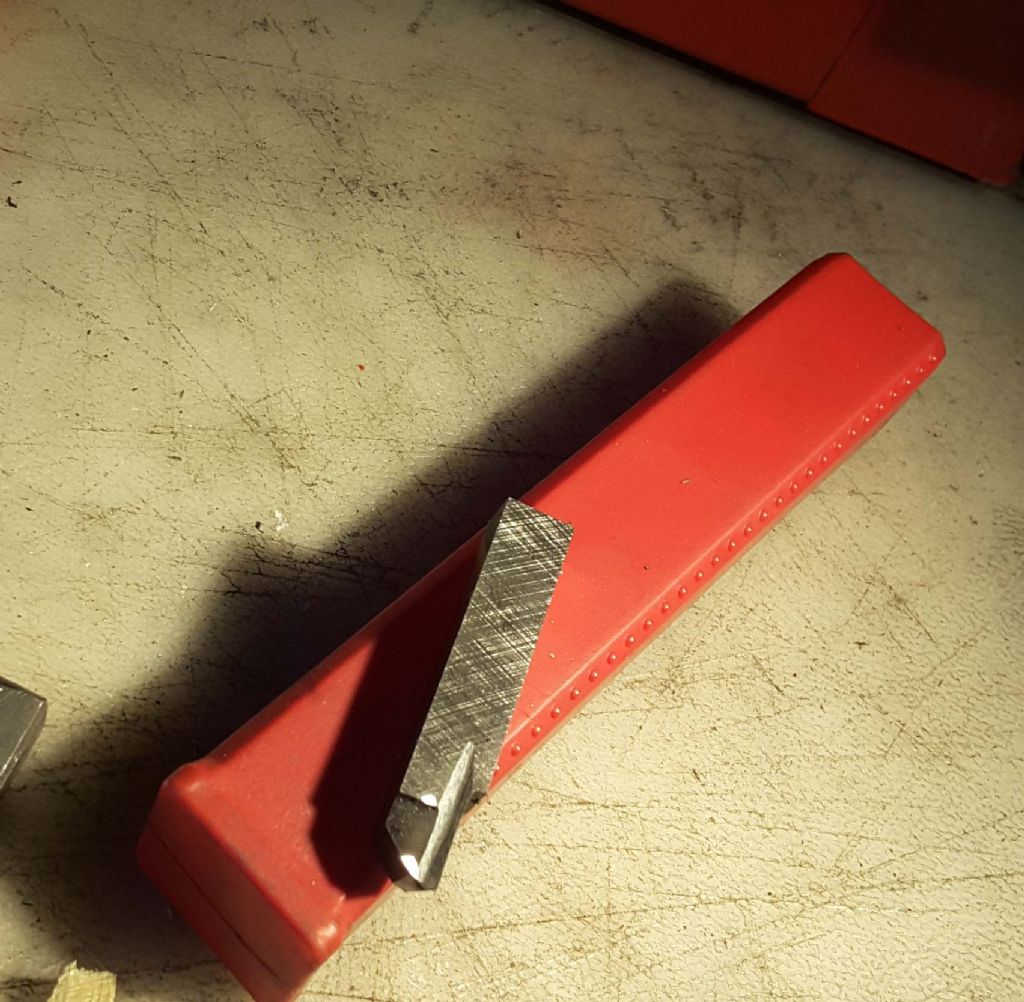
                                    I use two basic shapes for general turning, a left hand knife shape and a similar but with a chip breaker ground along the cutting edge which is especialy good on aluminium. I have been an engineer for over 50 years and only use carbide tooling for special job ie hardened tough materials or special shapes. Have a look at the tool with a chip breaker in sharp edge no tip radius it cuts great on most materials except brass type stock.

                                    20171016_161005.jpg

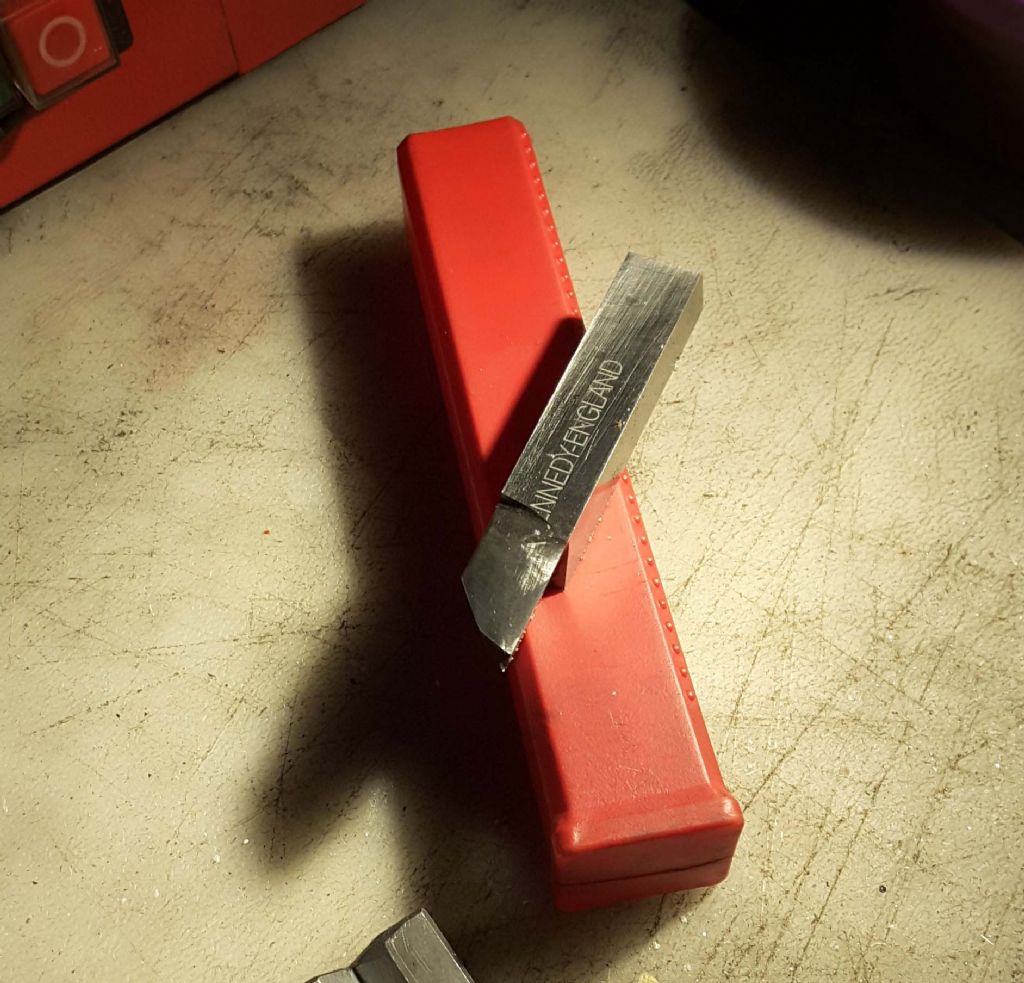
                                    I also clear the back of the tool so I can get near to the end of a small part near to a revolving center. This is the one I use for brass material.

                                    20171016_160742.jpg

                                    Try them out. The plain tool has only a very small radius stoned on.

                                    David


                                    Edited By David George 1 on 27/01/2021 09:47:25

                                    #522983
                                    larry phelan 1
                                    Participant
                                      @larryphelan1

                                      As S-O-D and others have said, you wont go too far wrong if you follow Sparey,s advice.

                                      Everything is explained in simple terms, and more important, aimed at the small lathe.

                                      You dont need exact angles ect unless you are working for pay, and even then ??.

                                      I have been using Sparey,s book since I began and have never had any problems [except the ones I made myself ! ]

                                      Check it out and forget about getting everything "Exact" life is too short for that.wink

                                      #522986
                                      Howard Lewis
                                      Participant
                                        @howardlewis46836

                                        Gary of Eccentric told me that the edge is deliberately rounded on the toolbits that they supply.

                                        After two or more years of continuous use the original is nearly finished, so shall have to round the edge of the replacement myself!

                                        Howard

                                      Viewing 18 posts - 1 through 18 (of 18 total)
                                      • Please log in to reply to this topic. Registering is free and easy using the links on the menu at the top of this page.

                                      Advert

                                      Latest Replies

                                      Viewing 25 topics - 1 through 25 (of 25 total)
                                      Viewing 25 topics - 1 through 25 (of 25 total)

                                      View full reply list.

                                      Advert

                                      Newsletter Sign-up