DRO Z-Axis /4th axis “combiner”

Advert

DRO Z-Axis /4th axis “combiner”

Home Forums General Questions DRO Z-Axis /4th axis “combiner”

Viewing 25 posts - 1 through 25 (of 49 total)
  • Author
    Posts
  • #406586
    Kealan O’Carroll
    Participant
      @kealanocarroll32466

      Hi all,

      I've recently added a Ali-Express DRO to my Archdale 18" Mill. I was facing the problem of only having one Z-Axis and not knowing whether to attach it to the knee or the quill, so I bought a 4th glass scale from the seller and added a scale to both axes.

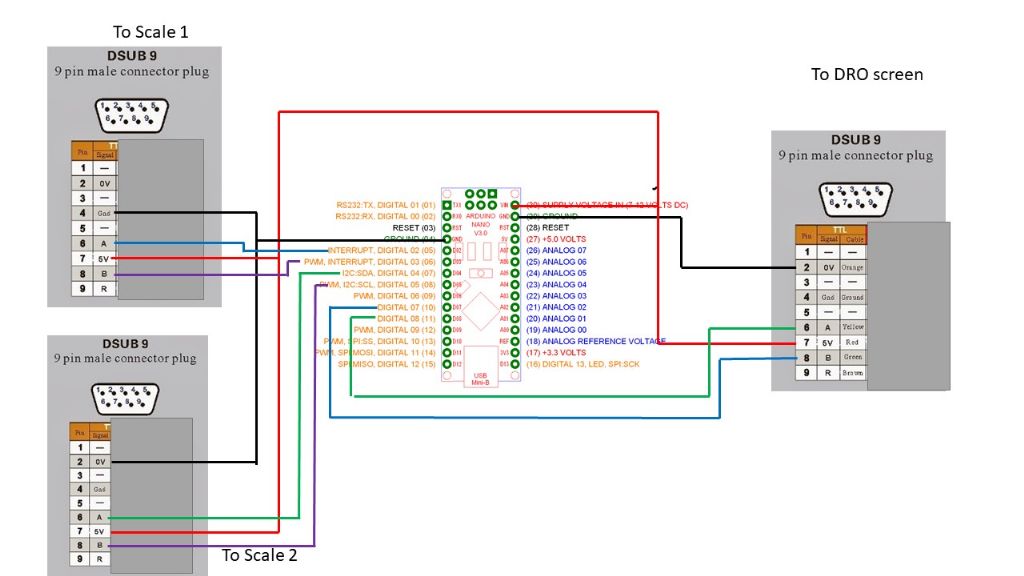
      The DRO display only has one input for each axis, so I got an arduino nano via ebay along with a small enclosure and some RS232 cables. The two input cables attach to the scales and the output goes to the DRO display. The arduino calculates which scale is moving in which direction, sums them for an absolute position and then outputs that to the display so both the knee and quill can move in opposite directions at the same time and the DRO Z-position will remain correct.

      Component parts came to about a tenner + labour time of assembling it and figuring out the code. It's possible to move the scales fast enough to out-pace the arduino and 'lose' steps, but my scales are 1 micron rather than the usual 5 micron so that's effectively limiting the maximum speed by 1/5th and even at that it's still capable of keeping the position correct up to about 100mm/sec so as long as I keep the quill retract speeds sensible I think it'll be okay.

      The arduino gets its power from the 5V output pin on the DRO which supplies the glass scales, so no batteries / plug is required.

      I'm an absolute amateur when it comes to the arduino stuff so it may be possible for someone to make the code much more elegant / run much faster but this does me for now.

      20190426_171735.jpg

      Advert
      #26578
      Kealan O’Carroll
      Participant
        @kealanocarroll32466
        #406587
        Kealan O’Carroll
        Participant
          @kealanocarroll32466

          Code here:


          /*
          Code by Kealan O'Carroll, April 2019
          Encoder.h library by PaulStoffregen
          http://www.pjrc.com/teensy/td_libs_Encoder.html

          Code intended for an arduino nano with the following wiring:
          Pins 2, 4 : Scale 1 inputs
          Pins 3, 5 : Scale 2 inputs
          Arduino Pins 7, 8 : Outputs to DRO A and B pins. (Pins 6 and 8 on a DSUB9 type plug)

          */

          #define ENCODER_OPTIMIZE_INTERRUPTS
          #include
          Encoder scale1(4,2); //Wire first scale A & B quadrature lines to arduino Pins 2 and 4
          Encoder scale2(5,3); //Wire second scale A & B quadrature lines to arduino Pins 3 and 5
          //If either of the scales reads in the wrong direction, reverse the pin numbers above (e.g. (4,2) changes to (2,4)

          long pos2 = 0;
          long pos1 = 0;
          long delt = 0;
          long oldpos1 = 0;
          long oldpos2 = 0;
          long delt1 = 0;
          long delt2 = 0;
          bool outA = LOW;
          bool outB = LOW;

          void setup() {
          DDRD = DDRD | B11000000;
          DDRB = DDRB | B000001;
          PORTD = B00000000; // sets digital pins all Low
          PORTB = B00000000; // sets digital pins all Low
          }

          void loop() {

          pos1 = scale1.read();
          pos2 = scale2.read();

          delt2 = pos2 – oldpos2;
          delt1 = pos1 – oldpos1;
          delt = delt2 – delt1;

          while (delt > 0) {
          if (outA == LOW && outB == LOW) { //if 8 is low and 7 is low
          PORTD = B10000000; //push 7 high
          PORTB = B000000; //leave 8 low
          outB = HIGH;
          delt–;
          }
          else if (outA == LOW && outB == HIGH) { //if 8 is low and 7 is high
          PORTD = B10000000; //leave 7 high
          PORTB = B000001; //Push 8 high
          outA = HIGH;
          delt–;
          }
          else if (outA == HIGH && outB == HIGH) { //if 8 is high and 7 is high
          PORTD = B00000000; //push 7 low
          PORTB = B000001; //Leave 8 high
          outB = LOW;
          delt–;
          }
          else if (outA == HIGH && outB == LOW) { //if 8 is HIGH and 7 is LOW;
          PORTD = B00000000; //leave 7 LOW;
          PORTB = B000000; //push 8 low
          outA = LOW;
          delt–;
          }
          }

          while (delt < 0) {
          if (outA == LOW && outB == LOW) { //if both are low,
          PORTD = B00000000; //leave 7 low;
          PORTB = B000001; //Push 8 high
          outA = HIGH;
          delt++;
          }
          else if (outA == LOW && outB == HIGH) { //if 8 is low and 7 is high;
          PORTD = B00000000; //push 7 low
          PORTB = B000000; //Leave 8 LOW
          outB = LOW;
          delt++;
          }
          else if (outA == HIGH && outB == LOW) { //if 8 is high and 7 is low;
          PORTD = B10000000; //push 7 high
          PORTB = B000001; //Leave 8 HIGH
          outB = HIGH;
          delt++;

          }
          else if (outA == HIGH && outB == HIGH) { //if 8 is high and 7 is high;
          PORTD = B10000000; //leave 7 high;
          PORTB = B000000; //Push 8 LOW
          outA = LOW;
          delt++;
          }
          }
          oldpos1 = pos1;
          oldpos2 = pos2;
          }

          Edited By Kealan O’Carroll on 26/04/2019 17:44:17

          #406593
          SillyOldDuffer
          Moderator
            @sillyoldduffer

            I'm impressed Kevin, good idea and clever implementation.

            Just a thought, the bit twiddling to drive the output makes the logic harder for others to follow and may not be necessary in this application. I suspect the main performance bottleneck is the Nano only having two external interrupt pins slowing the encoder library down. Likely the hardware and library are stopping your code following very fast traverses rather than your high-speed implementation. Might be possible to compute the output slightly faster, but I suspect switching to a processor with 4 external interrupts (like the Mega) would rocket propel the whole thing.

            Have to say I'd be unbearably smug if I'd got that to work – well done you!

            yes

            Dave

            #406594
            Michael Gilligan
            Participant
              @michaelgilligan61133

              If Dave is impressed … just think how I feel

              MichaelG.

              #406598
              Andy Carruthers
              Participant
                @andycarruthers33275

                Very well thought out and nicely done!

                #406601
                Ian P
                Participant
                  @ianp

                  I too am impressed. Apart from the original idea the execution is an wonderful example of something made in a cost effective, fit for purpose manner. It looks robust but not over engineered and even using moulded on connectors saves cost and time.

                  If I had two encoders (linear or rotary) on any axis I would want definitely one of these

                  Ian P

                  #406603
                  Neil Lickfold
                  Participant
                    @neillickfold44316

                    I have a 3 layer read and also want a scale on the column. This will be useful indeed. Thank you so much for sharing.

                    Neil Lickfold

                    #406605
                    Les Jones 1
                    Participant
                      @lesjones1

                      I built a similar device many years ago for my Seig X3 mill and find it very useful. Mine works with the original Chinese scales (2 x 24 bit protocol). Mine is based on a Pic16f628 with a 4 line by 20 LCD display, It displays the reading from each scale and the sum of the readings.

                      Les.

                      #406623
                      Paul Lousick
                      Participant
                        @paullousick59116

                        Hi Kealan, I also want to fit a 4th scale to my mill.

                        My intention was to use a manual RS232 switch to change from the column scale to the quill scale and use my existing 3-axis display. The more expensive displays allow for a combined Z-axis reading but out of my budget.

                        Are you able to post details and circuit for your project. I have a little knowledge about electronics but know nothing about Arduino's.

                        Paul.

                        #406635
                        Les Jones 1
                        Participant
                          @lesjones1

                          Hi Paul,
                          There is no real need for a circuit as Kealan gives the connections at the start of his program.
                          These are the lines that give the information.

                          Code intended for an arduino nano with the following wiring:
                          Pins 2, 4 : Scale 1 inputs
                          Pins 3, 5 : Scale 2 inputs
                          Arduino Pins 7, 8 : Outputs to DRO A and B pins.

                          The only other connections will be the power to the Arduino.

                          You will have to make sure that the signal level from the scales is the same as the signal levels on the version of Arduino that you use'

                          Les.

                          Edited By Les Jones 1 on 27/04/2019 08:42:47

                          Edited By Les Jones 1 on 27/04/2019 08:43:14

                          #407788
                          Kealan O’Carroll
                          Participant
                            @kealanocarroll32466

                            Hi chaps,

                            As Les has said, the wiring is in the comments of the code, but Ive put a diagram below.
                            As per Dave's comment you might be better off with an arduino mega or something with 4x interrupt pins if you want it to run faster

                            wiring.jpg

                            #517620
                            David Tocher
                            Participant
                              @davidtocher94033

                              I've just completed adding the quill scale to the column scale. It ran without any problems except it required a change in direction. I am using 5 mincron scales and it counts correctly even when I release the quill handle.

                              The pictorial wiring schematic does not correspond with the comments in the sketch and I used the connections in the sketch.

                              Thanks for your contribution.

                              #535998
                              ronald bakker
                              Participant
                                @ronaldbakker48084

                                hi all , new guy here , have bought a three axis dro and have been looking at the idea of the axis combiner to give the the columb and the quill a shared z axis on the dro

                                i cant seem to find the sketch david is talking about and i am slightly worried with how the ground lines are hooked up on the schematic

                                scale one and the plug going intoo the dro has the ground (pin 4) hooked up to the ground tab on the arduino

                                but scale two has the zero (pin 2) hooked to the ground on the ardiuno , is this correct ?

                                have all the stuff needed here to make one but dont want to make a misstake soldering the thing up and after plugging it in release the magic smoke

                                #536013
                                David Tocher
                                Participant
                                  @davidtocher94033

                                  A 'sketch' in Arduino-speak is what I'd call a program. The comments at the start of the program/sketch and the schematic wiring diagram (called in Arduino-speak a 'fritz&#39 contradict each other in a minor way.

                                  I used the screen in the SUBD9 cable from the display unit daisy-chained to the screen of the cables going to the scales, making sure there were no possible loops which can pick up hum.

                                  Provided you don't do anything silly like connecting the 5v to ground I don't think you can do any damage. All the Nano connections to the scales are inputs and, I'd guess, the pins on the display are also inputs and the worse that can happen it won't work!

                                  It's been working fine for a while and I'm very pleased with it. Using DRO on the mill makes things so easy and now being able to raise or lower the quill to change to/from cutter and drill chuck without losing the Z position is great.

                                  Again thanks to Kealan for his efforts.

                                  #536015
                                  Matt Harrington
                                  Participant
                                    @mattharrington87221

                                    What a great idea. My mill has no quill but one day…….

                                    Matt OH

                                    #536027
                                    ronald bakker
                                    Participant
                                      @ronaldbakker48084
                                      Posted by David Tocher on 25/03/2021 12:45:24:

                                      A 'sketch' in Arduino-speak is what I'd call a program. The comments at the start of the program/sketch and the schematic wiring diagram (called in Arduino-speak a 'fritz' contradict each other in a minor way.

                                      I used the screen in the SUBD9 cable from the display unit daisy-chained to the screen of the cables going to the scales, making sure there were no possible loops which can pick up hum.

                                      Provided you don't do anything silly like connecting the 5v to ground I don't think you can do any damage. All the Nano connections to the scales are inputs and, I'd guess, the pins on the display are also inputs and the worse that can happen it won't work!

                                      It's been working fine for a while and I'm very pleased with it. Using DRO on the mill makes things so easy and now being able to raise or lower the quill to change to/from cutter and drill chuck without losing the Z position is great.

                                      Again thanks to Kealan for his efforts.

                                      ok so it doesnt matter if i use zero (pin 2) or ground (pin 4) to connect the power out from the dro to the scales and the arduino ?

                                      #536065
                                      David Tocher
                                      Participant
                                        @davidtocher94033

                                        Ronald:

                                        I'm not sure which pins you are referencing. There are at least two different SUBD9 pin-outs from/to the scales/display so the connections need to be checked for your setup. The website or manual should give the pinouts but . . . .

                                        My display unit connections on the SUBD9, which are all that I used, are

                                        pin 2 0v

                                        pin 6 A+

                                        pin 7 +5v

                                        pin 8 B+

                                        Pins 6 and 8 are the two quadrature signals and the other pair the power.

                                        There is a PE (protected earth?) connection on pin 4 that is connected to the screen but I don't think it's a good idea to use it for the power because of the risk of earth loops which can cause electrical interference.

                                        I rewired the plug from my quill to match the X, Y and Z plugs so they are all interchangeable. The screen is not connected to 0v wire anywhere external to the display unit but does contact the metal case of my Nano box and the screens of the two Z scale cables.

                                        #536078
                                        SillyOldDuffer
                                        Moderator
                                          @sillyoldduffer
                                          Posted by ronald bakker on 25/03/2021 13:17:15:

                                          Posted by David Tocher on 25/03/2021 12:45:24:.

                                          ok so it doesnt matter if i use zero (pin 2) or ground (pin 4) to connect the power out from the dro to the scales and the arduino ?

                                          It might. Although 0V and Gnd are the same on the Arduino, they may not be on the DRO, which is providing the power. Makes sense for the DRO to put power between the 0V and 5V pins, but the Gnd could ba just a cable shield. As shields are often only connected at one end to prevent earth loops, the Gnd pin may not complete the circuit Try it and see – no risk of smoke because the Nano just won't power up if the DRO Gnd pin is floating. Or test it with a multimeter.

                                          Electrical safety earths, signal earths, and RF earths are all a bit different, but as a rule of thumb it's not a good idea to carry power on an earth line. So if a plug has a 0V pin, use it, not Gnd. However, just to keep us on our toes, printed circuit boards often label the 0V line as Gnd, Vss, or other things. The Nano is an example of 0V = Gnd.

                                          Dave

                                          #536090
                                          ronald bakker
                                          Participant
                                            @ronaldbakker48084

                                            guess i connect the shielding together to prevent radio interference and connect the 0's together and to the zero on the arduino board , that way all the cables are hooked up the same way (to the dro unit) and the power side from the dro side will power the arduino like it does on the schematic so it should work the same way as a single glass scale would

                                            thanks for youre help i apreciate it

                                            #536095
                                            ronald bakker
                                            Participant
                                              @ronaldbakker48084
                                              Posted by David Tocher on 25/03/2021 16:15:45:

                                              Ronald:

                                              I'm not sure which pins you are referencing. There are at least two different SUBD9 pin-outs from/to the scales/display so the connections need to be checked for your setup. The website or manual should give the pinouts but . . . .

                                              My display unit connections on the SUBD9, which are all that I used, are

                                              pin 2 0v

                                              pin 6 A+

                                              pin 7 +5v

                                              pin 8 B+

                                              Pins 6 and 8 are the two quadrature signals and the other pair the power.

                                              There is a PE (protected earth?) connection on pin 4 that is connected to the screen but I don't think it's a good idea to use it for the power because of the risk of earth loops which can cause electrical interference.

                                              I rewired the plug from my quill to match the X, Y and Z plugs so they are all interchangeable. The screen is not connected to 0v wire anywhere external to the display unit but does contact the metal case of my Nano box and the screens of the two Z scale cables.

                                              seems like its the same pin out as the schematic , i have a chineese dro on order and my guess is that the pinouts are the same throughout as they advertize it will work on multiple chineese glas scales

                                              like i said in the former comment i probably just make a 4 way central connection from all the three cables combined for the 5v pin and another one of the 0 pin and connect those with the fourt branch to the power input of the arduino

                                              the A and B connections i connect as described on the sketch and as an extra i will twist the shielding of the three cables together (but whont connect it to the arduino ) 

                                              that way the power side will be the same as it would be if it was the cable directly from the glass rule to the dro (just split up) and the signal gets processed by the arduino like it should too

                                              allso thank you for youre help

                                              Edited By ronald bakker on 25/03/2021 18:13:56

                                              Edited By ronald bakker on 25/03/2021 18:17:57

                                              #536348
                                              ronald bakker
                                              Participant
                                                @ronaldbakker48084

                                                well have it soldered together (hopefully might need to buy a new nano and try again as a drop of solder got on one of the components , the middle led on the nano is working though &nbsp and am trying to put the code in

                                                had to copy and paste it in a few sections to get the void setup and void loop in the right places but it looks like in the sketch on the forum ,

                                                also had to put " # define ENCODER_OPTIMIZE_INTERUPTS #include " in one line as having include in the next line gave a different fault in the download

                                                the fault i got now :

                                                scan 1

                                                exit status 1

                                                'encoder 'does not name a type

                                                does that mean i need to hook oup the scales to the arduino before putting the program in or do i need to add some type name in there ?

                                                #536355
                                                SillyOldDuffer
                                                Moderator
                                                  @sillyoldduffer

                                                  Posted by ronald bakker on 26/03/2021 16:08:03:

                                                  also had to put " # define ENCODER_OPTIMIZE_INTERUPTS #include " in one line as having include in the next line gave a different fault in the download

                                                  the fault i got now :

                                                  scan 1

                                                  exit status 1

                                                  'encoder 'does not name a type

                                                  does that mean i need to hook oup the scales to the arduino before putting the program in or do i need to add some type name in there ?

                                                  No, the programs have to be compiled correctly before they will upload, and the Arduino doesn't need to be connected to anything other than USB to do the upload.

                                                  The problem appears to be a typo in Kevin's published code, and it's related to the change you made, which is also wrong.

                                                  Kevin's code is:

                                                  #define ENCODER_OPTIMIZE_INTERRUPTS
                                                  #include
                                                  Encoder scale1(4,2); //Wire first scale A & B quadrature lines to arduino Pins 2 and 4

                                                  The error is that the name of the file to be included is missing. It should probably be:

                                                  #define ENCODER_OPTIMIZE_INTERRUPTS
                                                  #include "Encoder.h"
                                                  Encoder scale1(4,2); //Wire first scale A & B quadrature lines to arduino Pins 2 and 4

                                                  In C/C++ the #include statement causes the content of another file to be inserted into the source code. In this case it contains the library code defining the Encoder type, and because the definition is missing, the compiler doesn't know what Encoder scale1(4,2); means.

                                                  Encoder.h may have to be installed using the Arduino IDE's Library Manager. If so, have a read of this.

                                                  Dave

                                                  #536361
                                                  David Tocher
                                                  Participant
                                                    @davidtocher94033

                                                    I'm a bit puzzled as to why you need to cut n paste – apart from the missing 'include Encoder.h' it work for me just copying the code given by the author.

                                                    As an aside to the moderator(s); can a section be created for code like this so folk can upload files to a common area? It would allow the file to be downloaded rather than copying a posting. It's easy to miss characters or even the top or tail of the text.

                                                    #536379
                                                    ronald bakker
                                                    Participant
                                                      @ronaldbakker48084

                                                      youre both right , i can cut and paste i just need to erase wats allready in the sketch at the startup of the program , and indeed i needed to load encoder from the library

                                                      it now compiles without problems , just doesnt load it intoo the arduino , tried all the com ports , one is responding a little quicker in saying it cannot reach the arduino but nothing else is happening

                                                      it cannot read the arduino either , the arduino might be broke (thats my first hunch as i kindah messed with it a little during the soldering )

                                                      so i will buy another one and compile that before i start laying the solder down but if you guys still have ideas i hook it back up and give it a try

                                                      i allready followed the tip of the program and tried the old version (before 2018) no such luck

                                                      could there be a possibility that the arduino is empty and needs to have sumting loaded on it before loading the sketch ?

                                                    Viewing 25 posts - 1 through 25 (of 49 total)
                                                    • Please log in to reply to this topic. Registering is free and easy using the links on the menu at the top of this page.

                                                    Advert

                                                    Latest Replies

                                                    Home Forums General Questions Topics

                                                    Viewing 25 topics - 1 through 25 (of 25 total)
                                                    Viewing 25 topics - 1 through 25 (of 25 total)

                                                    View full reply list.

                                                    Advert

                                                    Newsletter Sign-up