Accuracy to be expected from a 0-1″ travel DTI

Advert

Accuracy to be expected from a 0-1″ travel DTI

Home Forums Workshop Tools and Tooling Accuracy to be expected from a 0-1″ travel DTI

Viewing 20 posts - 1 through 20 (of 20 total)
  • Author
    Posts
  • #534124
    Greensands
    Participant
      @greensands

      Hi all- In the absence of a DRO system on the carriage of my lathe I quite often resort to a DTI for monitoring the extent of movement towards the headstock as for example, when parting off to length using either a DTI with a 0-0.5" travel or for longer movements, one with a 0-1" travel. This has served me well until recently when I noticed that when parting off to a length of 0.941" (work +tool) there was a surprising discrepancy of approximately +0.020” between the read-out on the 0-1" gauge and a steel rule.

      I would be interested to hear other people’s experiences when using DTIs in this manner. Perhaps DTIs are not designed to be used in this way but they are very simple to set up.

      Advert
      #20205
      Greensands
      Participant
        @greensands
        #534126
        Brian Wood
        Participant
          @brianwood45127

          Hello Greensands,

          DTIs are not intended to be used as measuring instruments, they are however very good at indicating a departure from the setting reference. You can't rely on the indicated travel as a true measure of displacement so I am not surprised at your findings.

          Regards Brian

          #534127
          Hopper
          Participant
            @hopper

            Better to use the topslide graduated dial to measure the amount the tool is moved along for parting or grooving etc.

            On some lathes (Myford etc) you can put a graduated handwheel on the leadscrew for the same purpose via moving the whole carriage.

            Or you can make a carriage stop with an incorporated micrometer unit. If you are a metric worker, you can buy those micrometer units dirt cheap on line. It.s basically a micrometer thimble and screw unit without the U shaped body to hold the anvil. Sorry, not allowed to post links to show what I mean.

            Edited By Hopper on 16/03/2021 10:19:42

            #534135
            John Haine
            Participant
              @johnhaine32865
              #534142
              Brian G
              Participant
                @briang
                Posted by Greensands on 16/03/2021 10:07:57:

                …there was a surprising discrepancy of approximately +0.020” between the read-out on the 0-1" gauge and a steel rule…

                Maybe it is my nasty suspicious mind, but is it possible that the dial indicator has metric internals and an imperial dial? Approximately 0.020" is suspiciously close to 0.4mm, and I wouldn't put it past some makers in certain countries to do this. After all, you would get the same error using the compound slide on an "imperial" mini-lathe.

                Brian G

                #534145
                Howard Lewis
                Participant
                  @howardlewis46836

                  Bought my min lathe secondhand. It has DRO on Cross and Topslide, just as well. The Leadscrew appears to be Metric, but the Cross and Top Slide are Imperial!

                  One day will get round to converting it to analogue Metric dials!

                  Might be worth using the DTI to measure the travel for one complete turn of each handwheel.

                  Howard

                  #534146
                  Mike Crossfield
                  Participant
                    @mikecrossfield92481

                    There is a very helpful note on the Mitutoyo website discussing the accuracy of their gauges. They state that for a plunger-type dial indicator with a range of 10mm, the total indicated error over the full travel of 10 dial rotations should be within +/- 12 microns (about 1/2 thou). I have a 0-1 inch Mitutoyo dial gauge, and 1 must say I have never been aware of any significant errors over quite wide travel ranges provided I have set it accurately and rigidly mounted. Maybe other makes are less accurate?

                    #534147
                    Michael Gilligan
                    Participant
                      @michaelgilligan61133
                      Posted by Brian Wood on 16/03/2021 10:14:14:

                      Hello Greensands,

                      DTIs are not intended to be used as measuring instruments, they are however very good at indicating a departure from the setting reference. You can't rely on the indicated travel as a true measure of displacement so I am not surprised at your findings.

                      Regards Brian

                      .

                      Brian’s reply is [predictably enough] spot-on

                      but if you find it expedient to use them as you describe; it’s a simple matter to do your own calibration

                      aside from any problems attributable to ‘stiction’ the deviation from linearity should be measurable and repeatable.

                      MichaelG.

                      #534148
                      Anonymous

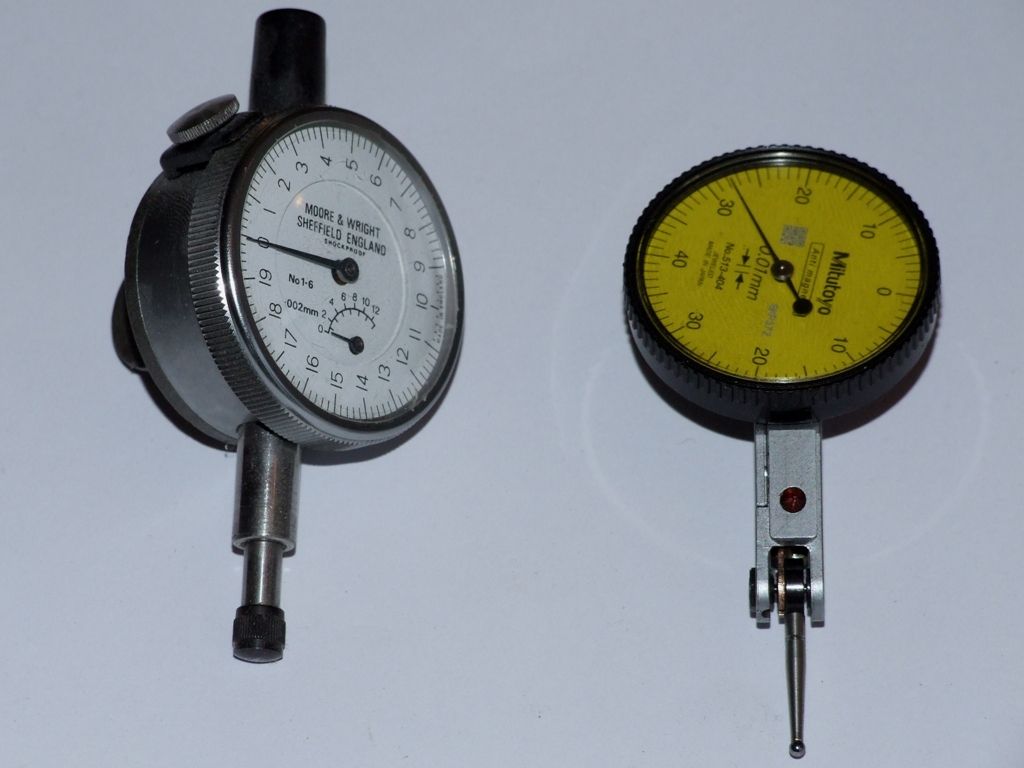
                        It depends upon what is being used to make the measurement. Here are two instruments:

                        test gauges.jpg

                        On the left is a dial indicator, on the right a dial test indicator (DTI). The dial indicator should be accurate, assuming that the shaft is aligned with the direction of movement. The DTI is not intended to give accurate readings but simply an indication of movement from an arbitrary zero.

                        I've just checked the dial indicator on the left with a 1mm slip gauge and surface plate, the reading was 1.006mm. It would probably be more accurate if I'd cleaned the surface plate first.

                        So a dial indicator should give accurate measurements of distance. If it doesn't then something is wrong with it or the setup.

                        Andrew

                        Edited By Andrew Johnston on 16/03/2021 11:29:58

                        #534150
                        Mick B1
                        Participant
                          @mickb1
                          Posted by Andrew Johnston on 16/03/2021 11:28:21:

                          It depends upon what is being used to make the measurement. Here are two instruments:

                          test gauges.jpg

                          On the left is a dial indicator, on the right a dial test indicator (DTI). The dial indicator should be accurate, assuming that the shaft is aligned with the direction of movement.

                          Andrew

                          I don't think I've ever seen a lever-type clock with a range of movement of anywhere near an inch. Apart from anything else the point of the lever moves in an arc, not a line. Those gauges are only suitable for reading small deviations, such as when completing truing-up of something already close to what's required.

                          So if the OP's using one o' them, it'd be deeply unsurprising if he got a discrepancy.

                          But he says he was using one with a full inch of range, so I read that as meaning it must be a plunger-type; and in that case I'd agree with you – something has to be wrong with the clock or how the test's set up.

                          #534151
                          ChrisH
                          Participant
                            @chrish

                            I use a 0-2" dial indicator (as in Andrews post above) on an adjustable rod to measure carriage travel towards the headstock on my lathe. It has always been spot on for me with no errors noted.

                            Chris

                            #534155
                            Michael Gilligan
                            Participant
                              @michaelgilligan61133

                              Andrew,

                              I suppose it depends upon whether you put more emphasis on Test, or Indicator

                              … I have always believed both versions to be Indicators [albeit with likely differences in accuracy and repeatability]

                              Here’s a useful note on calibration: **LINK**

                              https://www.usbr.gov/tsc/techreferences/mands/rockmanual/tan_earthmanualUSBR/USBR1007.pdf

                              MichaelG.

                              #534200
                              Clive Brown 1
                              Participant
                                @clivebrown1

                                This thread prompted me to check a dial indicator currently set up in my workshop. Over its maximum travel of 0.4" it was less than a thou. out against a slip gauge.

                                #534214
                                Mike Crossfield
                                Participant
                                  @mikecrossfield92481

                                  That’s interesting Clive, and exactly consistent with the dat from Mitutoyo that I posted earlier.

                                  Mike

                                  #534225
                                  SillyOldDuffer
                                  Moderator
                                    @sillyoldduffer
                                    Posted by Clive Brown 1 on 16/03/2021 14:56:11:

                                    This thread prompted me to check a dial indicator currently set up in my workshop. Over its maximum travel of 0.4" it was less than a thou. out against a slip gauge.

                                    Which I suggest scores D minus compared with a micrometer, and C minus compared with a caliper!

                                    Good luck to anyone who happens to have an indicator that maintains accuracy across its range, but as a breed they are untrustworthy over a distance. The way they are used mitigates against accuracy too. A micrometer works in a stiff frame and often has an insulating pad to minimise temperature errors. It also has a precision ground thread, and a high-grade parallel anvil, polished and hardened. In comparison, an indicator is held in a wobbly stand, at any old angle, has a gear train of dubious precision, a wobbly mechanical movement, a rounded probe, and the dial needle is behind glass, which is classic parallax error territory.

                                    DTI's work extremely well as comparators, and measure well enough over short distances too, but they're not for metrology! Of course for home workshop purposes, one as applied by Greensands might be 'good enough' : I don't suppose many of us really work better than a thou/0.02mm – ish, in which case a DTI is in the zone.

                                    Be fun to have everyone on the forum make a rod exactly 31.4159mm long at 20°C and have them all measured professionally to see how scattered the result is! Only for interest though because roughly 31.42mm is generally good enough for most practical work. Chasing accuracy unnecessarily may be a sin, but why not enjoy it? Have fun!

                                    devil

                                    Dave

                                    #534228
                                    old mart
                                    Participant
                                      @oldmart

                                      There is one thing to be aware of when using a long travel DTI in a horizontal plane, they can sometimes stick slightly, as their preferred attitude is with the plunger vertical. It would pay to double check the contact when extending.

                                      #534233
                                      John Purdy
                                      Participant
                                        @johnpurdy78347

                                        I have three dial indicators and just out of curiosity I just checked them. Two are 1" travel of Chinese manufacture and one is a 1/2" travel UK "Oldak". One Chinese is spot on and the other is 1/2 thou low using a 1" slip gauge. The 1/2" one reads 1 thou over using a .500" slip gauge.

                                        John

                                        #534244
                                        Tim Stevens
                                        Participant
                                          @timstevens64731

                                          Could it be that the steel rule (see original post) was of less than toolroom quality ?

                                          Tim

                                          #534253
                                          Howard Lewis
                                          Participant
                                            @howardlewis46836

                                            I made a stand so that a large diameter plunger type could be used as a Comparator. Measurements are made as differences from a stack of slip gauges. Or rather by making up a stack which will return the reading to the original Zero.

                                            Howard

                                          Viewing 20 posts - 1 through 20 (of 20 total)
                                          • Please log in to reply to this topic. Registering is free and easy using the links on the menu at the top of this page.

                                          Advert

                                          Latest Replies

                                          Viewing 25 topics - 1 through 25 (of 25 total)
                                          Viewing 25 topics - 1 through 25 (of 25 total)

                                          View full reply list.

                                          Advert

                                          Newsletter Sign-up