What Did You Do Today 2020

Advert

What Did You Do Today 2020

Home Forums The Tea Room What Did You Do Today 2020

Viewing 25 posts - 501 through 525 (of 636 total)
  • Author
    Posts
  • #487718
    Robin
    Participant
      @robin
      Let me introduce a bearing who I will call 15x28x7. A miraculous device that supports the head on the Warco surface grinder. This holds up 40kg of iron aided only by a 20kg iron counterweight. Just above it is an axial bearing that could easily take the load,l but unfortunately that is positioned to force the slide down should it ever stick and it will be up to good old 15x28x7 here to catch everything as it comes free.
      I am not complaining, I think I got a lot of tool for not a lot of money and this is easy to fix with a 15x32x9 angular contact.wink
      Robin

      Advert
      #487744
      Nicholas Farr
      Participant
        @nicholasfarr14254

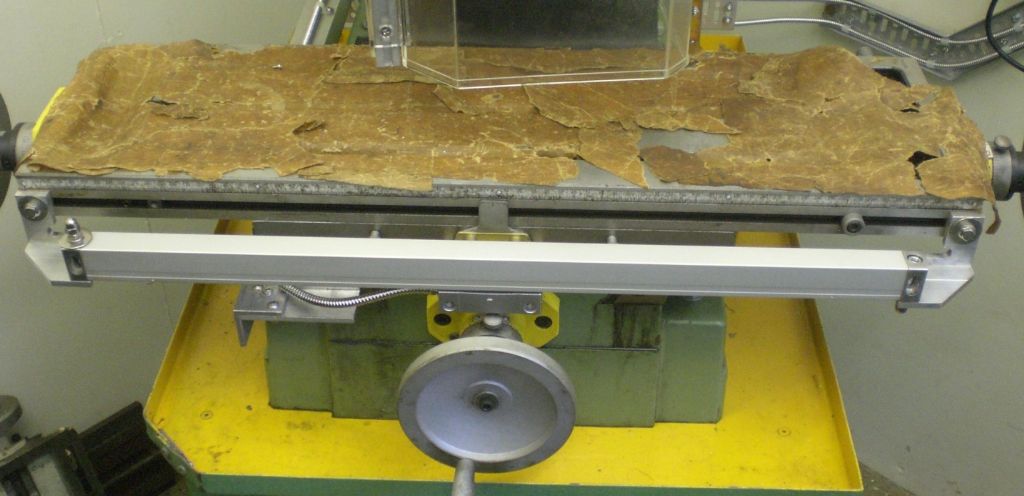
        Hi, after buying a DRO and a couple of glass scale optical encoders in January last year at a good discount from ARC, I finally finished installing them yesterday. The X travel one was pretty much straight forward and is mounted at the front of the table, leaving enough gap to still have the stops to use. The lever type gib locks were removed anyway as they had a tendency to be in the wrong place and jamming while moving the table forward in towards the column, these were replaced with 40 X 8mm set bolts with the ends of the threads turned off and rounded much like the lever locks.

        x 001.jpg

        x 002.jpg

        The reading head was attached with a couple of short stand off's, which should help any build up of swarf between the head and the two part brass bracket the fixes it to the Y travel, the upper part being held by the socket head bolts that hold the stop plate on.

        x 003.jpg

        The Y mounting was a bit more challenging. Two pieces of 40 X 40 X 5mm Aluminium angle were made and bolted on each side of the left hand end of the table, which carries another bit 90 degrees to the table and close enough to the saddle, to allow maximum X travel to the right.

        y 001.jpg

        y 002.jpg

        y 003.jpg

        Another piece of 40 X 40 X 5mm Aluminium angle was then attached back to back, so to speak, which carries the Y encoder, having it this way round will help the encoder being showered with swarf and any cutting oil. Two off cuts from the other bits of angle that made the brackets were used to pack the DRO away for bolting the two pieces of angle together, after using a DTI to set it to travel in a level plain and then drilling the other holes through.

        y 004.jpg

        y 005.jpg

        y 006.jpg

        A bracket was then press up from a piece of 6mm Aluminium plate, to secure the Y reading head in position and was fixed in place.

        y 007.jpg

        y 008.jpg

        The cables were then secured with P clips, the X one along the top of the Y angles and then both onto a piece of second hand 50mm wide cable tray behind the machine and a small bracket of this tray was made, just to hold the loop of the X cable from sagging.

        cabling 001.jpg

        cabling 002.jpg

        cabling 003.jpg

        cabling 004.jpg

        Finally the cables were carried onto another piece of cable tray fixed to the adjacent wall and up to the DRO.

        cabling 005.jpg

        cabling and dro mounting.jpg

        All I want to do now is make and fit a protective cover for the X encoder to stop swarf and cutting oil getting on to it.

        Regards Nick.

        Edited By Nicholas Farr on 26/07/2020 18:11:39

        #487845
        Colin Heseltine
        Participant
          @colinheseltine48622

          Fitted Quill DRO to my Gate PBM-2000 mill.

          I had been given the brackets for a quill DRO of sorts when I purchased my mill. It was a bit Heath Robinson and I could not see a neat way to fit it to my machine and put it to one side. It had a good Mitutoyo scale with it.

          I looked at the Mill Star quill DRO sold by Machine-DRO and had a chat with them and purchased just the bracket off them and made up the remaining bits I needed.

          z-quill-dro.jpg

          I trimmed the original scaled and refitted it and was able to set it correctly on zero.

          Quite pleased with how it works. Just have to remember to switch it off.

          Next job is to fit DRO to the knee.

          Colin

          #488079
          Anthony Knights
          Participant
            @anthonyknights16741

            All the bits for the Starret type clamps are completed, so I can assemble them. I'm not sure how they will be finished off yet. Polish on a sheet of fine emery cloth or blacken? Compromised with the jaw size which I have made 16mm. No second set because its just something else for the workshop gremlins to hide.

            clamps.jpg

            Edited By Anthony Knights on 29/07/2020 02:59:48

            #488301
            Adrian Rawson
            Participant
              @adrianrawson27430

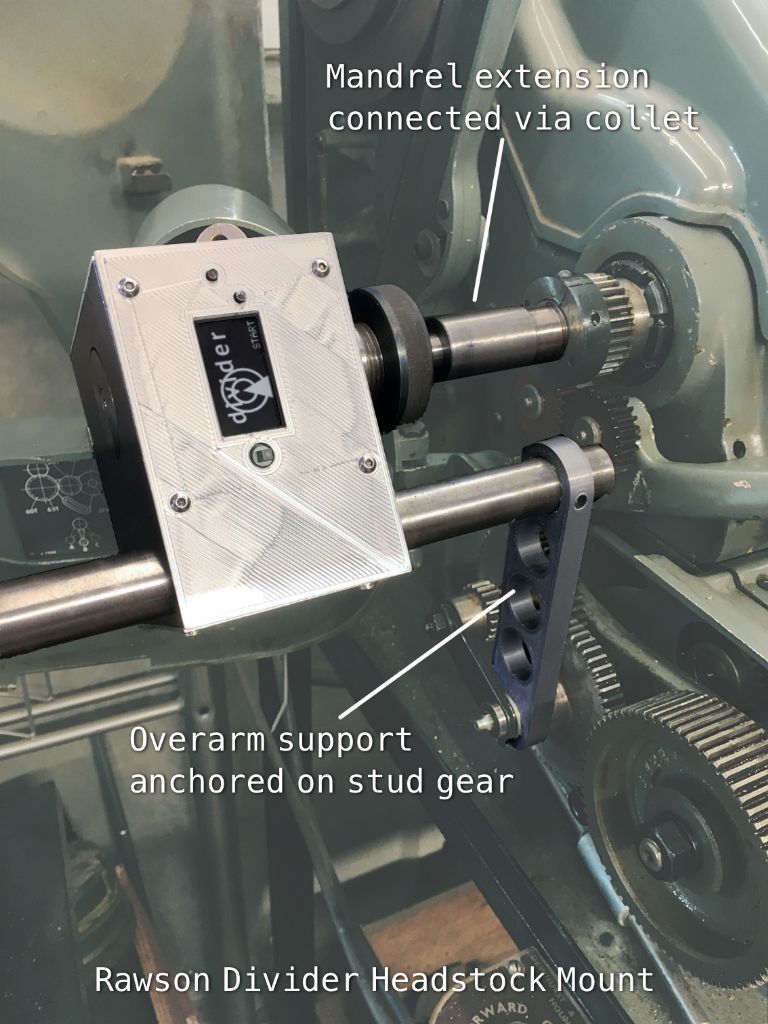
              Finished making a headstock mount for my divider project. Suffered a bit of grief from a home made 'Myford' collet but managed to get it tight enough to make this video **LINK**.

              The mount, as designed, requires the lathe to have a quick change gear box as it relies on the stub gear as a fixing point. I couldn't find any where else to hold the divider firmly in place. The bracket with holes in is printed plastic. I made the mandrel extension with plenty of steel to fix the 'driving' collet to. Now I must make a handle for it to extend its usefulness.

              divider_headstock_mount.jpg

              #488677
              Anthony Knights
              Participant
                @anthonyknights16741

                Today I was cutting my lawn when the mower died. A quick check with my test meter revealed that, fuse OK, switch OK, motor not OK, in fact reading open circuit. this mower is about 30 years old and I am not going to reveal the make. Sufficient to say it has a revolving horizontal blade and is based on hovercraft technology. Lasting this long it had obviously avoided the final checks before leaving the factory. " We can't have these machines lasting more than ten years".

                As any engineer would do, I stripped it down to look at the motor and found that the problem was due to a "spade" connector, which had gone high resistance and burnt out. A quick clean-up, solder the offending joint and back up and running. The thing which really annoyed me is that the motor is constructed in such a way as to make it impossible to check the motor brushes, without taking the risk of breaking the tabs with which the motor has been constructed in the first place. Motor label says "made in Sweden" which were obviously not into recycling back then. Should the brushes fail in the near future I will obviously have to risk bending the assembly tabs and hope they don't break.

                #488858
                kirkpatrick hutchinson
                Participant
                  @kirkpatrickhutchinson18019

                  Currently ordering some new saw blades too since I currently need to replace mine.

                  #489028
                  Howard Lewis
                  Participant
                    @howardlewis46836

                    A friend of mine had the same problem, some years ago, with his Flymo.

                    He very carefully bent back the tabs, and bought some nearly identical brushes. He "ground" them to size on a strip of emery, and carefully rebent the tabs, so that the mower had another life.

                    Howard.

                    #489043
                    john fletcher 1
                    Participant
                      @johnfletcher1

                      Done it many time for our own and the neighbours mowers. You just have to careful when bending up the tabs or else they break off. If the tab does break off all is not lost, you drill a small/thin hole across the brush box, shorten the brush a bit and fit a thin split pin over the spring as a retainer Regarding bedding in carbon brushes brushes, you are aiming at creating an arc similar to the shape of the motor armature commutator. So glass paper upside down if you like, back and forth until the correct shape is created.. NOT EMERY as it is a conductor. Save fifty or more pounds and helping to save the earth. John

                      PS. Same with some washing machine motors.

                      #489101
                      Anthony Knights
                      Participant
                        @anthonyknights16741

                        Thank you for that information gentlemen.

                        #489138
                        John Hinkley
                        Participant
                          @johnhinkley26699

                          Today I crossed two jobs off my "round tuit" list. Firstly, when I fitted a digital scale to the quill of my VMC mill to complement the DRO, the original quill locking handle would foul the digital display at the lower extremity of the quill extension. I used a piece of aluminium off-cut to make a new extended handle and turned down the original locking handle for a tight press fit. Here's the before and after pictures:

                          Before

                          Modified scale installed.

                          And after:

                          Replacement locking handle

                          The other job was to make a double-ended pusher to aid with the alignment of narrow stock in the lathe chuck. It took less than ½ hour and begs the question why I hadn't made one years ago!

                          Double-ended pusher

                          Only downside is I've had to order a couple more toolholders from my favourite Leicestershire emporium.

                          John

                          #489319
                          Anthony Knights
                          Participant
                            @anthonyknights16741

                            I thought the scratch gauge in the last MEW would be really useful, so I went into the workshop today with the intention of making one. I couldn't find a suitable piece of square bar or a TC tip so I came up with this.

                            scratch.jpg

                            The 8mm rod is a piece from a dismantled printer and the scriber is part of a 3mm drill with a point ground on it. I make no claim as to originality, but I'm not really taking up woodwork.

                            Edited By Anthony Knights on 05/08/2020 18:41:51

                            #489344
                            Roderick Jenkins
                            Participant
                              @roderickjenkins93242

                              Today I milled some cow bone:

                              bone milling.jpg

                              Works a treat.

                              Stay well,

                              Rod

                              #489353
                              DiogenesII
                              Participant
                                @diogenesii
                                Posted by Roderick Jenkins on 05/08/2020 23:36:28:

                                Today I milled some cow bone:

                                bone milling.jpg

                                Works a treat.

                                Stay well,

                                Rod

                                ..that swarf will be a good source of phosphoros for the garden..

                                #489357
                                File Handle
                                Participant
                                  @filehandle
                                  Posted by Anthony Knights on 05/08/2020 18:41:02:

                                  I thought the scratch gauge in the last MEW would be really useful, so I went into the workshop today with the intention of making one. I couldn't find a suitable piece of square bar or a TC tip so I came up with this.

                                  scratch.jpg

                                  The 8mm rod is a piece from a dismantled printer and the scriber is part of a 3mm drill with a point ground on it. I make no claim as to originality, but I'm not really taking up woodwork.

                                  Edited By Anthony Knights on 05/08/2020 18:41:51

                                  I prefer your design to the one in MEW, thought about making a similar one. I have been known to use my woodworking one on metal. To keep t square you need a widish face to run against the edge.

                                  #489402
                                  Colin Heseltine
                                  Participant
                                    @colinheseltine48622

                                    Fitted the knee DRO to Gates PBM-200 mill.

                                    Fitting the vertical mounting bar on the main body of the mill was quite a long task. It only had three fixing screws but 12 jacking screws to get the bar both vertical in both axes and square with the knee travel. Took several hours but in the end i manage to get it within 3 thou from top to bottom. The scale support profile was then fitted and set vertical.move to a shelf on a trolley.

                                    Mounted the display below the main DRO display. I used to have a brackets with the R8 collets hanging below the display but decided the knee display was better here and the collets have moved to a shelf on a trolley.

                                    With the power feed and the knee DRO winding the handle will no longer be a painful chore.

                                    knee-dro-mount.jpg

                                    knee-dro-display.jpg


                                    Having the power is great,so I then decided to modify the knee handle on my small Cowells mill to a simple power feed. The previous owner had added a handle to the winding know to make things easier. It works very well but when sitting at the desk and operating the handle I can hear and feel my shoulder creaking painfully.

                                    Turned down a 10mm piece of silver steel and threaded it M8. Fitted three washers to replicate the handle and then tightened up a M8 nut onto the thread. Faced this off to produce a thin locking nut. Mounted the handle in mill and found center and then drilled and tapped M8. Fitted adaptor with some washers to space out above the center fixing screw.

                                    handle adaptor.jpg

                                    Motive power is provided by an old Powercraft 1/4" electric screwdriver.

                                    powerfeed.jpg

                                    Works a dream

                                    Colin

                                    Edited By Colin Heseltine on 06/08/2020 15:26:48

                                    #489501
                                    John Hinkley
                                    Participant
                                      @johnhinkley26699

                                      REALLY surprised no-one pulled me up on my mistake with the pusher tool! (See my earlier post above.)

                                      My new toolholders arrived yesterday and some replacement dog point stainless grub screws came today. Fitted the pusher tool to a new toolholder and offered it up to a workpiece. What a silly billy – I'd set the bearings at 90° to each other such that when I moved it to the other orientation, it presented exactly the same way as previously! Luckily, there was enough meat left to chop off the end and re-tap so that it works as intended. That will teach me to not think a design through – or will it?

                                      Here's what it should have looked like in the first place:

                                      Corrected pusher

                                      John

                                      #489557
                                      Mark Rand
                                      Participant
                                        @markrand96270

                                        The original layour made perfect sense to me, in terms of centring a piece on the faceplate. I hadn't considered orienting the tool in any other way!

                                        #489580
                                        John Hinkley
                                        Participant
                                          @johnhinkley26699

                                          Mark,

                                          That's what I must have thought when I made the first one. When used in the orientation shown in the corrected version, above, it is used on the outside of the stock to push it gently into running true. Move it to the other position and the bearing runs on the end of the stock and, assuming that is square, will allow it to be moved to run true axially. With the original, the bearing presents itself to the stock on the face in both positions. You could always just have one bearing and swap it around in the toolholder, I suppose, but that rather takes away the "quick" bit of a QCTP! Having said that, presenting to the face is the position I would anticipate getting the most use.

                                          John

                                          #490152
                                          Martin King 2
                                          Participant
                                            @martinking2

                                            Hi All,

                                            Spent today outside under the sun brolly fixing the seized up and filthy little watchmakers hand lathe that I got at Cheddar Car Boot Sale on Sunday along with a Wolf Jahn Cased watchmakers lathe.

                                            Came up not too badly, the little work holders on the faceplate are really lovely bits of engineering in themselves.

                                            wmfaceplate 2.jpg

                                            wmfaceplate 3.jpg

                                            wmfaceplate 4.jpg

                                            Seems to be missing the front tool rest or fitment, not sure what that would look like?

                                            Cheers, Martin

                                            #490162
                                            Neil A
                                            Participant
                                              @neila

                                              What a lovely little watchmakers lathe, even if you never actually use it. It deserves to be looked after.

                                              A similar lathe, described as a "Burin Fixe" watchmakers lathe sold for £550 in 2018 at Flints Auctions.

                                              A search under that name brings up quite a few images, you may find a suitable image to copy.

                                              I think you were very lucky to find it.

                                              Neil

                                              #490163
                                              Dick H
                                              Participant
                                                @dickh

                                                See this one on fleabay.de

                                                "Sehr schöne dekorative antike Uhrmacher Drehbank Messing auf einem Holzsockel"

                                                it could be its twin but with the rest,.

                                                #490174
                                                Martin King 2
                                                Participant
                                                  @martinking2

                                                  Thanks for the links guys, will knock up a tool rest tomorrow!

                                                  Cheers, Martin

                                                  #490175
                                                  Mick B1
                                                  Participant
                                                    @mickb1

                                                    Diving kingfisher, titanium and alli, copied from an internet photo:-

                                                    kingfisher2.jpg

                                                    Also starting a smaller brass copy of the wooden train I made for the youngest grandkids, to fit on their Brio track. Hopefully I'll finish it while they're still small enough not to turn their noses up at it…

                                                    laugh

                                                    #490450
                                                    Martin King 2
                                                    Participant
                                                      @martinking2

                                                      Hi All,

                                                      Managed to knock this up out of the scrap box and copying the picture from the previous link.

                                                      wmfaceplate 12.jpg

                                                      wmfaceplate 11.jpg

                                                      Doesn't look too bad in situ, just waiting for some drive belt to arrive from EBay

                                                      wmfaceplate 13.jpg

                                                      Cheers, martin

                                                    Viewing 25 posts - 501 through 525 (of 636 total)
                                                    • Please log in to reply to this topic. Registering is free and easy using the links on the menu at the top of this page.

                                                    Advert

                                                    Latest Replies

                                                    Home Forums The Tea Room Topics

                                                    Viewing 25 topics - 1 through 25 (of 25 total)
                                                    Viewing 25 topics - 1 through 25 (of 25 total)

                                                    View full reply list.

                                                    Advert

                                                    Newsletter Sign-up