What Did You Do Today 2019

Advert

What Did You Do Today 2019

Home Forums The Tea Room What Did You Do Today 2019

Viewing 25 posts - 476 through 500 (of 1,046 total)
  • Author
    Posts
  • #413643
    Danny M2Z
    Participant
      @dannym2z
      Posted by Michael Gilligan on 10/06/2019 07:23:48:

      Great result, Danny yes

      But; from this side of the planet, that looks remarkably like a steel can

      MichaelG.

      Michael. I retrieved the container from the bin and tested it with a magnet, it is indeed steel. The white coating on the inside and the fragility/softness led me astray.

      It did cause me to ponder why the mildly corrosive contents were packaged in a container that would be eaten away internally during prolonged storage.

      I eventually found my can of Brasso which I should have used in the first place. It appears to be in good condition so today I can start on some more gauges to suit larger calibres.

      * Danny M *

      Advert
      #413648
      Michael Gilligan
      Participant
        @michaelgilligan61133

        Thanks for the confirmation, Danny yes

        MichaelG.

        .

        Edit: I've just looked at a few versions of the MSDS, and all indicate that the liquid component is isopropanol

        I suppose the corrosion mechanism might be specific to the ratio of product to airspace, in your part-used can.

        Edited By Michael Gilligan on 11/06/2019 06:12:35

        #413667
        Danny M2Z
        Participant
          @dannym2z

          Today I made two more gauges successfully thankfully after a 'Baldrick Moment'.

          He said inside my head, "Why not start with the big ones first, that way of you stuff one up you can make it into the next size down?"

          Now why didn't I think of that?

          I shall post a photo when all 7 gauges are completed. Apart from the 0.224" which suits rimfire and the various .22" centerfire calibres a decent set should contain 0.243" (6mm nominal), 25 calibre (0.257" 0.263" (6.5mm nominal), 0.277" (.270" nominal), 0.284" (7mm nominal) and 30 calibre (0.308" diameter) which covers about 99% of the competition shooters at our local range.

          I also plan to make a nice case for the set with a few spare empty holes marked 0.311" and 0.338"

          * Danny M *

          Just terminated a grinning 'winky"

          Edited By Danny M2Z on 11/06/2019 09:51:19

          #413676
          SillyOldDuffer
          Moderator
            @sillyoldduffer
            Posted by Michael Gilligan on 11/06/2019 05:58:35:

            Thanks for the confirmation, Danny yes

            MichaelG.

            .

            Edit: I've just looked at a few versions of the MSDS, and all indicate that the liquid component is isopropanol

            I suppose the corrosion mechanism might be specific to the ratio of product to airspace, in your part-used can.

            Edited By Michael Gilligan on 11/06/2019 06:12:35

            Fascinating!

            My hypothesis: over several years the Isopropyl Alcohol escaped through a not-quite-sealed cap and was replaced by damp air. Differences between day and night temperatures caused the can to breath and it gradually collected enough water from the air to form an oxygen rich pool on top of the hardened polish. Maybe the tin layer was nicked, maybe there's something in the polish that dissolves in water making it acid enough to attack tin, but an active corrosive layer formed at the interface and cut the bottom off.

            For the very lazy, its a neat alternative to a hacksaw…

            Dave

            #413743
            mark costello 1
            Participant
              @markcostello1

              A little bit of cling wrap or transfer to a small glass jar solves the problem. And ,yes, My picture is under the word "skint" in the dictionary.

              #413749
              Nigel Graham 2
              Participant
                @nigelgraham2

                Today – a trip to the doctor to confirm ultrasound results were clear so I don't have a thrombosis after my knee replacement.

                Am slowly starting to become more mobile but am still on crutches, so my expeditions down the garden to the workshop are to still just refill the bird-feeder. Eating me out of house and home they are, the sparrows.

                Still learning TurboCAD, but as the steam-wagon's part-finished cylinders and engine base-plate sit accusingly on the table next to the PC, this enforced indoor-engineering seems a good opportunity to use the former to assess what's next on the latter. (No original drawings exist.)

                Or I could think the best approach to moving the Myford gear-box from the box under the settee, to the lathe itself. Not wanting to risk modifying the existing lead-screw, do I try to make the replacement, using the Harrison lathe; or try to obtain one second-hand?

                Meanwhile, time to eat me out of house and home….

                #413791
                Cornish Jack
                Participant
                  @cornishjack

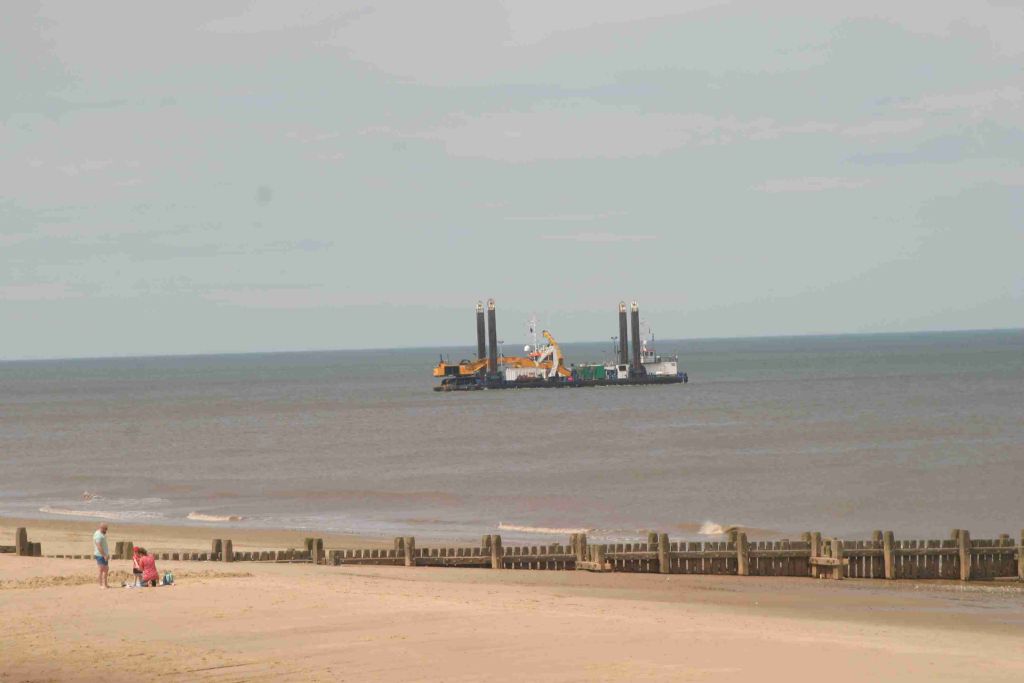
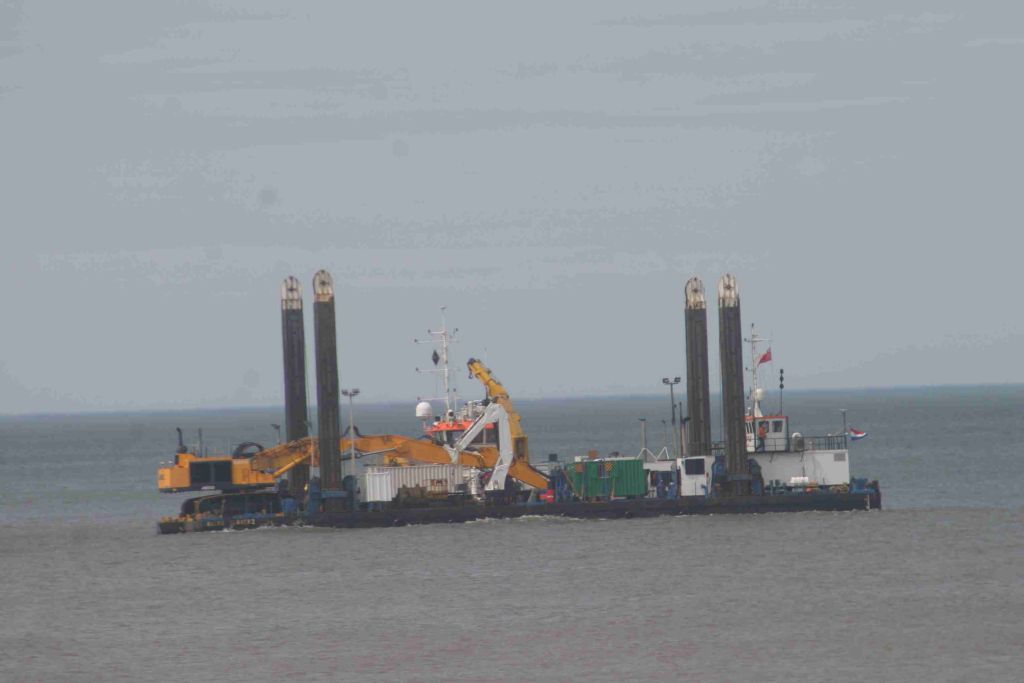
                  More a matter of the last week or so, watching the start of 37 million quids worth of trying to modify Nature – or, to be precise, the North Norfolk coast. The antics of the accompanying twin-hulled tow craft are quite amazing. one hopes the results will help to avoid a repeat of the 2013 'excitement' !!

                  img_9161a.jpg

                  img_9164a.jpg

                  rgds

                  Bill

                  #413793
                  Boiler Bri
                  Participant
                    @boilerbri
                    Posted by Joseph Noci 1 on 08/06/2019 19:46:19:

                    Posted by Boiler Bri on 08/06/2019 05:21:44:

                    I made a start on the hydrostatic lubrication today.

                    New tanks made from 316stst.

                    Forgive my ignorance…What are those tanks used for?

                    You said :

                    Yep all tig welded.

                    I am sure my boiler inspector will have something to say!

                    Are the tanks boilers? If not boilers, are you saying they have have hot water in them somehow?

                    Interested to know how you tigged them. Did you fill/purge with Argon when welding?

                    Maybe you are coded in SS welding, but if not , there are many pitfalls in welding stainless that is exposed to hot water. The tanks must be back-filled with gas, and weld temps must be very well controlled to prevent carbon precipitation. Else those become rust focus points, and the tank turns becomes a sieve..Ask how I know..

                    Joe

                    yes they were welded by a coded welder. Back purged and fully welded Although purging takes place the gas is moving and replenishing. I have seen welders block the void complete so no gas is escaping. This is a very bad practice are not to be recommended.

                    They will hold the oil and condensate that build up during the cooling process of the steam that is fed to them. As this takes place the oil is displaced and fed to the feed of each cylinder. They will be part of the system that is under pressure, but not generating it, so it will fall into the pipework. There only 38mm diameter 1.5mm solid drawn tube with 3mm plate ends. Having worked with stainless steel for the last 30 odd years they will be fine for the work they are going to do and are a lot easier to make than copper ones.

                    Bri

                    #413871
                    gary
                    Participant
                      @gary44937

                      bought a series 2 bridgeport special today complete with collets, vice, rotary table and 3 axis DRO . its a big heavy beast ! the table feed and DRO are 110 volt so no problem, will let my sparky mate worry about the 3 phase- single phase wiring. gary

                      #413996
                      Mark Rand
                      Participant
                        @markrand96270

                        Finally used the riser that I made for the Beaver milling machine on the job that I'd made it for. I'd screwed up when scraping the ram ways for the shaper and got them 3 thou out of square with the vertical ways that I'd scraped first. I was so annoyed with myself that I decided to make the raising block and machine them square before re-scraping them angry.

                        Shimmed the shaper body so that the vertical ways were vertical with respect to the X feed using a DTI and a precision square clamped to the vertical ways and made the horizonatal ways parallel to the motion. Then milled the ways. The scraped surfaces of the ram print up nicely against the milled ways when blued, which is promising.

                        Photo picks up the scraping nicely wink.

                        #414184
                        Nigel Graham 2
                        Participant
                          @nigelgraham2

                          Yesterday actually, but the log-in routine on this site was being especially obstinate!

                          Ordered, after a good deal of shopping around, the worm and wheel for my steam-wagon's steering-gearbox. I don't know what was actually inside the casing showed in rather low detail on the archive photos of the original.

                          It's actually the corresponding gearing for an M.J. Engineering 3"-scale Fowler.

                          With a copy of the wheel & worm's drawing kindly e-posted to me, I started designing the box itself to resemble the prototype as far as I can discern from the photos – so in spirit more than precision to something that looks different in each picture anyway.

                          #414261
                          Boiler Bri
                          Participant
                            @boilerbri

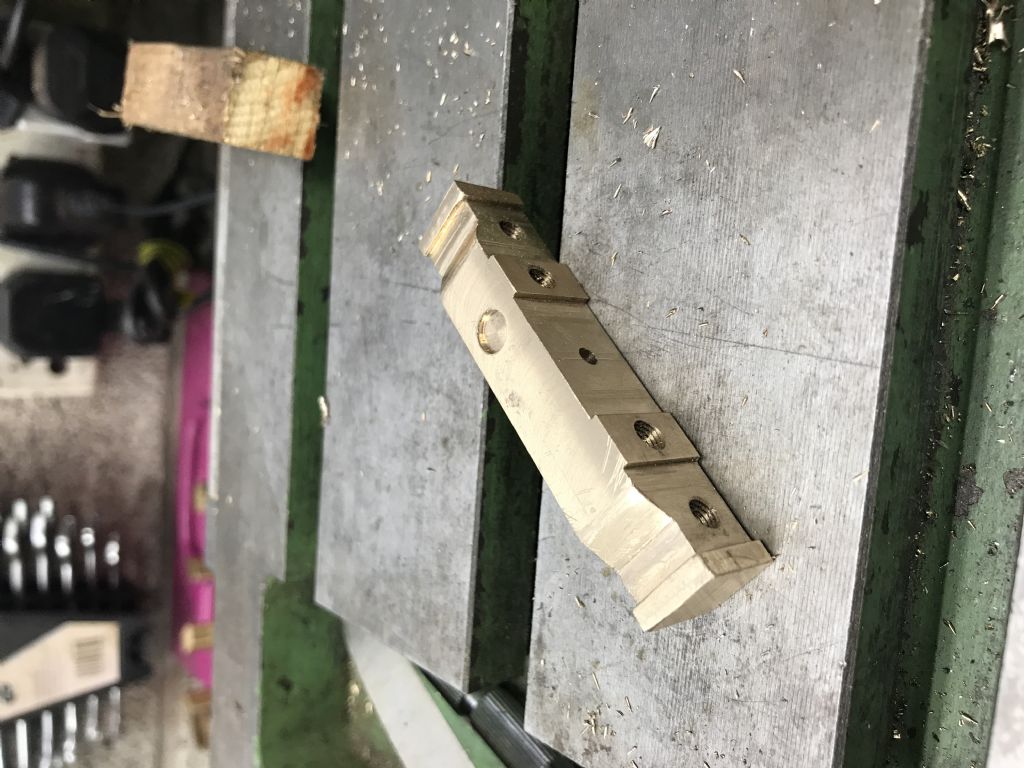
                            Finished my steam manifold ready to Silver solder the fittings onto it

                            should look much better than the 5/8 square block that can with it

                            d8a5943f-87ee-4424-8a1b-e61d8826c133.jpeg

                            B


                            Edited By Boiler Bri on 14/06/2019 20:10:24

                            #414376
                            John Hinkley
                            Participant
                              @johnhinkley26699

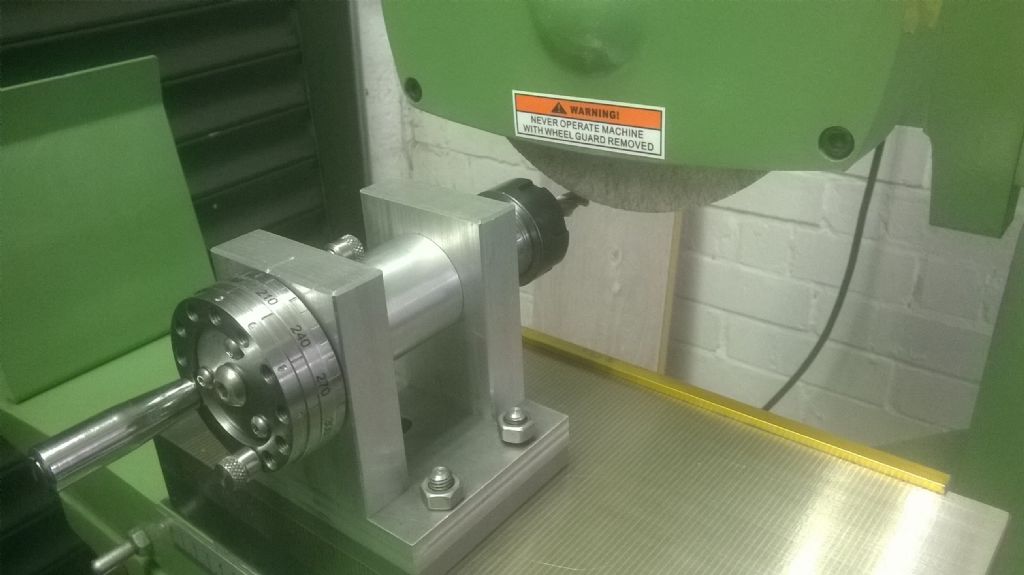
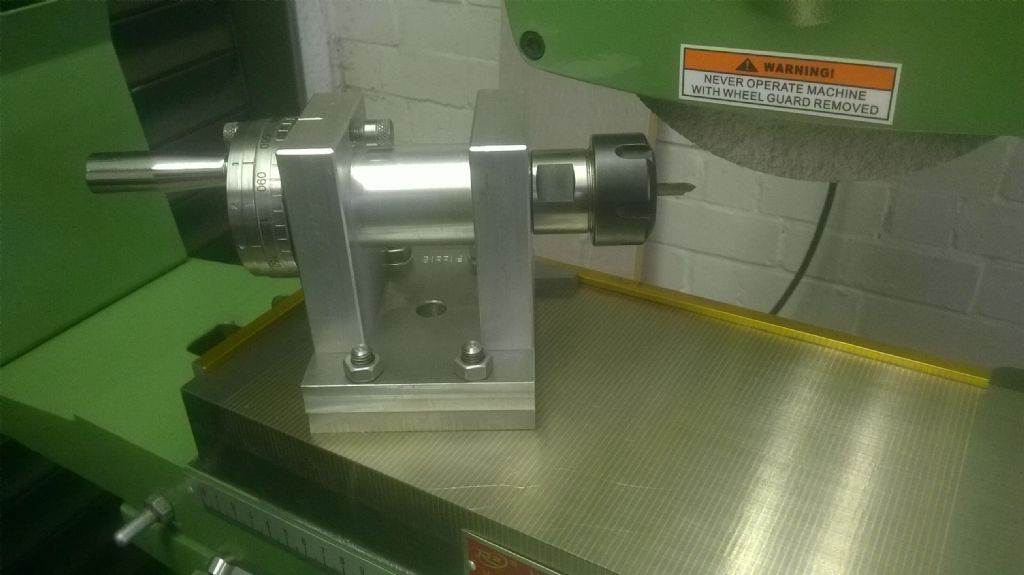
                              I finished a couple of mods to my simple indexer today. I've made up a mild steel plate the same dimensions as the base plate and fixed it to the indexer so that I can use it on the surface grinder. ( The original base plate was aluminium – 'cos I had some! ) The idea was to use the indexer as a rudimentary form of cylindrical grinding arrangement while amassiing the material for the real thing. Also to grind the points of the engraving cutters for the secondhand engraving machine that I recently purchased. The detent screw locating the reference plate is released and the machine handle, attached to the outer plate provides the rotation. The pictures say it all, really.

                              Cylindrical grinding setup.

                              Angle grinding setup

                              Before anyone comments – the pictures are posed to demonstrate the positioning of the indexer only. I don't intend to grind on the side of the mounted grinding wheel. I have just received a deep cup diamond wheel for that but haven't fitted it yet.

                              John

                              #414390
                              Nigel Graham 2
                              Participant
                                @nigelgraham2

                                At the moment, still recovering from having new knee bearings, (me, not the milling-machine!), the get-up-and-go has gone. It's probably lost in the rapidly-growing thicket that passeth for a lawn / neighbourhood's cats' station of ease.

                                Still, managed a little more battling with TurboCAD to design my seam-wagon's steering gearbox. The rest is all made – though ball-joints are not quite prototypical.

                                I believe they were used on cars of the time (1908) but the advertising photos suggests the Hindley wagon used rather crude universal-joints for the drag-link. I did make that pattern, driven by a temporary worm-and-wheel from some salvaged something-or-other, but it introduced a lot of free-play and I replaced it a new drag-link using commercial ball-joints of appropriate size. (I've not thrown away the clevises. Barely use, they might come in handy…)

                                Looking at my drawing so far, the 3"dia wheel and 1.3" dia worm makes the gearbox look disproportionately wide, and I began to think I'd made an expensive mistake until memory kicked in….

                                Many early vehicles used worm-and-sector steering, but the sectors were probably made to that shape. However, I once worked for DEK Screen-Printing Machines, whose high-precision products could be used for anything from trade-marks and instruction-labels, to p.c.b. masks. One of these machines used a large-diameter sector gear made by cutting a stock wheel. Careful thought suggested, if it were good enough for DEK…

                                Now the wheel I've ordered, for a Fowler TE, has a large-diameter boss on one face, and keyway-ed bore of nearly 1". I'm not yet fit enough to exhume the poor wagon from accumulated "stuff" and measure things, but I doubt the drop-arm swings more than about 60 – 70º lock-to-lock, if that. There is enough meat on the Fowler wheel to make it into two semi-circular sectors that can be screwed to flanges, using suitable registers and key, thus greatly slimming the space needed.

                                The unused half? Cut a keyway in that and store it carefully as a spare.

                                Now to wind up TurboCAD and investigate…

                                '

                                DEK thrives now as part of ASM, but using the original name as a trade-mark. It concentrates on very high-precision machines that link to others from elsewhere to form assembly-lines mass-producing circuit-boards for computers, portable-telephones etc. These machines are naturally now all-NC driven.

                                The word "DEK" never stood for anything: the original proprietor, whose prototypes labelled oil-drums and the like, had the vision to invent a snappy name easy to pronounce and of no meaning, in any known language!

                                My own society (Weymouth & D.M.E.S.) was privileged to have a guided tour of ASM one evening a few months ago, among the club's Winter activities.

                                #414413
                                Neil Wyatt
                                Moderator
                                  @neilwyatt

                                  Did a 'mini restoration' on a bass guitar, a Westone Thunder 1 – well-made and good sounding mid-range Japanese bass from the early 80s, but not worth a fortune. Discovered the lacquer on the badly tarnished brass was very tough – overnight in nitromors required. Three of the seven bridge screws had to be replaced with matching ones – these all went in at an angle – I discovered that the original ones had been sheared off leaving bits behind.

                                  Cleaned the brass up with vinegar and salt followed by brasso, then clean tissue, finished with Windsor and Newton gloss lacquer, meant for 'artworks' – it will come off with white spirit but is pretty tough.

                                  EvoStik 'Grip Filth' wipes worked very well on the wood, especially where the varnish was worn off and teh wood had gone grey. Didn't overdo the cleaning as I want it to look its age.

                                  Before (not my pic):

                                  After:

                                  #414494
                                  robjon44
                                  Participant
                                    @robjon44

                                    Hi Nigel Graham 2, I'm afraid you will have to be patient with your knee transplant, your body will be wrestling with the after effects of the anesthesia, the antics of the physioterrorists etc, plus periods of not being allowed to drive your car & irrational fear of the damn things falling out on the floor! However fear not, mine were so crippled with osteoarthritis that the grating noises were audible when walking, having now had both replaced with lots of shiny stainless steel & engineering plastic over the last year or so, a complete transformation, signed off by the surgeon a couple of weeks ago. DO NOT try to rush things, I know people who have had to had them replaced again after undertaking major gardening & building projects, silly. On the bright side, ignoring the editors advice I insisted on imperial replacements so that I can walk for miles not kilometres (joke), bottom line? I have just turned 75 & can now run 300 yards along a sand beach & clear low obstacles without falling on my face, little different to struggling to cover the same distance to the corner shop or walk the dog, workshop never tidier & learned the latin names of every weed in the garden. Final tip, do get a pair of quality knee pads the knees do not appreciate hard surfaces at all. Best of luck Bob H

                                    #414506
                                    Nigel Graham 2
                                    Participant
                                      @nigelgraham2

                                      Thank you Robjon, for your support & encouragement! Imperial knees – I like it!

                                      '

                                      By 'eck this site's log-in is so obtuse! I'd posted on the thread about acids, and the result was all my efforts to open this thread to reply kept putting me back there. I had to close the lot right back to the Desktop to make it work properly.

                                      '

                                      Anyway, yes, I am being very cautious. I can walk reasonable distances now, still on crutches, slowly and carefully.

                                      Our physio- " terrorists " are not that bad at all. They don't force things along but assess your progress, select a menu of exercises and teach you them, then leave you to exercise at your own pace though to recommended frequency, at home for a few weeks before seeing you again.

                                      I was there for the first session a week ago but the phsyiotherapist spotted potential complications and consulted a doctor – up-shot was a thrombosis scan (clear) but also antibiotics for an infection.

                                      Driving? I asked last year, after the first op; and was surprised that the doctors and even more surprisingly, the insurers were quite sanguine about, telling me to leave driving until I was confident I could press the brake-pedal in an emergency stop. One doctor suggested simply sitting in the car in its parking-place, and trying it. Last year I had the operation in March, made a few short local journeys in quiet times in mid-June, and was able to attend the MSRVS Rally in Tewkesbury – I live in Weymouth so about 150 miles each way, but I visited the Rally on Sunday and stayed there overnight, helping the lighter duties in clearing the site. (As an MSRVS member.)

                                      '

                                      As for Caving and Geology –

                                      Well, I was caving again gently from last August to the weekend before the operation this May, involved in a particular exploration project; but I'll never be able to do the sort of caving-trips I could years ago. And yes, I have worn knee-pads for that, for years, though most progress underground is by walking, not crawling. Geology-club field-trips have largely been out for a long time because Geology makes big steep hills and boulder-covered beaches.

                                      Still, whilst convalescing I've written a couple of articles for my caving club's Journal, one on a related geological topic, so at least I've done some office-chair caving and geology!

                                      Office-chair model-engineering too, still trying to teach myself TurboCAD, including using it in designing the steering-box for my 4"-scale steam-wagon I should have completed years ago. I'm certainly not yet up to standing at a milling-machine, or even at the drawing-board that dominates the dining-room. My only trips to the workshop so far have been to fetch the bird-seed to feed the ravening hordes of sparrows. It's amusing watching their antics – especially the two yesterday trying to make more sparrows!

                                      '

                                      Meanwhile the garden is becoming very Latinate, to the point the "lawn" will need the electric mower when I am fit enough to use it; but the rain has topped up the ponds via water-butt overflows, so the resident frogs are happy.

                                      #414578
                                      Nigel Graham 2
                                      Participant
                                        @nigelgraham2

                                        Tried the Trial version of Alibre Atom again, but it knows I have had it before, and won't play. It doesn't tell you till it's all loaded though, and you try to run it!

                                        '

                                        So, re-visited the training CD bundled with my copy of TurboCAD. Previously I could not make its first exercise work but now realised it was probably for an older edition of TC. This time I succeeded, though still with some odd problems.

                                        Also discovered to my great surprise that although it says "2D CAD" in big letters all over the labels, its exercises actually advance to 3D modelling.

                                        #414703
                                        Joseph Noci 1
                                        Participant
                                          @josephnoci1

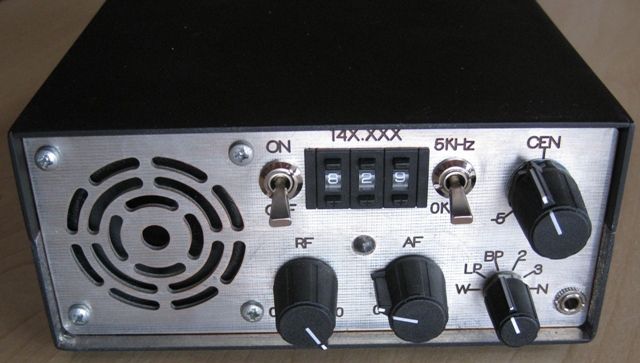
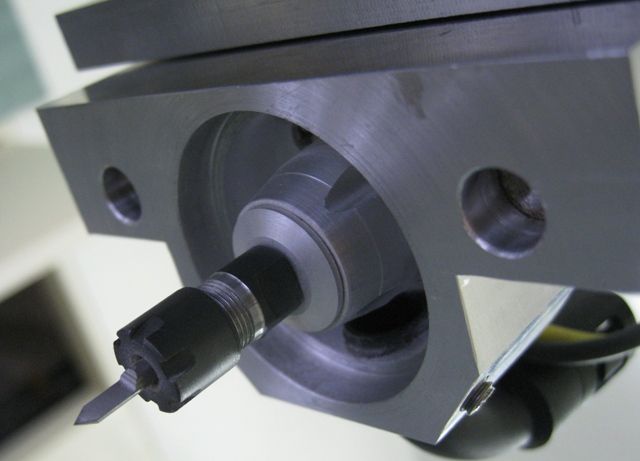
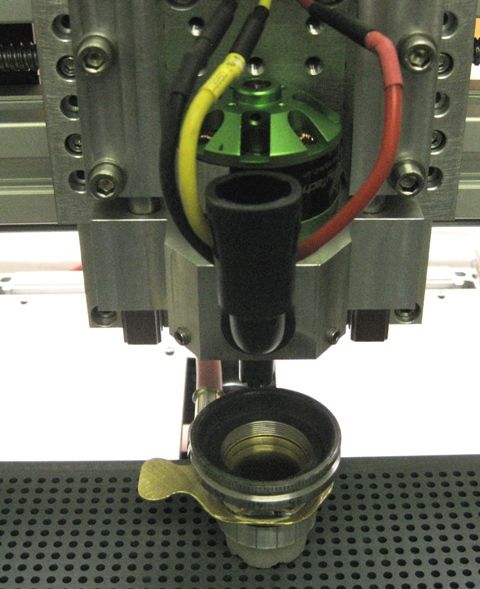
                                          Engraving Circuit boards again – this time for a direct-conversion VHF SSB/CW receiver I am building ( for tracking animal Radio Collars). The current one I use, also a diy unit, is a bit large and unwieldy while trekking in the desert mountains searching for the Lions…Trying to make one that fits in a shirt pocket…

                                          The current receiver: front is 150mm x 60mm – trying to get to 100mm x 35mm..

                                          front.jpg

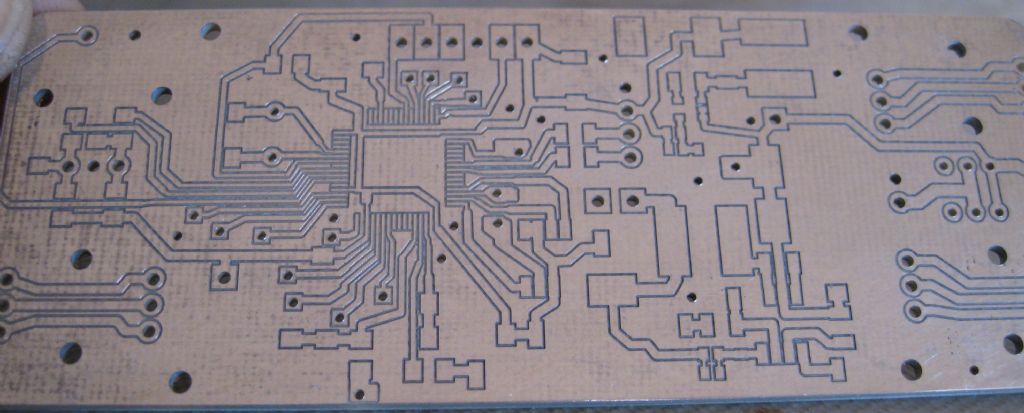
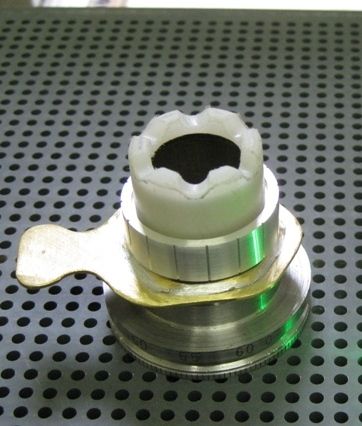
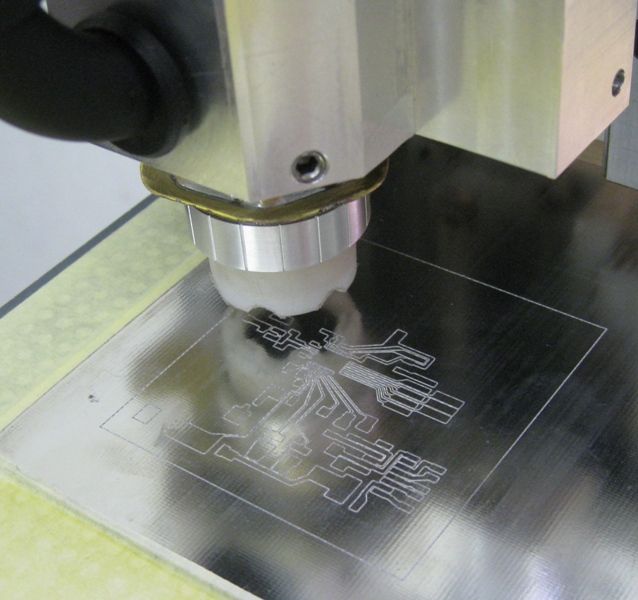
                                          Am getting really good results with the small CNC Engraver – the IC in the middle is a microprocessor, with pins spaced 0.5mm apart. Circuit board material is FR4 35um copper clad fibreglass laminate, 1.6mm thick. Cutter is a 30deg D type carbide bit @ 30,000 RPM, and constant depth assured with the floating engraving head. Depth is around 45um

                                          All for a prototype to test before committing to actual PCB…

                                          This board is the control and microprocessor module – RF/AF module to follow..

                                          vhf_rx_control panel.jpg

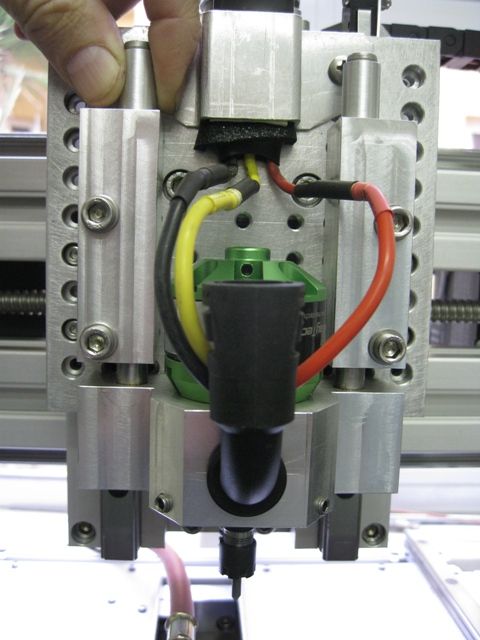
                                          The engraving bit and floating head;

                                          head down.jpg

                                          spindle2.jpg

                                          The floating foot:

                                          floating foot.jpg

                                          nose and tool1.jpg

                                          PCB Being Engraved

                                          #414882
                                          Colin Heseltine
                                          Participant
                                            @colinheseltine48622

                                            Fitted new Nitron shock absorbers and matching springs to my Caterham 7. Although it was built (by me) in 1997 all the bolts came out a dream. The Copperslip had worked its magic. Cleaned up bolts, fresh Copperslip, and loctite as appropriate and hopefully will last another 22 years. Whether i will still have a licence and can drive it then (at 91) remains to be seen, or even if petrol will still be available.

                                            Colin

                                            #415006
                                            Anthony Knights
                                            Participant
                                              @anthonyknights16741

                                              I intended to start on a stirling engine project which got shelved 2 years ago, but it wasn't to be. The submersible pump which I use in the fish pond, suddenly started tripping the earth leakage breaker. I suspect this is due to water ingress via the cable inlet as I have checked in the mains plug and also for any cable damage. This has always been suspect, even from new.cable in.jpg

                                              I managed to partially dismantle the pump, but don't seem to be able to get the motor out of the top part of the housing. The internet is no help as points me to a new pump, or the manual, which doesn't tell me much at all.in bits.jpg

                                              There is a small screw in the top with a rubber washer under it's head. It appears to a vent for the top housing. I have left the screw out and put the pump in a warm place. I will check the insulation readings in a couple of days. I may try some WD40. I all this fails, I will cut the end off the housing. If I can repair it, I can glue it back together and add a bit of fibregass for strength. I know this works because 4 years ago I accessed the faulty bearings on a sealed drum washing machine the same way. If it's not repairable then it was scrap anyway and I'll have to get a new one.

                                              #415040
                                              Nigel Graham 2
                                              Participant
                                                @nigelgraham2

                                                Does anyone know if a pond pump would work as a suds pump, or whether, as possible, it uses natural-rubber parts that the oil would attack?

                                                I do have a Stuart circulating-pump saved from the skip, but that was made for, and only used for, water. I'm not sure of its type: peering into the outlet, the impeller doesn't look like a conventional centrifugal type.

                                                #415053
                                                Frances IoM
                                                Participant
                                                  @francesiom58905

                                                  I bought at auction for a very low price a 12V sump oil pump thinking it may be useful in workshop but on reading the fine print it has do not use for water. Not sure quite why but may well be material used for any impeller ?

                                                  #415279
                                                  Neil Wyatt
                                                  Moderator
                                                    @neilwyatt
                                                    Posted by Frances IoM on 19/06/2019 19:01:40:
                                                    I bought at auction for a very low price a 12V sump oil pump thinking it may be useful in workshop but on reading the fine print it has do not use for water. Not sure quite why but may well be material used for any impeller ?

                                                    Water might be too thin for it?

                                                    #415288
                                                    Nigel Graham 2
                                                    Participant
                                                      @nigelgraham2

                                                      Possibly, Neil, if it's a gear- rather than centrifugal- pump.

                                                      Another reason may be the material used for its bearing. Some plastics are hydrophilic, tending to swell slightly, so though otherwise suitable for low-cost bearings might bind on the shaft.

                                                      Or, much simpler, it might contain mild-steel in a combination that would simply corrode rapidly in water.

                                                    Viewing 25 posts - 476 through 500 (of 1,046 total)
                                                    • Please log in to reply to this topic. Registering is free and easy using the links on the menu at the top of this page.

                                                    Advert

                                                    Latest Replies

                                                    Home Forums The Tea Room Topics

                                                    Viewing 25 topics - 1 through 25 (of 25 total)
                                                    Viewing 25 topics - 1 through 25 (of 25 total)

                                                    View full reply list.

                                                    Advert

                                                    Newsletter Sign-up