warco 4850RB mini mill lead screw split nut

Advert

warco 4850RB mini mill lead screw split nut

Home Forums General Questions warco 4850RB mini mill lead screw split nut

Viewing 13 posts - 1 through 13 (of 13 total)
  • Author
    Posts
  • #474586
    Clive Farrar
    Participant
      @clivefarrar90441

      Hello Gentle folk,

      Its a long while since i have been on here, but here goes.

      The above mill has been rather poor in terms of accuracy and rigidity for a long while. With the abundance of time recently I decided to SORT it out.

      The column has been removed scraped fettled and forced into submission by various means and a stiffening bracket. I am now well pleased with it at 0.005mm difference across a 260 mm circle in the x axis and 0.03mm on the Y. That is better than half of the manufacturing spec.

      My attention moved to the vagarities of the gib strip " tension" in both axis.

      I have had a go at polishing them before but over time every thing got very slack and the backlash on the x axis was appalling at nearly a full turn ( 1.5mm )

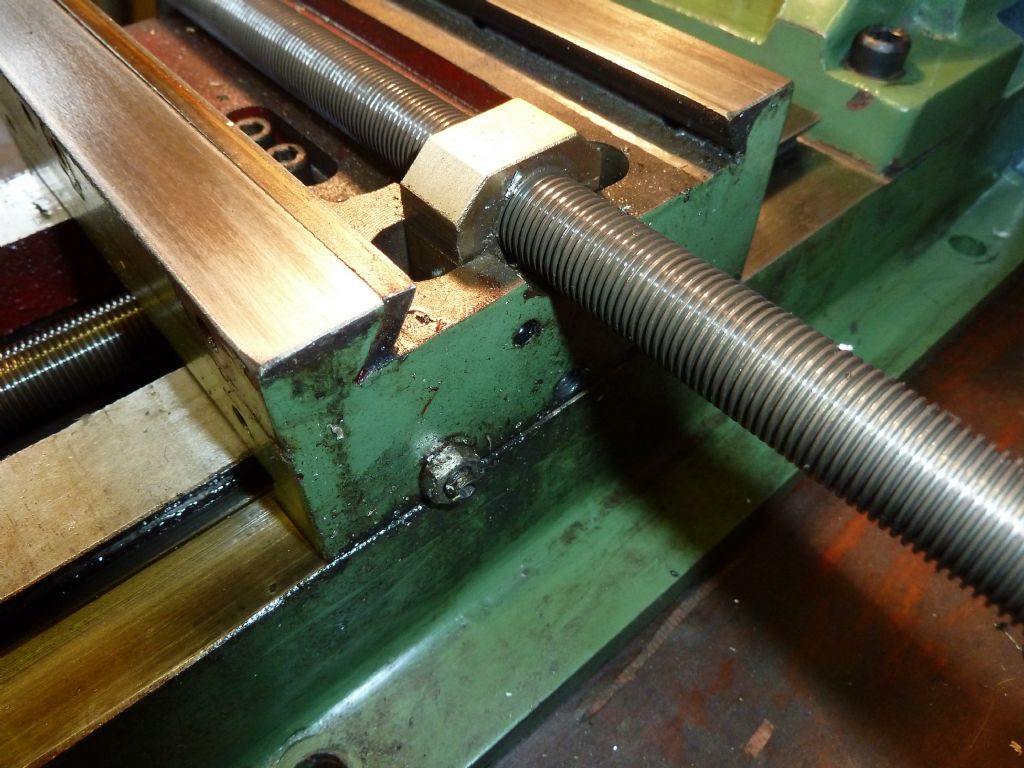
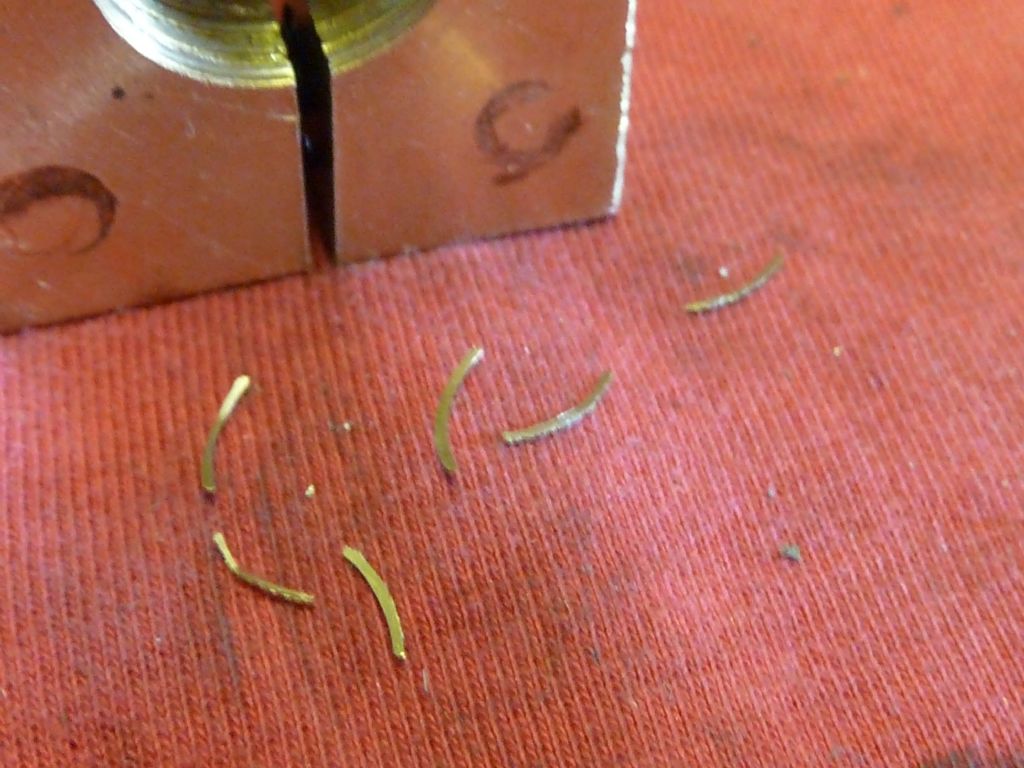
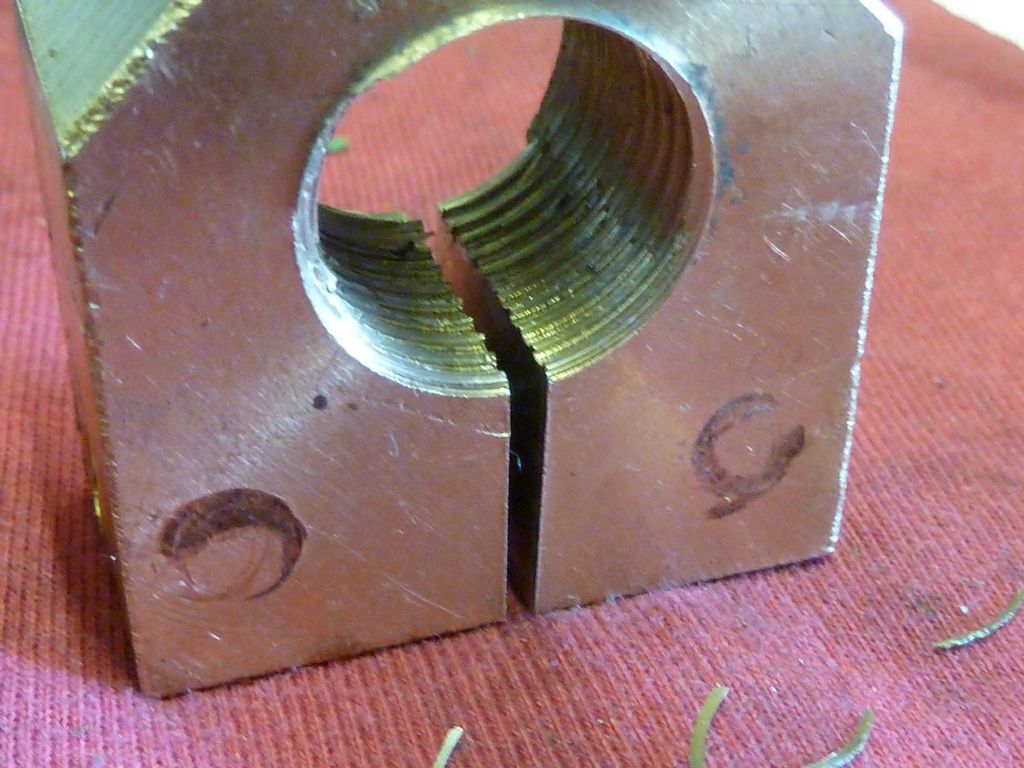
      So today i have pulled it all apart to sort it properly. That is where the real problem rose its ugly head. The X axis split nut sits in a little recess full of oil. Only in this case it looked to be in a bath of gold. Yes severe wear had taken place and the bottom half of the thread no longer had a form or crest there where just whisps of brass standing in that spot. ( the upper half of thread is pretty decent which is why the machine still worked.

      I will ring WARCO tomorrow about a spare but their performance on previous enquiries for parts for this machine are abysmal so i do not hold out much hope.

      The old ARC x2 spares may do the job but look different in shape and are not split. They may be a possibility though.

      The lead screw is a metric 1.5mm pitch, 16mm OD

      The likeyhood is though that i will have to MAKE a replacement. This eventualy leads on to the questions.

      1) Will the thread form be ACME 29 degrees or will it be METRIC 30 degrees , I suspect the latter.

      2) How would I check that?
      3) would a replacement be better made out of phosphor bronze or just plain old brass.

      4) Are the threads in such NUTS over size to allow them to be adjusted by the two grub screws that go though the side of the oil well that can be used to skew the block to get a good fit on the lead screw.

      If so how do you gauge the amount of oversize on the thread.

      5) Does any one know of a source of ready made ones so that I don't have to.

      6) any other reccomendations or wrinkles that i have missed.

      Many thanks Clive Fnut in oil well

      thread shards

      worn out threads and grub screw marks

      Advert
      #27396
      Clive Farrar
      Participant
        @clivefarrar90441

        several questions re spare or repair.

        #474603
        old mart
        Participant
          @oldmart

          The thread will be a trapezoidal form, 30 degrees. As it is a fine pitch, it would be easy to make a new nut using lay down tooling and inserts. There could be room for a second nut to the left of the existing one to make a better antibacklash setup.

          #474604
          old mart
          Participant
            @oldmart

            The thread will be a trapezoidal form, 30 degrees. As it is a fine pitch, it would be easy to make a new nut using lay down tooling and inserts. There could be room for a second nut to the left of the existing one to make a better antibacklash setup.

            #474828
            Clive Farrar
            Participant
              @clivefarrar90441

              OK confirmed it is a metric T16 lead screw.

              I think if i cut the thread 1mm deep that will give a little clearance to the calculated 0.925mm thread depth on the lead screw.

              Any oppinions on suitable replacement material. The ARC ones look to be cast iron as opposed to brass.

              I do have some good PB in stock.

              Regards Clive

              #474834
              old mart
              Participant
                @oldmart

                Bronze would be very good as long as you pay attention to regular lubrication.

                #474837
                old mart
                Participant
                  @oldmart

                  My best calculations are bore 14.8mm and total cutting depth from there +0.75mm. At that point, use the leadscrew as a gauge, you will have to remove the tailstock and move the tooling out of the way.

                  The basic dimensions are thread depth = 1/2 X pitch.

                  Starting bore 16mm -2 x thread depth + 0.1 x pitch.

                  #474847
                  Clive Foster
                  Participant
                    @clivefoster55965

                    The squeeze to adjust backlash system is unsatisfactory because it needs a deeper thread than standard to give space for the tips of the male thread when closing down. Effectively impossible with standard inserts because increasing the cut depth makes the thread spaces wider somewhat defeating the objective.

                    Its possible that the male thread on the screw is made shallower to provide the space in a standard dimensioned nut but its going to need very careful measurement to prove that.

                    I'd be seriously tempted to look into the hot moulding a delrin nut around the screw technique. Unlikely to last as long as a metal nut but if it really is the "5 minute" process claimed accepting that it will only last a year or two before needing to be changed might well be a better way of going about things than struggling to cut a rather difficult metal nut. Not to mention the difficulties of engineering in a proper dual nut anti-backlash system.

                    Clive

                    #474859
                    old mart
                    Participant
                      @oldmart

                      I see your point about the limitations of squeezing the thread, Clive, and if I was needing to produce that thread in a nut, I would look closely at the threading insert to see if it could be modified to allow the tip to stick out another 0.1mm. Maybe just getting a good close fitting starting size before sawing the slot would be enough. The design is rather poor, just enough to get past the guarantee.

                      The inserts for 1.5mm TR are available from Cutwel in 11IR and 16IR , but I don't know whether they have a minimum order of one insert or not.

                      https://www.cutwel.co.uk/threading/indexable-threading-single-point-threading/trapezoidal-threading-inserts/tr-trapezoidal-internal-right-hand-for-aluminium-and-non-ferrous-vk2-grade-vardex

                      Edited By old mart on 25/05/2020 18:19:19

                      #475188
                      Clive Farrar
                      Participant
                        @clivefarrar90441

                        thanks for that OM but at £16 I think my skinflint side is emerging and some grinding practice on my CBN cutter grinder jig may be in order. I have more than enough suitable material in stock.

                        It will give me immense satisfaction to do it myself. even if it takes a lot longer.

                        Regards Clive

                        #475197
                        Clive Foster
                        Participant
                          @clivefoster55965

                          Clive

                          When a similar job came my way I delegated it to my friend John who used to single point cut feed nut (and screw?) threads for the old CVA lathe company. I figured he knew more than I and that I might learn something.

                          That particular nut had been made for another friend by a professional engineering company who got the pitch right but everything else wrong. Fortunately leaving too much metal in the nut.

                          John used a tool ground narrower and deeper than the thread specifications working on both sides of the thread. As I recall it he cut one side to a proper finish then bought the thread out to size on the other. Clearly as the tool was thinner than the space it was no problem to provide a little clearance at the base. Finished up with under a thou backlash and an apology for being out of practice!

                          If he'd been starting from scratch he'd have roughed it out quickly with sonething close before bringing to size with the accurate, dead sharp, finishing tool. He said using the same tool from the start was a bad idea because you will wear the edge off before you get to the bit that matters. Of course a feed nut thread has room to align the second tool in the roughed out thread.

                          I'd not bother with adjustment. If its a decent fit to start with and you have adequate lubrication its going to last for years befoer any adjustment could be needed. By which time the screw will have worn unevenly.

                          Clive

                          #475301
                          Clive Farrar
                          Participant
                            @clivefarrar90441

                            Rang ARC about their part.

                            Josh was very helpful i can have one sale or return and its cast iron so i have ordered one and will try that for fit first.

                            If it doesn't work its out with the grinder and follow my namesakes advice for a roughing and then polishing cutter.

                            Thanks Guys

                            Clive

                            PS it must be an age thing but i have come across more Clive's on this forum than anywhere else in my life.

                            #479177
                            Clive Farrar
                            Participant
                              @clivefarrar90441

                              An update for those who gave advice.

                              The cast iron job from ARC did the job. it was a much better fit in the base casting than the old split brass job.

                              It took about 3 runs end to end in the X axis to get it all lined up.

                              It now moves very well i now have smooth slop free operation in all directions. back lash is 2 divisions max.

                              Just used it with a fly cutter tonight to square off some brass and steel off cuts that i inherited a while ago and have been hiding in the back of a cupboard. very smooth operation. Beautiful cross circles machining.

                              I am one happy bunny the 2 weeks of careful prep were well worth it.

                              I may now have the confidence to restart the ME Argus steam engine or the Forrest developments Coke bottle engine I got a decade or so ago, if I can find it!

                              Regards Clive

                            Viewing 13 posts - 1 through 13 (of 13 total)
                            • Please log in to reply to this topic. Registering is free and easy using the links on the menu at the top of this page.

                            Advert

                            Latest Replies

                            Home Forums General Questions Topics

                            Viewing 25 topics - 1 through 25 (of 25 total)
                            Viewing 25 topics - 1 through 25 (of 25 total)

                            View full reply list.

                            Advert

                            Newsletter Sign-up