Surface Plate & Height Gauge recommendations

Advert

Surface Plate & Height Gauge recommendations

Home Forums Workshop Tools and Tooling Surface Plate & Height Gauge recommendations

Viewing 25 posts - 26 through 50 (of 83 total)
  • Author
    Posts
  • #476424
    mechman48
    Participant
      @mechman48

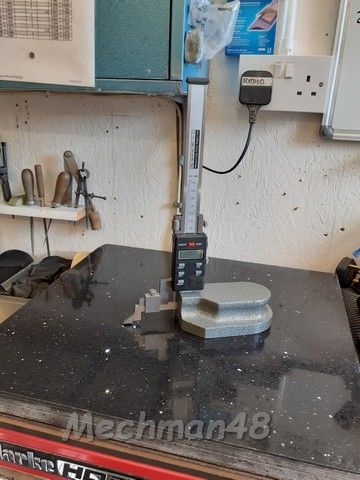
      I have a Digi height gauge from M-DRO & a 18" x 17" x1.5/16" polished granite sink cut out from a kitchen manufacturer… free gratis after I told them what it was for.. suits me fine for the accuracy I need.. as for flatness.. measured with digi gauge from corner to corner ( 4 corners ) & measured to '0' with a 0.0005" fall off at one corner, just fine for me.

      height gauge & granite plate .jpg

      George.

      Advert
      #476429
      SillyOldDuffer
      Moderator
        @sillyoldduffer
        Posted by Lee Jones 6 on 31/05/2020 14:29:29:

        Posted by Barrie Lever on 31/05/2020 13:39:10:

        Lee

        I would add that decent second hand 0.001mm digital micrometers can be had for S/H £25.00 they can easily be calibrated against a 1" standard. Why not buy good gear at this price.

        Surface plates are not so easy that is why granite is good, it does not move much !!

        I have just bought an unbelievably good micrometer (£1000.00 new) for £40.00 and it makes the digital 0.001mm jobs look like a blunt instrument, like I said earlier if you dont open the door you don't know what is on the otherside, you might think you do but who knows?

        Obviously this is exactly what I'm after.

        Yes, but beware!!!

        If there's a need for repeatable accuracy better than 0.01mm you can't just buy second-hand and hope for the best. Checking against a 1" standard is a good first move, but have you got a 1" standard? With a certificate? Do you know how to use standards properly in the 0.001mm region?

        Unfortunately, checking high-precision instruments at only one point on their scale isn't good enough either – they have to be calibrated across the entire range. Whilst a micrometer thread might be in excellent condition at the 1" end, it could be badly adrift towards zero where most of the action is.

        Instruments in this class can't be trusted until their accuracy is confirmed. Best not to be led astray by a quality brand with fine graduations and a good feel. Sod the fantasy, get it calibrated! If it's good, hurrah, otherwise no tears please. In the bin with it.

        Comes back to what the tool is for. At best I suspect most Imperial model engineers work to ±0.001", and most Metric model engineers about the same at ±0.02mm. Working to 0.01mm is comparatively unusual and a home workshop cutting to ±0.001mm must be a rare beast indeed. Don't get sucked into miserably chasing accuracy that can't be had outside a properly equipped tool-room.

        Dave

        #476435
        Anonymous
          Posted by SillyOldDuffer on 31/05/2020 17:27:34:…

          If there's a need for repeatable accuracy………………….

          Repeatability and accuracy are not the same thing. Generally the former is easier to achieve than the latter. smile

          Andrew

          #476438
          Howard Lewis
          Participant
            @howardlewis46836

            S O D is right.

            Probably, most of the time, we are happy to work to +/- 0.001" or 25 microns.

            If we want better than that, we are going to start thinking in terms of lapping the mating parts together.

            You can't work to single figure microns outside a temperature and humidity controlled Standards or Calibration Room, and only after everything has soaked for at least 24 hours.. And the measuring instruments used will be traceable back to a NPL standard!

            Even a Rabone 6" rule is marked "At 20'C" , and modern micrometers, and length standards, have insulating pads on the frame, so that hand heat does not affect the size, to give the clue.

            To see the effects of hand heat, hold an Aluminium Piston with its Gudgeon Pin in place.. After a few minutes the Gudgeon Pin will fall out of the bore, because of the expansion from the small temperature rise above ambient resulting from the heat of your hand.

            Howard

            #476441
            Former Member
            Participant
              @formermember32069

              [This posting has been removed]

              #476445
              JasonB
              Moderator
                @jasonb

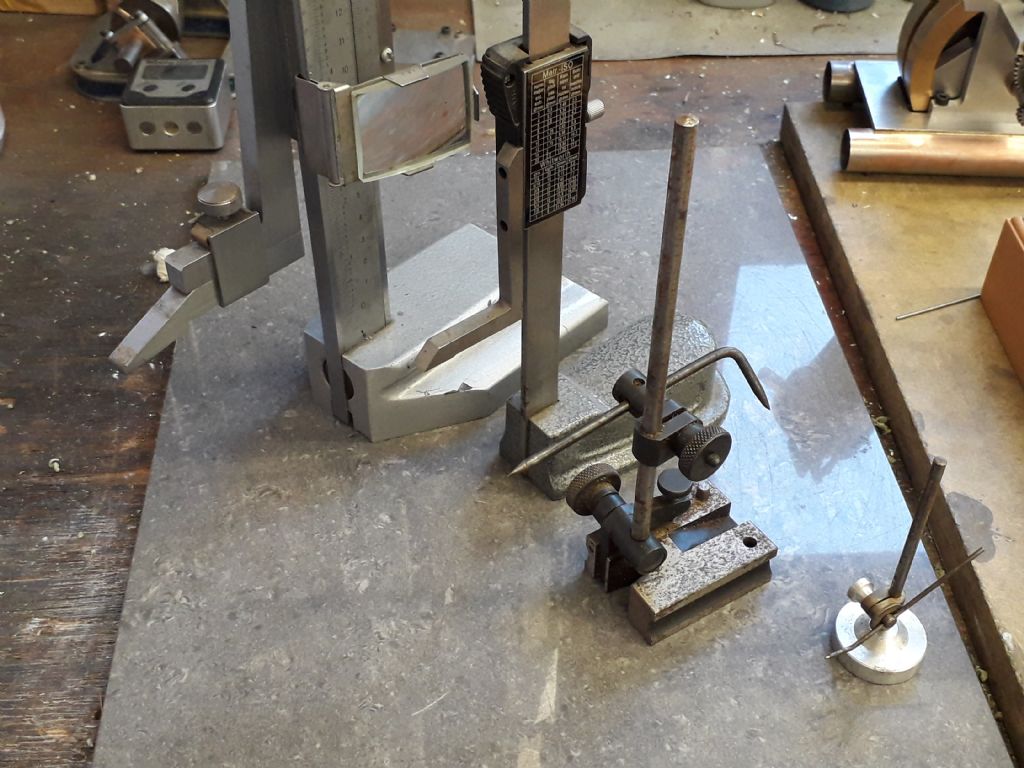
                20200531_174143.jpg

                Photo above shows the evolution of my marking out tools, on the right is a homemade surface gauge built when I must have been about 15 on the Unimat3, can't remember what I used it on but may have just been the formica worktop but got a Stuart 10V and Beam made with it.

                Next is a bought surface gauge that I must have got during the Minnie build and that would also have been use don some if the early Fowler TE too.

                The 6" digital height gauge was not brilliant with an uneven base and scriber that pointed upwards but a bit of work flattened that out, don't use it much now but it is handy on the mill when setting up a casting to check heights as it's small size fits under the column and does not need much table surface.

                The vernier one saw a bi step up in accuracy of my marking out though now not used so much as I tend to layout holes and faces with the DRO but it comes in handy some times and a few scribed lines act as a double check when using the DRO.

                Currently using a polished porcelain tile as a marking out surface, with a smallish shed it's easy to put it out the way if the bench space is needed and it also makes a good background for photos of small parts.

                #476452
                Former Member
                Participant
                  @formermember32069

                  [This posting has been removed]

                  #476461
                  Howard Lewis
                  Participant
                    @howardlewis46836

                    Barrie,

                    I am not trying put off anyone.

                    We all work to whatever standard of accuracy we can can attain, or are prepared to accept.

                    I was merely implying using common sense.

                    If you don't need to work to 0.005 mm, don't, unless you want to boast of your prowess, and are prepared to spend the time and money so to do.

                    A bolt made to a length within 0.005 mm will, all other things being equal, clamp no better when then the nut is tightened, than one with a 0.5 mm tolerance. It will just be much more costly!

                    Normally, +/- 0.025 mm suffices for my work, but last week, I had to make a part that would seal against petrol. So I had to work to an interference fit on the OD and size and size for the ID.

                    Fitness for purpose has to be the watchword.

                    Howard

                    #476465
                    Former Member
                    Participant
                      @formermember32069

                      [This posting has been removed]

                      #476468
                      Michael Gilligan
                      Participant
                        @michaelgilligan61133
                        Posted by Andrew Johnston on 31/05/2020 17:33:50:

                        Posted by SillyOldDuffer on 31/05/2020 17:27:34:…

                        If there's a need for repeatable accuracy………………….

                        Repeatability and accuracy are not the same thing. Generally the former is easier to achieve than the latter. smile

                        Andrew

                        .

                        Very true, Andrew … and I suspect that Dave tries to avoid tautology

                        ‘repeatable accuracy’ however, comes pretty close to a working definition of ‘precision’

                        MichaelG.

                        #476470
                        Lee Jones 6
                        Participant
                          @leejones6

                          Never fear. I am not put off (good luck with that – must try harder)! smile p

                          And please try to refrain from getting personal with one another, particularly on my account.

                          After watching Stephan on YouTube, it's hard not to be inspired to work more accurately. At least to some degree. But I'm not going to kid myself. I am unlikely to buy (maybe make?!) a lathe mounted tool grinder or a surface grinder or even a shaper, so measuring to a degree where I need to account for if the ambient temperature of my workshop is currently 15°C or 20°C is highly unlikely.

                          It would be nice to have the capability (in terms of tooling and competence) to work to 0.001mm, but in reality we're talking at least an order of magnitude less precise than that. Talk of industry standards and certification are so far beyond my aspirations, they're not even worth contemplating (at this stage wink).

                          #476500
                          Former Member
                          Participant
                            @formermember32069

                            [This posting has been removed]

                            #476539
                            IanT
                            Participant
                              @iant

                              Lee,

                              As you can see from their remarks, different folk here have different needs – and it's not always clear what these are when they offer advice (which will naturally be influenced by their personal requirements). For my work, I don't need to measure microns and (frankly) none of my machines are capable of reliable/repeatable cuts much below a couple of thou anyway.

                              I still mark-out my work (I've no DROs fitted) and try to do so as accurately as possible. Convenience is also important to me and a surface plate and Vernier are generally ideal for this work.

                              My machines are mostly old and occasionally I also need to check (and correct) wear or damage on a machine surface I therefore need a reference 'flat' to check against. A surface plate is obviously a very useful tool to have when doing this. For checking related surfaces (or machined work) – a dial test indictor and stand is preferable to a height gauge in my view.

                              Please note that I'm often checking surfaces by comparison – Is this machined surface parallel? – Is this table flat (enough)? I'm certainly not going for any extremes of metrology – I'm just trying to get a machine to work a bit better or make something that pleases me (which is generally anything that doesn't end up in the bin).

                              However, you originally enquired about a surface plate and height gauge.

                              A Rotagrip granite plate and a mini-height ( 6" ) gauge from Arc would probably suit most hobbyist needs and cost about £100 new. There are cheaper alternatives available but these are certainly tools that I use regularly – and I can't claim that for all of my purchases I'm afraid..

                              Regards,

                              IanT

                              #476555
                              Lee Jones 6
                              Participant
                                @leejones6
                                Posted by IanT on 31/05/2020 23:44:35:

                                Lee,

                                As you can see from their remarks, different folk here have different needs – and it's not always clear what these are when they offer advice (which will naturally be influenced by their personal requirements).

                                Absolutely. Which is the reason I posed the question here. To obtain a varied plethora of views, opinions and experiences from a wide collection of knowledgeable enthusiasts/professionals. And boy, you guys did not disappoint. So, thank you to everyone who as (and who will) participate in the conversation. I've learned a lot from you all.

                                Still not entirely sure how I will end up proceeding. The immediate plan is to keep all 20 of my phalanges crossed for some eBay gems. Failing that, I might have to purchase new from one of the regularly mentioned retailers.

                                #notsponsored smile p

                                #476568
                                Iain Downs
                                Participant
                                  @iaindowns78295

                                  To get back to the original subject, a while back I bought a biggish piece of float glass (around 60 x40, maybe a bit bigger and about 20mm deep) to act as a 'cheap' surface plate.

                                  When I got it and did some checking, I found that it varied by around 0.5mm in height over the area. I raised this with a colleague and he told me that this was within tolerances! One of his roles as an engineer was quality control in a glass factory so I guess he know his stuff.

                                  I'm not saying that a piece of glass can't be accurate to within the sort of tolerances we need, but I am saying it may not be.

                                  Iain

                                  #476620
                                  SillyOldDuffer
                                  Moderator
                                    @sillyoldduffer
                                    Posted by Andrew Johnston on 31/05/2020 17:33:50:

                                    Posted by SillyOldDuffer on 31/05/2020 17:27:34:…

                                    If there's a need for repeatable accuracy………………….

                                    Repeatability and accuracy are not the same thing. Generally the former is easier to achieve than the latter. smile

                                    Andrew

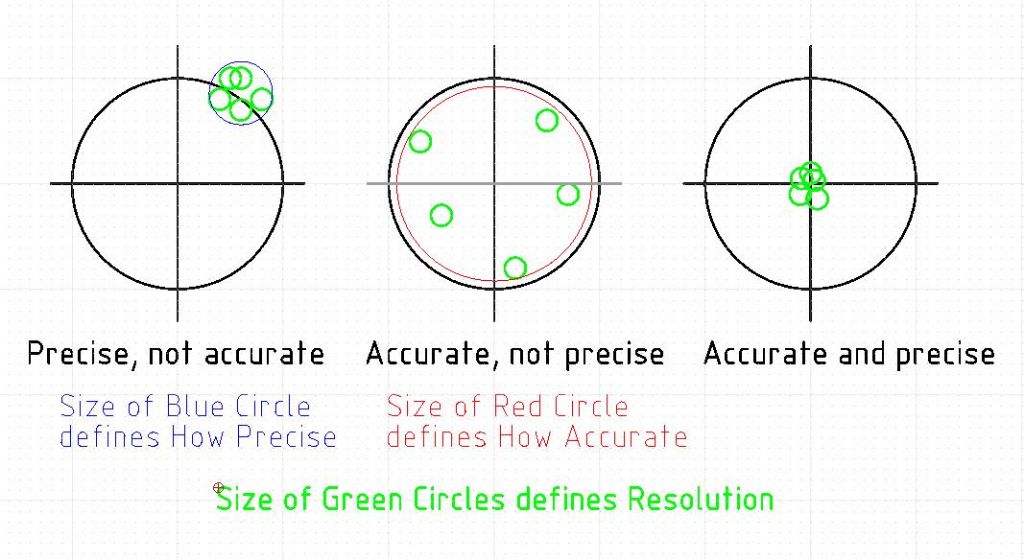
                                    Quite right! I hope it's correct, but this diagram shows how I remember the difference between accuracy, precision and resolution. Using a bulls-eye target to illustrate accuracy and precision came from Neil Wyatt I think. I've added resolution. Apologies for the colours; red's fairly obvious but blue isn't good on my screen.

                                    accprecres.jpg

                                    Resolution is how finely a particular instrument can read. It's not the same as the graduations, which are often over optimistic. However, assuming the operator has a good touch, successfully avoids parallax, and corrects for temperature, the resolution of a 0.001mm micrometer is limited by the state of its threads and anvils. The instruments ability to measure down to 0.001mm is compromised as it wears. Not possible to repair worn threads and anvils in a home workshop, and the professionals rarely bother either. It's cheaper to replace. Serious measurement requires ruthless reduction of all sources of error, and having a good looking but untrustworthy instrument laying around is asking for trouble. Calibration rejects are one source of ebay bargains.

                                    The diagram represents the actual dimension with cross-hairs. Ideally measurements would hit the bulls-eye every time but it's impossible. Minimising measurement errors gets progressively more difficult and expensive. Consequently engineers should be mindful that good enough is good enough. Time and money is wasted on a grand scale when quality is pursued without justification.

                                    The picture has three examples.

                                    On the left bulls-eye, the instrument gets close repeatable results but is persistently off target. It's precise, but not accurate. Not bad news though, because the error might be due to incorrect zeroing, and in any case precise measurements can be corrected by calibrating the instrument. I wonder how many forum members working to better than a thou bother to correct their micrometer readings, or even need to? But calibration and subsequent correction of readings is certainly necessary for serious measuring!

                                    The centre bulls-eye shows an instrument scattering measurements around the target. On average the instrument is correct but its individual readings are all untrustworthy. This is typical of practical measuring, and it doesn't matter provided the scatter isn't too big for the purpose. The instrument is accurate but not precise. Again, the scatter matters for serious work, but how many of us take the trouble in our workshops to average several readings before proceeding?

                                    The bulls-eye on the right is measurement heaven. The instrument reads accurately and precisely. But note that none of the measurements is spot-on. Magnifying this chart shows it has the same character as the central diagram, but the instrument is better because it measures with less scatter. Unfortunately this kind of performance is expensive to buy, tricky to apply, and expensive to maintain. Screw micrometers inevitably lose precision and accuracy because they wear slightly every single time they're used. For that reason serious micrometers are checked periodically against standards and dumped as soon as they exceed specified tolerances. The gauges used to check micrometers also wear, making it necessary for them to be regularly checked against even better standards and replaced too. At the top of the tree is the standard metre, defined from the average of several high-end atomic clocks. There's an enormous gap between the standard metre and my £30 micrometer! Fortunately for me, a £30 0.01mm micrometer is 'good enough' for my purposes, and I don't need to apply any of the disciplined methods made necessary by working to close tolerances.

                                    When buying tools I feel it's important to separate utility from desirability. Understand your reasons. On the down-side, a £30 micrometer looks and feels cheap. There's no pride of ownership in it and having to use it carefully wastes time! My workshop meets my needs but it wouldn't suit a time-is-money professional or the type who enjoys 'quality' tools.

                                    But please don't tell beginners struggling to start on limited money that only the best will do, especially if the best is second-hand, condition unknown, and is over the top. There's a great deal of fun and education to had from imperfect equipment, and one can always upgrade later.

                                    Dave

                                    Edited By SillyOldDuffer on 01/06/2020 11:05:31

                                    #476624
                                    Hopper
                                    Participant
                                      @hopper

                                      Seems a bit much to spend up big on a precision surface table to use it to run a digital height gauge over to scribe lines on jobs. The lines themselves are at least two thou wide and are generally just a rough guide. Final machining for anything precision is done by measurement during the machining process, not by machining to the line. If you are just machining to the scribed line, then you might as well just use a piece of glass or a bit of granite worktop or whatever as it will be close enough for that type of work.

                                      As far as setting your sine bar or sine table goes, that is only as accurate as the milling table it is then sat on. So you might as well just use the mill table for the original set up.

                                      And if you want to use a 10th of a thou dial indicator for measuring bearing roller diameters etc sat on a flat surface, you might as well use a much handier proper comparator stand with its own mini-surface table incorporated below the dial gauge holder.

                                      But if you just want to buy a surface plate, rule of thumb is buy the most expensive one you can afford. Cheap will be cheap. Used will be used and possibly abused. Quality new will be quality new.

                                      #476629
                                      roy entwistle
                                      Participant
                                        @royentwistle24699

                                        For the 8 clocks that I have made and the number of small steam engines. I have managed with a 6inch rule, a pair of dividers, a good loupe. and the dials on my Myford. ( My mothers dressmakers tape for pendulum lengths )

                                        When I was an apprentice the use of the ratchet on a mike was frowned upon as well.

                                        Roy smiley

                                        #476707
                                        larry phelan 1
                                        Participant
                                          @larryphelan1

                                          I spend my money on good Irish Whiskey, can,t do much better than that !cheeky

                                          #476708
                                          Lee Jones 6
                                          Participant
                                            @leejones6
                                            Posted by larry phelan 1 on 01/06/2020 15:56:48:

                                            I spend my money on good Irish Whiskey, can,t do much better than that !cheeky

                                            Now I know you're fibbing.

                                            *Good* Irish Whiskey indeed. smile p​​​​​​

                                            Whatever next? Quality import tooling? laugh

                                            #476927
                                            Neil Lickfold
                                            Participant
                                              @neillickfold44316

                                              I bought a few years ago a digital height gauge. One of the cheaper ones. About 1 weekend after using it a lot that weekend, wish that I bought the type with a hand wheel like Mitutoyo make. Did not need to be Mitutoyo but that type. My friend did pick up a brand new Mitutoyo for a rediculously cheap price, because they were no longer going to be stocking that model any more. Ahhhh

                                              Sometimes you can spend more time getting what you want from inferior gear, and the right gear allows you to have Sunday free to enjoy a nice meal and glass of wine.

                                              #476933
                                              Former Member
                                              Participant
                                                @formermember32069

                                                [This posting has been removed]

                                                #476942
                                                SillyOldDuffer
                                                Moderator
                                                  @sillyoldduffer
                                                  Posted by Neil Lickfold on 02/06/2020 11:11:09:

                                                  Sometimes you can spend more time getting what you want from inferior gear, and the right gear allows you to have Sunday free to enjoy a nice meal and glass of wine.

                                                  If there's enough money left for a nice meal with wine, you haven't spent enough!

                                                  A proper Coordinate Measuring Machine is essential, not that old-fashioned Surface Table and Height Gauge rubbish. Golly, it's impossible these days for a Model Engineer to make anything without a Point Cloud.

                                                  Not your ordinary Cast-iron and Granite table CMMs mind, they're yesterday's carp. No, decent CMMs are made of Silicon Carbide and Ceramics. Put daughter on the game, sell drugs, mortgage the house and rob a bank. Only the best tools are good enough…

                                                  devil

                                                  Dave

                                                  #476959
                                                  Former Member
                                                  Participant
                                                    @formermember32069

                                                    [This posting has been removed]

                                                    #476961
                                                    IanT
                                                    Participant
                                                      @iant

                                                      SoD – I installed the mini-computer that ran an early 'CCM' at the Jaguar plant many years ago. It replaced a team of men with large (manual) height gauges and other devices who QA'd body shells taken off the line. The problem with the old system was that it took nearly a week to do the work and by that time a week of 'duff' body shells could have been produced (and possibly were occasionally).

                                                      The new system had a single multi-axis probe and the body shell was placed on a very (very) large slab of granite and the probe just moved manually about touching key reference points. It could be done in two hours in theory – at least when it was working. The system suffered from an unusually high number of failures, which didn't seem to upset everyone at Jaguar, as a 'downtime' rate had been negotiated for the operators before the table was installed.

                                                      The other service engineers where I worked all hated going there and I (being the Newbie at that time) often go the short straw. It wasn't possible to drive my Ford estate into the plant (well you could – but you might not be able to drive it out again) which meant dragging toolboxes and scopes from outside, right across the factory floor – which was some way. You then waited an hour or two for the electrician and his apprentice to arrive and change your 13A plugs over to factory 'standard' plugs so you could start work (I was not allowed to do this myself). When finished it was about another hour for them to come back and replace your 13A plugs before you could leave. When the manufacturer of the CMM system approached me to ask if I'd like to work directly for them – I declined!

                                                      Hopper – I think the Rotagrip plates are perfectly good enough for the majority of Hobbyist users and when/if they need to start making sure things are 'flat' (enough) – then they will already have the right tool available to check against. It's certainly not essential – but then many things available to us these days fall into that category…

                                                      Regards,

                                                      IanT

                                                    Viewing 25 posts - 26 through 50 (of 83 total)
                                                    • Please log in to reply to this topic. Registering is free and easy using the links on the menu at the top of this page.

                                                    Advert

                                                    Latest Replies

                                                    Viewing 25 topics - 1 through 25 (of 25 total)
                                                    Viewing 25 topics - 1 through 25 (of 25 total)

                                                    View full reply list.

                                                    Advert

                                                    Newsletter Sign-up