Clarkson Radius Grinding Fixture

Advert

Clarkson Radius Grinding Fixture

Home Forums Manual machine tools Clarkson Radius Grinding Fixture

Viewing 25 posts - 1 through 25 (of 29 total)
  • Author
    Posts
  • #515269
    Ian Armstrong
    Participant
      @ianarmstrong78579

      Merry Christmas all

      I find myself 800 miles way from loved ones at Christmas, with a lump of cast iron and workshop time.

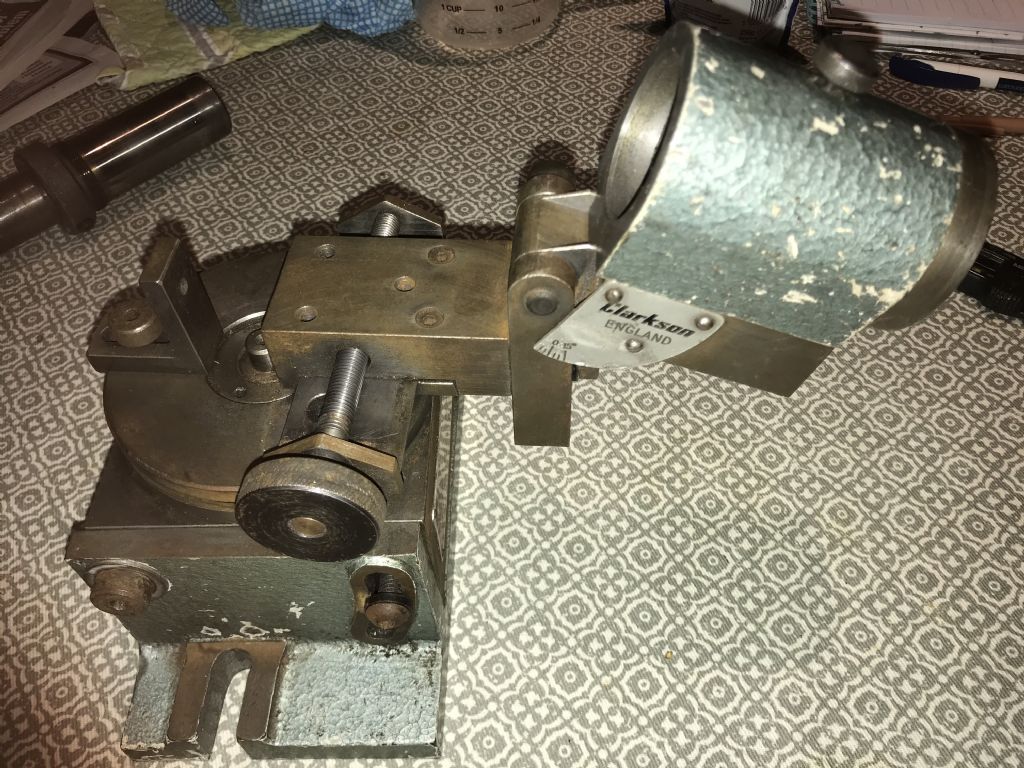
      Can anyone help with dimensions for a Clarkson tool and cutter Radius Grinding Fixture? I have a boxed mark 1 unit which like most others, is missing the circa 3” long component which holds adaptors.

      Superficially simple to make, I’d appreciate some dimensions as the project has waited a year or more to be kicked off and Tier 4 looks like the perfect time….

      Many Thanks

      Ian

      Advert
      #14117
      Ian Armstrong
      Participant
        @ianarmstrong78579
        #515271
        Oily Rag
        Participant
          @oilyrag

          Ian

          Give me a couple of hours and I'll dig mine out and send you any dimensions you need. Sorry that I am busy at the moment! something to do with the time of year.

          #515297
          Ian Armstrong
          Participant
            @ianarmstrong78579

            Hi Oily Rag

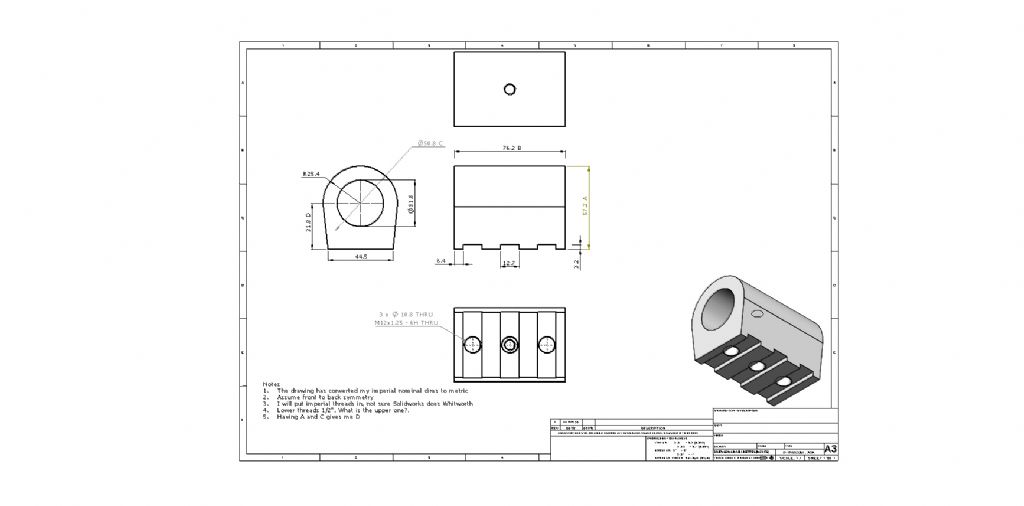
            My first stab at dimensions. I'm making from scratch and only have the 'Bedroom workshop' photos to work from.

            Ian

            rga body.jpg

            #515298
            peak4
            Participant
              @peak4

              If you're not already aware, The Bedroom Workshop is quite a good resource for information.

              My own RGA (as yet unused by me as I need to make a universal head) id different to the one shown in the photos in this link. Rather than a solid Z shape, mine is built up of several parts; the top piece which supports the head is on a swivel, which looks original.
              Depending on what design you're looking for, you appear to have a couple of options.

              Bill

              #515300
              Ian Armstrong
              Participant
                @ianarmstrong78579

                Hi Bill

                My plan is the simple Mk1 holder to start with, that makes it useable. I might put the effort in for Mk2 parts afterwards. Presumably there are enough people missing the holder, that it can be passed on.

                Merry Christmas

                Ian

                #515303
                Oily Rag
                Participant
                  @oilyrag

                  Hi Ian,

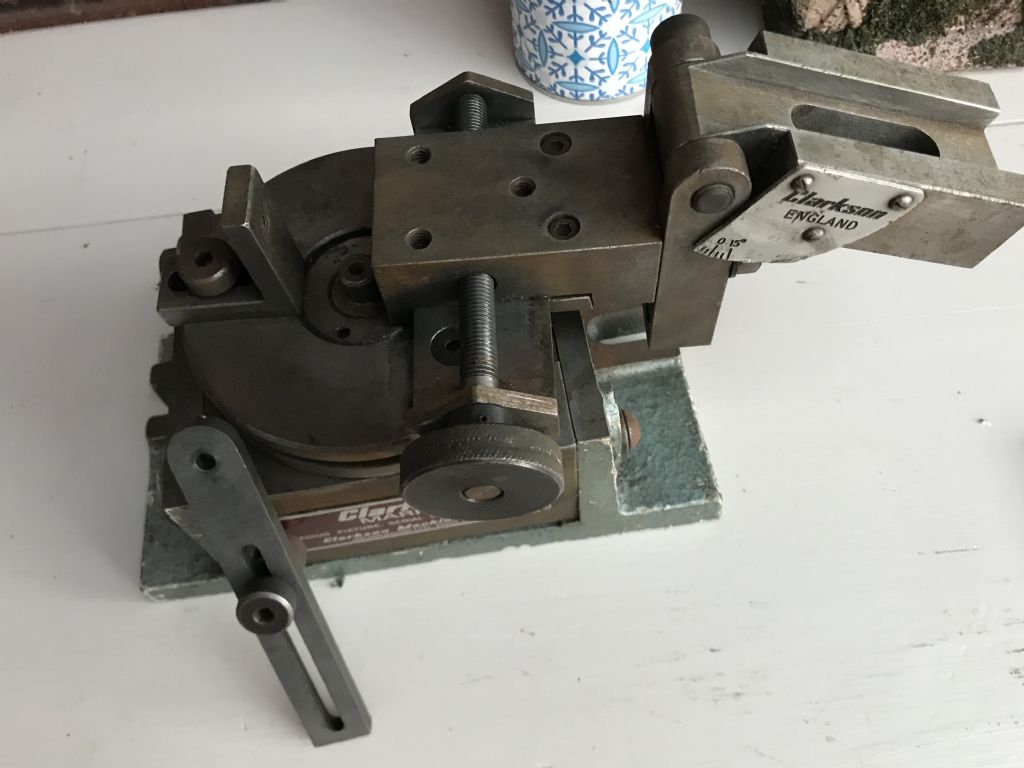
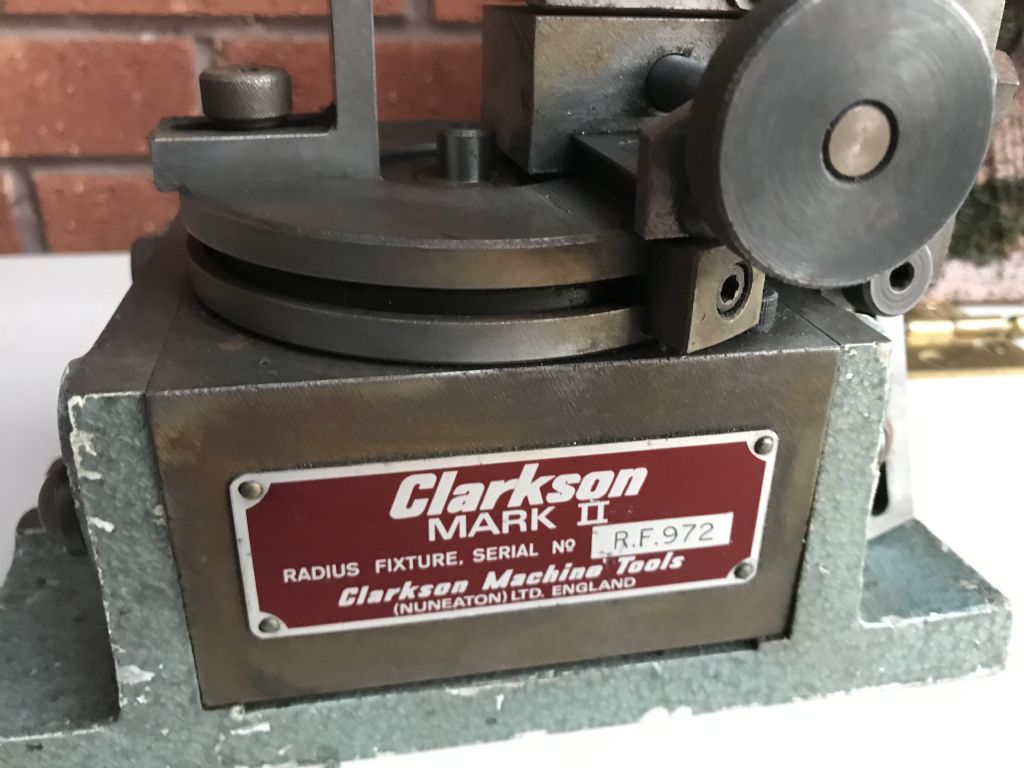
                  I've dug my Clarkson RCA out and what I'd forgotten is that it is a MkII – having said that I am not sure it is a standard MkII as it came directly out of St Mary's Rd Factory and may be a prototype or special.

                  Perhaps someone can confirm if it is a MkII!

                  img_3580.jpg

                  img_3581.jpg

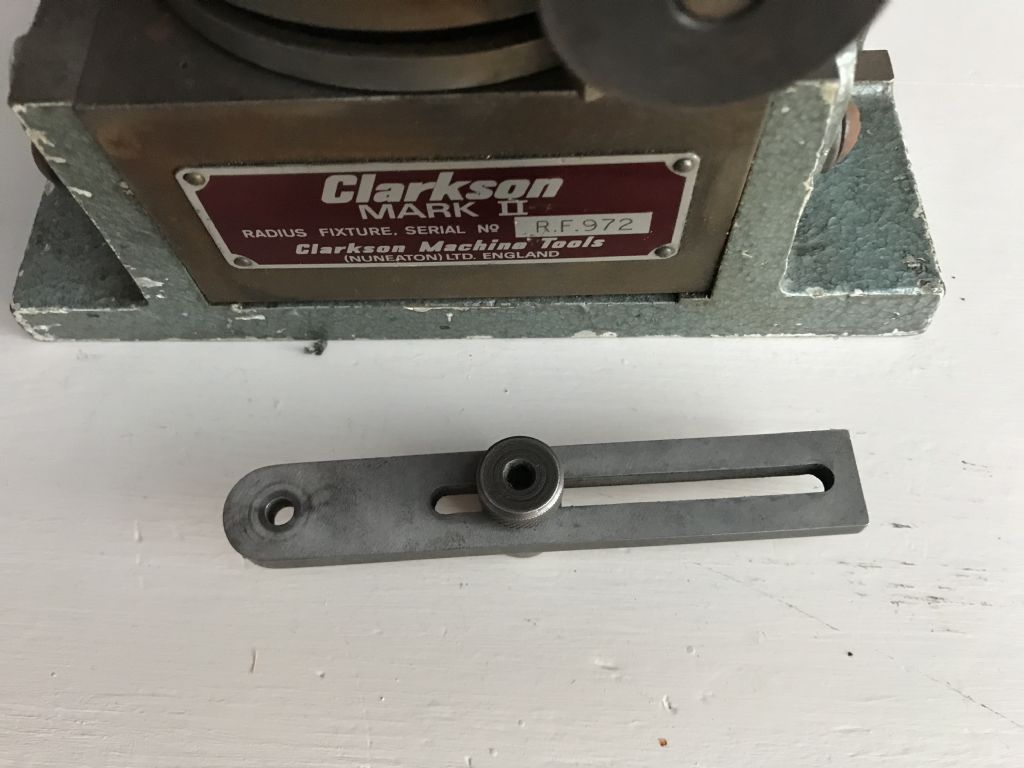
                  img_3582.jpg

                  On this the toolholder assembly (I've still got to dig that out!) is similar to your drawing but the tenon is coaxial with the bore not at right angles as shown in your sketch.

                  It locates into the female tenon slot as shown in the first photo. It has a very long toolholder 'tube' to allow for long tooling to be raidiused. I also have a lathe style square toolholder which allows lathe tooling to be radiused accurately.

                  I'll dig the bits out and post later!

                  Martin

                  #515306
                  peak4
                  Participant
                    @peak4

                    Martin, that looks to be broadly the same as mine; those bits are all I have at the moment.
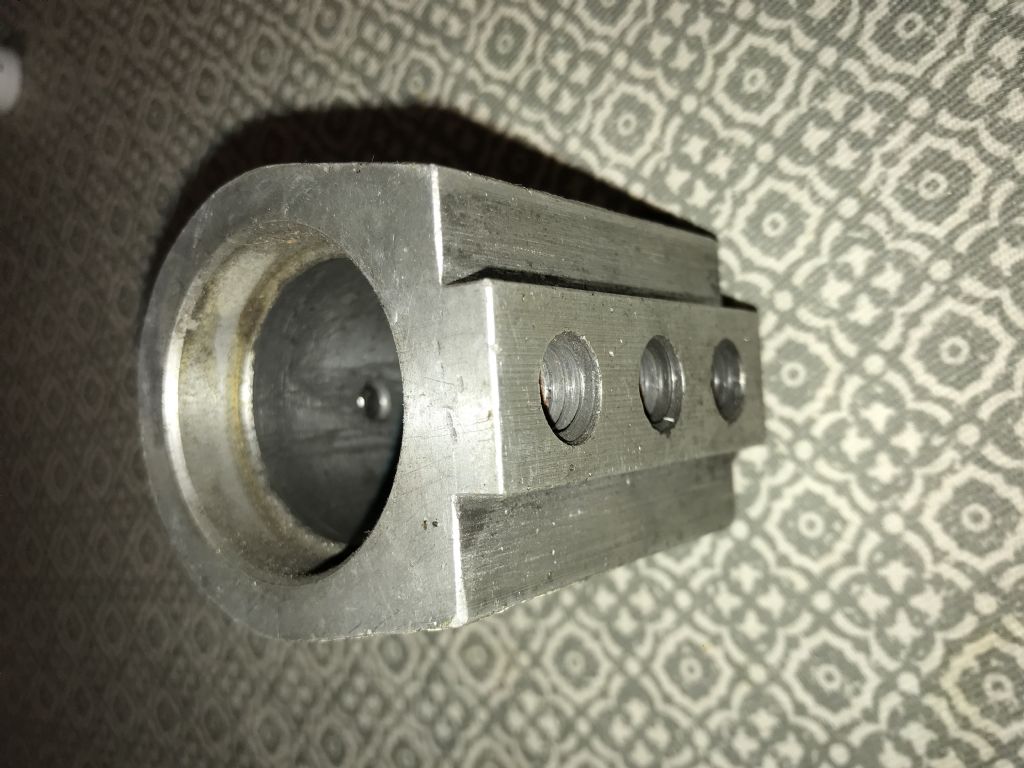
                    The only obvious difference, are the three holes on the sliding part.

                    I'd certainly appreciate a photo of your other parts as well, since I still have them to make as well.
                    Unfortunately Covid got in the way of my trying to organise some lumpy bits of cast iron bar.

                    Also, does anyone have a working contact with the chap who runs the Bedroom Workshop website please?
                    I've tried the one on the site, but had no reply.

                    Bill

                    #515319
                    Oily Rag
                    Participant
                      @oilyrag

                      Ian, peak4,

                      Ere'tiz:-

                      img_3583.jpg

                      and separately with its sleeve:-

                      img_3584.jpg

                      img_3587.jpg

                      Look in my album "Clarkson T&C' for further photos.

                      The lathe tool tip grinder eludes me at the moment but I shall search it out! Measurements for the tenoned block (it is interesting that it is made in aluminium ), is as follows:-

                      Overall length = 2.887" (Not including the internally screwed collar/thin wall sleeve – that is 2.248" o/d, collar shoulder depth 7/16th, bore i/d 1.5005", sleeve o/d 1.6845"

                      C/line of bore to tenon location face = 1.125", tenon face major width = 1.92", tenon locating width = 0.8745", depth of tenon = 0.245". 3 holes in male tenon are tapped 7/16" Whit (BSW) there spacing along the tenon length are 0.567" from one end x 0.9" x 0.9" ctrs.

                      Sleeve clamp screw is 5/16" BSW centrally displaced along axis centreline.

                      The thread in the retained inner sleeve appears to be 1 5/8th x 20tpi whit form (but I will confirm later)

                      The long sleeve is interesting in that it is in two parts (which at the moment I cannot separate!) More details of the sleeve will follow. There is one other item which I need to photograph and that is a straight shanked (1.000" dia) centre point which is the setter for the radius offset. it fits into one of the sleeve ends (one long sleeve end is 1.250" dia the other is 1.000" dia)

                      Hope this helps you get started on making swarf, if you need any other dimensions then feel free to mark up any of the photos and repost.

                      Merry Christmas to one and all, pray we have a safer New Year and defeat this wretched pestilence.

                      Kitchen table used for photo backdrop by courtesy of Mrs. Rag (after stuffing the turkey!)

                      Edited By Oily Rag on 24/12/2020 22:12:39

                      #515320
                      Clive Foster
                      Participant
                        @clivefoster55965

                        Ian

                        I have a Mk 1 radius attachment with the correct adapter holder. Your drawing looks about right. I can easily check the dimensions if you send me an electronic copy of your drawing to work from. Picture above doesn't blow up well enough to see properly. With luck you can save in a CAD format that I can open and edit directly.

                        PM me for my E-Mail.

                        I need to find dimensions for the bracket it sits on. Mine has very non standard workshop made version clearly intended to do something special.

                        Clive

                        #515324
                        Oily Rag
                        Participant
                          @oilyrag

                          Clive,

                          Can you post a photo of your attachment as I would be interested in the differences. As I said previously mine came out of the Clarkson St Marys Road factory when it shut down and the guy I got it from told me it was a development department unit and had some unusual parts. I also had a flute and tap grinder attachment which looked like no other I've ever seen.

                          The other interesting part I have is a Pratt Burnerd 3 jaw 'watch makers' chuck on a tee slotted mounting for uncentred slot drill sharpening.

                          #515328
                          Clive Foster
                          Participant
                            @clivefoster55965

                            Oily Rag

                            I'll have a look after Christmas to see if I have enough standard parts to make a sensible picture. Mine has non standard "shop made" extras and I'm pretty sure the bracket to carry the adapter holder is missing.

                            I'm not really sure what the special bits were made for as with flat carriers rather than the proper stepped one it would seem that the end of the cutter would be far too low to grind correctly. The adapter holder is currenly mounted on a flat palte about 4 inces square with a long slot, presumably for a bolt or stud, running parallel to the adapter and a 2 inch long upward pointing post in one corner.

                            The other shop made accessory is also on a flat base but this uses one of the standard cutter holder adapters, as per the univesal bracket, converted into a sort of deviding head with a spindle through the middle and a 5 inch (ish) plate having several rows of index holes. The hole counts are quite high. The plate looks suspiciously like one of the ones hidden under a cover on some British makes of larger rotary tables. Back in the day I used a 12" table with a 6 hole plate hidden in a bulge behind the dials.

                            Clive

                            #515445
                            noel shelley
                            Participant
                              @noelshelley55608

                              Hello all, the two picctures are both Mk2. The Mk1 has a fixed arm and raised tenon with a single hole, the tool holder for this has 3 slots and threaded holes. The slots run across the axis of the large hole. The Mk2 has an arm that can be angled, with a slot running down the middle and a single bolt. The tool holder has a tenon down the middle and single threaded hole. They nearly all seem to loose their tool holders. They would be easy to cast in alli if a good drawing was available. How many ? Noel

                              #515450
                              Phil P
                              Participant
                                @philp

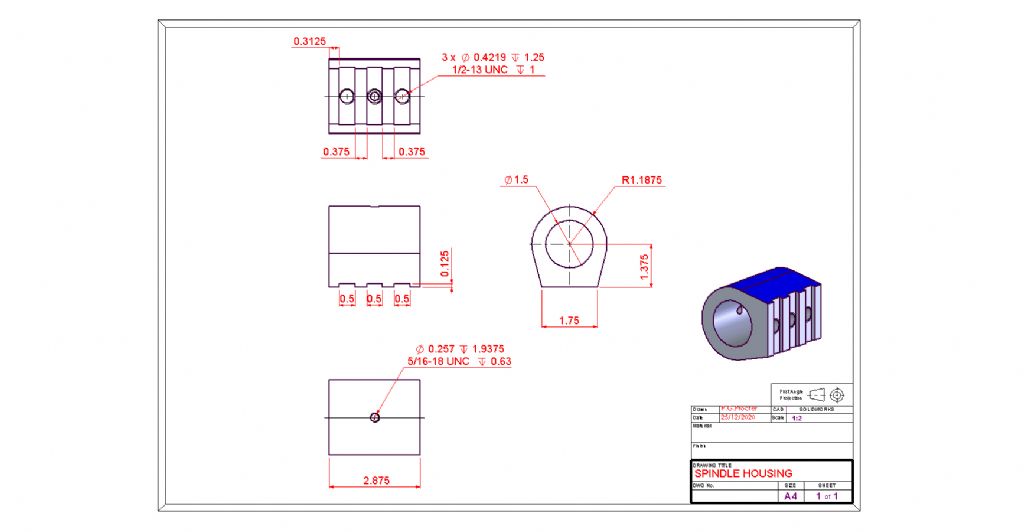
                                This is the one fitted to my mk1 version.

                                Phil

                                spindle housing.jpg

                                #515473
                                Ian Armstrong
                                Participant
                                  @ianarmstrong78579

                                  Thanks Phil/all

                                  That should keep me busy on Boxing day.

                                  Martin's Mk 2 has a front counterbore. I assume Mk1 has a plain 1.5" through bore?

                                  Ian

                                  #515481
                                  Ian Armstrong
                                  Participant
                                    @ianarmstrong78579

                                    Noel

                                    My thoughts on part replication, for what they are worth.

                                    The fastest way for me to get a workable solution for my own use is to machine from solid, using dimensions kindly provided by forum members. I happen to have some 4” dia cast iron bar. The hardest bit of the job is probably ensuring an orderly transition from the outer radius to the side walls, using a rotary table.

                                    Al. alloy is probably good enough for a bearing, for home use on a Radius Cutter, if I had suitable stock to machine it from. If I was going to the effort of casting and wasn’t limited by material, I’d have it made in cast iron, which is a nice bearing material. With the dimensions I have, an updated CAD solid model could be made that had a shrinkage allowance added, I’d then 3D print and use that as the basis of a sacrificial pattern, investment casting style. You still end up machining the bores, base tenons, and threads.

                                    If I were going for the big effort solution (which I might yet do as a follow up) I’d be focusing on ‘MK 2’ style arms. Mk 2 is presumably a better option than Mk 1 by dint of evolution. I assume the turntable is common to both designs so a Mk 1 base could be upgraded to Mk 2 status by anyone with the will.

                                    Ian

                                    #515485
                                    Phil P
                                    Participant
                                      @philp

                                      I had an "interesting" debate with an expert on one of the forums a few years ago about the radius grinding fixture.

                                      The debate was on how one should apply the cut after each new pass on the grinding wheel the expert said that you apply the cut by advancing the table of the cutter grinder as you would in most other cases.

                                      Mt argument was that if you do that the finished radius with get progressively smaller as you are moving the pivot point closer to the wheel.

                                      This is the explanatory sketch I did at the time.
                                      diagram 1.jpg

                                      What is needed is a way of advancing the cutter holder forwards on the grinding fixture, the mk2 head has the tenon in line with the angled holder so that could be achieved, but I plan on making mine with a fine adjustment screw built into the design. That might be something you want to think about.

                                      If you need an instruction manual for the radius attachment mk1 or mk2 let me know by PM.

                                      Phil

                                      #515504
                                      DC31k
                                      Participant
                                        @dc31k
                                        Posted by Phil P on 26/12/2020 11:38:07:

                                        This is the explanatory sketch I did at the time.

                                        What the sketch is depicting is true, but is it not mislabelled? Where it says 'initial setup', that should say 'final cut' or 'sparkout pass'. So you start with the wheel further from the pivot point than your final dimension and gradually advance until it hits a stop at the correct place. If you go beyond that point, as you say, you will end up with an undesirable result.

                                        Conceptually, it is similar to using a vertical axis ball turner on a lathe. You turn the stock to the diameter of the ball, advance the cross slide until the pivot is under the workpiece centreline, then advance the cutter until it touches the OD of the stock. Note the cross slide reading or set a stop at that point. Then you can back off the cross slide and work inwards to your stop, sure that you will end up with the correct diameter ball.

                                        #515515
                                        noel shelley
                                        Participant
                                          @noelshelley55608

                                          Dear Ian, I would agree with you that cast iron is the better option Though from all the pictures I've seen the original was in alli – strange ! The bore IS 1.25" NOT 1.5". The turntable on Mk1 & Mk2 is the same and to convert to Mk2 cut off the extension, then make up new extension allowing for variation of the horizontal axis and a Mk2 tool holder. I have become a bit of a Clarkson man. Noel

                                          #515525
                                          Phil P
                                          Participant
                                            @philp
                                            Posted by DC31k on 26/12/2020 13:14:40:

                                            Posted by Phil P on 26/12/2020 11:38:07:

                                            This is the explanatory sketch I did at the time.

                                            What the sketch is depicting is true, but is it not mislabelled? Where it says 'initial setup', that should say 'final cut' or 'sparkout pass'. So you start with the wheel further from the pivot point than your final dimension and gradually advance until it hits a stop at the correct place. If you go beyond that point, as you say, you will end up with an undesirable result.

                                            Conceptually, it is similar to using a vertical axis ball turner on a lathe. You turn the stock to the diameter of the ball, advance the cross slide until the pivot is under the workpiece centreline, then advance the cutter until it touches the OD of the stock. Note the cross slide reading or set a stop at that point. Then you can back off the cross slide and work inwards to your stop, sure that you will end up with the correct diameter ball.


                                            ————————————————————————————————————————————————-

                                            Yes I get what you mean, I must admit I did that sketch before i was in possession of any Clarkson instructions a good few years ago.

                                            I think the method requires that the cutter to be re-sharpened is ground back sufficiently first so that when the setting button is used with the slip gauges, that will be the new datum to grind the radius back to as described.

                                            I have never actually got round to modifying my own attachment yet, it is still sat on the shelf unused.
                                            All very interesting stuff though. Mine will probably get more use for putting a radius on a lathe tool if I am honest, the ball nose milling cutters don't get all that much use, so they don't need sharpening often.


                                            Phil


                                            Edited By Phil P on 26/12/2020 13:58:15

                                            Edited By Phil P on 26/12/2020 13:58:47

                                            Edited By Phil P on 26/12/2020 13:59:28

                                            #515580
                                            SteveI
                                            Participant
                                              @stevei

                                              Hi,

                                              My MK2 attachment came with a few items that are not in the pictures shown so far. So I've put a few pictures into an album. If you want any measurements of the items pictured do let me know.

                                              Oily Rag – I'd be interested to see pictures of the lathe tool radiusing holder you have. Is it anything clever?

                                              Thanks,

                                              Steve

                                              #515585
                                              Oily Rag
                                              Participant
                                                @oilyrag

                                                Hi Steve,

                                                No it is fairly straight forward other than it has an adjusting dovetail slide to bring the tool forwards (sideways movement is accomplished by the cross travel screw). I have only used it a couple of times and that was for a shaper tool grind. However it did produce an excellent radius – far better than a hand formed one!

                                                As I said previously I have to dig it out and currently Mrs Rag is, much to my frustration, limiting my 'shed time'; something to do with the time of year, I will drag it out and photograph for you.

                                                Noel, interesting that you say the bore of the toolholder is 1.25" and not 1.5" – mine is 1.500" and is sleeved with a steel sleeve. There is then a further holder (long) shown in photo #2 of the second 24/12/2020 post. this screws into the rear of the holder and is then sleeved down to either 1.25" or by reversing is sleeved down to 1.000".

                                                Phil, I would certainly appreciate a copy of the MkII instructions as I have never seen/read any and have so far used it 'intuitively' (and more than likely wrongly!). Can I PM you as well?

                                                #515603
                                                Phil P
                                                Participant
                                                  @philp

                                                  I just checked mine earlier this evening and it is definitely 1.5" bore. It looks to be original but I suppose someone could have bored out before I got it.

                                                  Phil

                                                  #515883
                                                  Baz
                                                  Participant
                                                    @baz89810
                                                    Posted by Phil P on 26/12/2020 11:38:07:

                                                    I had an "interesting" debate with an expert on one of the forums a few years ago about the radius grinding fixture.

                                                    The debate was on how one should apply the cut after each new pass on the grinding wheel the expert said that you apply the cut by advancing the table of the cutter grinder as you would in most other cases.

                                                    Mt argument was that if you do that the finished radius with get progressively smaller as you are moving the pivot point closer to the wheel.

                                                    This is the explanatory sketch I did at the time.
                                                    diagram 1.jpg

                                                    What is needed is a way of advancing the cutter holder forwards on the grinding fixture, the mk2 head has the tenon in line with the angled holder so that could be achieved, but I plan on making mine with a fine adjustment screw built into the design. That might be something you want to think about.

                                                    If you need an instruction manual for the radius attachment mk1 or mk2 let me know by PM.

                                                    Phil

                                                    Phil I am a bit late coming to this discussion due to Christmas jobs for her who must be obeyed. Regarding your sketches you are correct that winding the table nearer the wheel reduces the radius. The correct way to use the radius grinding attachment is to set the tool as in your initial setup illustration and then touch the end of the tool onto the grinding wheel. The table is then locked and the tool is advanced into the wheel by using the threaded sleeve that fits into the aluminium block. The cutter to be ground is held in a standard holder with a collar in front and behind the ally block / sleeve assembly so the tool can be rotated. A finger is mounted in the usual fashion to locate and index the cutter.

                                                    #516399
                                                    noel shelley
                                                    Participant
                                                      @noelshelley55608

                                                      Having got my RGA out and studied all that has been said, here Baz is right ! I could not understand the Bore in the alli housing being 1.5" when most clarkson gear revolves around 1.25" or less. BUT with the 1.5" to 1.25" sleeve threaded and grubscrewed to the alli body it is the feed screw, and the pivot point remains centre. The way I see it there is a 1.5"od sleeve about 3" long with an internal thread may be 20 tpi X 1.375" for 1/2" and a Knurled ring od 2" X 1" long stepped down and threaded 20tpi X1.375". This ring will have a 3/8"whit grubscrew in the center of the knurling . Then there's the Alli holder Bored 1.5".

                                                      The delux version could have a graduated ring at 50 thou per full turn.

                                                      Like most clarkson manuals the instructions are at best brief and very little in the way of clues as to what is IF you have parts missing as is so often the case.

                                                      WELL, at least I think I know what I'm doing NOW ! IF any one needs a copy of the drivers hand book for the Mk 2 RGA let me know ! Noel.

                                                    Viewing 25 posts - 1 through 25 (of 29 total)
                                                    • Please log in to reply to this topic. Registering is free and easy using the links on the menu at the top of this page.

                                                    Advert

                                                    Latest Replies

                                                    Home Forums Manual machine tools Topics

                                                    Viewing 25 topics - 1 through 25 (of 25 total)
                                                    Viewing 25 topics - 1 through 25 (of 25 total)

                                                    View full reply list.

                                                    Advert

                                                    Newsletter Sign-up