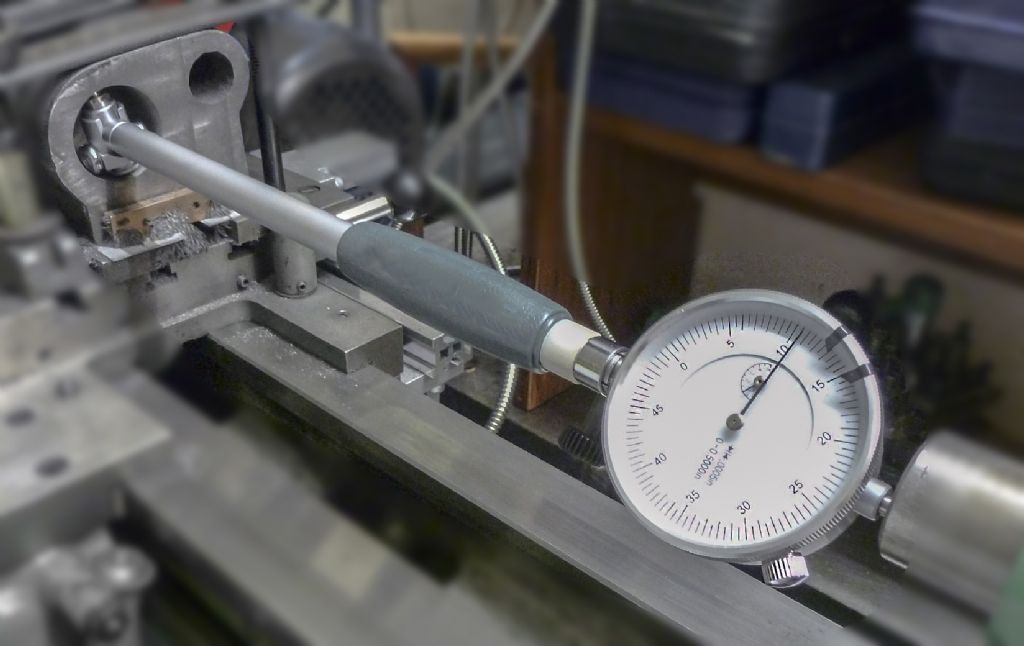
Bore micrometer

Advert

Bore micrometer

Home Forums Workshop Tools and Tooling Bore micrometer

  • This topic has 24 replies, 11 voices, and was last updated 11 May 2019 at 22:33 by CHARLES lipscombe.
Viewing 25 posts - 1 through 25 (of 25 total)
  • Author
    Posts
  • #408554
    Adam Harris
    Participant
      @adamharris13683

      When looking at used bore micrometers, analogue dial with a variety of tips each having a specific range, should the small revolution counter dial (not the main outer dial) be at zero when at rest with nothing touching the tip? If not at zero at rest, how would one get an absolute reading for a bore? It seems on ebay the used ones are often far from zero at rest…

      Advert
      #19340
      Adam Harris
      Participant
        @adamharris13683
        #408556
        Emgee
        Participant
          @emgee

          Adam, the bore micrometer or vernier are set on a known size gauge ring before use to confirm the reading, the bore mic should be adjusted if needed and the external bezel on the vernier can be rotatad and locked to suit the dimension.

          Emgee

          #408558
          Ex contributor
          Participant
            @mgnbuk

            Are these not "comparators", rather than "micrometers" ?

            To use them, a ring gauge of known size is used to set the zero on the dial gauge on the comparator, then the deviations from the setting gauge in the bore to be checked are read off the dial gauge. The comparator in itself is not an "absolute" device.

            Nigel B

            #408560
            Adam Harris
            Participant
              @adamharris13683

              Oh I see thank you both. So without a gauge ring, I could take its reading against my known other (digital) micrometer set reading, then insert in the bore and measure the difference in readings and add/substract from set reading of my (digital) micrometer to get an absolute bore measurement?

              Edited By Adam Harris on 10/05/2019 10:02:20

              #408562
              Adam Harris
              Participant
                @adamharris13683

                Would it be less fiddly (better) or more fiddly to use a high quality telescopic bore gauge (eg Mitutoyo) with the aim of measuring down to 0.001"?

                Edited By Adam Harris on 10/05/2019 10:05:28

                #408569
                Watford
                Participant
                  @watford
                  Posted by mgnbuk on 10/05/2019 09:55:06:

                  Are these not "comparators", rather than "micrometers" ?

                  To use them, a ring gauge of known size is used to set the zero on the dial gauge on the comparator, then the deviations from the setting gauge in the bore to be checked are read off the dial gauge. The comparator in itself is not an "absolute" device.

                  Is there much difference when checking an outside micrometer against a slip gauge. Some mic's even come with their own standard gauge in the case.

                  Or am I being stupid?

                  Mike.

                  #408578
                  Kiwi Bloke
                  Participant
                    @kiwibloke62605

                    Adam,

                    You asked: 'Would it be less fiddly (better) or more fiddly to use a high quality telescopic bore gauge (eg Mitutoyo) with the aim of measuring down to 0.001"?'

                    Well, have you ever tried? Telescopic gauges need a bit of practice and a fine feel to get consistent readings, and, of course, are just transfer devices – the micrometer does the reading, so multiple error mechanisms. Certainly more fiddly. A decent bore comparator should indicate 0.0001" and can be set, as suggested, against a micrometer, slip gauges, etc. It will also directly indicate out-of-roundness and taper. Also need a bit of practice and finesse, but easier than a telescopic gauge (at least in my hands).

                    If you want a bore micrometer (of the three-leg variety) get a mortgage. If the bore is large enough, however, an internal micrometer is fine, and about as fiddly as a telescopic gauge, but at least reads directly.

                    #408585
                    Nick Hughes
                    Participant
                      @nickhughes97026

                      If it helps, there is an example of use in my Hemingway Dynamic Toolpost Grinder thread here:- **LINK**

                      (Scroll down to around the 13th photo)

                      Nick.

                      Edited By Nick Hughes on 10/05/2019 11:53:06

                      #408586
                      Adam Harris
                      Participant
                        @adamharris13683

                        Ok great – I will look for a dial comparator. Many thanks

                        #408589
                        Simon Williams 3
                        Participant
                          @simonwilliams3

                          I've done some experimenting with telescopic gauges to see how accurate I am with them, and although it's not terribly scientific (I'm not working in a metrology lab with the resources to arbitrate on measurements to tenths of a thou) I would offer the following.

                          Firstly I measured a bore of about three inches with an internal micrometer. I could do this to a repeatability of about +/- 2 – 3 thou, as my ability to apply the same force to the micrometer barrel consistently was the limiting factor, though getting the micrometer straight across a diameter of the bore was also fiddly and variable. Taking successive measurements just taught me that I was a hopeless case and wasn't getting better.

                          I then tried telescopic gauges, in my case the Moore and Wright ones, though I do have some Starrett ones.

                          I found my measurement was immediately at least as repeatable, and with practice I got better in that the measurement I made with an external micrometer was also about +/- 2 thou repeatability initially, but I got better with practice which I didn't with the internal micrometer.. As the process of making a measurement with a telescopic gauge means making two measurements – one to set the gauge to the bore and another to measure the distance across that gauge – there is scope for more variation than a direct measurement. But using the telescopic gauge was more repeatable than the internal micrometer – at least in my hands. After some practice (I was boring a hole for a bearing) I was fairly confident my bore measurement was repeatable to about +/- 0.5 thou. Some of my gauges are in better nick than others, and it also depends to some extent on being well within the working range of the gauge, but that just taught me to be careful that my telescopic gauge was working properly.

                          Measuring the same bore with a digital caliper is revealing – the caliper may have a resolution of 1 thou but it sure ain't that repeatable.

                          I also have tried the same experiment with smaller holes within the range of a Starrett internal micrometer of the caliper kind (model 700) and find this is more repeatable, typically +/0.5 thou or may be a bit better, but of course this only measures the mouth of the hole and says nothing about the bore.

                          I've been careful to talk about repeatability, as I don't have anything I could actually say was calibrated to give an absolute accuracy.

                          HTH Simon

                          #408592
                          Adam Harris
                          Participant
                            @adamharris13683

                            Thanks Simon. Oh dear , what to do? What to do?….And I was thinking that with a dial comparator all i need to do is take the peak dial reading as I twiddle it carefully about in the bore , and adding/subtracting difference to the preset reading, I am done for the actual bore…

                            Edited By Adam Harris on 10/05/2019 12:33:05

                            #408596
                            Kiwi Bloke
                            Participant
                              @kiwibloke62605

                              Well, turn up a go, no-go plug gauge. Multiple steps, if you like. But a bore comparator is so much nicer – but pricey… Make sure it has all the anvil extension pieces!

                              It's certainly possible to do better than 0.001" with telescopic gauges, but fiddly. The bore comp's self-centring facility is a great bonus. You only need to wiggle it about in one plane, to get a minimum reading.

                              #408600
                              Adam Harris
                              Participant
                                @adamharris13683

                                Ah yes quite right – register a Maximum reading in the finger twiddle rotation plane, but a MINIMUM reading in the wrist dipping plane  – not so easy to get both right simultaneously I suspect! Well I have now got my dial comparator and have plenty of time allocated to practice.

                                Edited By Adam Harris on 10/05/2019 12:56:36

                                Edited By Adam Harris on 10/05/2019 13:03:32

                                #408603
                                Fowlers Fury
                                Participant
                                  @fowlersfury

                                  Valuable comments above ! Kiwi Bloke ! makes observations I can endorse from experience.
                                  I've been through similar exercises recently when trying to determine as accurately as possible the bore of cylinders about 1.5" diameter.
                                  Conclusions for what they are worth:-

                                  • Prime requirement seemed to be a reference standard of known ID. Far too expensive to buy at that ID. I bore out a steel tube segment but then what? I still need its precise ID somehow.
                                  • A digital micrometer (Mitutoyo) was useless since the flat edges of the "inside" jaws obviously do not register the actual, true diameter. Allowance may be possible IF a reference standard was available.
                                  • Spring-bow internal calipers and telescopic bore guages – as others report, very much subject to variation of "feel" and require a secondary measurement adding to the error potential.
                                  • A dial bore guage – zeroed (calibrated) against a 1.5 inch micrometer held in clamp – difficult to achieve but possible and was repeatable. Then insert dial bore guage into cylinder….instructions say "take maximum reading as it's moved around". OK, done that and have to assume value obtained is correct.

                                  I suppose, given my ignorance in such matters, that the least subjective method might be to turn down a diameter of steel on the lathe until it "just" fits and then measure its OD with a micrometer (allowing for temp equilibration). But that's fraught with problems of surface fnish etc and gives no indication of bore ovality.

                                  So Adam, apart from investing in a dial bore gauge……..

                                  Thanks Simon. Oh dear , what to do? What to do?….

                                  #408604
                                  Adam Harris
                                  Participant
                                    @adamharris13683

                                    img_0195.jpg


                                    My investment – a large sensitive dial that will no doubt go whizzing round and around erratically as i tear my hair out finding the "best" reading!

                                    Edited By Adam Harris on 10/05/2019 13:09:50

                                    #408606
                                    Adam Harris
                                    Participant
                                      @adamharris13683

                                      I have indeed up until now used the spring bow internal calipers wiggle feel method, but not good for aiming at press fit accuracy. 

                                      Edited By Adam Harris on 10/05/2019 13:12:29

                                      Edited By Adam Harris on 10/05/2019 13:13:11

                                      #408613
                                      Fowlers Fury
                                      Participant
                                        @fowlersfury

                                        'had written before" take maximum reading as it's moved around".
                                        Apologies, just realised that should have read take minimum reading…….

                                        This was it in use:-

                                        008.jpg

                                        #408615
                                        Adam Harris
                                        Participant
                                          @adamharris13683

                                          Using the lathe to hold two of the axis steady is good

                                          Edited By Adam Harris on 10/05/2019 14:19:43

                                          #408628
                                          Simon Williams 3
                                          Participant
                                            @simonwilliams3

                                            This seems to substantiate the Law of Ladies Underwear.

                                            "The less you want the more it costs"

                                            Simon

                                            #408629
                                            Fowlers Fury
                                            Participant
                                              @fowlersfury

                                              Adam, I don't disagree in principle about holding two of the axes steady but I didn't do so for 2 reasons.

                                              • Wanting to 'wiggle & turn' the DBG around in the cylinder bore to ensure a minimum reading was showing.
                                              • There was no provision on the DBG to support it by a dead centre in the tailstock and I wasn't confident – at the accuracy needed – that a light grip in my 2MT Jacobs chuck was precise enough.

                                              For reasons to do with the special piston rings that were to be used, the bore had to be 1.500 + or – 0.001" throughout the length. I was using a between centres boring bar and that had to keep being removed & replaced for the DBG as the required ID got closer – a PITA.
                                              There are numerous YouTube vids on using DBGs. As usual, some very useful others not so.
                                              Machine-DRO offer clear, illustrated instructions:-
                                              **LINK**

                                              #408635
                                              Adam Harris
                                              Participant
                                                @adamharris13683

                                                Thanks I'll check that link out in more detail when the Tesa toy arrives.

                                                #408788
                                                Oily Rag
                                                Participant
                                                  @oilyrag

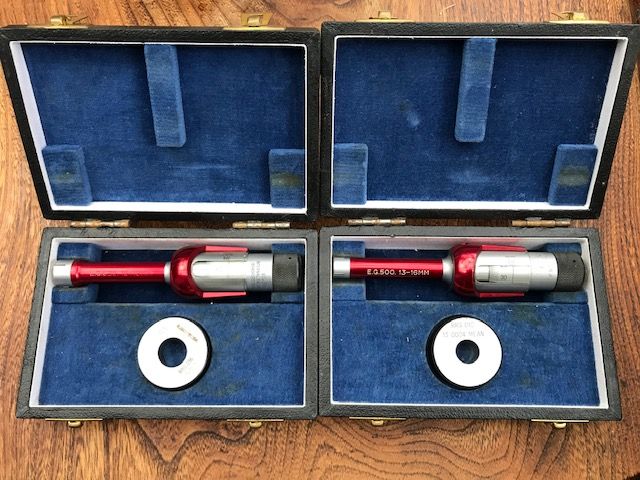
                                                  img_2297.jpg

                                                  Bowers 13-16 and 16-19 bore micrometers with their setting gauges. An excellent buy at an auction for £40 for the pair. I have also got some larger Mitutoya bore micrometers in imperial sizes from 3/4" through to 2.5" with some gaps in the range. Once set they are pretty reliable, but I do check them every time I use them. DBG's are good for checking bore taper and run-out but cannot meet the exactness of using a bore micrometer – these Bowers are graduated in 0.005mm but are readable to 0.002mm (glasses dependent!), especially where small bores are concerned and accuracy is required. I use these for little end measuring of con rods and pistons. The bigger imperial mikes I use for main bearing fits. I did have some Chinese small bore micrometers but given they were reasonably accurate they were poorly made to such an extent that the jaw on one mike dropped out! Their setting gauges were inaccurate when checked with the Bowers.

                                                  Edited By Oily Rag on 11/05/2019 14:23:48

                                                  #408830
                                                  bricky
                                                  Participant
                                                    @bricky

                                                    I don't know wether one can buy commercial wedges that are used as folding wedges in the bore and then measured outside the bore with a micrometer.I made my own when boring a 1.5"cylinder,they worked well.

                                                    Frank

                                                    #408857
                                                    CHARLES lipscombe
                                                    Participant
                                                      @charleslipscombe16059

                                                      I like the sound of Bricky's idea and although it is subject to the possible errors already listed above, it sounds a whole lot more convenient than turning up a plug gauge each time. Can anyone (Bricky ?) provide a sketch of such a device?

                                                      Chas

                                                    Viewing 25 posts - 1 through 25 (of 25 total)
                                                    • Please log in to reply to this topic. Registering is free and easy using the links on the menu at the top of this page.

                                                    Advert

                                                    Latest Replies

                                                    Viewing 25 topics - 1 through 25 (of 25 total)
                                                    Viewing 25 topics - 1 through 25 (of 25 total)

                                                    View full reply list.

                                                    Advert

                                                    Newsletter Sign-up