Restoring Beaver VBRP Mill

Advert

Restoring Beaver VBRP Mill

Home Forums Manual machine tools Restoring Beaver VBRP Mill

Viewing 25 posts - 1 through 25 (of 182 total)
  • Author
    Posts
  • #139169
    Paul Major
    Participant
      @paulmajor25237

      Hi,

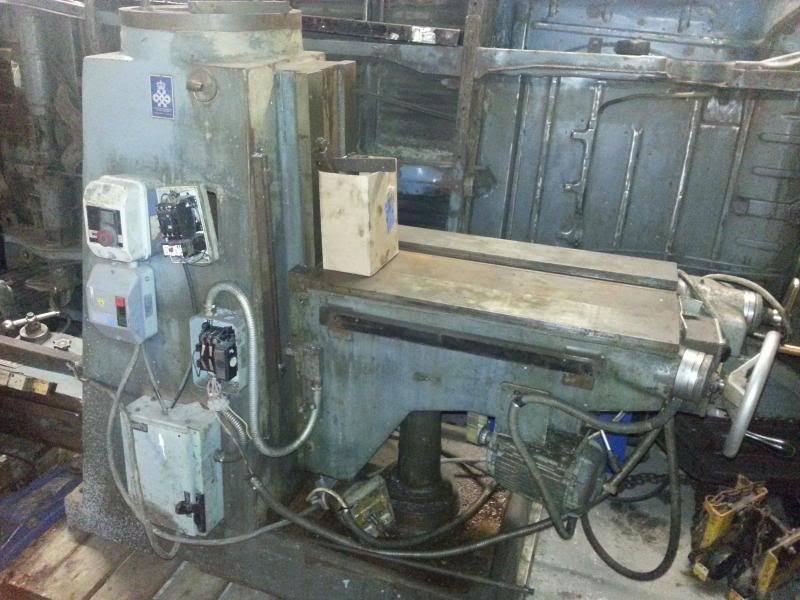
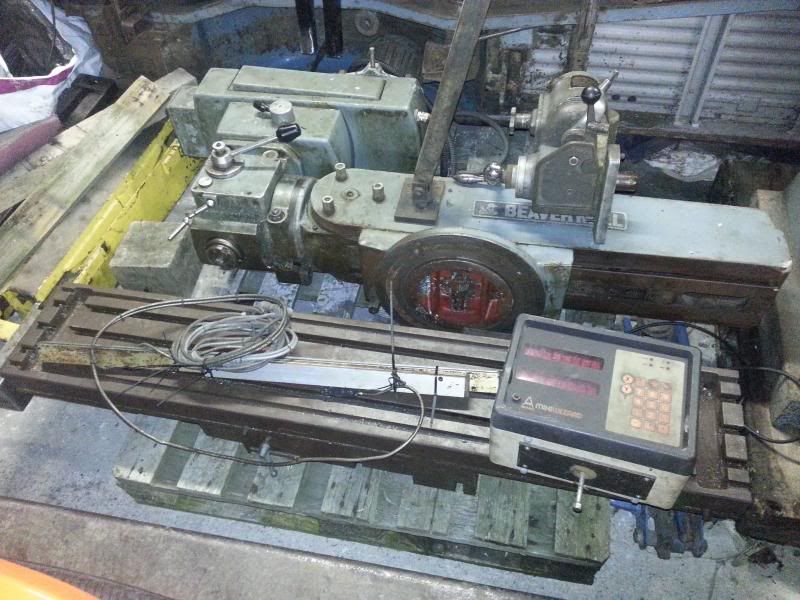
      First post on here having aquired my first mill, a Beaver VBRP model from Balding Engineering.

      Plan is to use it for "hobby engineering" mainly on engine work, skimming heads, fly cutting cases for aircooled vdubs etc.

      Rather large for a hobby mill but managed to squeeze it into the workshop so alls good thumbs up.

      Done the research on lathes.co.uk etc but very little written about the Beaver's so thought as well as asking for lots of advice this would be a good way to document how one of these is put together incase anyone else is looking for some info.

      Seperated the table and arm to help with transport. Was still a pig too unload using a combination of 1T engine crane and my 3T 4 post ramp to get them out of the trailer. Reckon the main body is about 900kg, arm 300kg and table 100+ :whistle:

      Got them onto pallets so i can move around the workshop anyways.


      Cheers,

      Paul.

      Edited by JasonB to add images to post

      Edited By JasonB on 31/12/2013 07:48:10

      Advert
      #12234
      Paul Major
      Participant
        @paulmajor25237

        Documenting strip and rebuild of this English built milling machine

        #139186
        Michael Gilligan
        Participant
          @michaelgilligan61133

          A great first post, Paul

          I look forward to following your progress.

          MichaelG.

          #139192
          John Haine
          Participant
            @johnhaine32865

            Not a mini mill then?

            #139217
            Ian S C
            Participant
              @iansc

              I thought it was a mini mill, you could machine a Mini on it. Ian S C

              #139219
              Mike Clarke
              Participant
                @mikeclarke87958

                Hi Paul – looking forward to seeing it restored.

                We used to have a VBRP at my last employer, a beautiful machine.

                Regards,

                Mike.

                #139225
                Paul Major
                Participant
                  @paulmajor25237
                  Posted by Ian S C on 31/12/2013 11:40:53:

                  I thought it was a mini mill, you could machine a Mini on it. Ian S C

                  smiley I know what you mean Ian, it is huge. Was looking for a Centec or Tom Senior but they were way to expensive. This came along at basically what it was worth as scrap value so I thought I would take a punt and see if it could be salvaged. yes

                  Paul.

                  #139226
                  Paul Major
                  Participant
                    @paulmajor25237

                    Closer view of the electrics.

                    Plan is to get a rotary converter or digital plug n play inverter to allow me to supply a single 3 phase to the original input allowing all 5 motors plus suds pumpto be run from the one feed as it was originally.

                    Am also planning to rewire everything at the same time as some of the wiring looks like it is original (circa 1960?).

                    [​IMG][​IMG][​IMG][​IMG]

                    [​IMG]

                    Cheers

                    Paul.

                    #139228
                    john kennedy 1
                    Participant
                      @johnkennedy1

                      I remember we had one where I worked in the 70s. It was used to make carbon electrodes for spark eroding dies to stamp out car crankshafts etc. It had 2 cutting heads and a smaller stylus head for copying from a fibreglass dummy crank. The heads worked in the opposite direction to each other,thereby making a pair of dies.

                      Got to say its a beautifully well made machine and I wish I had onecheeky

                      #139229
                      Paul Major
                      Participant
                        @paulmajor25237

                        Just catching up on what I have done so far :clapping:

                        Got the mill close to its final resting place in the corner of my workshop.

                        [​IMG]

                        Its underneath a pretty hefty RSJ that supports the mezzanine so I reckon that with a girder clamp fitted that should be good for lifting it off the pallet.

                        I also wanted to rig a smaller RSJ to use a girder trolley on to be able to easily lift engine blocks etc onto the table and also to help get the table itself in position.

                        The way they built the mezzanine they have fitted the rafters inside the main RSJ which is a real pain as it restricts the space, so I decided to go with a 100mm RSJ so it could clear the rafters and still fit in the web of the RSJ rather than suspend beneath.

                        Best laid plans and all that :rolleyes:, off I went to the local steel fabricator to see what he had lying around. Didn't have a long enough piece of 100mm UC but had 6m of 100mm channel for £60 which seemed reasonable so have used that and am going to bolt back to back to make up an H shape.

                        This is the span it will cover.

                        [​IMG]

                        U channels bolted together and ends notched to allow it to sit on main RSJ's

                        [​IMG]

                        [​IMG]

                        Any thoughts on whether this will have materially weakened the end of the beam? I can bolt or weld a right angle to create a new plate that sits ontop of the beam if necessary…. :whistle:

                        All fitted in place….

                        [​IMG]

                        The beauty of this approach is I can slide the cross member along the big RSJ meaning I can use it in different parts of the workshop
                        Ordered up a 2T beam clamp and 1T girder trolley from "Safety Lifting Gear" which arrived next day and seems to work pretty well.

                        Next job is to start stripping down the mill

                        Cheers,

                        Paul.


                        Edited By Paul Major on 31/12/2013 13:16:34

                        #139230
                        Paul Major
                        Participant
                          @paulmajor25237

                          Glad a few of you chaps have seen/used these before. As a bit of a novice in this area I am sure I will be getting you to rake over your memory banks laugh

                          Paul.

                          #139233
                          Paul Major
                          Participant
                            @paulmajor25237

                            I mentioned above that it has 5 motors and here they are smile o

                            Main motor is a mahoosive twin speed job

                            [​IMG]

                            A Power feed to the knee

                            [​IMG]

                            Table feed motor (Y axis).

                            [​IMG]

                            Cross feed motor (rapid return)

                            [​IMG]

                            And a second cross feed motor that isn't off this machine but has been modded to fit and provide a slow feed

                            [​IMG]

                            And finally, down here somewhere is a suds pump

                            [​IMG]

                            Cheers,

                            Paul.

                            Edited By Paul Major on 31/12/2013 13:37:25

                            #139234
                            John Stevenson 1
                            Participant
                              @johnstevenson1

                              Paul,

                              I have the CNC version of this machine, bottom half is about the same but top half it totally different being a fixed head.

                              Both these models are built like brick out houses, totally put a Bridgeport to shame, mind you that's not hard to do.

                              #139237
                              Michael Gilligan
                              Participant
                                @michaelgilligan61133
                                Posted by Paul Major on 31/12/2013 13:00:11:

                                U channels bolted together and ends notched to allow it to sit on main RSJ's

                                [​IMG]

                                [​IMG]

                                Any thoughts on whether this will have materially weakened the end of the beam?

                                Paul,

                                In principle, that should not make a big difference to the stiffness or strength of the cross beam … [the T section is almost as good as the back-to-back U sections, provided that it stays vertical] … but I cannot see how you are preventing it from toppling.

                                Apologies if I have missed seeing something clever.

                                MichaelG.

                                #139238
                                Paul Major
                                Participant
                                  @paulmajor25237

                                  Thanks Michael.

                                  Your right in that there isn't anything obvious stopping it from toppling.

                                  In practice though, the fit to the wooden rafters above is quite tight, maybe 5mm, so they stop the beam from rotating. Also once the grider trolley is in place and a load is on this pulls it down "square" so to speak.

                                  I did consider adding a couple of right angles in place to act almost as pads/slides but if the strength isn't compromised then I might try it like it is and see how stable it looks.

                                  Cheers,

                                  Paul.

                                  #139240
                                  Michael Gilligan
                                  Participant
                                    @michaelgilligan61133

                                    Paul,

                                    If you want to do some maths, you can confirm the change in stiffness by comparing the Moments of Inertia for the two shapes.

                                    … Happy Googling

                                    MichaelG.

                                    #139278
                                    Paul Major
                                    Participant
                                      @paulmajor25237

                                      The next step was to remove the table feed leadscrew. This turned out to be a bit of an epic battle as the parts diagram from the manual I have does not show the gearbox or power feed.

                                      The following sequence shows how it should be done, which I found out kinda by trial and error!sarcastic

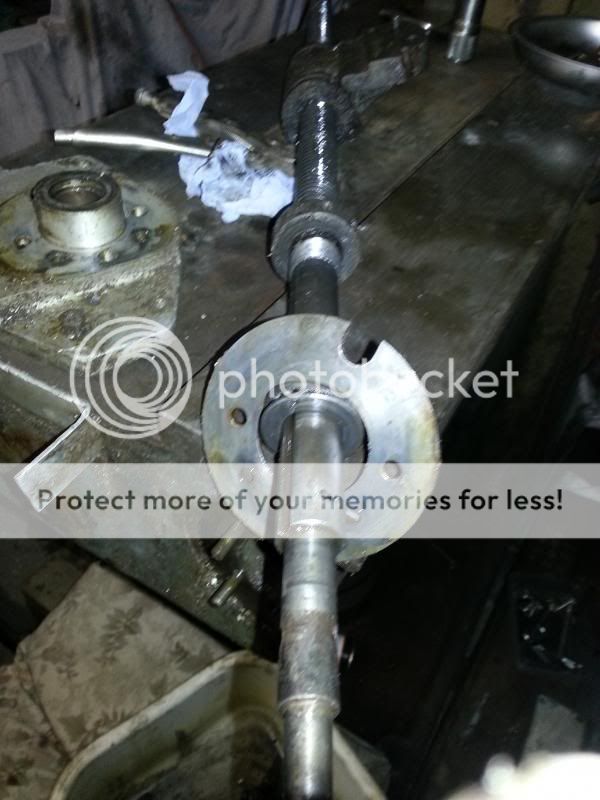
                                      The leadscrew runs right through the gearbox as one piece terminating in the micrometer and handle.

                                      [​IMG]

                                      The leadscrew sits in the side of the knee but will not come out sideways without the removal of a “C” shaped plate, which in turn is held in by bolts which can only be accessed when the gearbox is removed.

                                      This picture shows the leadscrew and the locking nut that holds it in place against the C plate.

                                      [​IMG]

                                      The gear box has interchangeable cogs to alter the rate of feed, only got the two that are fitted in this pic so won't have the full range of speeds to start with.

                                      [​IMG]

                                      [​IMG]
                                       

                                      This is the parts diagram I was working from.

                                      [​IMG]

                                      First of comes the handle which reveals a large circlip that holds the mic ring on and a securing screw that I presume stops the mic from slipping when it is zero’d.

                                      Initially I couldn’t work out of the mic ring was threaded on, held in by a grub screw or what. As it turns out it just slips over collet, I don’t know if it is supposed to move freely on this collet or not but it was totally seized on.

                                      In the end I loosened off the leadscrew locknut behind the casing to create a small gap between the mic ring and the gearbox. It is important to keep this nut on though otherwise the leadscrew is pulling just against the "Hoffman bearing" and will break it.

                                      [​IMG]

                                      [​IMG]

                                      I then used a couple of small drifts and applied some heat to the dial and it seemed to make a bit of progress so out came the biggest bearing puller I have in the workshop.surprise

                                      [​IMG]

                                      And it started moving

                                      [​IMG]

                                      After a fair bit of working back and forward the dial eventually came off. It is an interference fit that is locked in place by a pin/screw that goes in through the front of the dial. This pin then pushes a ball bearing up to lock the dial in place. Even though I had removed the pin the dial had rusted onto the collar and hence why I had the problem removing it.

                                      This ball bearing needs to be removed to reveal a very small grub screw which I will talk about in a moment.

                                      Cheers,

                                      Paul.

                                      Edited By Paul Major on 31/12/2013 20:34:25

                                      #139279
                                      Graham Wharton
                                      Participant
                                        @grahamwharton

                                        Nice work Paul. Look forward to seeing how it turns out. I hope to do a similar size refurb on an old beaver or bridgeport when I get more space.

                                        Just a comment about your plans to hook up to a 3 phase supply generated by an electronic inverter. I believe these can only be used to power a single motor at a time. The instruction manual in mine says to wire directly from inverter to single motor, and not via any switchgear at all. You might want to look into this before committing to any big inverter purchases.

                                        I think a rotary converter would be fine for multiple motors.

                                        Graham

                                        #139280
                                        John Stevenson 1
                                        Participant
                                          @johnstevenson1

                                          Paul,

                                          You are going to need a rotary converter for that machine as you can't run a two speed motor off a 240v in 240v out inverter.

                                          Also the knee motor isn't a power feed motor as such as it's just on or off and one speed, no reason though why you should not fit an inverter to this axis though to give you a vertical feed for boring etc as you only have 5" on quill.

                                          having said that do you have 5" on this model or 6" ?

                                          #139281
                                          Paul Major
                                          Participant
                                            @paulmajor25237

                                            Thanks Graham,

                                            Yep, your right a normal inverter/VFD will only run one motor. You can however get digital inverters which are "plug and play" that allow the running of multiple motors from the one inverter,

                                            Naturally they are far more expensive! The Drives Direct 7.5hp one is about £1300 I think. sad The alternative is a rotary converter.

                                            Cheers,

                                            Paul.

                                            #139300
                                            Paul Major
                                            Participant
                                              @paulmajor25237

                                              Once the mic ring is removed this then allows you to get to a tapered pin, which locks the collar in place that the dial is mounted on.

                                              [​IMG]
                                              At this point it gets a bit confusing as the collar needs to come over the end of the leadscrew, (yellow arrow) but the end looks like it has a mushroom head (red circle) that stops the handle engagement collar sliding off.

                                              [​IMG]

                                              [​IMG]

                                              Initially I ground off the mushroom head to allow me to removed the engagement collar, but eventually found this was unnecessary.

                                              [​IMG]

                                              After again using drifts and brute force I managed to get the collar to move and when it did it revealed that mushroom head is actually a sleeve that fits over the end of the leadscrew.

                                              To remove the collar from this sleeve you need to remove the grub screw that is located BENEATH the mic ring locking ball bearing mentioned above.

                                              [​IMG]

                                              This then allows the collar/sleeve to slide off the leadscrew (in theory, again mine were seized solid).

                                              [​IMG]

                                              [​IMG]

                                              [​IMG]

                                              With the collets removed the gearbox cover will then slide off.

                                              [​IMG]

                                              [​IMG]

                                              Cheers,

                                              Paul.

                                              #139301
                                              Paul Major
                                              Participant
                                                @paulmajor25237

                                                Finally, onto the easy bit. smiley

                                                The innards of the gearbox are now revealed.

                                                [​IMG]

                                                The gearbox is sitting on locating dowels and to get it to clear these you first have to slacken the shaft nut from behind the box

                                                [​IMG]

                                                Then you have to remove a retaining collar held in place with a pin

                                                [​IMG]

                                                Once this is done the gearbox will slide forward and drop down

                                                [​IMG]

                                                Gearbox removed,

                                                [​IMG]

                                                The geartrain can then be slid off the leadscrew

                                                [​IMG]

                                                [​IMG][​IMG]

                                                And finally the gearbox mounting plate is revealed

                                                It is held in place by 4 bolts, 3 hidden behind the gearbox and 1 coming through from the opposite side.

                                                [​IMG]
                                                [​IMG]

                                                With these undone, the gearbox mounting plate will slide off its locating dowels and reveals the circular “C” plate that holds the leadscrew into the knee.

                                                [​IMG]

                                                With the circular plate removed from the dowels the leadscrew will slide out of the side of the bed.

                                                [​IMG]

                                                And finally, the leadscrew is removed.

                                                It took rather a long time to achieve this, but hopefully now it is written up, if anyone else ever needs to do it, it should be a lot easier.surprise

                                                The only real damage was the end of the leadscrew where the handle fits has got a bit bent whilst I was drifting off the dials, hopefully this will get straightened out in the hydraulic press.

                                                Now onto the next bit, might have to wait till next year for that laugh

                                                Cheers,

                                                Paul.


                                                Edited By Paul Major on 31/12

                                                #139581
                                                Russ B
                                                Participant
                                                  @russb

                                                  This is really great info, we've got one where I work, its been gather dust for decades, it was going to get thrown out when we moved premise but I managed to have it moved to our test facility with the old lathe we have, it's very noticably better than my bridgeport 1J, and since I'll soon be selling that sad it might just come in handy if I have some big jobs


                                                  All the best,

                                                  Edited By Russell Bates on 03/01/2014 20:03:15

                                                  #139587
                                                  Paul Major
                                                  Participant
                                                    @paulmajor25237

                                                    Hi Russell, I couldn't find any detailed info anywhere on how these are put together so hence why I thought i would take the time to document it

                                                    If you've got one at work I'll keep you in mind incase I need to compare stuff – got any pics of it?

                                                    Cheers,

                                                    Paul.

                                                    #139597
                                                    Paul Major
                                                    Participant
                                                      @paulmajor25237

                                                      Next job was to remove the knee.

                                                      The knee is locked onto the column with a gib held in place by some locking plates, shown here. I have punch marked the plates ready for when they come off for cleaning.

                                                      [​IMG]

                                                      The locking plates are held in place with bolts which can be loosened with a shortened Allen key, the elevating nut for the knee is held in place by 3 nuts at its base.

                                                      With the plates loosened and the elevating nut removed my new cross beam and girder trolley came into play.

                                                      [​IMG]

                                                      Up, up and away laugh

                                                      The column with knee removed

                                                      [​IMG]

                                                      A bit grubby so cleaned up the face of the column for a closer look.

                                                      [​IMG]

                                                      Top is in very good condition, although there is heavier marking near the bottom, looks like this is where it has spent most of its working life.

                                                      [​IMG]

                                                      The wear in the middle is odd as I can’t see anything that would rub hear. I am guessing the roughness in the middle is just casting/grinding marks?

                                                      Sides of the column looks OK.

                                                      [​IMG]

                                                      Put a straight edge down the length of the face and couldn’t get a 5 thou feeler in. Will ask later about acceptable tolerances.

                                                      Next to the knee, after an initial clean.

                                                      [​IMG]

                                                      Not sure if it shows in the picture but the "depth" of the mating surface when referenced against the casting of the knee is very different across the length of the surface.

                                                      It looks almost like it is worn at one end, especially as it feathers out onto the casting, but looking at the depth of the oil ways they are all pretty consistent.

                                                      The bottom left of this picture is the side that looks particularly “flush”

                                                      [​IMG]

                                                      So question is, is this where the knee would have been ground flat when it was manufactured and the differing depth is due to the original casting being rough?

                                                      Cheers

                                                      Paul.

                                                    Viewing 25 posts - 1 through 25 (of 182 total)
                                                    • Please log in to reply to this topic. Registering is free and easy using the links on the menu at the top of this page.

                                                    Advert

                                                    Latest Replies

                                                    Home Forums Manual machine tools Topics

                                                    Viewing 25 topics - 1 through 25 (of 25 total)
                                                    Viewing 25 topics - 1 through 25 (of 25 total)

                                                    View full reply list.

                                                    Advert

                                                    Newsletter Sign-up